一、在 /etc/redis/ 里面使用命令 cp redis.conf /redis63791.conf, cp redis.conf /redis63792.conf , cp redis.conf /redis63793.conf到根目录准备好 vim redis63792.conf ---修改配置文件daemonize yes 守护进程port 63792 端口

一、在 /etc/redis/ 里面使用命令 cp redis.conf /redis63791.conf, cp redis.conf /redis63792.conf , cp redis.conf /redis63793.conf到根目录准备好
vim redis63792.conf  --->修改配置文件
daemonize yes 守护进程
port 63792 端口
bind 192.168.0.3 绑定内网地址
databases 16 开启16个数据库
save ---> 每多少个文件执行一次保存
(主人不需要以下操作)
slaveof 116.196.107.20 63791 --> 作为该ip该端口的奴隶
masterauth '123456789' --> 认证主人的密码
----------------------
appendonly yes 开启这个增强数据的安全性
(以上为正常的redis.conf里面的配置文件,所有的slave都要去连接主人的服务器,只能读,不能写,自动同步数据,读写分离可以大大的增强服务器的性能能,因为在正常的数据操作中, 读的时候往往比写的时候的情况要多的多, 一般情况下主从机按1:3进行分配)
二、哨兵配置 ,在 /etc/redis 里面找到 sentinel.conf 文件,(如果没有去找一份这种配置文件即可), 复制 cp sentinel.conf /mysentinel.conf
vim mysentinel.conf
sentinel monitor mymaster 116.196.107.20 63791 1 -->分别的意思是 哨兵监听主人:116.196.107.20的 端口:63791 哨兵数量1个, 一般情况下哨兵的数量越多, 投票选举通过的几率越小, 在投票选举出新主人花费的时间就越多, 不利于快速切换主从机制
sentinel down-after-milliseconds mymaster 5000 主机掉线以后5s进行认证,如果无法连接则重新由哨兵从slave中选出新的主人
sentinel auth-pass mymaster 123456789 哨兵通过密码连接主人
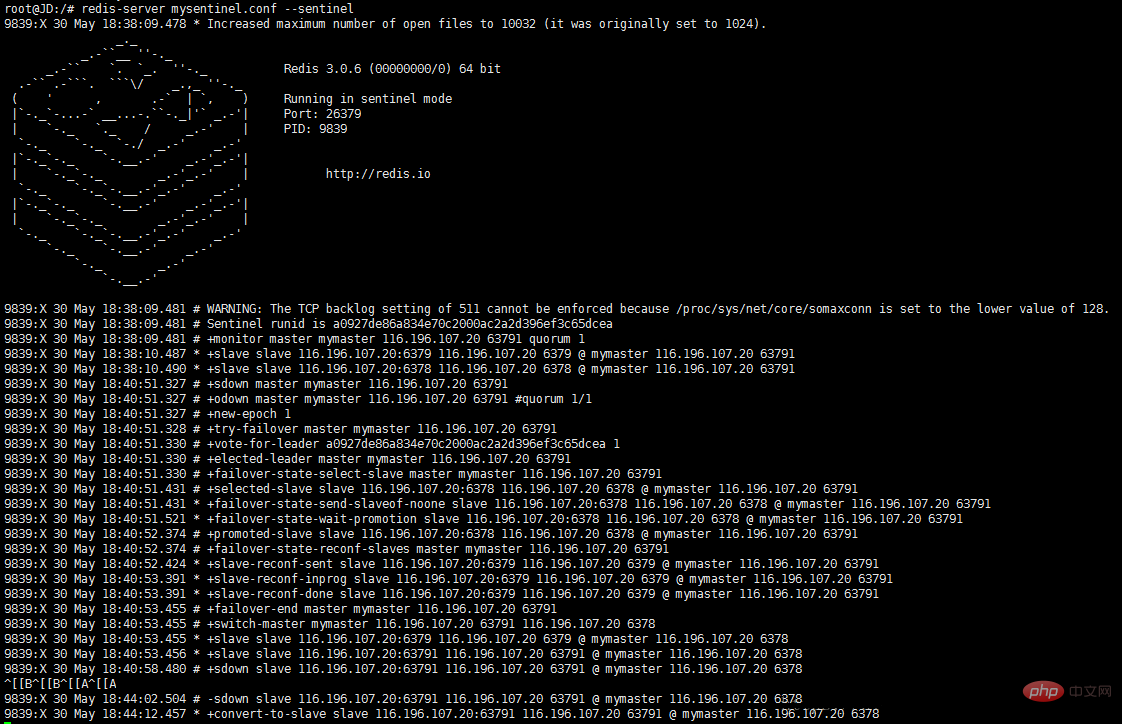
三、配置完成以后,即可开启主从机制,读写分离,并提供哨兵机制, 在主人down机5秒以后在slave中随机选出一个新的主人, 以前的主人连上来以后只能作为slave进行工作!!
redis操作命令:
redis-server redis63791.conf & -->以该配置文件在后台运行服务器
redis-cli -h 116.196.107.20 -p 63791 远程连接服务器
auth 123456789 --->在redis中验证密码
redis-server mysentinel.conf --sentinel 启动哨兵模式开始监听, 如下:

更多redis知识请关注redis入门教程栏目。
以上就是redis读写分离与哨兵机制配置的详细内容,更多请关注自由互联其它相关文章!
