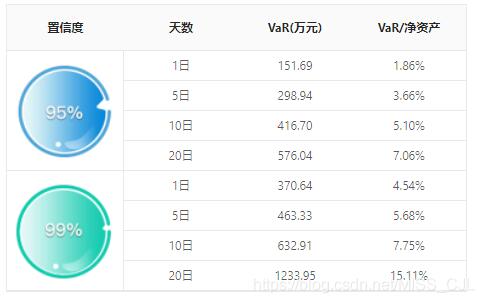
ant-design-vue版本:~1.3.8 需求:表格实现跨行合并,并且在合并完的单元格中显示图片 效果图: 源码: export default { data() { return { pic95: require('@/assets/produit/95.png'), pic99: require('@/assets/pr
ant-design-vue版本:~1.3.8
需求:表格实现跨行合并,并且在合并完的单元格中显示图片
效果图:

源码:
export default {
  data() {
    return {
      pic95: require('@/assets/produit/95.png'),
      pic99: require('@/assets/produit/99.png'),
      varTable: {
        cloumns: [
          {
            title: '置信度',
            dataIndex: 'confidence ',
            class: 'confidence',
            customRender: (value, row, index) => {
              let obj = {
               children: '',
               attrs: {}
              }
              if (index === 0) {
               obj = {
                children: <div class="risk-pic"><img src={this.pic95} /></div>,
                attrs: { rowSpan: 4 }
               }
              }
              if (index === 4) {
                obj = {
                children: <div class="risk-pic"><img src={this.pic99} /></div>,
                attrs: { rowSpan: 4 }
                }
              }
              if ([1, 2, 3, 5, 6, 7].indexOf(index) !== -1) {
               obj.attrs.colSpan = 0
              }
              return obj
            }
          },
          {
           title: '天数',
           dataIndex: 'window_length',
           width: '25%',
           customRender: (text) => text + '日'
          },
          {
           title: 'VaR(万元)',
           dataIndex: 'var',
           width: '25%'
          },
          {
           title: 'VaR/净资产',
           dataIndex: 'var_rate',
           width: '25%',
           customRender: (text) => fmtRatio(text, 2)
          }
        ],
        data: [
          {window_length: 1, var: 151.69, var_rate: 0.01858},
          {window_length: 5, var: 298.94, var_rate: 0.03661},
          {window_length: 10, var: 416.70, var_rate: 0.05104},
          {window_length: 20, var: 576.04, var_rate: 0.07055},
          {window_length: 1, var: 370.64, var_rate: 0.045398},
          {window_length: 5, var: 463.33, var_rate: 0.056751},
          {window_length: 10, var: 632.91, var_rate: 0.077523},
          {window_length: 20, var: 1233.95, var_rate: 0.15114}
        ]
      }
    }
  },
  methods:{
    // 百分数设置
    fmtRatio(val, index, def) {
      // index默认值为2
      var index = arguments[1] ? arguments[1] : 2
      if (val == null || isNaN(val) || typeof (val) === 'string' && val === '') {
        return def || '--'
      }
      var ratio = (val * 100).toFixed(index)
      return ratio + '%'
    }
  }
}
导入图片的方式还有
import pic95 from '@/assets/produit/95.png'
import pic99 from '@/assets/produit/99.png'
如果有问题,欢迎提出,一起交流~~!
补充知识:ant-design vue table 可选列、自定义列实现
实现ant-design for vue 自定义列实现。点击按钮,弹窗显示所有列的checkbox,选择checkbox,确定即可实现自定义列。先上代码
<script>
/**
 * 该组件为实现table可选列。
 * 具体操作见下方注释。
 * 全部集成原a-table功能,使用方式与原a-table完全相同,扩展增加了可选列功能
 * 该组件已注册至全局,使用方式只需将a-table变为zyx-table即可,等等一系列原写法不变,即可增加该功能.
 * 采用rander函数模式写,为了实现a-table中slot可动态。
 */
export default {
 name: 'Table',
 data () {
  return {
   modalVisible: false, // 弹窗
   columns: [], // 表格的列,根据条件来操作该字段
   selectList: [], // 已选择的列
   temporarySelectData: [], // 暂时选择的列,点击checkbox暂存到该字段,点确定同步到selectList
   checkboxList: []// checkbox的list,也做总数据来使用
  }
 },
 mounted () {
  /**
   * 挂载后,将原columns复制到本页columns,checkboxList
   *     将selectList赋值全选状态
   */
  this.columns = this.deepClone(this.$attrs.columns)
  this.checkboxList = this.deepClone(this.$attrs.columns)
  this.selectList = this.columns.map(ele => ele.dataIndex)
 },
 methods: {
  /**
   * 打开modal,将checkbox默认值或者是选择值(暂存)重新赋值
   */
  handelOpenSelect () {
   this.temporarySelectData = this.deepClone(this.selectList)
   this.modalVisible = true
  },
  /**
   * 点击确定,将暂存值赋值(temporarySelectData)给已选择的列(selectList)
   * 将列(columns)根据已选择的列(selectList)筛选出来
   */
  handleOk () {
   this.selectList = this.deepClone(this.temporarySelectData)
   this.modalVisible = false
   this.columns = this.checkboxList.filter(ele => this.selectList.includes(ele.dataIndex))
  },
  handleCancel () {
   this.modalVisible = false
  },
  handelChange (e) {
   this.temporarySelectData = this.deepClone(e)
  },
  deepClone (target) {
   let result
   if (typeof target === 'object') {
    if (Array.isArray(target)) {
     result = []
     for (const i in target) {
      result.push(this.deepClone(target[i]))
     }
    } else if (target === null) {
     result = null
    } else if (target.constructor === RegExp) {
     result = target
    } else {
     result = {}
     for (const i in target) {
      result[i] = this.deepClone(target[i])
     }
    }
   } else {
    result = target
   }
   return result
  }
 },
 render () {
  const props = { ...this.$attrs, ...this.$props, ...{ columns: this.columns } }
  const on = { ...this.$listeners }

  const slots = Object.keys(this.$slots).map(slot => {
   return (
    <template slot={slot}>{ this.$slots[slot] }</template>
   )
  })

  const table = (
   <a-table props={props} scopedSlots={ this.$scopedSlots } on={on} ref="zyxTable">
    {slots}
   </a-table>
  )

  const changeDiv = (
   <a-button class="select-columns" size="small" onClick={this.handelOpenSelect}>列</a-button>
  )

  const checkboxArr = []
  for (let i = 0; i < this.checkboxList.length; i++) {
   checkboxArr.push(<a-col span={8}><a-checkbox value={this.checkboxList[i].dataIndex}>{this.checkboxList[i].title}</a-checkbox></a-col>)
  }
  const modal = (
   <a-modal
    title="设置列"
    visible={this.modalVisible}
    onOk={this.handleOk}
    onCancel={this.handleCancel}>
    <a-checkbox-group value={this.temporarySelectData} onChange={this.handelChange}>
     <a-row>
      {checkboxArr}
     </a-row>
    </a-checkbox-group>
   </a-modal>
  )

  return (
   <div class="zyx-table">
    { table }
    { changeDiv }
    { modal }
   </div>
  )
 }
}
</script>
<style lang="less" scoped>
.zyx-table{
 position: relative;
 margin-top: 20px;

 .select-columns{
  position: absolute;
  right: 0;
  top: -30px;
 }
}

.ant-row{
 width: 100%;

 .ant-col-8{
  margin-bottom: 10px;
 }
}

.ant-checkbox-group{
 width: 100%;
}
</style>
该组件二次封装了a-table,集成原a-table所有方法
使用方法,在全局注册该组件,将原a-table替换为zyx-table即可实现。
将原标签替换为rander函数,是为了实现slot动态传入的效果。
有疑问或者更好的建议,欢迎光临思密达。github传送门
以上这篇antd vue table跨行合并单元格,并且自定义内容实例就是小编分享给大家的全部内容了,希望能给大家一个参考,也希望大家多多支持易盾网络。
