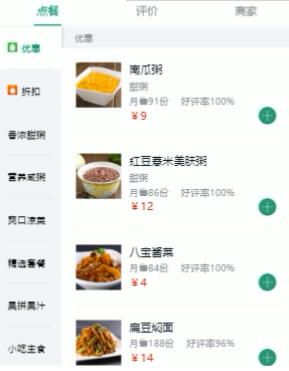
本文实例为大家分享了vue基于better-scroll实现左右联动滑动页面,供大家参考,具体内容如下 界面如下: vue模板 template div class="goods" div class="menu-wrapper" ul li class="menu-item" v-for="(good, in
本文实例为大家分享了vue基于better-scroll实现左右联动滑动页面,供大家参考,具体内容如下
界面如下:

vue模板
<template>
 <div class="goods">
 <div class="menu-wrapper">
 <ul>
 <li class="menu-item" v-for="(good, index) in goods" :key="index"
  :class="{current: currentIndex===index}" @click="clickMenuItem(index)">
  <span class="text bottom-border-1px">
  <img :src="good.icon" class="icon" v-if="good.icon">
  {{good.name}}
  </span>
 </li>
 </ul>
 </div>
 <div class="foods-wrapper">
 <ul ref="foodsWrapperUl">
 <li class="food-list food-list-hook" v-for="(good, index) in goods" :key="index">
  <h1 class="title">{{good.name}}</h1>
  <ul>
  <li class="food-item bottom-border-1px" v-for="(food, index) in good.foods" :key="index">
  <div class="icon">
  <img :src="food.icon" width="57" height="57" alt="">
  </div>
  <div class="content">
  <h2 class="name">{{food.name}}</h2>
  <p class="desc">{{food.description}}</p>
  <div class="extra">
   <span class="count">月售{{food.sellCount}}份</span>
   <span>好评{{food.rating}}%</span>
  </div>
  <div class="price">
   <span class="now">¥{{food.price}}</span>
   <span class="old" v-if="food.oldPrice">¥{{food.oldPrice}}</span>
  </div>
  <div class="cartcontrol-wrapper"><cartcontrol :food="food"/></div>
  </div>
  </li>
  </ul>
 </li>
 </ul>
 </div>
 </div>
</template>

<script>
 import BScroll from 'better-scroll'
 import { mapState } from 'vuex'
 import CartControl from "../../../components/CartControl/CartControl"
 export default {
 data() {
 return {
 scrollY: 0,
 tops: []
 }
 },
 mounted () {
 this.$store.dispatch('getShopGoods', () => { //回调函数,等到action中执行
 this.$nextTick(() => { //页面更新后再使用滚动组件,获取DOM高度
  this._initScroll();
  this._initTops();
 })
 })
 },
 methods: {
 _initScroll() {
 new BScroll('.menu-wrapper', {
  click:true
 })

 this.foodsScroll = new BScroll('.foods-wrapper', {
  probeType: 2,
  click: true
 })

 this.foodsScroll.on('scroll', (pos) => {
  this.scrollY = Math.abs(pos.y);
 })

 this.foodsScroll.on('scrollEnd', (pos) => {
  this.scrollY = Math.abs(pos.y);
 })
 },

 _initTops () {
 const tops = [];
 let top = 0;
 tops.push(top);
 const lis = this.$refs.foodsWrapperUl.getElementByClassName('food-list-hook');
 Array.prototype.slice.call(lis).forEach((li, index) => {
  top += li.clientHeight;
  tops.push(top);
 })
 this.tops = tops;
 },

 clickMenuItem (index) {
 const top = this.tops[index];
 this.scrollY = top;
 this.foodsScroll.scrollTo(0, -top, 300)
 }
 },

 computed: {
 ...mapState(['goods']),
 currentIndex () {
 return this.tops.findIndex((top, index) => {
  return this.scrollY>=top && this.scrollY<this.tops[index+1]
 })
 }
 }
 }
</script>//也可以不用计算属性,直接在data中定义currentIndex,改动时赋新值,那页面自然跟着更新
state.js
goods: [], // 商品列表
action.js
//异步获取商品列表
 async getShopGoods ({commit}, callback) {
 const result = await reqShopGoods();
 const goods = result.data;
 commit(RECEIVE_GOODS, {goods});
 callback && callback();
 }
mutation.js
[RECEIVE_GOODS](state, {goods}) {
 state.goods = goods
 }
关于vue.js组件的教程,请大家点击专题vue.js组件学习教程进行学习。
以上就是本文的全部内容,希望对大家的学习有所帮助,也希望大家多多支持易盾网络。
