前言
我们知道angular组件间通讯有多种方法,其中最常用的一种方法就是借助于 @Input 和 @Output 进行通讯。具体如何通讯请参考angular组件间通讯,本文不再赘述,我们来讲讲关于此方法如何进行单元测试。
创建假组件
我们单元测试父组件与子组件的的交互是否符合我们的要求,我们在父组件进行测试,就需要模拟一个假的子组件出来,这样排除其他因素对测试的影响。
比如现在我在分页组件里写了一个每页大小选择组件,现在要测试一下组件间交互。现在分页组件就是我们的父组件,每页大小组件就是我们的子组件。我们现在需要去模拟一个假的子组件出来。我们先模拟一个假模块出来。
我们的子组件在core模块里,我们在core模块下创造一个core-testing模拟模块。再在core-testing模块下创造一个core组件,因为我们是一个模拟模块,我们只需要ts文件即可。
@Component({
 selector: 'app-size',
 template: `
 <p>
  size-select works!
 </p>
 `,
 styles: []
})
export class SizeComponent implements OnInit {
 constructor() {
 }

 ngOnInit() {
 }
}
为了我们可以在父组件的测试文件中得到模拟的子组件,我们还需要一个controller,在core-testing文件夹下创建一个core-testing-controller.ts文件。CoreTestingController类继承TestingController。
export class CoreTestingController extends TestingController {
}
同时在我们的core-testing.module里声明CoreTestingController为提供者
providers: [
 CoreTestingController
 ]
此时我们的目录树
core-testing git:(134) ✗ tree
.
├── core-testing-controller.ts
├── core-testing.module.ts
├── page
│ └── page.component.ts
└── size
└── size.component.ts
因为我们是模拟的子组件,所以我们应该添加子组件的@Input 和 @Output,同时在构造函数里把这个模拟的子组件添加到CoreTestingController里。
export class SizeComponent implements OnInit {
 @Input() size: number;

 @Output() onChangeSize = new EventEmitter<number>();

 constructor(private controller: CoreTestingController) {
 this.controller.addUnit(this);
 }
}
此时我们的准备工作就完成了。
单元测试
首先我们引入假组件并声明提供者
import {CoreTestingController} from '../core-testing/core-testing-controller';
import {SizeComponent} from '../core-testing/size/size.component';

beforeEach(async(() => {
 TestBed.configureTestingModule({
  declarations: [ PageComponent, SizeComponent ],
  imports: [FormsModule],
  providers: [
  CoreTestingController
  ]
 })
 .compileComponents();
 }));
我你们这里引入的是我们创造的假的SizeComponent,因为我们父组件与子组件在同一个模块里,所以我们直接引入SizeComponent就可以。
此时我们父组件想要子组件时就会使用假的子组件。
我们先断言@Input,我们断言父组件的值与我们假的子组件值相等
it('选择每页大小', () => {
 const controller = TestBed.get(CoreTestingController) as CoreTestingController;
 const sizeComponent = controller.get(SizeComponent) as SizeComponent;
 expect(sizeComponent.size).toBe(component.size);
 });
我们这里的get方法就对应的我们之前的构造函数的addUnit方法,具体参考TestingController类定义的方法。
然后我们再断言子组件向父组件@Output也没有问题,我们先spyon父组件接收子组件值的方法,然后定义一个变量并传给父组件,然后断言父组件接收到的值与子组件传的值相同。
spyOn(component, 'onSizeSelected');
const emitSize = 4;
sizeComponent.onChangeSize.emit(emitSize);
expect(component.onSizeSelected).toHaveBeenCalledWith(4);
这时我们就达到了我们测试的目的。
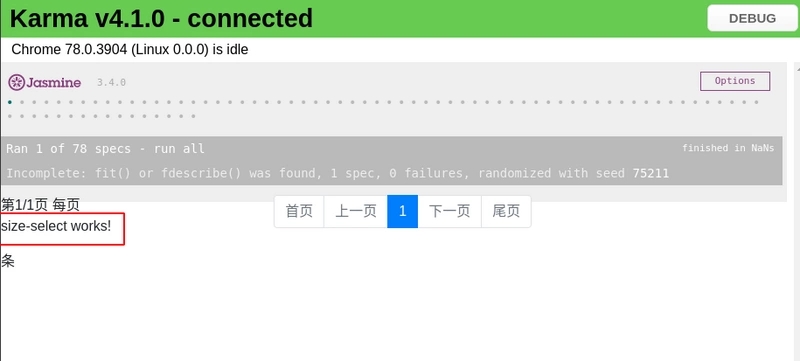
我们启动测试,发现我们本来的选择下拉框变成了文字,这就是我们假的子组件的效果。

总结
我们进行单元测试,就需要除被测组件外,其他引用组件尽量为假,才能达到我们的目的。
到此这篇关于angular组件间传值测试的文章就介绍到这了,更多相关angular组件间传值测试内容请搜索易盾网络以前的文章或继续浏览下面的相关文章希望大家以后多多支持易盾网络!
