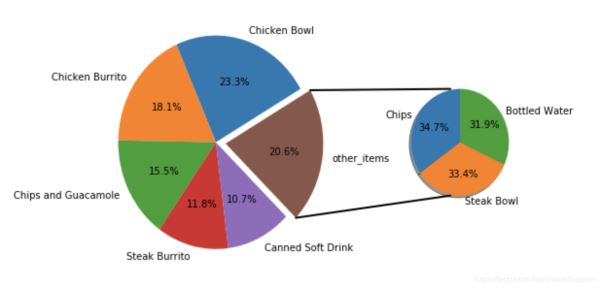
可以通过matplotlib实现 from matplotlib.patches import ConnectionPatch#制画布fig = plt.figure(figsize=(9,5.0625))ax1 = fig.add_subplot(121)ax2 = fig.add_subplot(122)fig.subplots_adjust(wspace=0)#大饼图的制作labels = newdata8.i
可以通过matplotlib实现
from matplotlib.patches import ConnectionPatch
#制画布fig = plt.figure(figsize=(9,5.0625))
ax1 = fig.add_subplot(121)
ax2 = fig.add_subplot(122)
fig.subplots_adjust(wspace=0)
#大饼图的制作
labels = newdata8.index
size = newdata8.quantity
explode=(0,0,0,0,0,0.1)
ax1.pie(size, autopct='%1.1f%%',startangle=30,labels=labels,explode=explode)
#小饼图的制作
labels2 = others.index
size2 = others.quantity
width=0.2
ax2.pie(size2, autopct='%1.1f%%',startangle=90,labels=labels2,
    radius=0.5,shadow=True)
#使用ConnectionPatch画出两个饼图的间连线
#先得到饼图边缘的数据
theta1, theta2 = ax1.patches[5].theta1, ax1.patches[5].theta2
center, r = ax1.patches[5].center,ax1.patches[5].r
#画出上边缘的连线
x = r*np.cos(np.pi/180*theta2)+center[0]
y = np.sin(np.pi/180*theta2)+center[1]
con = ConnectionPatch(xyA=(-width/2,0.5),xyB=(x,y),
           coordsA='data', coordsB='data',axesA=ax2,axesB=ax1)
con.set_linewidth(2)
con.set_color=([0,0,0])
ax2.add_artist(con)
#画出下边缘的连线
x = r*np.cos(np.pi/180*theta1)+center[0]
y = np.sin(np.pi/180*theta1)+center[1]
con = ConnectionPatch(xyA=(-width/2,-0.5),xyB=(x,y),
           coordsA='data', coordsB='data',axesA=ax2,axesB=ax1)
con.set_linewidth(2)
con.set_color=([0,0,0])
ax2.add_artist(con)
plt.show()
输出:

图源数据为快餐店销量
总结
以上所述是小编给大家介绍的python通过matplotlib实现生成复合饼图,希望对大家有所帮助!
