WinRM 即 Windows Remote Management,是微软对于WS-Management 远程管理协议的实现。
一、受控端配置 WinRM 服务
方式一:cmd 命令行(管理员)
- 启用 WinRM 远程服务:
winrm quickconfig - 查看 WinRM 服务监听状态:
winrm e winrm/config/listener
C:\Windows\system32>winrm e winrm/config/listener
Listener [Source="GPO"]
 Address = *
 Transport = HTTP
 Port = 5985
 Hostname
 Enabled = true
 URLPrefix = wsman
 CertificateThumbprint
 ListeningOn = 127.0.0.1, 169.254.52.7, xx.xx.xx.xx, ::1, fe80::3989:dd91:e6b3:6f41%15, fe80::fd01:a9fd:c410:3407%12
允许使用 Basic 认证方式: winrm set winrm/config/service/auth @{Basic="true"}
winrm set winrm/config/service/auth @{Basic="true"}
Auth
 Basic = true [Source="GPO"]
 Kerberos = true
 Negotiate = true
 Certificate = false
 CredSSP = false
 CbtHardeningLevel = Relaxed
允许 WinRM 使用非加密的连接: winrm set winrm/config/service @{AllowUnencrypted="true"}
方式二:bat 脚本
call winrm quickconfig -quiet
call winrm set winrm/config/service/auth @{Basic="true"}
call winrm set winrm/config/service @{AllowUnencrypted="true"}
方式三:组策略
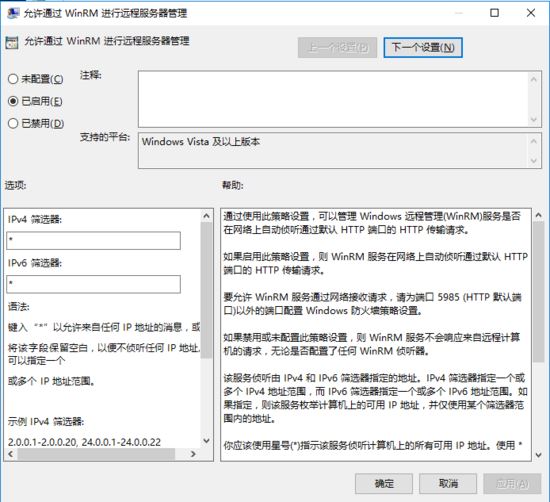
定位到 计算机配置 -> 策略 -> 管理模板 -> Windows 组件 -> Windows 远程管理(WinRM) -> WinRM 服务 。
启用 允许通过 WinRM 进行远程服务器管理 、 允许基本身份验证 、 允许未加密通信 。

建议同时启用服务与防火墙策略:
计算机配置-> 策略 -> Windows 设置 -> 安全设置 -> 系统服务 -> Windows Remote Management (WS-Management) ,启动模式为自动。
计算机配置-> 策略 -> Windows 设置 -> 安全设置 -> 高级安全 Windows 防火墙 -> 高级安全 Windows 防火墙 - XXX -> 入站规则 ,开放 5985(HTTP)和 5986(HTTPS)端口。
二、Python 使用 pywinrm 连接 WinRM 服务
安装 pywinrm 库: pip install pywinrm
执行 cmd 命令:
>>> import winrm
>>> session = winrm.Session('xx.xx.xx.xx', auth=('Administrator', 'admin_password'))
>>> cmd = session.run_cmd('ipconfig')
>>> cmd.std_out
b'\r\nWindows IP Configuration\r\n\r\n\r\nEthernet adapter \xd2\xd4\xcc\xab\xcd\xf8:\r\n\r\n Connection-specific DNS Suffix . : example.com\r\n Link-local IPv6 Address . . . . . : fe80::3989:dd91:e6b3:6f41%15\r\n IPv4 Address. . . . . . . . . . . : xx.xx.xx.xx\r\n Subnet Mask . . . . . . . . . . . : 255.255.255.0\r\n Default Gateway . . . . . . . . . : 172.20.23.254\r\n\r\nEthernet adapter \xd2\xd4\xcc\xab\xcd\xf8 2:\r\n\r\n Media State . . . . . . . . . . . : Media disconnected\r\n Connection-specific DNS Suffix . : \r\n'
执行 Powershell 命令:
>>> import winrm
>>> session = winrm.Session('xx.xx.xx.xx', auth=('Administrator', 'admin_password'))
>>> ps = session.run_ps('Get-Disk')
>>> ps.std_out
b'\r\nNumber Friendly Name Serial Number     HealthStatus   OperationalStatus  Total Size Partition \r\n                            Style  \r\n------ ------------- -------------     ------------   -----------------  ---------- ----------\r\n0  ST500DM002...    Z3TFS1S3    Healthy    Online     465.76 GB MBR  \r\n\r\n\r\n'
到此这篇关于Python Tricks 使用 pywinrm 远程控制 Windows 主机的方法的文章就介绍到这了,更多相关Python Tricks远程控制 Windows 主机内容请搜索易盾网络以前的文章或继续浏览下面的相关文章希望大家以后多多支持易盾网络!
