小程序开发教程栏目介绍微信小程序开发的一些问题

推荐(免费):小程序开发教程
微信小程序开发问题汇总
- 样式如何使用变量
- video遮罩问题
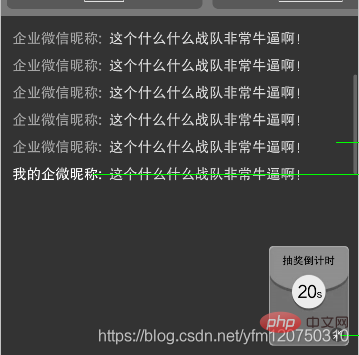
- 弹幕自动上推信息流
- 软键盘问题
- websocket使用
- weapp.socket.io
- 小程序当中的使用
小程序开发告一段落,总结一下这段时间小程序开发遇到的问题及解决方案,react冲冲冲!!!
样式如何使用变量
在wxss中,定义变量:width:var(–width–);
在js中,定义变量:viewWidth,并给这个变量赋予想要的值
在wxml中,使用wxss中的变量和js中的变量:style="–width–: {{ viewWidth }}px"
video遮罩问题
在实现直播的功能时,我们需要弹出红包等遮盖video的处理,此时会发现,使用z-index属性在小程序中是无效的,微信开发者文档提供了cover-view,cover-imge等控件实现遮罩的功能。
这里值得注意的是cover-view中的background-image属性是无效的,所以我们要安放背景图时需要使用到cover-image,并且将它的position设置为absolute, top为0, left也为0即可。
弹幕自动上推信息流

首先是将这个scroll的高度定死,让scroll自动滑动到某个item的位置:
    <scroll-view class="danmu-list" scroll-y="true" scroll-into-view="{{'item_' + danmulist.length}}" style="height: {{windowHeight - 890}}rpx">
        <view id="{{'item_' + (index + 1)}}" wx:for="{{danmulist}}" class="{{item.nickName == username ? 'danmu-item owner' : 'danmu-item'}}" wx:key="this">
          <view class="nickname">{{item.nickName}}:</view>
          <view class="content {{ item.system ? 'system' : '' }}" style="color: {{ item.system ? '#71f474' : (item.color || '#fff')}}">{{item.content}}</view>
        </view>
    </scroll-view>
为scroll添加样式:
.danmu-list {
  width: 750rpx;
  height: 290rpx;
  position: relative;
  padding-top: 27rpx;}.danmu-item {
  padding: 0 27rpx;}.danmu-item .nickname {
  color: #cdd5ff;
  font-size: 26rpx;
  display: inline-block;}.danmu-item.owner .nickname {
  color: #ffab00;}.danmu-item .content {
  color: #ffffff;
  font-size: 26rpx;
display: inline-block;}可以看到在小程序上的实现,明显比在网页上要简单,我们只需要一个scroll-into-view的属性,并且为每个item添加一个id即可。
那么有没有纯css的实现呢?当然。
我们将item都放在一个盒子中,让盒子的相对于list底部对齐,overflow则进行scroll,这样同样能实现现在的效果。
软键盘问题
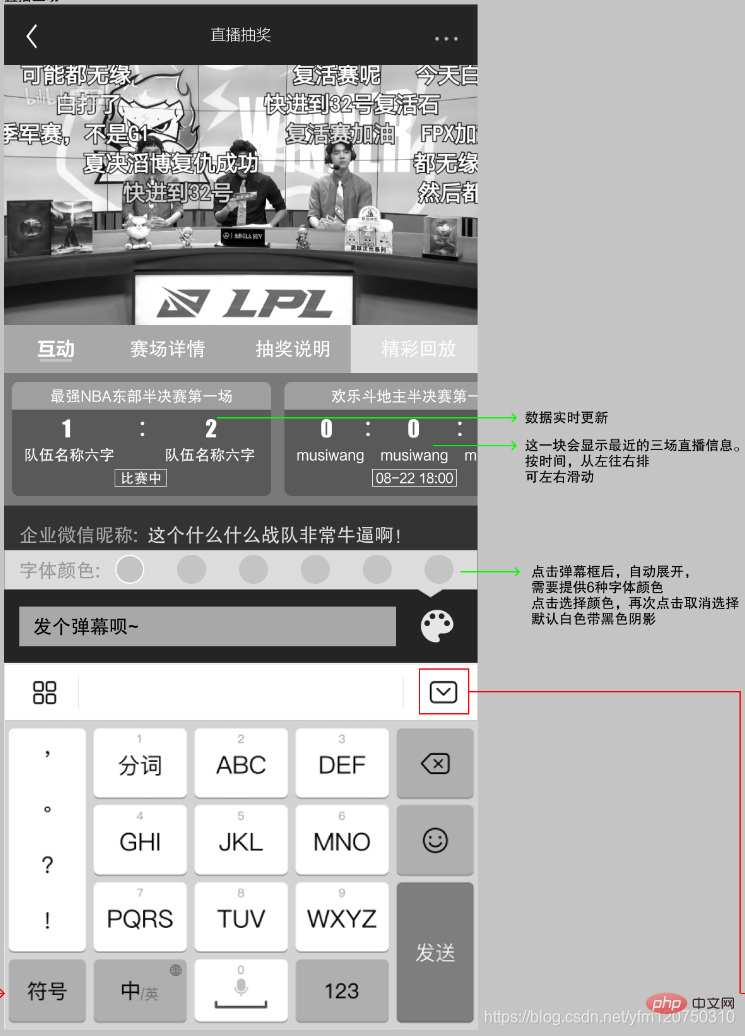
此次开发,需要实现一个输入框点击,软键盘弹起,选择颜色功能。我们看下效果图:
那么考虑几个问题:
1、选择颜色时键盘失去焦点会缩起
微信小程序提供了一个hold-keyboard属性
我在input 中设定了hold-keyboard="true"
2、软键盘弹出时会自动把页面上推,但是我们仅仅想要软键盘把input框上推而不是整个页面。
分析一下这个问题,首先是考虑纯css解决方案,把页面设为fixed,然而不起作用;接下来考虑页面弹起时减去软键盘的高度让它恢复到原位,这会带来两个问题:1)软键盘弹起后才能获取软键盘高度,这样一来页面的下落会产生严重的滞后;2)同样的不起作用
这个问题最终的解决方案是这样的:
首先查看官方文档,微信小程序提供了一个adjust-position属性
设定adjust-position=“false",此时的确不会进行页面的上推了,但是我们需要的input框上推如何实现?
我们可以在input的方法参数e.detail.height中拿到软键盘的高度,设定input的高度为e.detail.height的高度即可。
最终代码:
 <cover-view wx:if="{{inputParam.colorShow}}" class="color-check" style="bottom: {{inputParam.bottom + (windowWidth / 750 * 90)}}px">
   <cover-image class="color-background" src="{{assets}}/images/live-index-danmu-send-color-check.png"></cover-image>
   <cover-view class="color-list">
     <cover-view wx:for="{{colorStatusList}}" wx:key="this" catchtap="checkColor" data-index="{{index}}" class="{{item.checked == 0 ? 'color-icon' : 'color-icon with-border'}}" style="background-color: {{item.color}}"></cover-view>
   </cover-view>
 </cover-view>

 <view class="enterDanmu" style="bottom: {{inputParam.bottom}}px">
	  <input hold-keyboard="true" catchtap catchfocus="enterMessage" bindconfirm="loseColor" bindinput="getInputValue" placeholder="发个弹幕呗~"
	     placeholder-style="font-size: 26rpx; color: #09091b" style="color:{{fontcolor}};"
	     value="{{inputParam.inpuentertValue}}" focus="{{inputParam.focus}}" adjust-position="{{false}}"></input>
     <image catchtap="sendMessageOperation" class="danmu-btn" src="{{assets}}images/live-index-danmu-send.png"></image>
 </view>
checkColor(e) {
let colorStatusList = this.data.colorStatusList;
let index = e.currentTarget.dataset.index;
let foncolor = colorStatusList[index].color;
let inputParam = this.data.inputParam
inputParam.focus = true
if (colorStatusList[index].checked == true) {
colorStatusList[index].checked = false
foncolor = '#09091b'
} else {
for (let colorIndex in colorStatusList) {
colorStatusList[colorIndex].checked = false
}
colorStatusList[index].checked = true
}
this.setData({
colorStatusList: colorStatusList,
fontcolor: foncolor,
inputParam: inputParam })
},
getInputValue(e) {
let inputParam = this.data.inputParam;
inputParam.inputValue = e.detail.value;
this.setData({
inputParam: inputParam })
},
enterMessage(e) {
let inputParam = this.data.inputParam;
inputParam.colorShow = true,
inputParam.focus = true,
inputParam.bottom = e.detail.height this.setData({
inputParam: inputParam,
})
},
loseColor() {
let inputParam = this.data.inputParam;
inputParam.colorShow = false;
inputParam.focus = false;
inputParam.bottom = 0;
this.setData({
inputParam: inputParam,
})
},
sendMessageOperation(e) {
let inputParam = this.data.inputParam;
if (inputParam.inputValue != '') {
this.socket.emit('message', inputParam.inputValue, this.data.fontcolor);
app.api.send_message(this.data.liveId, this.data.fontcolor, inputParam.inputValue);
inputParam.inputValue = '';
inputParam.colorShow = false
inputParam.focus = false
inputParam.bottom = 0
this.setData({
inputParam: inputParam,
})
console.log("sendMessageOperation")
} else {
inputParam.inputValue = '';
inputParam.colorShow = false
inputParam.focus = false
this.setData({
inputParam: inputParam,
})
}
}至于说上面的catchtap则很好理解了,当我们要点击任意处导致失去焦点时,必定要在外层绑定bindtap事件,那么此处就需要使用catchtap阻止事件的冒泡。
值得一提的是,微信小程序也提供了一个wx.onKeyboardHeightChange(function callback)方法来监听键盘的高度变化,但是亲测这个方法并没有很好用,尝试了一下就弃之不用了。
websocket使用
我们都知道 HTTP 协议有一个缺陷:通信只能由客户端发起。那么在这种情况下,如果服务器有连续的状态变化,客户端要获知就非常麻烦。我们只能使用"轮询",最典型的应用场景就是聊天室了。
轮询的效率低,非常浪费资源。因此,工程师们一直在思考,有没有更好的方法。WebSocket 就是这样发明的。
那么如何在微信小程序中使用websocket呢?先来看看本次的需求:
在观看直播的过程当中,用户会进行聊天,服务器要将用户的弹幕信息推送到每个用户的手机端。
weapp.socket.io
weapp.socket.io是基于socket.io的微信程序环境中的客户端,以及socket.io-client浏览器版本的完整功能。
安装方式:
npm i weapp.socket.io
简单使用的代码:
<template>
    <view class="content">
       <button type="primary" @click="send">发送消息</button>
    </view></template>
// 引入 weapp.socket.io.js import io from '@/util/weapp.socket.io.js';export default {
data() {
return {};
},
onLoad() {
// 建立一个socket连接
const socket =(this.socket = io('https://socket-io-chat.now.sh/'));
/**
* 客户端socket.on()监听的事件:
*/
// 连接成功
socket.on('connect', () => {
console.log('连接成功');
});
// 正在连接
socket.on('connecting', d => {
console.log('正在连接', d);
});
// 连接错误
socket.on('connect_error', d => {
console.log('连接失败', d);
});
// 连接超时
socket.on('connect_timeout', d => {
console.log('连接超时', d);
});
// 断开连接
socket.on('disconnect', reason => {
console.log('断开连接', reason);
});
// 重新连接
socket.on('reconnect', attemptNumber => {
console.log('成功重连', attemptNumber);
});
// 连接失败
socket.on('reconnect_failed', () => {
console.log('重连失败');
});
// 尝试重新连接
socket.on('reconnect_attempt', () => {
console.log('尝试重新重连');
});
// 错误发生,并且无法被其他事件类型所处理
socket.on('error', err => {
console.log('错误发生,并且无法被其他事件类型所处理', err);
});
// 加入聊天室
socket.on('login', d => {
console.log(`您已加入聊天室,当前共有 ${d.numUsers} 人`);
});
// 接受到新消息
socket.on('new message', d => {
console.log('new message',d);
});
// 有人加入聊天室
socket.on('user joined', d => {
console.log(`${d.username} 来了,当前共有 ${d.numUsers} 人`);
});
// 有人离开聊天室
socket.on('user left', d => {
console.log(`${d.username} 离开了,当前共有 ${d.numUsers} 人`);
});
},
methods: {
send(){
// 发送消息
this.socket.emit('new message', '发送消息')
}
}};小程序当中的使用
 initWebSocket(live) {
    if(this.socket) {
      this.socket.disconnect();
      this.socket = null;
    }
    if(live.step != '直播中') {
      return this.setData({ liveTipTime: live.start_time });
    }
    const username = this.data.username;
    const timestamp = Math.floor(Date.now()/1000/60/10);
    const token = `gz.${timestamp}.${username}`;
    const socket = io( `${socketHost}/chat?id=${this.data.liveId}&token=${token}`);
    socket.on('connect', () => {
      this.setData({ socketError: '' });
      console.log('connection created.')
    });
    socket.on('join', user => {
      let { danmulist } = this.data;
      danmulist.push({ nickName: user, content: '加入了房间', system: true });
      this.setData({ danmulist, onlineUserCount: this.data.onlineUserCount + 1 });
    });
    socket.on('message', msg => {
      let { danmulist } = this.data;
      danmulist.push({ nickName: msg.user, content: msg.content, color: msg.color || '#fff' });
      this.videoContext.sendDanmu({ text: msg.content, color: msg.color || '#fff' })
      this.setData({ danmulist });
      console.log(msg)
    });
    socket.on('alluser', users => {
      //console.log('alluser', users);
      this.setData({ onlineUserCount: users.length });
    });
    socket.on('logout', users => {
      console.log('alluser', users)
      this.setData({ onlineUserCount: this.data.onlineUserCount - 1 });
    });
    socket.on('getAlluser', ({ type, users }) => {
      console.log('getAlluser', type, users);
      if(this.data.isAdmin) {
        app.api.lottery_start(type, users).then(x=>{
          if(!x.length) {
            return wx.showModal({ content: '当前已无符合条件的中奖候选名单,请稍后再试' });
          }
          wx.showToast({ title: '抽奖成功' });
          this.setData({ activeTab: 0 });
          this.socket.emit('lotteryStart', type);
          this.lottery_result_summary();
        }).catch(e=>{
          wx.showModal({ title: '抽奖失败: '+e, showCancel: false });
        });
      }
    });
    socket.on('setScore', score => {
      const liveIndex = this.data.swiperList.findIndex(x=>x.id == this.data.liveId);
      if(this.data.swiperList[liveIndex]) {
        this.setData({ [`swiperList[${liveIndex}].score`]: score });
      }
      console.log('setScore', score)
    });
    socket.on('lotteryStart', type => {
      console.log('lotteryStart', type)
      if(this.data.lotteryStatus == 1) {
        app.api.lottery_result(type).then(lotteryResult=>{
          this.setData({ lotteryStatus: 2, lotteryResult, time2: 10 });
          this.countdown();
        });
      }
    });
    socket.on('setliveStep', step => {
      console.log('setliveStep', step)
    });
    socket.on('error', e => {
      console.error('socket error', e);
      wx.showToast({ title: '连接弹幕服务失败', icon: 'none' });
      this.setData({ socketError: e + '' });
    })
    this.socket = socket;
    this.setData({ liveTipTime: '' });
  },
想了解更多编程学习,敬请关注php培训栏目!
以上就是汇总微信小程序开发问题的详细内容,更多请关注自由互联其它相关文章!
