前言
Vue区别于传统的JS库,例如JQuery,其中一个最大的特点就是不用手动去操作DOM,只需要对数据进行变更之后,视图也会随之更新。 比如你想修改div#app里的内容:
/// JQuery
<div id="app"></div>
<script>
 $('#app').text('lxb')
</script>
<template>
	<div id="app">{{ message }}</div>
  <button @click="change">点击修改message</button>
</template>
<script>
export default {
	data () {
  	return {
    	message: 'lxb'
    }
  },
  methods: {
  	change () {
    	this.message = 'lxb1' // 触发视图更新
    }
	}
}
</script>
在代码层面上的最大区别就是,JQuery直接对DOM进行了操作,而Vue则对数据进行了操作,接下来我们通过分析源码来进一步分析,Vue是如何做到数据驱动的,而数据驱动主要分成两个部分依赖收集和派发更新。
数据驱动
// _init方法中
initLifecycle(vm)
initEvents(vm)
initRender(vm)
callHook(vm, 'beforeCreate')
initInjections(vm) // resolve injections before data/props
initState(vm) // 重点分析
initProvide(vm) // resolve provide after data/props
callHook(vm, 'created')
在Vue初始化会执行_init方法,并调用initState方法. initState相关代码在src/core/instance/state.js下
export function initState (vm: Component) {
 vm._watchers = []
 const opts = vm.$options
 if (opts.props) initProps(vm, opts.props) // 初始化Props
 if (opts.methods) initMethods(vm, opts.methods) // 初始化方法
 if (opts.data) {
  initData(vm) // 初始化data
 } else {
  observe(vm._data = {}, true /* asRootData */)
 }
 if (opts.computed) initComputed(vm, opts.computed) // 初始化computed
 if (opts.watch && opts.watch !== nativeWatch) { // 初始化watch
  initWatch(vm, opts.watch)
 }
}
我们具体看看initData是如何定义的。
function initData (vm: Component) {
 let data = vm.$options.data
 data = vm._data = typeof data === 'function' // 把data挂载到了vm._data上
  ? getData(data, vm) // 执行 data.call(vm)
  : data || {}
 if (!isPlainObject(data)) {
  data = {} // 这也是为什么 data函数需要返回一个object不然就会报这个警告
  process.env.NODE_ENV !== 'production' && warn(
   'data functions should return an object:\n' +
   'https://vuejs.org/v2/guide/components.html#data-Must-Be-a-Function',
   vm
  )
 }
 // proxy data on instance
 const keys = Object.keys(data) // 取到data中所有的key值所组成的数组
 const props = vm.$options.props
 const methods = vm.$options.methods
 let i = keys.length
 while (i--) {
  const key = keys[i]
  if (process.env.NODE_ENV !== 'production') {
   if (methods && hasOwn(methods, key)) { // 避免方法名与data的key重复
    warn(
     `Method "${key}" has already been defined as a data property.`,
     vm
    )
   }
  }
  if (props && hasOwn(props, key)) { // 避免props的key与data的key重复
   process.env.NODE_ENV !== 'production' && warn(
    `The data property "${key}" is already declared as a prop. ` +
    `Use prop default value instead.`,
    vm
   )
  } else if (!isReserved(key)) { // 判断是不是保留字段
   proxy(vm, `_data`, key) // 代理
  }
 }
 // observe data
 observe(data, true /* asRootData */) // 响应式处理
}
其中有两个重要的函数分别是proxy跟observe,在往下阅读之前,如果还有不明白Object.defineProperty作用的同学,可以点击这里进行了解,依赖收集跟派发更新都需要依靠这个函数进行实现。
proxy
proxy分别传入vm,'_data',data中的key值,定义如下:
const sharedPropertyDefinition = {
 enumerable: true,
 configurable: true,
 get: noop,
 set: noop
}
export function proxy (target: Object, sourceKey: string, key: string) {
 sharedPropertyDefinition.get = function proxyGetter () {
  return this[sourceKey][key]
 }
 sharedPropertyDefinition.set = function proxySetter (val) {
  this[sourceKey][key] = val
 }
 Object.defineProperty(target, key, sharedPropertyDefinition)
}
proxy函数的逻辑很简单,就是对vm._data上的数据进行代理,vm._data上保存的就是data数据。通过代理的之后我们就可以直接通过this.xxx访问到data上的数据,实际上访问的就是this._data.xxx。
observe
oberse定义在src/core/oberse/index.js下,关于数据驱动的文件都存放在src/core/observe这个目录中:
export function observe (value: any, asRootData: ?boolean): Observer | void {
 if (!isObject(value) || value instanceof VNode) { // 判断是否是对象或者是VNode
  return
 }
 let ob: Observer | void
 // 是否拥有__ob__属性 有的话证明已经监听过了,直接返回该属性
 if (hasOwn(value, '__ob__') && value.__ob__ instanceof Observer) {
  ob = value.__ob__
 } else if (
  shouldObserve && // 能否被观察
  !isServerRendering() && // 是否是服务端渲染
  (Array.isArray(value) || isPlainObject(value)) && // 是否是数组、对象、能否被扩展、是否是Vue函数
  Object.isExtensible(value) &&
  !value._isVue
 ) {
  ob = new Observer(value) // 对value进行观察
 }
 if (asRootData && ob) {
  ob.vmCount++
 }
 return ob
}
observe函数会对传入的value进行判断,在我们初始化过程会走到new Observer(value),其他情况可以看上面的注释。
Observer类
export class Observer {
 value: any; // 观察的数据
 dep: Dep; // dep实例用于 派发更新
 vmCount: number; // number of vms that have this object as root $data
 constructor (value: any) {
  this.value = value
  this.dep = new Dep()
  this.vmCount = 0
  // 把__ob__变成不可枚举的,因为没有必要改变watcher本身
  def(value, '__ob__', this) 会执行 value._ob_ = this(watcher实例)操作
  if (Array.isArray(value)) { // 当value是数组
   if (hasProto) {
    protoAugment(value, arrayMethods) // 重写Array.prototype的相关方法
   } else {
    copyAugment(value, arrayMethods, arrayKeys) // 重写Array.prototype的相关方法
   }
   this.observeArray(value)
  } else {
   this.walk(value) // 当value为对象
  }
 }

 /**
  * Walk through all properties and convert them into
  * getter/setters. This method should only be called when
  * value type is Object.
  */
 walk (obj: Object) {
  const keys = Object.keys(obj)
  for (let i = 0; i < keys.length; i++) {
   defineReactive(obj, keys[i]) // 对数据进行响应式处理
  }
 }

 /**
  * Observe a list of Array items.
  */
 observeArray (items: Array<any>) {
  for (let i = 0, l = items.length; i < l; i++) {
   observe(items[i]) // 遍历value数组的每一项并调用observe函数,进行响应式处理
  }
 }
}
Observe类要做的事情通过查看源码也是清晰明了,对数据进行响应式处理,并对数组的原型方法进行重写!defineReactive函数就是实现依赖收集和派发更新的核心函数了,实现代码如下。
依赖收集
defineReactive
export function defineReactive (
 obj: Object, // data数据
 key: string, // data中对应的key值
 val: any, // 给data[key] 赋值 可选
 customSetter?: ?Function, // 自定义setter 可选
 shallow?: boolean // 是否对data[key]为对象的值进行observe递归 可选
) {
 const dep = new Dep() // Dep实例 **每一个key对应一个Dep实例**

 const property = Object.getOwnPropertyDescriptor(obj, key) // 拿到对象的属性描述
 if (property && property.configurable === false) { // 判断对象是否可配置
  return
 }

 // cater for pre-defined getter/setters
 const getter = property && property.get
 const setter = property && property.set
 if ((!getter || setter) && arguments.length === 2) { // 没有getter或者有setter,并且传入的参数有两个
  val = obj[key]
 }

 let childOb = !shallow && observe(val) // 根据shallow,递归遍历val对象,相当于val当做data传入
 Object.defineProperty(obj, key, {
  enumerable: true,
  configurable: true,
  get: function reactiveGetter () {
   const value = getter ? getter.call(obj) : val
   if (Dep.target) { // 当前的全部的Watcher实例
    dep.depend() // 把当前的Dep.target加入到dep.subs数组中
    if (childOb) { // 如果val是对象,
     childOb.dep.depend() // 会在value._ob_的dep.subs数组中加入Dep.target, 忘记ob实例属性的同学可往回翻一番
     if (Array.isArray(value)) {
      dependArray(value) // 定义如下,逻辑也比较简单
     }
    }
   }
   return value
  },
  set: function reactiveSetter (newVal) {
   // ....
  }
 })
}

function dependArray (value: Array<any>) {
 for (let e, i = 0, l = value.length; i < l; i++) {
  e = value[i]
  e && e.__ob__ && e.__ob__.dep.depend() // 如果e是响应式数据,则往e._ob_.dep.subs数组中加入Dep.target
  if (Array.isArray(e)) {
   dependArray(e) // 递归遍历
  }
 }
}
代码中多次用到了Dep类和Dep.target,理解清楚了它们的作用,我们就离Vue数据驱动的原理更近一步了,相关的代码如下:
Dep
let uid = 0
/**
 * A dep is an observable that can have multiple
 * directives subscribing to it.
 */
export default class Dep {
 static target: ?Watcher;
 id: number;
 subs: Array<Watcher>;

 constructor () {
  this.id = uid++ // 每一个dep都有一个唯一的ID
  this.subs = [] // 存放watcher实例的数组
 }

 addSub (sub: Watcher) {
  this.subs.push(sub) // 往this.subs加入watcher
 }

 removeSub (sub: Watcher) {
  remove(this.subs, sub) // 删除this.subs对应的watcher
 }

 depend () {
  if (Dep.target) {
   // watcher.addDep(this) actually
   Dep.target.addDep(this) // 在watcher类中查看
  }
 }

 notify () {
  // stabilize the subscriber list first
  const subs = this.subs.slice()
  if (process.env.NODE_ENV !== 'production' && !config.async) {
   // subs aren't sorted in scheduler if not running async
   // we need to sort them now to make sure they fire in correct
   // order
   subs.sort((a, b) => a.id - b.id) // 根据watcher的id进行排序
  }
  for (let i = 0, l = subs.length; i < l; i++) {
   subs[i].update() // 遍历subs数组中的每一个watcher执行update方法
  }
 }
}

// The current target watcher being evaluated.
// This is globally unique because only one watcher
// can be evaluated at a time.
Dep.target = null // Dep.target 代表当前全局的watcher
const targetStack = []

export function pushTarget (target: ?Watcher) {
 targetStack.push(target)
 Dep.target = target // 赋值
}

export function popTarget () {
 targetStack.pop()
 Dep.target = targetStack[targetStack.length - 1] // 赋值
}
Dep的定义还是非常清晰的,代码注释如上,很明显Dep跟Watcher就跟捆绑销售一样,互相依赖。我们在分析denfineReactive的时候,在对数据进行响应式操作的时候,通过Object.defineProperty重写了getter函数。
Object.defineProperty(obj, key, {
  enumerable: true,
  configurable: true,
  get: function reactiveGetter () {
   const value = getter ? getter.call(obj) : val
   if (Dep.target) { // 当前的全部的Watcher实例
    dep.depend() // 把当前的Dep.target加入到dep.subs数组中
    // ..
   }
   return value
  },
其中的dep.depend()实际上就是执行了Dep.target.addDep(this),this指向Dep实例,而Dep.target是一个Watcher实例,即执行watcher.addDep(this)函数。我们接下来在看看这个函数做了什么:
class Watcher {
	addDep (dep: Dep) {
   const id = dep.id
   if (!this.newDepIds.has(id)) {
    this.newDepIds.add(id)
    this.newDeps.push(dep) //
    if (!this.depIds.has(id)) {
     dep.addSub(this) // 会把watcher插入到dep.subs数组中
    }
   }
 }
}
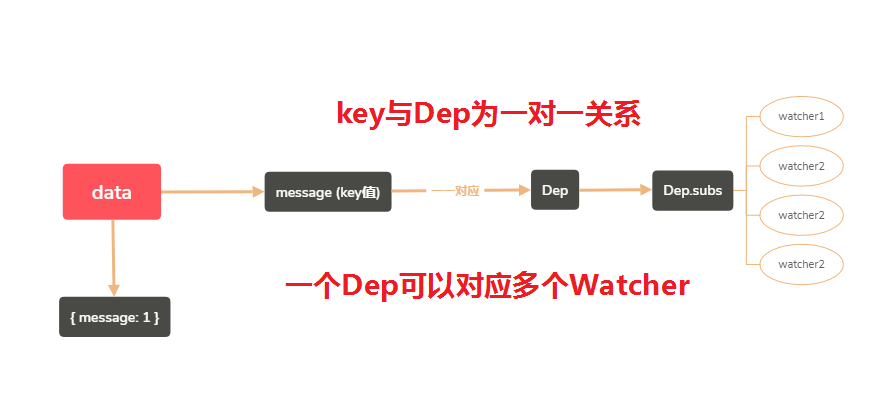
可以通过下图以便理解data、Dep、Watcher的关系:

回到代码中,其中dep.addSub(this)就是会把当前的wathcer实例插入到dep.subs的数组中,为之后的派发更新做好准备,这样依赖收集就完成了。但是到现在为止,我们只分析了依赖收集是怎么实现的,但是依赖收集的时机又是在什么时候呢?什么时候会触发getter函数进而实现依赖收集的?在进行依赖收集的时候,Dep.tagrget对应wathcer又是什么呢?
Watcher大致可以分为三类: * 渲染Watcher: 每一个实例对应唯一的一个(有且只有一个) * computed Watcher: 每一个实例可以有多个,由computed属性生成的(computed有多少个keyy,实例就有多少个computedWatcher) * user Watcher: 每一个实例可以有多个,由watch属性生成的(同computed一样,userWatcher的数量由key数量决定) 为避免混淆,我们接下来说的Watcher都是渲染Watcher。我们知道在Vue初始化的过程中,在执行mountComponent函数的时候,会执行new Watcher(vm, updateComponent, {}, true),这里的Watcher就是渲染Watcher
class Wachter {
	get () {
   pushTarget(this) // Dep.target = this
   let value
   const vm = this.vm
   try {
    value = this.getter.call(vm, vm) // 更新视图
   } catch (e) {
    if (this.user) {
     handleError(e, vm, `getter for watcher "${this.expression}"`)
    } else {
     throw e
    }
   } finally {
    // "touch" every property so they are all tracked as
    // dependencies for deep watching
    if (this.deep) {
     traverse(value)
    }
    popTarget()
    this.cleanupDeps()
   }
   return value
  }
}
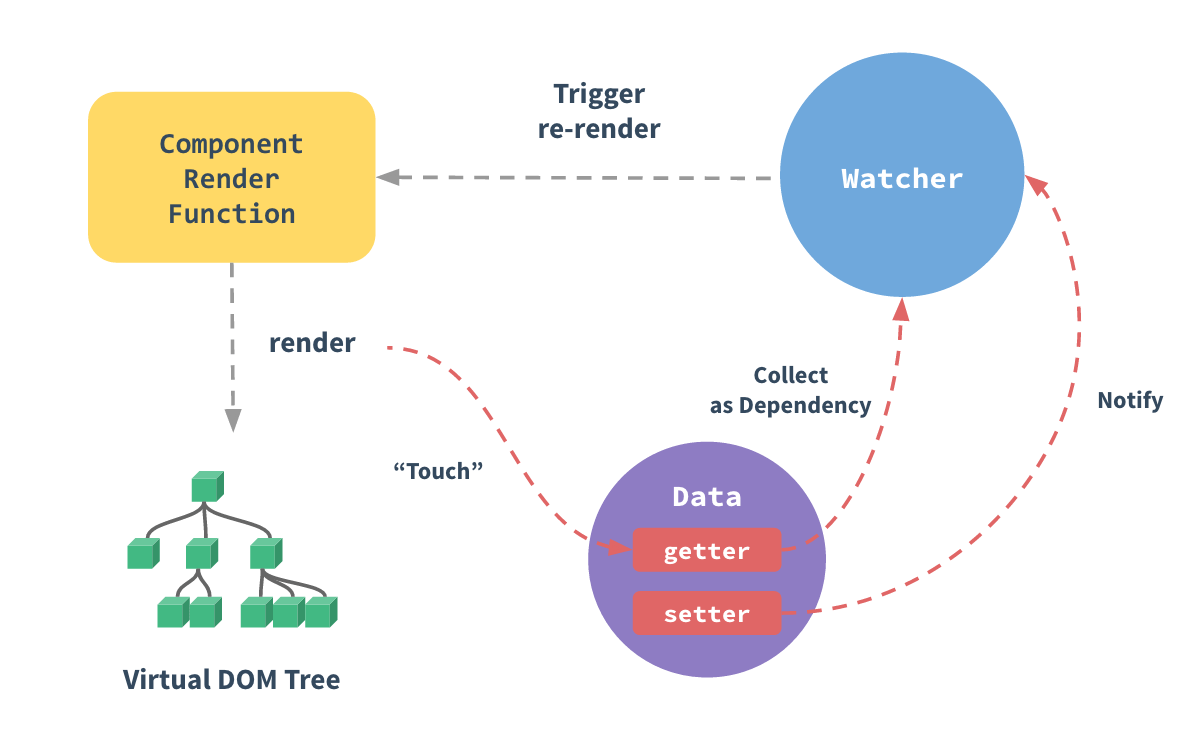
new Watcher对于渲染watcher而言,会直接执行this.get()方法,然后执行pushTarget(this),所以当前的Dep.target为渲染watcher(用于更新视图)。 而在我们执行this.getter的时候,会调用render函数,此时会读取vm实例上的data数据,这个时候就触发了getter函数了,从而进行了依赖收集,这就是依赖收集的时机,比如
{{ message }} // 会读取vm._data.message, 触发getters函数
派发更新
我们继续来看defineReactive函数里
export function defineReactive (
 obj: Object,
 key: string,
 val: any,
 customSetter?: ?Function,
 shallow?: boolean
) {
 const dep = new Dep()
	// ..
 Object.defineProperty(obj, key, {
  enumerable: true,
  configurable: true,
  get: function reactiveGetter () {
   // ..
  },
  set: function reactiveSetter (newVal) {
   /* eslint-disable no-self-compare */
   if (newVal === value || (newVal !== newVal && value !== value)) {
    return
   }
   /* eslint-enable no-self-compare */
   if (process.env.NODE_ENV !== 'production' && customSetter) {
    customSetter()
   }
   // #7981: for accessor properties without setter
   if (getter && !setter) return
   if (setter) {
    setter.call(obj, newVal)https://cn.vuejs.org//images/data.png
   } else {
    val = newVal
   }
   childOb = !shallow && observe(newVal)
   dep.notify() // 遍历dep.subs数组,取出所有的wathcer执行update操作
  }
 })
}
当我们修改数据的时候,会触发setter函数,这个时候会执行dep.notify,dep.subs中所有的watcher都会执行update方法,对于渲染Watcher而言,就是执行this.get()方法,及更新视图。这样一来,就实现了数据驱动。 到这里,Vue的数据驱动原理我们就分析完了,如果还对这个流程不大清楚的,可以结合参考官方给的图解:

总结
- 通过Object.defineProperty函数改写了数据的getter和setter函数,来实现依赖收集和派发更新。
- 一个key值对应一个Dep实例,一个Dep实例可以包含多个Watcher,一个Wathcer也可以包含多个Dep。
- Dep用于依赖的收集与管理,并通知对应的Watcher执行相应的操作。
- 依赖收集的时机是在执行render方法的时候,读取vm上的数据,触发getter函数。而派发更新即在变更数据的时候,触发setter函数,通过dep.notify(),通知到所收集的watcher,执行相应操作。
以上就是详解Vue数据驱动原理的详细内容,更多关于Vue数据驱动原理的资料请关注易盾网络其它相关文章!
