目录 Swagger实现接口版本号管理 使用swagger测试接口 Swagger实现接口版本号管理 前言:使用swagger暴露对外接口时原则是每个系统在不同的迭代版本仅仅需要暴露该迭代版本的接口给外部
目录
- Swagger实现接口版本号管理
- 使用swagger测试接口
Swagger实现接口版本号管理
前言:使用swagger暴露对外接口时原则是每个系统在不同的迭代版本仅仅需要暴露该迭代版本的接口给外部使用,客户端不需要关心不相关的接口
先来看张效果图
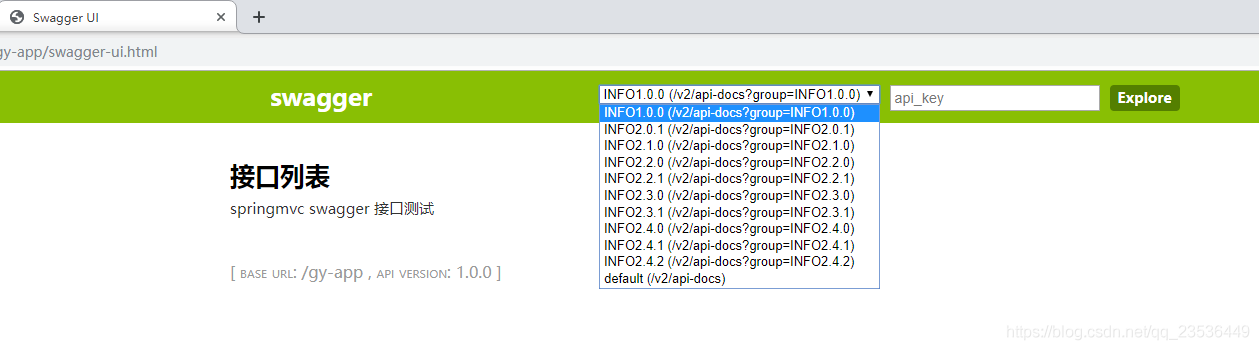
下面是实现代码:
定义注解ApiVersion:
/**
 * 接口版本管理注解
 * @author 周宁
 * @Date 2018-08-30 11:48
 */
@Retention(RetentionPolicy.RUNTIME)
@Target(ElementType.METHOD)
public @interface ApiVersion {

    /**
     * 接口版本号(对应swagger中的group)
     * @return String[]
     */
    String[] group();

}
定义一个用于版本常量的类ApiVersionConstant
/**
 * api版本号常量类
 * @author 周宁
 * @Date 2018-08-30 13:30
 */
public interface ApiVersionConstant {
    /**
     * 图审系统手机app1.0.0版本
     */
    String FAP_APP100 = "app1.0.0";

}
更改SwaggerConfig添加Docket(可以理解成一组swagger 接口的集合),并定义groupName,根据ApiVersion的group方法区分不同组(迭代)的接口,代码如下:
@Configuration
@EnableSwagger2
@EnableWebMvc
public class SwaggerConfig {

    //默认版本的接口api-docs分组
    @Bean
    public Docket vDefault(){
        return new Docket(DocumentationType.SWAGGER_2)
                .apiInfo(buildApiInf())
                .select()
                .apis(RequestHandlerSelectors.basePackage("com.gysoft"))//controller路径
                .paths(PathSelectors.any())
                .build();
    }
    //app1.0.0版本对外接口
    @Bean
    public Docket vApp100(){
        return new Docket(DocumentationType.SWAGGER_2)
                .apiInfo(buildApiInf())
                .groupName(FAP_APP100)
                .select()
                .apis(input -> {
                    ApiVersion apiVersion = input.getHandlerMethod().getMethodAnnotation(ApiVersion.class);
                    if(apiVersion!=null&&Arrays.asList(apiVersion.group()).contains(FAP_APP100)){
                        return true;
                    }
                    return false;
                })//controller路径
                .paths(PathSelectors.any())
                .build();
    }

    private ApiInfo buildApiInf(){
        return new ApiInfoBuilder()
                .title("接口列表")
                .termsOfServiceUrl("http://127.0.0.1:8080/swagger-ui.html")
                .description("springmvc swagger 接口测试")
                .version("1.0.0")
                .build();
    }
}
立即食用
/**
 * @author 周宁
 * @Date 2018-08-24 11:05
 */
@RestController
@RequestMapping("/document")
@Api(value = "资料文档或者CAD图纸", description = "资料文档或者CAD图纸")
public class DocumentController extends GyBasicSession {

    private static final Logger logger = LoggerFactory.getLogger(DocumentController.class);

    @ApiImplicitParams({@ApiImplicitParam(name = "page", value = "当前页数", dataType = "int", paramType = "path"),
            @ApiImplicitParam(name = "pageSize", value = "每页大小", dataType = "int", paramType = "path"),
            @ApiImplicitParam(name = "projectId", value = "项目id", dataType = "string", paramType = "path"),
            @ApiImplicitParam(name = "stageNum", value = "阶段编号", dataType = "string", paramType = "path"),
            @ApiImplicitParam(name = "type", value = "0资料(文档);1cad图纸", dataType = "int", paramType = "path"),
            @ApiImplicitParam(name = "searchkey", value = "搜索关键字", dataType = "string", paramType = "query")})
    @ApiOperation("分页获取资料文档(CAD图纸)列表数据")
    @GetMapping("/pageQueryAppDocumentInfo/{page}/{pageSize}/{projectId}/{stageNum}/{type}")
    @ApiVersion(group = ApiVersionConstant.FAP_APP100)
    public PageResult<AppDocumentInfo> pageQueryAppDocumentInfo(@PathVariable Integer page, @PathVariable Integer pageSize, @PathVariable String projectId, @PathVariable String stageNum, @PathVariable Integer type, @RequestParam String searchkey) {
        return null;
    }
}
使用swagger测试接口
swagger:自动扫描 controller 包下的请求,生成接口文档,并提供测试功能。
引入依赖
       <!-- https://mvnrepository.com/artifact/io.springfox/springfox-swagger2 -->
        <dependency>
            <groupId>io.springfox</groupId>
            <artifactId>springfox-swagger2</artifactId>
            <version>2.9.2</version>
        </dependency>
        <!-- https://mvnrepository.com/artifact/io.springfox/springfox-swagger-ui -->
        <dependency>
            <groupId>io.springfox</groupId>
            <artifactId>springfox-swagger-ui</artifactId>
            <version>2.9.2</version>
        </dependency>
在 config 包引入 swagger 自定义配置类
package com.zhiyou100.zymusic.config;
import org.springframework.context.annotation.Bean;
import org.springframework.context.annotation.Configuration;
import springfox.documentation.builders.ApiInfoBuilder;
import springfox.documentation.builders.PathSelectors;
import springfox.documentation.builders.RequestHandlerSelectors;
import springfox.documentation.service.ApiInfo;
import springfox.documentation.service.Contact;
import springfox.documentation.spi.DocumentationType;
import springfox.documentation.spring.web.plugins.Docket;
import springfox.documentation.swagger2.annotations.EnableSwagger2;
/**
 * @author teacher
 * @date 2019/9/25
 */
@Configuration
@EnableSwagger2
public class MySwaggerConfiguration {
    @Bean
    public Docket createRestApi() {
        return new Docket(DocumentationType.SWAGGER_2)
                .apiInfo(apiInfo())
                .select()
                .apis(RequestHandlerSelectors.any())
                .paths(PathSelectors.any())
                .build();
    }
    private ApiInfo apiInfo() {
        return new ApiInfoBuilder()
                //标题
                .title("Spring Boot 中使用 Swagger2 构建 RESTful APIs")
                //简介
                .description("hello swagger")
                //服务条款
                .termsOfServiceUrl("1. xxx\n2. xxx\n3. xxx")
                //作者个人信息
                .contact(new Contact("admin", "http://www.zhiyou100.com", "admin@zhiyou100.com"))
                //版本
                .version("1.0")
                .build();
    }
}
启动项目后,使用 http://localhost:8080/swagger-ui.html
选择需要测试的接口:Try it out -> 填写参数 -> Execute -> 查看响应
以上为个人经验,希望能给大家一个参考,也希望大家多多支持自由互联。