目录
- 一、dubbo简介
- 二、架构设计
- 三、开发工具
- 四、一步步实现
- 4.1 客户端消费实现
- 4.2 服务实例曝光到注册中心
- 4.3 自动化配置实现
- 五、测试
- 5.1 编写api
- 5.2 实现api,标记@Service
- 5.3 编写controller接口,使用@Reference注入api依赖
- 5.4 启动步骤
- 六、总结
- 6.1 已完成功能列表
- 6.2 TODO LIST
一、dubbo简介
实现一个简易版的dubbo,首先看下dubbo是什么
dubbo是阿里开源的rpc框架,目前是apache顶级开源项目,可以用来构建微服务。社区已经到了3.0版本,生态活跃,原来是java写的,现在有go版本,支持云原生。
研究dubbo的目的
- dubbo浑身是宝,用到了zk/javassit/netty/spring/spi等技术,可以说看懂了dubbo源码,对自己是十分有帮助的。不仅能学习优秀的代码设计,理解solid原则,更能深刻理解rpc的实现原理,了解各种技术的运用。
- 当前目前有不少大公司在使用,dubbo也是经常被问的面试题,包括dubbo spi/dubbo通信流程,对于简历也是十分加分的。
- 手写dubbo,比看懂dubbo要难得多,让自己透彻理解dubbo的设计细节,内功修炼更上一层楼,以后再去看其他源码会非常快。
二、架构设计
博主在看懂dubbo源码的基础上,自己动手实现dubbo最基础的功能,包括服务注册、服务发现、服务负载均衡、网络通信、与spring boot集成等,以便更好掌握dubbo的实现原理。实现架构如下:
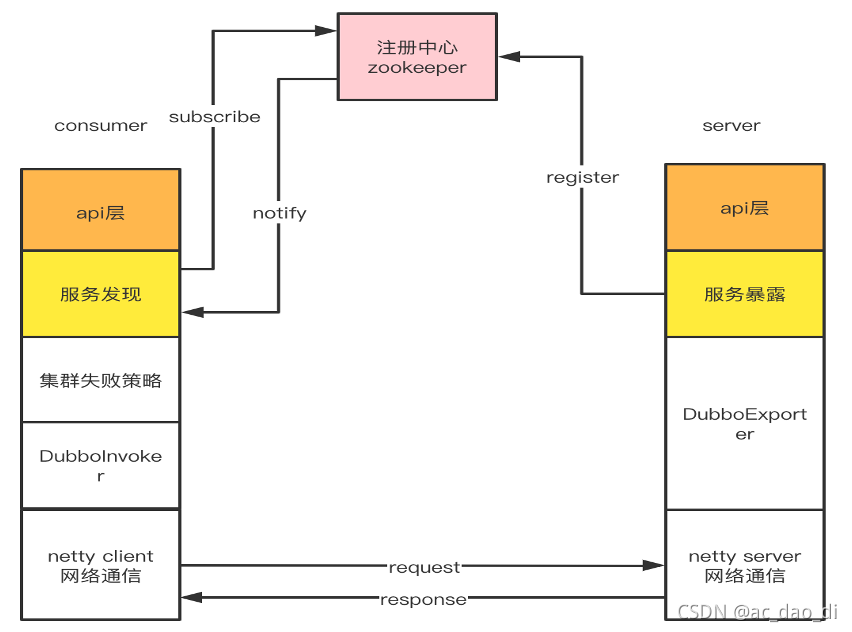
Api层主要是面向框架使用者,通过注解就能使用简易版dubbo。并实现了在spring boot中进行自动配置。
目前微服务都是基于spring boot搭建的,大部分公司都从spring迁移到spring boot。整个实例都是基于spring boot来构建的,基于自动化配置搞个starter,配置下yaml就能使用miniDubbo,无需配置xml。
服务发现基于zookeeper实现,所有发现的实例,暂存在注册目录中。
Zookeeper是一个树状的结构,有三种节点类型,永久节点(需要自己删除)、临时节点(有会话的概念,当zookeeper监听到会话断开时,会删除临时节点)、有序节点。在dubbo中主要用的是临时节点,用于实时感知服务实例上下线。
路径格式:
/miniDubbo/${group}/${className}/providers/${ip:port}
集群失败策略:主要有failover/failsafe/failback。
也就是当consumer调用某个provider失败时,采取的策略,failover表示失败转移,重试下一台实例;failsafe表示不重试,不抛出异常,返回null。
模拟dubbo协议,这里通过netty实现网络通信,底层使用JSON序列化,通过长度 + body的协议防止粘包。
Netty是java领域的一套高性能的nio异步网络编程框架,底层也是基于java nio,已经封装好了网络编程,实现网络通信非常方便。在dubbo中用于provider-consumer建立长连接,避免重复建立连接。
整体思路是:consumer调用接口方法时,对接口进行JDK代理,代理逻辑是通过服务发现找到一台可用实例,将请求的类名、方法名、入参进行打包、编码,通过网络请求发送给provider。在服务端拿到请求的类名、方法名、入参后,通过反射调用服务实例,并将结果的返回给consumer。
三、开发工具
需要安装如下工具。
- IDEA+JDK8+MAVEN
- zookeeper
四、一步步实现
这里给出部分代码,具体参考github:miniDubbo
4.1 客户端消费实现
4.1.1 扫描Reference注解,注入dubbo依赖
定义一个Reference注解,这个注解必须是运行时注解,且至少可用在属性上。
package com.jessin.practice.dubbo.processor;

import java.lang.annotation.Documented;
import java.lang.annotation.ElementType;
import java.lang.annotation.Retention;
import java.lang.annotation.RetentionPolicy;
import java.lang.annotation.Target;

/**
 * 消费端注解
 * @Author: jessin
 * @Date: 19-11-25 下午9:48
 */
@Target({ ElementType.CONSTRUCTOR, ElementType.METHOD, ElementType.PARAMETER, ElementType.FIELD, ElementType.ANNOTATION_TYPE})
// 必须写为runtime,否则获取不到
@Retention(RetentionPolicy.RUNTIME)
@Documented
public @interface Reference {

    String group() default "";

    String version() default "1.0.0";

    String timeout() default "3000";

    String failStrategy() default "failover";

    String retryCount() default "3";
}
在spring bean实例化后初始化前,对应的是InstantiationAwareBeanPostProcessor#postProcessProperties,这个是bean实例化后第一个扩展点,且在aware方法之前,进行依赖反射注入,并设置动态代理,代理实现该属性对应的接口。
package com.jessin.practice.dubbo.processor;

import com.jessin.practice.dubbo.config.InterfaceConfig;
import com.jessin.practice.dubbo.config.MiniDubboProperties;
import java.lang.reflect.Field;
import lombok.extern.slf4j.Slf4j;
import org.springframework.beans.BeansException;
import org.springframework.beans.PropertyValues;
import org.springframework.beans.factory.config.InstantiationAwareBeanPostProcessorAdapter;

/**
 * @Author: jessin
 * @Date: 19-11-25 下午9:49
 */
@Slf4j
public class ReferenceBeanPostProcessor extends InstantiationAwareBeanPostProcessorAdapter {
    private MiniDubboProperties miniDubboProperties;
    public ReferenceBeanPostProcessor(MiniDubboProperties miniDubboProperties) {
        this.miniDubboProperties = miniDubboProperties;
    }

    @Override
    public PropertyValues postProcessProperties(PropertyValues pvs, Object bean, String beanName)
            throws BeansException {
        Field[] fields = bean.getClass().getDeclaredFields();
        for (Field field : fields) {
            boolean isExist = field.isAnnotationPresent(Reference.class);
            if (isExist) {
                try {
                    if (!field.getType().isInterface()) {
                        throw new RuntimeException("dubbo依赖不是接口:" + field.getType().getName());
                    }
                    Reference  ref = field.getAnnotation(Reference.class);
                    log.info("尝试注入接口代理,bean的{}属性为:{}", beanName, ref);
                    // 私有属性,必须设置为可访问
                    field.setAccessible(true);
                    field.set(bean, JdkDynamicProxy.createProxy(field.getType(), transform(ref), miniDubboProperties));
                } catch (IllegalAccessException e) {
                    log.error("设置jdk实例出错啦:{}", field);
                }
            }
        }
        return pvs;
    }

    private InterfaceConfig transform(Reference ref) {
        InterfaceConfig interfaceConfig = new InterfaceConfig();
        interfaceConfig.setGroup(ref.group());
        interfaceConfig.setVersion(ref.version());
        interfaceConfig.setTimeout(ref.timeout());
        interfaceConfig.setFailStrategy(ref.failStrategy());
        interfaceConfig.setRetryCount(ref.retryCount());
        return interfaceConfig;
    }
}
动态代理的逻辑非常简单,基于注册目录找到可用的DubboInvoker,并发起网络请求,传输请求id、类名、入参、超时时间、版本等信息。
package com.jessin.practice.dubbo.processor;

import com.alibaba.fastjson.JSONObject;
import com.jessin.practice.dubbo.config.InterfaceConfig;
import com.jessin.practice.dubbo.config.MiniDubboProperties;
import com.jessin.practice.dubbo.invoker.FailfastClusterInvoker;
import com.jessin.practice.dubbo.invoker.RpcInvocation;
import com.jessin.practice.dubbo.registry.RegistryDirectory;
import com.jessin.practice.dubbo.transport.Response;
import java.lang.reflect.InvocationHandler;
import java.lang.reflect.Method;
import java.lang.reflect.Proxy;
import lombok.extern.slf4j.Slf4j;
/**
 * @Author: jessin
 * @Date: 19-11-25 下午9:54
 */
@Slf4j
public class JdkDynamicProxy<T> implements InvocationHandler {

    private String clazzName;

    private Object proxy;

    private RegistryDirectory registryDirectory;

    private FailfastClusterInvoker failfastClusterInvoker;

    private InterfaceConfig interfaceConfig;

    private MiniDubboProperties miniDubboProperties;

    public JdkDynamicProxy(Class<T> clazz, InterfaceConfig interfaceConfig, MiniDubboProperties miniDubboProperties) {
        proxy = Proxy.newProxyInstance(this.getClass().getClassLoader(), new Class[]{clazz}, this);
        this.clazzName = clazz.getName();
        registryDirectory = new RegistryDirectory(clazzName, miniDubboProperties.getRegistry(), interfaceConfig);
        failfastClusterInvoker = new FailfastClusterInvoker(registryDirectory);
        this.interfaceConfig = interfaceConfig;
    }


    public static <T>  Object createProxy(Class<T> clazz, InterfaceConfig interfaceConfig, MiniDubboProperties miniDubboProperties) {
        return new JdkDynamicProxy(clazz, interfaceConfig, miniDubboProperties).proxy;
    }

    /**
     * TODO 特殊方法不拦截。。
     * @param proxy
     * @param method
     * @param args
     * @return
     * @throws Throwable
     */
    @Override
    public Object invoke(Object proxy, Method method, Object[] args) throws Throwable {
        if ("toString".equals(method.getName())) {
            return this.toString();
        }
        // todo group,attachment
        RpcInvocation rpcInvocation = new RpcInvocation();
        rpcInvocation.setInterfaceName(clazzName);
        rpcInvocation.setParameterType(method.getParameterTypes());
        rpcInvocation.setArgs(args);
        rpcInvocation.setMethodName(method.getName());
        rpcInvocation.setVersion(interfaceConfig.getVersion());
        Class returnType = method.getReturnType();

        log.info("jdk调用:{},代理类为:{},返回类型:{}", rpcInvocation, proxy, returnType);
        // todo 通过接口配置决定用哪种策略
        Response response = (Response)failfastClusterInvoker.invoke(rpcInvocation);
        if (returnType == Void.class) {
            return null;
        }
        JSONObject jsonObject = (JSONObject)response.getResult();
        return jsonObject.toJavaObject(returnType);
    }
}
4.1.2 使用注册目录刷新服务实例
主要是创建zk连接,订阅该类的zk路径,处理zk子节点事件,维护子节点上线和下线,并构造DubboInvoker,建立网络连接。该service接口的所有可用实例,都会存在一个注册目录中,并动态刷新。
package com.jessin.practice.dubbo.registry;

import com.google.common.collect.Lists;
import com.jessin.practice.dubbo.config.InterfaceConfig;
import com.jessin.practice.dubbo.invoker.DubboInvoker;
import java.util.ArrayList;
import java.util.List;
import java.util.Map;
import java.util.concurrent.ConcurrentHashMap;
import java.util.stream.Collectors;
import lombok.extern.slf4j.Slf4j;

/**
 *  * 注册项目录,所有的dubboInvoker都保存到这里,实现zk listener,监听zk路径变化,当zk变化时,构造DubboInvoker。
 *  * 每个service应该有一个,同一个zk集群同一台机器应该只建立一个共享连接
 * @Author: jessin
 * @Date: 19-11-25 下午10:34
 */
@Slf4j
public class RegistryDirectory {

    private Map<String, DubboInvoker> ipAndPort2InvokerMap = new ConcurrentHashMap<>();

    private CuratorZookeeperClient curatorZookeeperClient;

    private InterfaceConfig interfaceConfig;

    private String providerPath;

    /**
     * TODO 创建zk连接,监听zk路径创建DubboInvoker
     * @param path
     */
    public RegistryDirectory(String path, String registry, InterfaceConfig interfaceConfig) {
        this.interfaceConfig = interfaceConfig;
        // 监听group/接口名/providers,有变化时通知RegistryDirectory,也就是调用notify(url, listener, urls);
        this.providerPath = "/miniDubbo/" + interfaceConfig.getGroup() + "/" + path + "/providers";

        // TODO 创建zk连接,并创建RegistryDirectory,第一次时创建DubboInvoker
        // 判断zk/redis。
        curatorZookeeperClient = RegistryManager.getCuratorZookeeperClient(registry);
        // todo 抽取subscribe方法
        List<String> children = curatorZookeeperClient.addTargetChildListener(providerPath, new ChildListener() {
                    @Override
                    public void childChanged(String path, List<String> children) {
                        log.info("监听到zk路径变化:{},children:{}", path, children);
                        processChildren(children);
                    }
                });

        processChildren(children);
    }


    public void processChildren(List<String> children) {
        try {
            if (children == null || children.size() == 0) {
                // 可能是远程抖动,或者zookeeper出问题了,造成所有服务实例下线,这里还需要通过心跳检测。
                log.info("监听到zk路径无子节点:{}", providerPath);
                children = Lists.newArrayList();
            }
            List<String> added = children.stream()
                    .filter(one -> !ipAndPort2InvokerMap.containsKey(one))
                    .collect(Collectors.toList());
            List<String> finalChildren = children;
            List<String> deleted = ipAndPort2InvokerMap.keySet().stream()
                    .filter(one -> !finalChildren.contains(one))
                    .collect(Collectors.toList());
            log.info("监听到zk路径:{},子节点变化,新增zk节点:{},删除zk节点:{}", providerPath, added, deleted);

            added.forEach(ipAndPort -> {
                if (!ipAndPort2InvokerMap.containsKey(ipAndPort)) {
                    ipAndPort2InvokerMap.put(ipAndPort, new DubboInvoker(ipAndPort, interfaceConfig));
                }
            });
            deleted.forEach(ipAndPort -> {
                ipAndPort2InvokerMap.get(ipAndPort).destroy();
                ipAndPort2InvokerMap.remove(ipAndPort);
            });
        } catch (Exception e) {
            log.error("处理zk事件出错", e);
        }

    }

    public List<DubboInvoker> getInvokerList() {
        return new ArrayList<>(ipAndPort2InvokerMap.values());
    }
}
4.1.3 Netty client网络通信传输,编解码器的实现
这里基于netty client 4.x api,也就是NioEventLoopGroup/NioSocketChannel等,快速开发网络连接功能,异步发送网络请求,处理各种网络请求:
package com.jessin.practice.dubbo.netty;

import com.alibaba.fastjson.JSON;
import io.netty.bootstrap.Bootstrap;
import io.netty.channel.Channel;
import io.netty.channel.ChannelFuture;
import io.netty.channel.ChannelInitializer;
import io.netty.channel.ChannelOption;
import io.netty.channel.EventLoopGroup;
import io.netty.channel.nio.NioEventLoopGroup;
import io.netty.channel.socket.SocketChannel;
import io.netty.channel.socket.nio.NioSocketChannel;
import lombok.extern.slf4j.Slf4j;


/**
 * @Author: jessin
 * @Date: 19-11-25 下午10:17
 */
@Slf4j
public class NettyClient {


    private String ipAndPort;
    /**
     * worker可以共用
     */
    private EventLoopGroup worker = new NioEventLoopGroup();

    private Channel socketChannel;

    private NettyClientHandler clientHandler = new NettyClientHandler();

    public NettyClient(String ipAndPort) {
        this.ipAndPort = ipAndPort;
        connect();
    }

    public void connect() {
        log.info("建立netty连接:{}", ipAndPort);
        Bootstrap bootstrap = new Bootstrap();
        try {
            bootstrap.group(worker).channel(NioSocketChannel.class)
                    .option(ChannelOption.SO_KEEPALIVE, true)
                    .option(ChannelOption.CONNECT_TIMEOUT_MILLIS, 3000)
                    .handler(new ChannelInitializer<SocketChannel>() {
                        // TODO 注意pipeline的顺序
                        @Override
                        protected void initChannel(SocketChannel ch) throws Exception {
                            ch.pipeline()
                                    // clientHandler可以提为全局变量
                                    .addLast(new BaseEncoder())
                                    .addLast(new BaseDecoder())
                                    .addLast(clientHandler);
                        }
                    });
            // 客户端是connect
            String[] values = ipAndPort.split(":");
            // TODO 考虑超时重连,心跳断开重连,底层转换为pipeline.connect()
            ChannelFuture channelFuture = bootstrap.connect(values[0], Integer.parseInt(values[1])).sync();
            if (channelFuture.isSuccess()) {
                log.info("与服务端建立连接成功:{}", ipAndPort);
            } else {
                log.error("与服务端建立连接失败:{}", ipAndPort);
            }
            // 建立连接时保存下来,可能有需要连接多个客户端
            this.socketChannel = channelFuture.channel();
        } catch (Exception e) {
            log.error("与服务端建立连接失败:{}", ipAndPort, e);
            throw new RuntimeException("与服务端建立连接失败: " + ipAndPort, e);
        }
    }

    /**
     * 对外发送数据接口
     * @param msg
     */
    public void send(Object msg) {
        // TODO 必须用writeAndFlush才会真正发出去,同时必须序列化为字符串,才能被编码继续往下走
        String jsonStr = JSON.toJSONString(msg);
        socketChannel.writeAndFlush(jsonStr);
    }

    public void close() {
        log.info("关闭访问服务的连接:{}", ipAndPort);
        socketChannel.close();
        if (socketChannel != null && socketChannel.isActive()) {
            try {
                socketChannel.closeFuture().sync();
            } catch (InterruptedException e) {
                e.printStackTrace();
            }
        }
        worker.shutdownGracefully();
    }
}
编码器通过长度字段 + body实现,具体如下:
package com.jessin.practice.dubbo.netty;

import io.netty.buffer.ByteBuf;
import io.netty.channel.ChannelHandlerContext;
import io.netty.handler.codec.MessageToByteEncoder;
import org.slf4j.Logger;
import org.slf4j.LoggerFactory;

/**
 * todo protocol buf
 * @Author: jessin
 * @Date: 19-11-25 下午10:20
 */
public class BaseEncoder extends MessageToByteEncoder<String> {
    private Logger logger = LoggerFactory.getLogger(getClass());

    /**
     * Encode a message into a {@link ByteBuf}. This method will be called for each written message that can be handled
     * by this encoder.
     *
     * @param ctx the {@link ChannelHandlerContext} which this {@link MessageToByteEncoder} belongs to
     * @param msg the message to encode
     * @param out the {@link ByteBuf} into which the encoded message will be written
     * @throws Exception is thrown if an error occurs
     */
    @Override
    protected void encode(ChannelHandlerContext ctx, String msg, ByteBuf out) throws Exception {
        logger.info("对消息:{}进行编码", msg);
        byte[] wordBytes = msg.getBytes("utf-8");
        out.writeInt(wordBytes.length);
        out.writeBytes(wordBytes);
    }
}
对应解码器:
package com.jessin.practice.dubbo.netty;


/**
 * 发送的字节数 + 字节信息
 * 按照这个格式进行装包和拆包,主要是会产生粘包的现象
 * 也就是发送方按照abc, def, 发送
 * 接收方收到的可能是a,bc,de,f,面向的是字节流,需要拆包解出命令
 *
 * @author jessin
 * @create 19-11-25 下午10:20
 **/
import io.netty.buffer.ByteBuf;
import io.netty.channel.ChannelHandlerContext;
import io.netty.handler.codec.ByteToMessageDecoder;
import org.slf4j.Logger;
import org.slf4j.LoggerFactory;

import java.util.List;

public class BaseDecoder extends ByteToMessageDecoder {
    private Logger logger = LoggerFactory.getLogger(getClass());
    private int totalBytes = -1;

    /**
     * Decode the from one {@link ByteBuf} to an other. This method will be called till either the input
     * {@link ByteBuf} has nothing to read when return from this method or till nothing was read from the input
     * {@link ByteBuf}.
     *
     * @param ctx the {@link ChannelHandlerContext} which this {@link ByteToMessageDecoder} belongs to
     * @param in  the {@link ByteBuf} from which to read data
     * @param out the {@link List} to which decoded messages should be added
     * @throws Exception is thrown if an error occurs
     */
    @Override
    protected void decode(ChannelHandlerContext ctx, ByteBuf in, List<Object> out) throws Exception {
        int readableBytes = in.readableBytes();
        if (totalBytes == -1 && readableBytes >= 4) {
            totalBytes = in.readInt();
        }
        int secondReadableBytes = in.readableBytes();
        if (totalBytes > 0 && secondReadableBytes >= totalBytes) {
            byte[] realData = new byte[totalBytes];
            in.readBytes(realData);
            out.add(new String(realData, "utf-8"));
            totalBytes = -1;
        }
        logger.info("读取字节个数:{},剩余字节个数:{}", readableBytes, secondReadableBytes);
    }
}
4.1.4 发起请求和接收响应
如上,发送接口通过JSON进行序列化。这里通过CountDownLatch实现客户端等待功能,当然也可以通过wait/notify实现。发送时设置自增id到请求体中,并保存到consumer本地map中,然后会调用CountDownLatch.await,并设置等待时间,进行阻塞等待结果。在收到netty 响应时,也就是netty channelRead有数据时,唤醒等待的调用线程。在channelRead中根据响应的请求id,由netty线程设置上响应结果,调用countDownLatch.countDown进行唤醒。
package com.jessin.practice.dubbo.netty;

import com.alibaba.fastjson.JSON;
import com.jessin.practice.dubbo.transport.DefaultFuture;
import com.jessin.practice.dubbo.transport.Response;
import io.netty.channel.ChannelDuplexHandler;
import io.netty.channel.ChannelHandlerContext;
import io.netty.channel.ChannelPromise;
import lombok.extern.slf4j.Slf4j;

/**
 * @Author: jessin
 * @Date: 19-11-25 下午10:25
 */
@Slf4j
public class NettyClientHandler extends ChannelDuplexHandler {
    @Override
    public void channelActive(ChannelHandlerContext ctx) throws Exception {
        log.info("客户端和服务端建立连接成功");
        //ctx.writeAndFlush("{\"id\":1,\"rpcInvocation\":{\"interfaceName\":\"com.jessin.practice.dubbo.service.UserService\",\"methodName\":\"getUser\",\"parameterType\":[],\"version\":\"1.0.0\"}}");
    }

    /**
     * 对响应进行处理
     * @param ctx
     * @param msg
     * @throws Exception
     */
    @Override
    public void channelRead(ChannelHandlerContext ctx, Object msg) throws Exception {
        log.info("收到服务端消息:" + msg);
        // result字段为JSONObject
        Response response = JSON.parseObject((String)msg, Response.class);
        // todo 返回list/map,带复杂key/value的是否有问题
        DefaultFuture.setResponse(response);
    }

    /**
     * TODO 发送消息前进行拦截,oubound,只有channel.writeAndFlush()才能起作用,active里直接用ctx不起作用
     * @param ctx
     * @param msg
     * @param promise
     * @throws Exception
     */
    @Override
    public void write(ChannelHandlerContext ctx, Object msg, ChannelPromise promise) throws Exception {
        log.info("收到写消息:" + msg);
        // 必须的!保证继续往下走,发送出去,其实就是ctx.write(msg, promise)
        super.write(ctx, msg, promise);
        // TODO promise模式,依赖地狱,以及Future回调模式(guava、java8)
        promise.addListener(future -> {
            // 监听发送回调,看是否发送成功
            if (future.isSuccess()) {
                log.info("发送写消息:{},成功", msg);
            } else {
                log.info("发送消息失败:{}", msg);
            }
        });
    }
}
4.2 服务实例曝光到注册中心
4.2.1 在BeanDefinitionRegistryPostProcessor中处理@Service注解
服务端使用@Service注解:
package com.jessin.practice.dubbo.processor;

import java.lang.annotation.Documented;
import java.lang.annotation.ElementType;
import java.lang.annotation.Retention;
import java.lang.annotation.RetentionPolicy;
import java.lang.annotation.Target;

/**
 * @Author: jessin
 * @Date: 19-11-27 下午9:11
 */
@Target({ ElementType.TYPE, ElementType.CONSTRUCTOR, ElementType.METHOD, ElementType.PARAMETER, ElementType.FIELD, ElementType.ANNOTATION_TYPE})
// 必须写为runtime,否则获取不到
@Retention(RetentionPolicy.RUNTIME)
@Documented
public @interface Service {
    String group() default "";

    String version() default "1.0.0";

    String timeout() default "3000";
}
需要扫描标记有@Service的类,然后注册到spring 容器,涉及到注册BeanDefinition的,一般用到的扩展点是BeanDefinitionRegistryPostProcessor#postProcessBeanDefinitionRegistry。这里为什么要自定义一个@Service注解,而不复用spring原有的@Service注解?是因为我们还要基于标记有@Service的这个bean做一些处理操作,包括对该bean曝光到本地,开启网络监听,注册到zk,这些动作需要封装到“另外一个bean”来完成,我们需要注入“另外一个bean”这个Definition,这里也就是ServiceBean,下文讲解。
package com.jessin.practice.dubbo.processor;

import com.jessin.practice.dubbo.config.InterfaceConfig;
import com.jessin.practice.dubbo.config.MiniDubboProperties;
import java.util.Set;
import org.springframework.beans.BeansException;
import org.springframework.beans.factory.BeanClassLoaderAware;
import org.springframework.beans.factory.config.BeanDefinition;
import org.springframework.beans.factory.config.ConfigurableListableBeanFactory;
import org.springframework.beans.factory.config.RuntimeBeanReference;
import org.springframework.beans.factory.support.BeanDefinitionRegistry;
import org.springframework.beans.factory.support.BeanDefinitionRegistryPostProcessor;
import org.springframework.beans.factory.support.RootBeanDefinition;
import org.springframework.context.annotation.AnnotationBeanNameGenerator;
import org.springframework.context.annotation.ClassPathBeanDefinitionScanner;
import org.springframework.core.annotation.AnnotationUtils;
import org.springframework.core.type.filter.AnnotationTypeFilter;
import org.springframework.util.ClassUtils;

/**
 * @Author: jessin
 * @Date: 19-11-27 下午9:24
 */
public class ServiceBeanPostProcessor implements BeanDefinitionRegistryPostProcessor, BeanClassLoaderAware {

    private AnnotationBeanNameGenerator annotationBeanNameGenerator = new AnnotationBeanNameGenerator();

    private MiniDubboProperties miniDubboProperties;

    private ClassLoader classLoader;

    public ServiceBeanPostProcessor(MiniDubboProperties miniDubboProperties) {
        this.miniDubboProperties = miniDubboProperties;
    }

    @Override
    public void postProcessBeanDefinitionRegistry(BeanDefinitionRegistry registry) throws BeansException {
        ClassPathBeanDefinitionScanner classPathBeanDefinitionScanner = new ClassPathBeanDefinitionScanner(registry, false);
        classPathBeanDefinitionScanner.addIncludeFilter(new AnnotationTypeFilter(Service.class));
        // 将该包下的@Service注解全部扫描为bean
        Set<BeanDefinition> beanDefinitionSet
                = classPathBeanDefinitionScanner.findCandidateComponents(miniDubboProperties.getPackagePath());
        for (BeanDefinition beanDefinition : beanDefinitionSet) {
            String beanName = annotationBeanNameGenerator.generateBeanName(beanDefinition, registry);
            registry.registerBeanDefinition(beanName, beanDefinition);
            BeanDefinition wrapper = new RootBeanDefinition(ServiceBean.class);
            wrapper.getPropertyValues().addPropertyValue("ref", new RuntimeBeanReference(beanName));
            wrapper.getPropertyValues().addPropertyValue("miniDubboProperties", miniDubboProperties);
            Class beanClass = ClassUtils.resolveClassName(beanDefinition.getBeanClassName(), classLoader);
            Service service = AnnotationUtils.findAnnotation(beanClass, Service.class);
            wrapper.getPropertyValues().addPropertyValue("interfaceConfig", transform(service));
            registry.registerBeanDefinition("dubbo_" + beanName, wrapper);
        }
    }


    @Override
    public void postProcessBeanFactory(ConfigurableListableBeanFactory beanFactory) throws BeansException {

    }

    private InterfaceConfig transform(Service ref) {
        InterfaceConfig interfaceConfig = new InterfaceConfig();
        interfaceConfig.setGroup(ref.group());
        interfaceConfig.setVersion(ref.version());
        interfaceConfig.setTimeout(ref.timeout());
        return interfaceConfig;
    }

    @Override
    public void setBeanClassLoader(ClassLoader classLoader) {
        this.classLoader = classLoader;
    }
}
4.2.2 解析注解参数,注册服务到zookeeper
如上,我们在ServiceBean中,依赖标记有@Service的bean,同时将其曝光到本地,开启netty端口监听,注册到zk,具体如下,见afterPropertiesSet方法:
package com.jessin.practice.dubbo.processor;

import com.jessin.practice.dubbo.config.InterfaceConfig;
import com.jessin.practice.dubbo.config.MiniDubboProperties;
import com.jessin.practice.dubbo.exporter.DubboExporter;
import com.jessin.practice.dubbo.netty.NettyManager;
import com.jessin.practice.dubbo.netty.NettyServer;
import com.jessin.practice.dubbo.registry.CuratorZookeeperClient;
import com.jessin.practice.dubbo.registry.RegistryManager;
import com.jessin.practice.dubbo.utils.NetUtils;
import lombok.extern.slf4j.Slf4j;
import org.springframework.beans.factory.DisposableBean;
import org.springframework.beans.factory.InitializingBean;

/**
 * @Author: jessin
 * @Date: 19-11-27 下午10:31
 */
@Slf4j
public class ServiceBean implements InitializingBean, DisposableBean {

    private NettyServer nettyServer;
    /**
     * zk地址
     */
    private CuratorZookeeperClient curatorZookeeperClient;

    private Object ref;

    private MiniDubboProperties miniDubboProperties;

    private InterfaceConfig interfaceConfig;

    public MiniDubboProperties getMiniDubboProperties() {
        return miniDubboProperties;
    }

    public void setMiniDubboProperties(MiniDubboProperties miniDubboProperties) {
        this.miniDubboProperties = miniDubboProperties;
    }

    public InterfaceConfig getInterfaceConfig() {
        return interfaceConfig;
    }

    public void setInterfaceConfig(InterfaceConfig interfaceConfig) {
        this.interfaceConfig = interfaceConfig;
    }

    public Object getRef() {
        return ref;
    }

    public void setRef(Object ref) {
        this.ref = ref;
    }

    @Override
    public void afterPropertiesSet() throws Exception {
        Class[] interfaces = ref.getClass().getInterfaces();
        if (interfaces.length <= 0) {
            throw new IllegalStateException(ref.getClass().getName() + "未实现接口");
        }
        // todo 目前只能实现一个接口
        String clazzName = interfaces[0].getName();
        log.info("曝光key:{},ref:{}", clazzName, ref);
        // 暴露服务 todo 版本
        DubboExporter.exportService(clazzName, ref);
        // 先开启,再注册
        // 判断协议
        if ("dubbo".equals(miniDubboProperties.getProtocol())) {
            // 开启netty server
            nettyServer = NettyManager.getNettyServer(miniDubboProperties.getPort());
        } else {
            throw new RuntimeException("unknown communicate protocol:" + miniDubboProperties.getProtocol());
        }
        // 判断什么类型的注册中心
        curatorZookeeperClient = RegistryManager.getCuratorZookeeperClient(miniDubboProperties.getRegistry());
        String providerPath = "/miniDubbo/" + interfaceConfig.getGroup() + "/" + clazzName + "/providers" + "/" + NetUtils.getServerIp() + ":" + miniDubboProperties.getPort();

        // 注册zk,提炼register方法
        curatorZookeeperClient.create(providerPath, true);
    }

    @Override
    public void destroy() throws Exception {
        curatorZookeeperClient.doClose();
        nettyServer.close();
    }
}
4.2.3 开启netty server,接收请求
在接受到consumer请求后,解码,然后根据类名、方法名,找到对应的曝光服务,进行反射调用,将方法返回结果和请求id原样写出去,返回给客户端。具体如下:
package com.jessin.practice.dubbo.netty;

import com.alibaba.fastjson.JSON;
import com.alibaba.fastjson.JSONObject;
import com.jessin.practice.dubbo.exception.DubboException;
import com.jessin.practice.dubbo.exporter.DubboExporter;
import com.jessin.practice.dubbo.invoker.RpcInvocation;
import com.jessin.practice.dubbo.transport.Request;
import com.jessin.practice.dubbo.transport.Response;
import com.jessin.practice.dubbo.utils.ArgDeserializerUtils;
import io.netty.bootstrap.ServerBootstrap;
import io.netty.channel.ChannelDuplexHandler;
import io.netty.channel.ChannelFuture;
import io.netty.channel.ChannelHandler;
import io.netty.channel.ChannelHandlerContext;
import io.netty.channel.ChannelInitializer;
import io.netty.channel.ChannelOption;
import io.netty.channel.ChannelPromise;
import io.netty.channel.EventLoopGroup;
import io.netty.channel.nio.NioEventLoopGroup;
import io.netty.channel.socket.SocketChannel;
import io.netty.channel.socket.nio.NioServerSocketChannel;
import java.lang.reflect.Method;
import lombok.extern.slf4j.Slf4j;

/**
 * @Author: jessin
 * @Date: 19-11-27 下午7:40
 */
@Slf4j
public class NettyServer {
    // todo 底层会启动2*cpu个数的NioEventLoop,轮询注册到对应的NioEventLoop运行
    private EventLoopGroup boss = new NioEventLoopGroup();
    private EventLoopGroup worker = new NioEventLoopGroup();
    // 全局复用,是否需要考虑可共享?
    private ServerHandler serverHandler = new ServerHandler();
    private int port;

    public NettyServer(int port) {
        ServerBootstrap serverBootstrap = new ServerBootstrap();
        // boss线程池用于accept到达的请求,worker线程池对到达的请求进行读写
        // child表示对到达的请求起作用,没有child表示对ServerSocketChannel起作用
        // 服务端用NioServerSocketChannel
        ChannelFuture channelFuture;
        this.port = port;
        try {
            serverBootstrap.group(boss, worker)
                    .channel(NioServerSocketChannel.class)
                    .childOption(ChannelOption.SO_KEEPALIVE, true)
                    // todo option最终设置到jdk sever channel上
                    .option(ChannelOption.SO_BACKLOG, 1024)
                    .childHandler(new ChannelInitializer<SocketChannel>() {
                        @Override
                        protected void initChannel(SocketChannel ch) throws Exception {
                            // 对到达的请求进行读写操作,责任链模式,ChannelPipeline
                            ch.pipeline()
                                    .addLast(new BaseDecoder())
                                    .addLast(new BaseEncoder())
                                    .addLast(serverHandler);
                        }
                    });
            // todo bind时,会新建NioServerSocketChannel,并注册到NioEventLoop.selector中
            // todo 底层转换为pipeline.bind(),最终调用serverSocketChannel.bind(socketAddress, 128);
            channelFuture = serverBootstrap.bind(port);
            // 下面会阻塞
            channelFuture.sync();
            log.info("服务器绑定端口:{}成功", port);
            // TODO 关闭时调用,客户端也得关闭
            // channelFuture.channel().closeFuture().sync();
        } catch (Exception e) {
            throw new RuntimeException("bind port error:" + port, e);
        }
    }

    /**
     * 允许注册到多个客户端SocketChannel中
     */
    @ChannelHandler.Sharable
    class ServerHandler extends ChannelDuplexHandler {
        @Override
        public void channelActive(ChannelHandlerContext ctx) throws Exception {
            log.info("客户端:{}和服务端建立连接成功", ctx.channel().remoteAddress());
        }

        @Override
        public void channelRead(ChannelHandlerContext ctx, Object msg) throws Exception {
            // 这里是String类型,已经解码了
            Request request = JSONObject.parseObject((String)msg, Request.class);
            log.info("收到请求消息:{}", msg);
            RpcInvocation rpcInvocation = request.getRpcInvocation();
            Object obj = DubboExporter.getService(rpcInvocation);
            if (obj == null) {
                throw new IllegalStateException("服务端未曝光接口:" + request);
            }
            Response response = new Response();
            response.setId(request.getId());
            try {
                log.info("开始反射调用:{}", msg);
                // todo 这里最好用线程池实现,不然会阻塞NioEventLoop
                Method method = obj.getClass().getMethod(rpcInvocation.getMethodName(), rpcInvocation.getParameterType());
                Object[] originArgs = ArgDeserializerUtils.parseArgs(method, rpcInvocation.getParameterType(), rpcInvocation.getArgs());
                log.info("入参:{}", originArgs);
                Object responseData = method.invoke(obj, originArgs);
                response.setResult(responseData);
                log.info("调用实例:{},方法:{},返回结果:{}",
                        obj, method, response);
            } catch (Exception e) {
                log.error("调用dubbo异常:{}", rpcInvocation, e);
                response.setException(true);
                response.setResult(new DubboException("服务端调用接口异常",  e));
            }
            // TODO 通过原来客户端通道发送出去
            // 这里会走编码吗?,必须写成String,或者改下Encoder
            ctx.writeAndFlush(JSON.toJSONString(response));
        }

        @Override
        public void channelInactive(ChannelHandlerContext ctx) throws Exception {
            log.info("收到客户端退出的消息");
            ctx.close();
        }

        @Override
        public void exceptionCaught(ChannelHandlerContext ctx, Throwable cause) throws Exception {
            log.error("IO出错了...", cause);
        }

        @Override
        public void write(ChannelHandlerContext ctx, Object msg, ChannelPromise promise) throws Exception {
            log.info("发起写请求:{}", msg);
            // TODO 写的一般都有这个?
            super.write(ctx, msg, promise);
        }
    }

    /**
     * dubbo shutdown hook
     */
    public void close() {
        // TODO 这里是否有问题??
        log.info("关闭端口:{}", port);
        boss.shutdownGracefully();
        worker.shutdownGracefully();
    }
}
4.3 自动化配置实现
这里根据yaml中配置的开关,自动开启consumer/provider配置,需要注意的是,由于注入的@Service处理器是容器级别的后处理器,需要使用静态方法进行注入,避免过早初始化自动配置类,而且不能@autowirte 自动化属性,需要通过方法获取Environment,因为这个时候自动化属性类还没有对应的后处理器对其进行处理,拿到的属性是空的,需要自己做bind。
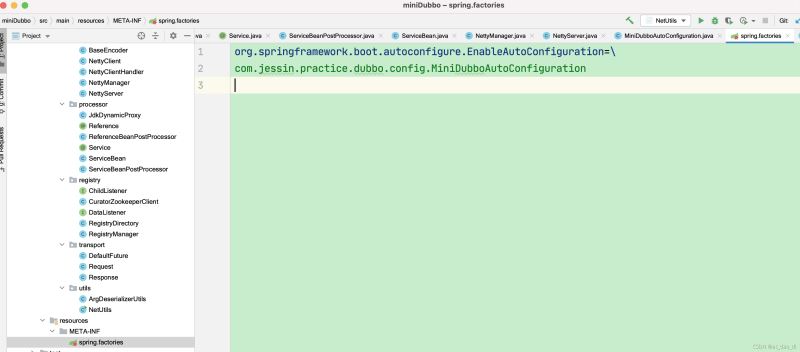
最后在Resource目录下,META-INF/spring.factories下,配置自动启动即可:
package com.jessin.practice.dubbo.config;

import com.jessin.practice.dubbo.processor.ReferenceBeanPostProcessor;
import com.jessin.practice.dubbo.processor.Service;
import com.jessin.practice.dubbo.processor.ServiceBeanPostProcessor;
import lombok.extern.slf4j.Slf4j;
import org.springframework.boot.autoconfigure.condition.AnyNestedCondition;
import org.springframework.boot.autoconfigure.condition.ConditionalOnClass;
import org.springframework.boot.autoconfigure.condition.ConditionalOnMissingBean;
import org.springframework.boot.autoconfigure.condition.ConditionalOnProperty;
import org.springframework.boot.context.properties.EnableConfigurationProperties;
import org.springframework.boot.context.properties.bind.Bindable;
import org.springframework.boot.context.properties.bind.Binder;
import org.springframework.context.annotation.Bean;
import org.springframework.context.annotation.Conditional;
import org.springframework.context.annotation.Configuration;
import org.springframework.core.env.Environment;

/**
 * todo 自己调用自己,以及url支持,资源销毁
 * @Author: jessin
 * @Date: 2021/10/26 9:27 PM
 */
@Configuration
@ConditionalOnClass(Service.class)
@EnableConfigurationProperties(MiniDubboProperties.class)
@Slf4j
public class MiniDubboAutoConfiguration {

    static {
        FastJsonConfig.config();
    }
    /**
     * 由于BeanFactoryPostProcessor是提前获取的,这个时候CommonAnnotationBeanPostProcessor还没注册到beanFactory中,
     * serviceBeanPostProcessor注入的属性为空
     */
//    @Autowired
//    private MiniDubboProperties miniDubboProperties;

//    public MiniDubboAutoConfiguration() {
//        log.info("init MiniDubboAutoConfiguration");
//    }

    /**
     *  由于这个Bean是BeanFactoryPostProcessor,提前获取时,
     *  ConfigurationProperties的ConfigurationPropertiesBindingPostProcessor还没注入到beanFactory中,
     *  所以MiniDubboProperties属性没法注入
     *  这里通过environment构造
     * @param environment
     * @return
     */
    @Bean
    @Conditional(ServerCondition.class)
    @ConditionalOnMissingBean
    public static ServiceBeanPostProcessor serviceBeanPostProcessor(Environment environment) {
        MiniDubboProperties miniDubboProperties = getMiniDubboProperties(environment);
        return new ServiceBeanPostProcessor(miniDubboProperties);
    }
    static class ServerCondition extends AnyNestedCondition {

        ServerCondition() {
            super(ConfigurationPhase.REGISTER_BEAN);
        }

        @ConditionalOnProperty(prefix = MiniDubboProperties.PREFIX, name = "type", havingValue = "both")
        static class HostProperty {

        }

        @ConditionalOnProperty(prefix = MiniDubboProperties.PREFIX, name = "type", havingValue = "server")
        static class JndiNameProperty {

        }

    }

    /**
     * 使用静态方法,防止造成自动化配置实例提前初始化,没有进行增强
     * @param environment
     * @return
     */
    @Bean
    @Conditional(ClientCondition.class)
    @ConditionalOnMissingBean
    public static ReferenceBeanPostProcessor referenceBeanPostProcessor(Environment environment) {
        MiniDubboProperties miniDubboProperties = getMiniDubboProperties(environment);
        return new ReferenceBeanPostProcessor(miniDubboProperties);
    }

    static class ClientCondition extends AnyNestedCondition {

        ClientCondition() {
            super(ConfigurationPhase.REGISTER_BEAN);
        }

        @ConditionalOnProperty(prefix = MiniDubboProperties.PREFIX, name = "type", havingValue = "both")
        static class HostProperty {

        }

        @ConditionalOnProperty(prefix = MiniDubboProperties.PREFIX, name = "type", havingValue = "client")
        static class JndiNameProperty {

        }

    }


    private static MiniDubboProperties getMiniDubboProperties(Environment environment) {
        MiniDubboProperties miniDubboProperties = Binder.get(environment) //首先要绑定配置器
                //再将属性绑定到对象上
                .bind(MiniDubboProperties.PREFIX, Bindable.of(MiniDubboProperties.class) ).get(); //再获取实例
        return miniDubboProperties;
    }


}
五、测试
5.1 编写api
这里设置了5个接口,覆盖了较多的场景,具体见:github
package com.jessin.practice.dubbo.service;

import com.jessin.practice.dubbo.model.User;
import com.jessin.practice.dubbo.model.UserParam;
import java.util.ArrayList;
import java.util.HashMap;
import java.util.List;
import java.util.Map;

/**
 * @Author: jessin
 * @Date: 19-11-24 上午11:23
 */
public interface UserService {
    User getUser();

    User getUser(UserParam userParam);

    User getUser(int age);

    User getUser(UserParam userParam,
            int type,
            String note,
            int[] ages,
            List<Integer> list);

    User getUser(List<UserParam> list,
            ArrayList<UserParam> list2,
            Map<String, UserParam> userParamMap,
            HashMap<String, UserParam> userParamMap2);

    User getUser(List list, Map userParamMap);
}
5.2 实现api,标记@Service
在miniDubboDemo中实现api,该工程基于spring boot实现。见miniDubboDemo
package com.example.demo.service;

import com.jessin.practice.dubbo.model.User;
import com.jessin.practice.dubbo.model.UserParam;
import com.jessin.practice.dubbo.processor.Service;
import com.jessin.practice.dubbo.service.UserService;
import java.util.ArrayList;
import java.util.HashMap;
import java.util.List;
import java.util.Map;

/**
 * @Author: jessin
 * @Date: 19-11-27 下午11:33
 */
@Service(group="myGroup")
public class UserServiceImpl implements UserService {
    @Override
    public User getUser() {
        User user = new User();
        user.setId(1L);
        user.setName("小明");
        user.setAge(10);
        user.setNote("测试无参miniDubbo");
        return user;
    }

    @Override
    public User getUser(UserParam userParam) {
        User user = new User();
        user.setId(2L);
        user.setName("小红");
        user.setAge(11);
        user.setNote("测试带参数UserParam");
        return user;
    }

    @Override
    public User getUser(int age) {
        User user = new User();
        user.setId(2L);
        user.setName("小红");
        user.setAge(11);
        user.setNote("测试带参数int");
        return user;

    }

    @Override
    public User getUser(UserParam userParam, int type, String note, int[] ages, List<Integer> list) {
        User user = new User();
        user.setId(2L);
        user.setName("小红");
        user.setAge(11);
        user.setNote("测试带多个参数");
        return user;
    }

    @Override
    public User getUser(List<UserParam> list, ArrayList<UserParam> arrayList, Map<String, UserParam> map,
            HashMap<String, UserParam> hashMap) {
        User user = new User();
        user.setId(2L);
        user.setName("小红");
        user.setAge(11);
        user.setNote("测试带list/map泛型参数");
        return user;
    }

    @Override
    public User getUser(List list, Map userParamMap) {
        User user = new User();
        user.setId(2L);
        user.setName("小红");
        user.setAge(11);
        user.setNote("测试带list/map无参");
        return user;

    }
}
5.3 编写controller接口,使用@Reference注入api依赖
也是在demo工程中,这里demo工程既作为provider,也作为consumer。
package com.example.demo.controller;

import com.google.common.collect.Lists;
import com.google.common.collect.Maps;
import com.jessin.practice.dubbo.model.User;
import com.jessin.practice.dubbo.model.UserParam;
import com.jessin.practice.dubbo.processor.Reference;
import com.jessin.practice.dubbo.service.UserService;
import java.util.HashMap;
import java.util.Map;
import org.slf4j.Logger;
import org.slf4j.LoggerFactory;
import org.springframework.web.bind.annotation.RequestMapping;
import org.springframework.web.bind.annotation.RequestParam;
import org.springframework.web.bind.annotation.RestController;

/**
 * TODO 泛化调用
 *
 * @Author: jessin
 * @Date: 19-8-3 下午4:25
 */
@RestController
public class HelloController {

    private Logger log = LoggerFactory.getLogger(getClass());

    @Reference(group = "myGroup")
    private UserService userService;

    /**
     * http://localhost:9999/practice/helloParam
     *
     * @return
     */
    @RequestMapping("/hello")
    public User hello(UserParam userParam, @RequestParam int type) {
        log.info("test miniDubbo param");
        if (type == 1) {
            return userService.getUser();
        } else if (type == 2) {
            return userService.getUser(userParam);
        } else if (type == 3) {
            return userService.getUser(3);
        } else if (type == 4) {
            return userService.getUser(userParam, 3, "hello", new int[]{1, 2, 3}, Lists.newArrayList(3, 5, 7));
        } else if (type == 5) {
            UserParam user2 = new UserParam();
            user2.setId(1132);
            user2.setName("hello");
            UserParam user3 = new UserParam();
            user3.setId(353);
            user3.setName("world");

            Map<String, UserParam> map = Maps.newHashMap();
            map.put("key1", user2);
            HashMap<String, UserParam> hashMap = Maps.newHashMap();
            hashMap.put("key2", user3);
            return userService.getUser(Lists.newArrayList(user2, user3),
                    Lists.newArrayList(userParam), map, hashMap);
        } else {
            UserParam user2 = new UserParam();
            user2.setId(1132);
            user2.setName("hello");
            UserParam user3 = new UserParam();
            user3.setId(353);
            user3.setName("world");
            Map<String, UserParam> map = Maps.newHashMap();
            map.put("key1", user2);
            HashMap<String, UserParam> hashMap = Maps.newHashMap();
            hashMap.put("key2", user3);
            return userService.getUser(Lists.newArrayList(userParam, user2, user3), map);
        }
    }
}
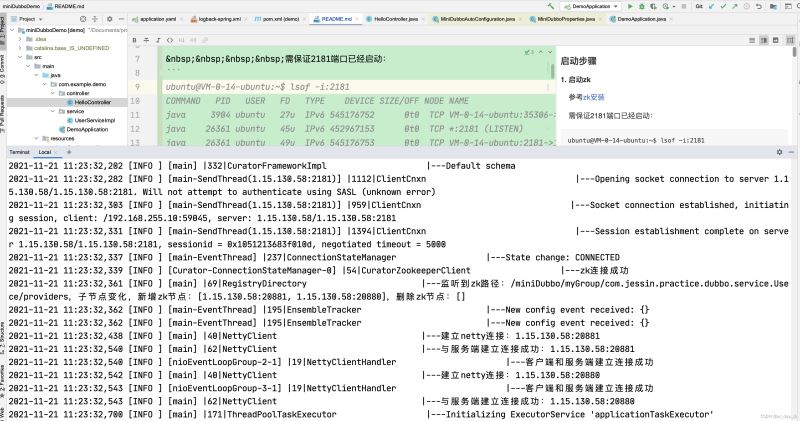
5.4 启动步骤
5.4.1 启动zk
博主的zk部署到云主机上,需保证2181端口已经启动:
ubuntu@VM-0-14-ubuntu:~$ lsof -i:2181
COMMAND   PID   USER   FD   TYPE    DEVICE SIZE/OFF NODE NAME
java     3904 ubuntu   27u  IPv6 545176752      0t0  TCP VM-0-14-ubuntu:35306->1.15.130.58:2181 (ESTABLISHED)
java    26361 ubuntu   45u  IPv6 452967153      0t0  TCP *:2181 (LISTEN)
java    26361 ubuntu   49u  IPv6 545176753      0t0  TCP VM-0-14-ubuntu:2181->1.15.130.58:35306 (ESTABLISHED)
5.4.2 部署api和miniDubbo到本地仓库
部署api到本地仓库:api,部署miniDubbo到本地仓库:miniDubbo
mvn install
5.4.3 在demo yaml配置miniDubbo。
配置zk地址和扫描的服务端路径(只在角色为服务端生效)
mini-dubbo:
  package-path: "@Service注解所在包"
  registry: "your_zk_ip:2181"
5.4.4 编译demo为可执行jar
mvn package
5.4.5 开启两个服务端
这两个服务端都部署在云服务器上,参数说明:
server.port=9997,指定http端口
public.ip=1.15.130.58,可以指定当前注册到zk上的公网地址,如果用的是云主机的话,可以在云端部署两台服务实例,以便在本地能进行服务发现和调用。
mini-dubbo.type=server,表示角色是服务端
catalina.base=xxx,设置的是日志目录,改为你的即可。
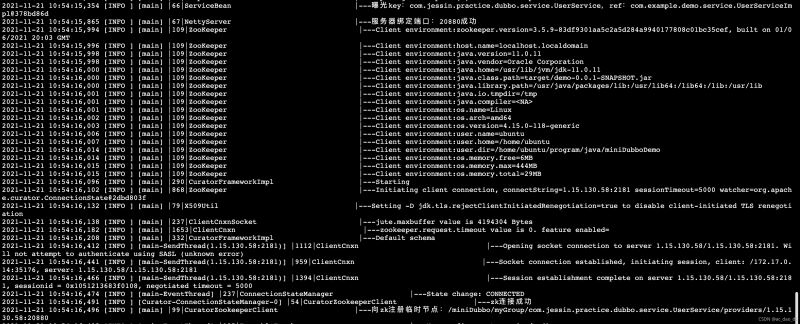
启动第一个provider实例: 默认9999 http端口,20880 miniDubbo端口
java -Dmini-dubbo.type=server -Dcatalina.base=/home/ubuntu/program/java/miniDubboDemo/tomcat1 -Dpublic.ip=1.15.130.58 -jar target/demo-0.0.1-SNAPSHOT.jar
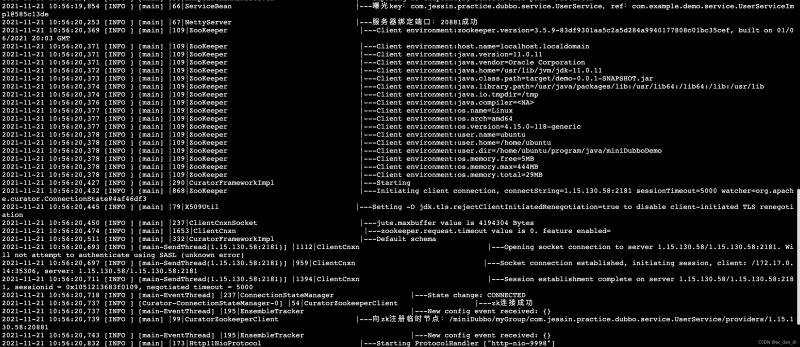
启动第二个provider实例: 默认9998 http端口,20881 miniDubbo端口
java -Dmini-dubbo.type=server -Dcatalina.base=/home/ubuntu/program/java/miniDubboDemo/tomcat2 -Dserver.port=9998 -Dmini-dubbo.port=20881 -Dpublic.ip=1.15.130.58 -jar target/demo-0.0.1-SNAPSHOT.jar
5.4.6 本地开启客户端进行调用
在本地启动客户端,并与两个provider建立连接:
java -Dmini-dubbo.type=client -Dcatalina.base=./tomcat3 -Dserver.port=9997 -jar target/demo-0.0.1-SNAPSHOT.jar```
通过客户端restapi触发miniDubbo调用,可以挂掉一台服务,两台服务,看看效果,并通过type调用不同的api方法
http://localhost:9997/practice/hello?type=2
得到结果:
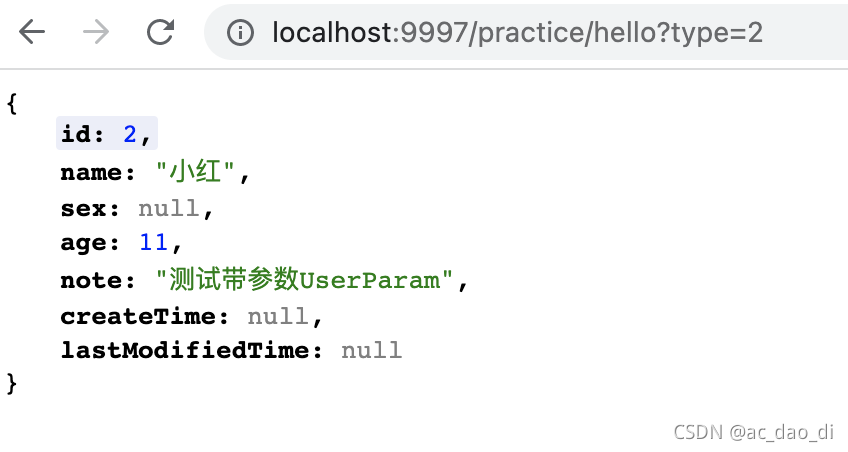
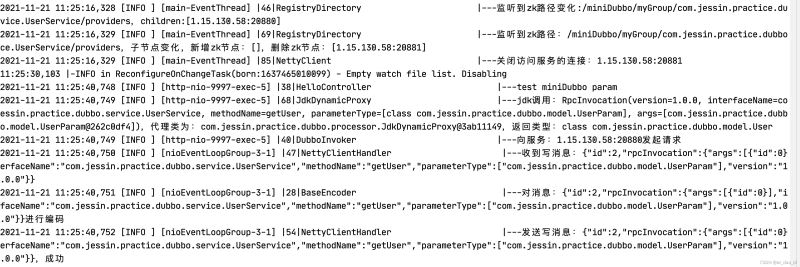
客户端发起请求,可以看到调用的是20881这个服务:
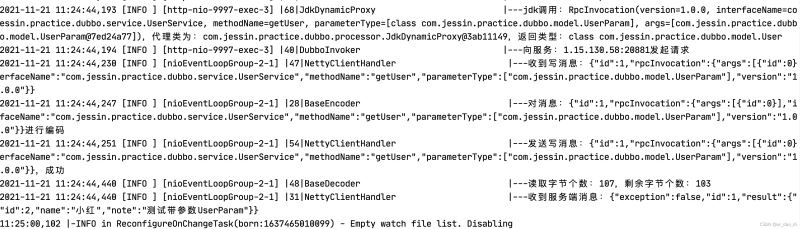
服务端返回结果:
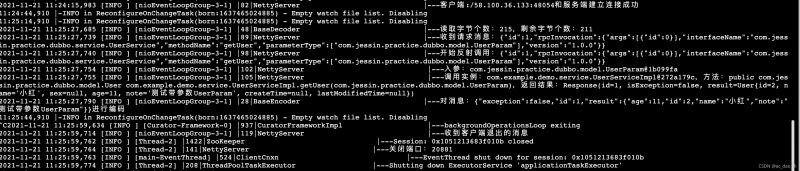
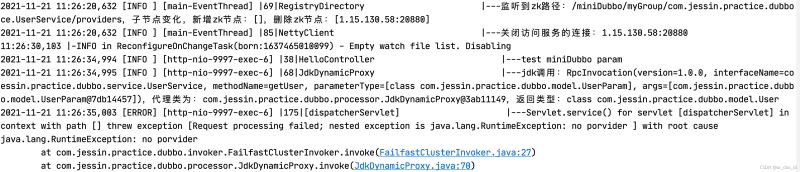
上面将20881销毁后,再次调用客户端发起请求,自动转移到20880这个服务:
将20880也销毁后,再次调用客户端发起请求,直接抛出no provider异常:
六、总结
6.1 已完成功能列表
- 基于zk服务注册和服务发现
- 基于netty + json序列化网络通信
- zk连接复用、netty client连接复用
- 与spring boot集成
6.2 TODO LIST
通用需求:
- spring容器销毁时,关闭占用的资源,如netty client/netty server
- 支持protobuf序列化
- 支持http协议通信
- netty超时重连,心跳断开重连,销毁dubbo invoker
- zk抖动导致所有服务实例下线优化
- 其他注册中心支持,如consul/redis
- Attach/tag实现
- 支持一个类多个版本实现
- zk重新连接时,需要重新注册关注的事件,恢复现场,对于服务端是重新注册;对于客户端是重新订阅
provider功能:
- 服务端优雅启动和优雅下线,防止流量过早进来,造成超时。在spring容器启动成功后,再注册到zk上。在spring容器销毁时,先从zk取消注册,最后再关闭客户端连接。
- 服务端请求用线程池实现,避免阻塞NioEventLoop
- 服务端支持曝光实现多个接口的一个类
consumer功能:
- netty client通过计数引用销毁资源
- 服务负载均衡算法:随机/轮询/加权
- 集群失败策略:failover/failsafe/failback
以上就是java实现简易版简易版dubbo的详细内容,更多关于dubbo的资料请关注自由互联其它相关文章!