创建项目 Spring+SpringMVC+MyBatis的配置文件 数据库内容 dao层+service层+controller层 映射文件 前端简单页面 配置tomcat,运行显示 总体项目架构 补充 SSM整合Thymeleaf 目前很多后端技术栈采用S
- 创建项目
- Spring+SpringMVC+MyBatis的配置文件
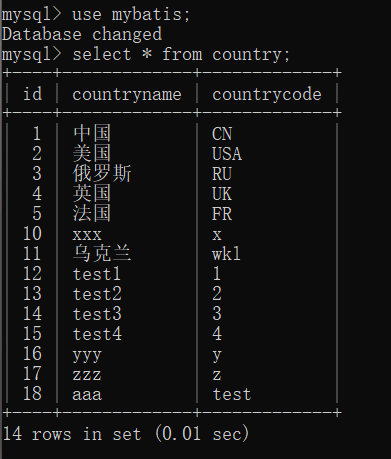
- 数据库内容
- dao层+service层+controller层
- 映射文件
- 前端简单页面
- 配置tomcat,运行显示
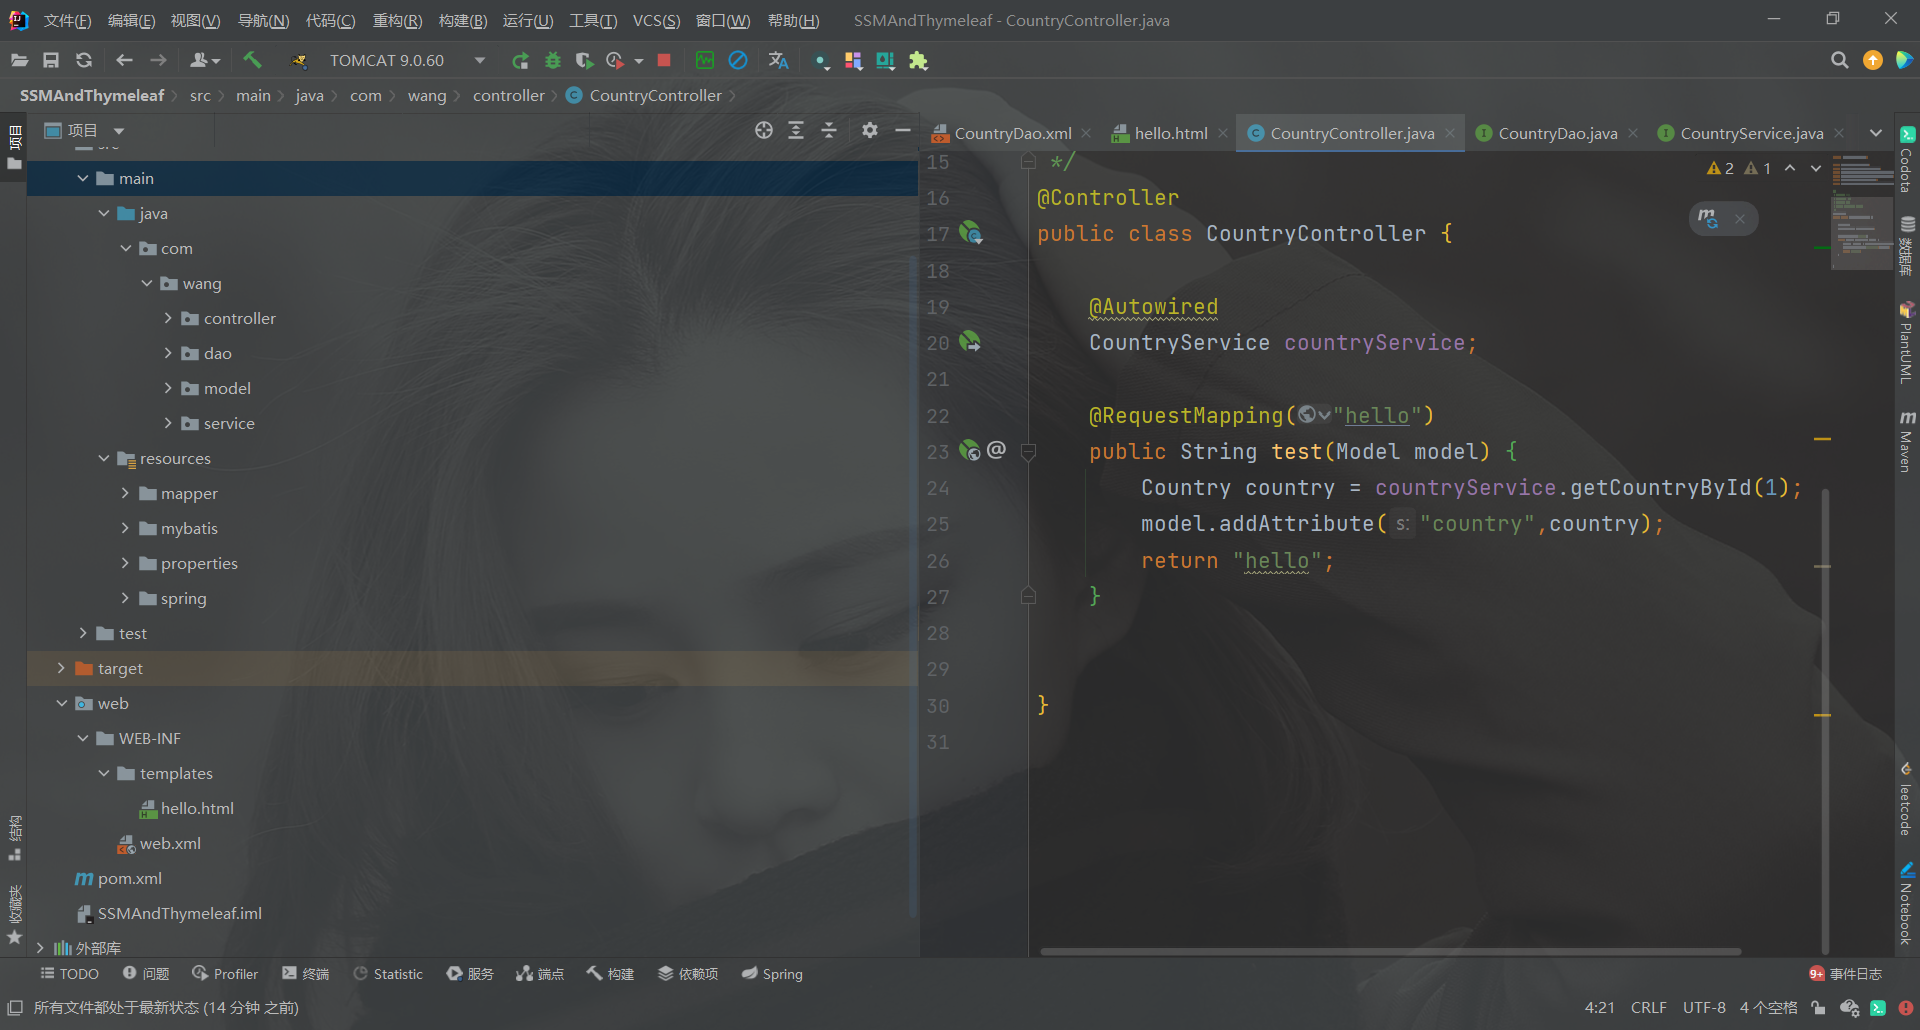
- 总体项目架构
- 补充
创建项目目前很多后端技术栈采用Spring+SpringMVC+MyBatis的项目,其模板引擎大多使用JSP。基于现在前后端分离趋势,我们使用Thymeleaf这个模板引擎和SSM框架配合。但是Thymeleaf不算是真正意义上的前后端分离。
创建一个maven项目,在例子中,我们创建一个名为SSMAndThymeleaf的项目。
引入全部依赖
<?xml version="1.0" encoding="UTF-8"?>
<project xmlns="http://maven.apache.org/POM/4.0.0"
         xmlns:xsi="http://www.w3.org/2001/XMLSchema-instance"
         xsi:schemaLocation="http://maven.apache.org/POM/4.0.0 http://maven.apache.org/xsd/maven-4.0.0.xsd">
    <modelVersion>4.0.0</modelVersion>
    <groupId>com.wang</groupId>
    <artifactId>SSMAndThymeleaf</artifactId>
    <version>1.0-SNAPSHOT</version>
    <properties>
        <maven.compiler.source>8</maven.compiler.source>
        <maven.compiler.target>8</maven.compiler.target>
    </properties>
    <dependencies>
        <!--导入spring,下面几个为spring和springmvc需要的依赖-->
        <dependency>
            <groupId>org.springframework</groupId>
            <artifactId>spring-context</artifactId>
            <version>5.1.9.RELEASE</version>
        </dependency>
        <dependency>
            <groupId>org.springframework</groupId>
            <artifactId>spring-jdbc</artifactId>
            <version>5.1.9.RELEASE</version>
        </dependency>
        <dependency>
            <groupId>org.springframework</groupId>
            <artifactId>spring-aop</artifactId>
            <version>5.1.9.RELEASE</version>
        </dependency>
        <dependency>
            <groupId>org.springframework</groupId>
            <artifactId>spring-core</artifactId>
            <version>5.1.9.RELEASE</version>
        </dependency>
        <dependency>
            <groupId>org.springframework</groupId>
            <artifactId>spring-tx</artifactId>
            <version>5.1.9.RELEASE</version>
        </dependency>
        <dependency>
            <groupId>org.aspectj</groupId>
            <artifactId>aspectjweaver</artifactId>
            <version>1.9.4</version>
        </dependency>
        <dependency>
            <groupId>org.springframework</groupId>
            <artifactId>spring-beans</artifactId>
            <version>5.1.9.RELEASE</version>
        </dependency>
        <!--导入springmvc-->
        <dependency>
            <groupId>org.springframework</groupId>
            <artifactId>spring-web</artifactId>
            <version>5.1.9.RELEASE</version>
        </dependency>
        <dependency>
            <groupId>org.springframework</groupId>
            <artifactId>spring-webmvc</artifactId>
            <version>5.1.9.RELEASE</version>
        </dependency>

        <!--导入mybatis-->
        <dependency>
            <groupId>org.mybatis</groupId>
            <artifactId>mybatis-spring</artifactId>
            <version>1.3.2</version>
        </dependency>
        <dependency>
            <groupId>org.mybatis</groupId>
            <artifactId>mybatis</artifactId>
            <version>3.5.2</version>
        </dependency>
  <!--mysql数据库的依赖-->
        <dependency>
            <groupId>mysql</groupId>
            <artifactId>mysql-connector-java</artifactId>
            <version>8.0.17</version>
        </dependency>
  <!-- 例子中使用的数据库连接池是C3P0,当然,你也可以选择Druid数据库连接池-->
        <dependency>
            <groupId>com.mchange</groupId>
            <artifactId>c3p0</artifactId>
            <version>0.9.5.2</version>
        </dependency>

        <!--导入Thymeleaf模板引擎 -->
        <dependency>
            <groupId>org.thymeleaf</groupId>
            <artifactId>thymeleaf-spring5</artifactId>
            <version>3.0.9.RELEASE</version>
        </dependency>
        <!-- servlet api-->
        <dependency>
            <groupId>javax.servlet</groupId>
            <artifactId>javax.servlet-api</artifactId>
            <version>4.0.0</version>
            <scope>provided</scope>
        </dependency>
        <dependency>
            <groupId>org.thymeleaf</groupId>
            <artifactId>thymeleaf</artifactId>
            <version>3.0.11.RELEASE</version>
        </dependency>

        <!--导入jackson注解-->
        <dependency>
            <groupId>com.fasterxml.jackson.core</groupId>
            <artifactId>jackson-core</artifactId>
            <version>2.9.8</version>
        </dependency>
        <dependency>
            <groupId>com.fasterxml.jackson.core</groupId>
            <artifactId>jackson-databind</artifactId>
            <version>2.9.8</version>
        </dependency>
        <dependency>
            <groupId>com.fasterxml.jackson.core</groupId>
            <artifactId>jackson-annotations</artifactId>
            <version>2.9.8</version>
        </dependency>
    </dependencies>
</project>
为项目添加web框架支持。
Spring的配置文件
主要是扫描数据持久层和业务层,然后数据库的相关配置。
<?xml version="1.0" encoding="utf-8"?>

<beans xmlns="http://www.springframework.org/schema/beans"
       xmlns:xsi="http://www.w3.org/2001/XMLSchema-instance"
       xmlns:context="http://www.springframework.org/schema/context"
       xmlns:aop="http://www.springframework.org/schema/aop"
       xmlns:tx="http://www.springframework.org/schema/tx"
       xsi:schemaLocation="http://www.springframework.org/schema/beans
        http://www.springframework.org/schema/beans/spring-beans.xsd
        http://www.springframework.org/schema/context
        http://www.springframework.org/schema/context/spring-context.xsd
        http://www.springframework.org/schema/aop
        http://www.springframework.org/schema/aop/spring-aop.xsd
        http://www.springframework.org/schema/tx
        http://www.springframework.org/schema/tx/spring-tx.xsd">

    <!--扫描dao层-->
    <context:component-scan base-package="com.wang.dao"/>
    <context:component-scan base-package="com.wang.service"/>

    <!--加载properties文件,这里的properties文件是数据源配置需要的内容-->
    <context:property-placeholder location="classpath:properties/db.properties"/>

    <!--配置数据源-->
    <bean id="dataSource" class="com.mchange.v2.c3p0.ComboPooledDataSource">
        <property name="driverClass" value="${jdbc.driver}"/>
        <property name="jdbcUrl" value="${jdbc.url}"/>
        <property name="user" value="${jdbc.username}"/>
        <property name="password" value="${jdbc.password}"/>
        <!-- 初始连接池大小 -->
        <property name="initialPoolSize" value="10"/>
        <!-- 连接池中连接最小个数 -->
        <property name="minPoolSize" value="5"/>
        <property name="maxPoolSize" value="20"/>
    </bean>

    <!--配置SqlSession工厂对象,MyBatis配置SqlSessionFactory,Spring中将它封装成了一个Bean-->
    <bean id="sqlSessionFactory" class="org.mybatis.spring.SqlSessionFactoryBean">
        <property name="dataSource" ref="dataSource"/>
        <!--MyBatis配置文件的位置-->
        <property name="configLocation" value="classpath:mybatis/mybatis-SqlMapConfig.xml"/>
        <!--MyBatis映射文件的位置-->
        <property name="mapperLocations" value="classpath*:mapper/*Dao.xml"/>
    </bean>

    <!--加载dao的接口对象,这一配置是为了让他能通过反射创建mapper对象-->
    <bean id="mapperScannerConfigurer" class="org.mybatis.spring.mapper.MapperScannerConfigurer">
        <property name="basePackage" value="com.wang.dao"/>
        <property name="sqlSessionFactoryBeanName" value="sqlSessionFactory"/>
    </bean>
</beans>
SpringMVC的配置文件
<?xml version="1.0" encoding="UTF-8"?>
<beans xmlns="http://www.springframework.org/schema/beans"
       xmlns:mvc="http://www.springframework.org/schema/mvc"
       xmlns:xsi="http://www.w3.org/2001/XMLSchema-instance"
       xmlns:context="http://www.springframework.org/schema/context"
       xsi:schemaLocation="http://www.springframework.org/schema/beans
        https://www.springframework.org/schema/beans/spring-beans.xsd
        http://www.springframework.org/schema/mvc
        https://www.springframework.org/schema/mvc/spring-mvc.xsd http://www.springframework.org/schema/context https://www.springframework.org/schema/context/spring-context.xsd">

    <!--扫描controller层注解-->
    <context:component-scan base-package="com.wang"/>

    <!--配置模板引擎-->
    <bean id="springResourceTemplateResolver" class="org.thymeleaf.spring5.templateresolver.SpringResourceTemplateResolver">
        <property name="prefix" value="/WEB-INF/templates/"/>
        <property name="suffix" value=".html"/>
        <!--解决页面的中文乱码-->
        <property name="characterEncoding" value="UTF-8"/>
        <property name="order" value="1"/>
        <property name="templateMode" value="HTML5"/>
        <property name="cacheable" value="false"/>
    </bean>
    <bean id="springTemplateEngine" class="org.thymeleaf.spring5.SpringTemplateEngine">
        <property name="templateResolver" ref="springResourceTemplateResolver"/>
    </bean>

 <!-- 配置thymeleaf视图解析器 -->
    <bean id="thymeleafViewResolver" class="org.thymeleaf.spring5.view.ThymeleafViewResolver">
        <property name="templateEngine" ref="springTemplateEngine"/>
        <property name="characterEncoding" value="UTF-8"/>
    </bean>

 <!--开启注解驱动-->
    <mvc:annotation-driven />
</beans>
MyBatis的配置文件
其实MyBatis的配置在Spring中都已经配置完,即使我们使用事务,也是使用Spring的事务处理,所以这里只需要配置一点点东西。
<?xml version="1.0" encoding="UTF-8" ?>
<!DOCTYPE configuration
        PUBLIC "-//mybatis.org//DTD Config 3.0//EN"
        "http://mybatis.org/dtd/mybatis-3-config.dtd">
<configuration>
    <!--扫描pojo对象,起个别名-->
    <typeAliases>
        <package name="com.wang.model"/>
    </typeAliases>
</configuration>

创建一个实体类(Country)
package com.wang.model;

/**
 * @author wya
 * @version 1.0
 * @school hhu
 * @date 2022/3/21 19:10
 */
public class Country {
    private Integer id;

    private String countryName;

    private String countryCode;

    public Integer getId() {
        return id;
    }

    public void setId(Integer id) {
        this.id = id;
    }

    public String getCountryName() {
        return countryName;
    }

    public void setCountryName(String countryName) {
        this.countryName = countryName;
    }

    public String getCountryCode() {
        return countryCode;
    }

    public void setCountryCode(String countryCode) {
        this.countryCode = countryCode;
    }

}
创建dao接口
import com.wang.model.Country;
import org.apache.ibatis.annotations.Param;
import org.springframework.stereotype.Repository;

/**
 * @author wya
 * @version 1.0
 * @school hhu
 * @date 2022/3/21 19:11
 */
@Repository
public interface CountryDao {

    Country selectACountry(@Param("countryId")int id);

}
创建service接口
package com.wang.service;

import com.wang.model.Country;

/**
 * @author wya
 * @version 1.0
 * @school hhu
 * @date 2022/3/21 19:11
 */
public interface CountryService {

    Country getCountryById(int id);

}
实现service接口
package com.wang.service.impl;

import com.wang.dao.CountryDao;
import com.wang.model.Country;
import com.wang.service.CountryService;
import org.springframework.beans.factory.annotation.Autowired;
import org.springframework.stereotype.Service;

/**
 * @author wya
 * @version 1.0
 * @school hhu
 * @date 2022/3/21 19:11
 */
@Service
public class CountryServiceImpl implements CountryService {

    @Autowired
    CountryDao countryDao;

    @Override
    public Country getCountryById(int id) {
        /**
         * 这里是业务层的操作,我们这里省略
         */
        return countryDao.selectACountry(id);
    }
}
创建controller
package com.wang.controller;

import com.wang.model.Country;
import com.wang.service.CountryService;
import org.springframework.beans.factory.annotation.Autowired;
import org.springframework.stereotype.Controller;
import org.springframework.ui.Model;
import org.springframework.web.bind.annotation.RequestMapping;

/**
 * @author wya
 * @version 1.0
 * @school hhu
 * @date 2022/3/21 19:09
 */
@Controller
public class CountryController {

    @Autowired
    CountryService countryService;

    @RequestMapping("hello")
    public String test(Model model) {
        Country country = countryService.getCountryById(1);
        model.addAttribute("country",country);
        return "hello";
    }

}
<?xml version="1.0" encoding="UTF8" ?>
<!DOCTYPE mapper
        PUBLIC "-//mybatis.org//DTD Mapper 3.0//EN"
        "http://mybatis.org/dtd/mybatis-3-mapper.dtd">
<!--定义为当前的命名空间-->
<mapper namespace="com.wang.dao.CountryDao">
    <select id="selectACountry" resultType="com.wang.model.Country">
        select * from country where id = #{countryId};
    </select>

</mapper>
<!DOCTYPE html>
<html lang="en" xmlns:th="http://www.thymeleaf.org">
<head>
    <meta charset="UTF-8">
    <title>Title</title>
</head>
<body>
<center><h1>显示成功!!!</h1>
国家名字: <p th:text="${country.countryName}"></p>
国家ID:  <p th:text="${country.countryCode}"></p>
</body>
</html>
 总体项目架构

后续需要其他依赖的再加入即可,像文件的上传下载依赖等。
有问题请联系我。
