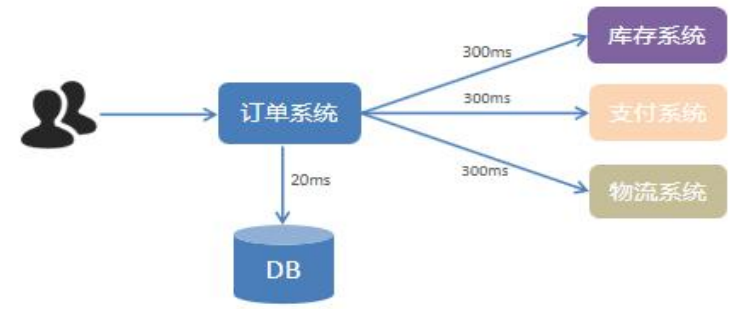
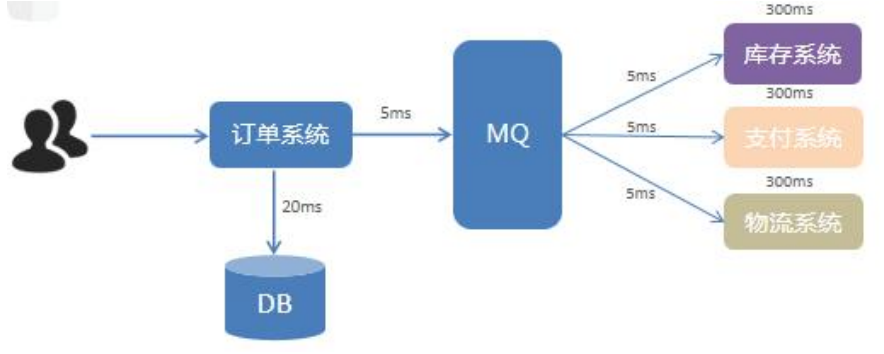
2.为什么要用 MQMQ 全称为 Message Queue,是在消息的传输过程中保存消息的容器。多用于分布式系统 之间进行通信。
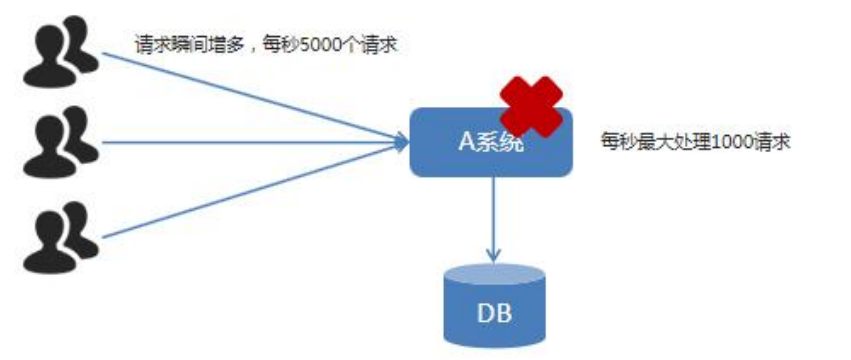
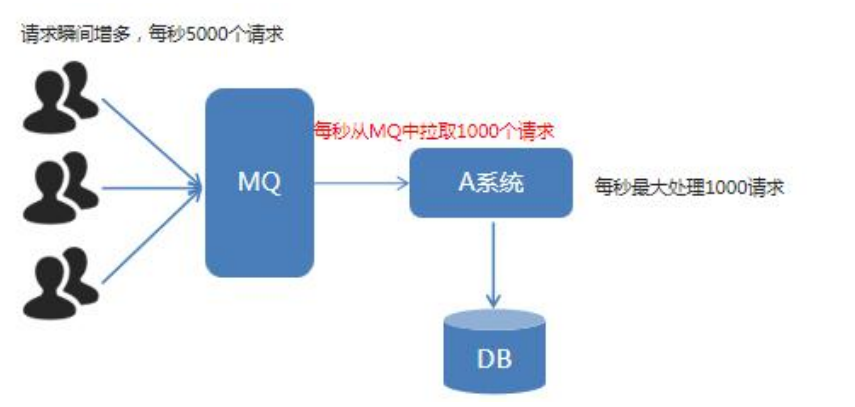
1.流量消峰
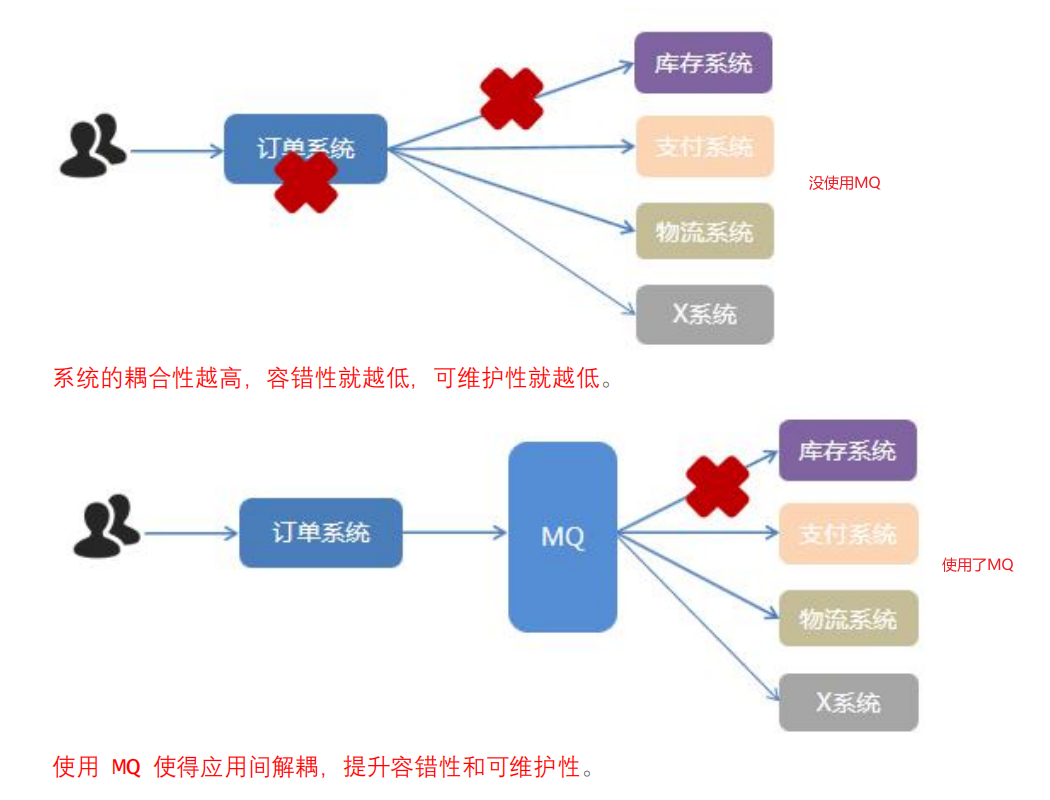
没使用MQ
使用了MQ
2.应用解耦
3.常见的MQ对比3.异步处理
没使用MQ
使用了MQ
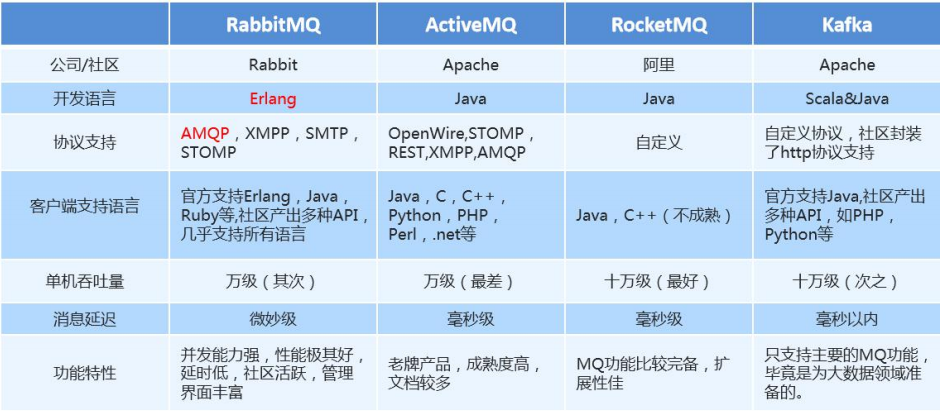
4.RabbitMQ的安装(linux:centos7环境,我使用的是docker容器进行安装的,也可以使用其他方式 >>>> 非docker方式安装RabbitMQ)先学习RabbitMQ,后面可以再学学RocketMQ和Kafka
一、下载镜像
docker search RabbitMQ
进入docker hub镜像仓库地址:https://hub.docker.com/
搜索rabbitMq,进入官方的镜像,可以看到以下几种类型的镜像;我们选择带有“mangement”的版本(包含web管理页面);
拉取镜像
docker pull rabbitmq:management
二、安装和web界面启动
镜像创建和启动容器
docker run -d -p 5672:5672 -p 15672:15672 --name rabbitmq rabbitmq:management
说明:
- -d 后台运行容器;
- --name 指定容器名;
- -p 指定服务运行的端口(5672:应用访问端口;15672:控制台Web端口号);
- --hostname 主机名(RabbitMQ的一个重要注意事项是它根据所谓的 “节点名称” 存储数据,默认为主机名);
查看所有正在运行容器
docker ps -a
删除指定容器
docker rm ID/NAME
删除所有闲置容器
docker container prune
重启docker
systemctl restart docker
重启启动RabbitMQ
docker run -d -p 5672:5672 -p 15672:15672 --name rabbitmq rabbitmq:management
开启防火墙15672端口
 firewall-cmd --zone=public --add-port=15672/tcp --permanent

 firewall-cmd --reload
停止RabbitMQ容器
- 命令: docker stop rabbitmq
启动RabbitMQ容器
- 命令:docker start rabbitmq
重启RabbitMQ容器
- 命令:docker restart rabbitmq
三、测试
http://linuxip地址:15672,这里的用户名和密码默认都是guest
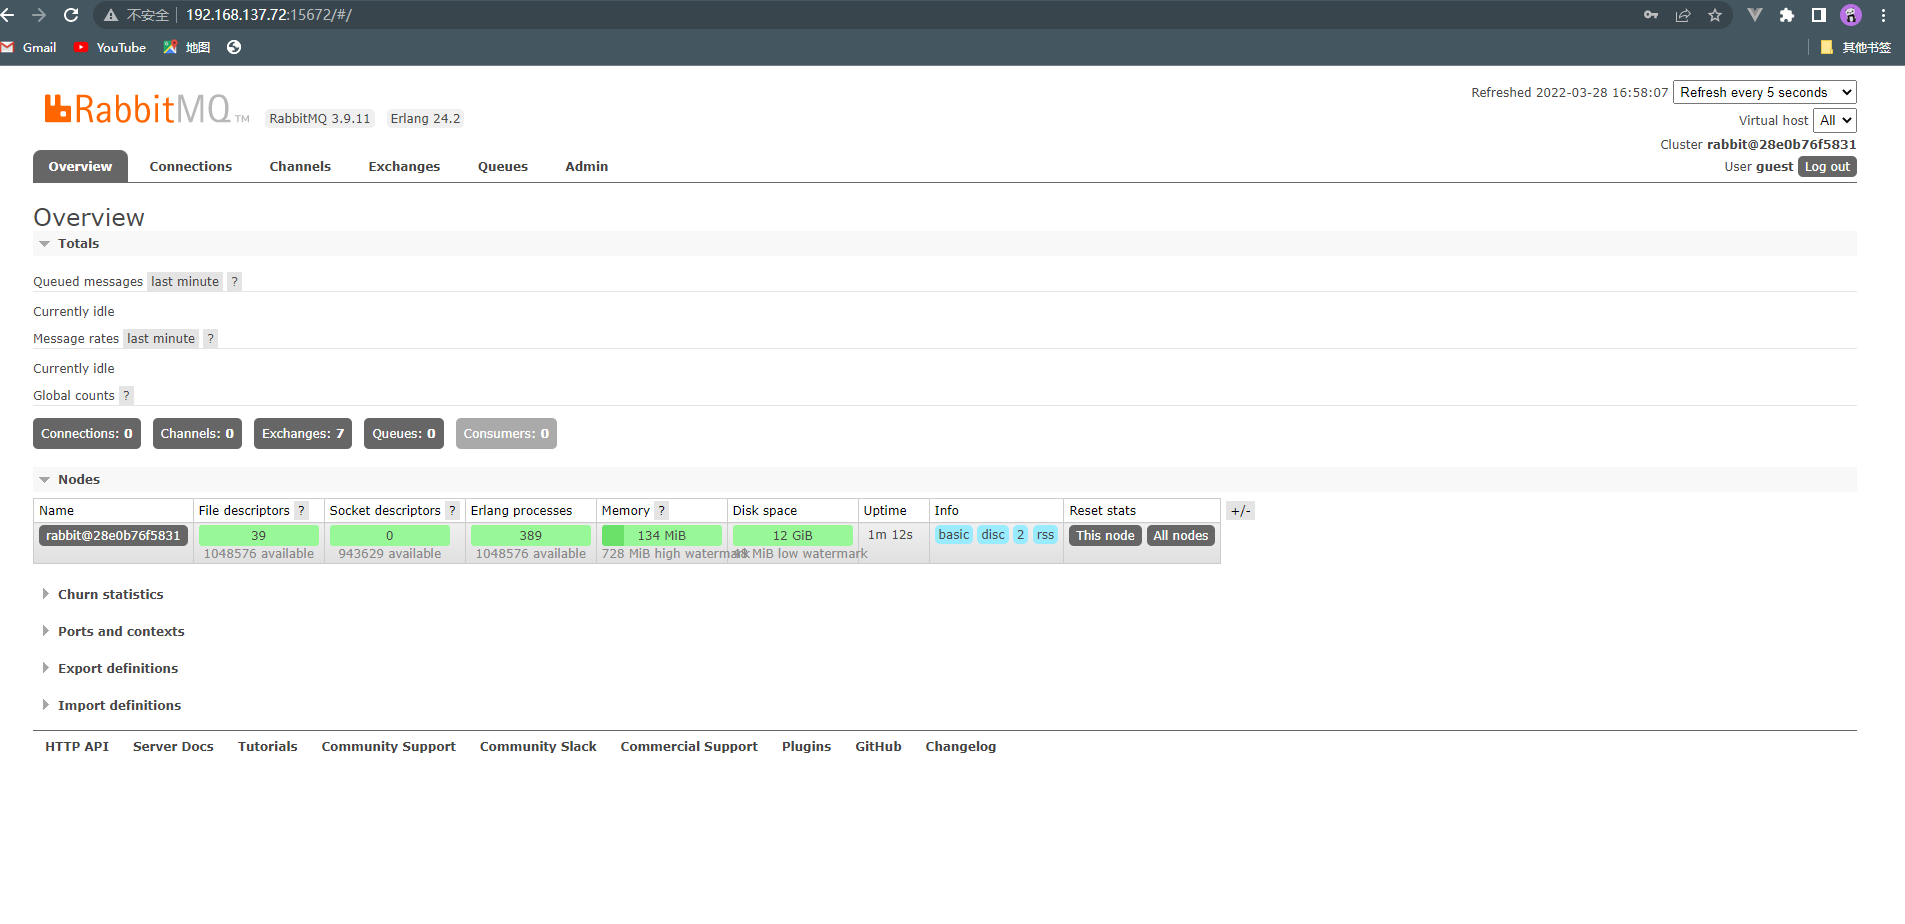
四、进入rabbitmq容器
docker exec -it rabbitmq /bin/bash
五、添加新的用户
创建账号
rabbitmqctl add_user 【用户名】 【密码】
设置用户角色
rabbitmqctl set_user_tags admin administrator
设置用户权限
rabbitmqctl set_permissions -p "/" qbb ".*"".*"".*"
查看当前用户角色、权限
rabbitmqctl list_users
1.创建一个普通的maven项目

2.在pom.xml中导入相关依赖
<?xml version="1.0" encoding="UTF-8"?>
<project xmlns="http://maven.apache.org/POM/4.0.0"
         xmlns:xsi="http://www.w3.org/2001/XMLSchema-instance"
         xsi:schemaLocation="http://maven.apache.org/POM/4.0.0 http://maven.apache.org/xsd/maven-4.0.0.xsd">
    <modelVersion>4.0.0</modelVersion>

    <groupId>com.qbb</groupId>
    <artifactId>java-mq-producer</artifactId>
    <version>1.0-SNAPSHOT</version>

    <dependencies>
        <dependency>
            <groupId>com.rabbitmq</groupId>
            <artifactId>amqp-client</artifactId>
            <version>5.14.2</version>
        </dependency>
    </dependencies>

</project>
3.编写生产者发送消息
package com.qbb.simple;

import com.rabbitmq.client.Channel;
import com.rabbitmq.client.Connection;
import com.rabbitmq.client.ConnectionFactory;

/**
 * @author QiuQiu&LL (个人博客:https://www.cnblogs.com/qbbit)
 * @version 1.0
 * @date 2022-03-28  16:25
 * @Description:生产者
 */
public class SimpleProducer {
    public static void main(String[] args) {
        try {
            // 创建连接工厂
            ConnectionFactory factory = new ConnectionFactory();
            factory.setHost("192.168.137.72");
            factory.setPort(5672);
            factory.setUsername("qbb");
            factory.setPassword("qbb");
            factory.setVirtualHost("/");
            // 获取连接对象
            Connection connection = factory.newConnection();
            // 获取channel
            Channel channel = connection.createChannel();
            // 我们将消息发送到队列中,前提是我们要有一个队列,所以先声明一个队列
            /**
             * String queue : 队列名称
             * boolean durable : 队列是否持久化
             * boolean exclusive : 是否独占本次连接,默认true
             * boolean autoDelete : 是否自动删除,最后一个消费者断开连接以后,该队列是否自动删除
             * Map<String, Object> arguments : 队列其它参数
             */
            channel.queueDeclare("simple-queue", false, false, false, null);
            // 发送消息
            /**
             * String exchange : 交换机名称,发送到哪个交换机
             * String routingKey : 路由key是哪个
             * BasicProperties props : 其他参数信息
             * byte[] body : 要发送的消息
             */
            String message = "hello QiuQiu RabbitMQ";
            channel.basicPublish("", "simple-queue", null, message.getBytes());

            System.out.println("消息发送完毕");
            // 释放资源
            channel.close();
            connection.close();
        } catch (Exception e) {
            e.printStackTrace();
        }
    }
}


4.编写消费者接收消息
package com.qbb.simple;

import com.rabbitmq.client.*;

import java.io.IOException;
import java.util.concurrent.TimeoutException;

/**
 * @author QiuQiu&LL (个人博客:https://www.cnblogs.com/qbbit)
 * @version 1.0
 * @date 2022-03-28  18:11
 * @Description:消费者
 */
public class SimpleConsumer {
    public static void main(String[] args) {
        try {
            // 创建连接工厂
            ConnectionFactory factory = new ConnectionFactory();
            factory.setHost("192.168.137.72");
            factory.setPort(5672);
            factory.setUsername("qbb");
            factory.setPassword("qbb");
            factory.setVirtualHost("/");
            // 获取连接对象
            Connection connection = factory.newConnection();
            // 获取channel通道
            Channel channel = connection.createChannel();
            // 声明队列
            /**
             * String queue,
             * boolean autoAck,
             * Consumer callback
             */
            Consumer consumer = new DefaultConsumer(channel) {
                @Override
                public void handleDelivery(String consumerTag, Envelope envelope, AMQP.BasicProperties properties, byte[] body) throws IOException {
                    String msg = new String(body);
                    System.out.println(msg);
                }
            };
            //监听队列,第二个参数false,手动进行ACK
            channel.basicConsume("simple-queue", true, consumer);
            // 注意消费者端不要释放资源,需要一直监控着队列中的消息
        } catch (Exception e) {
            e.printStackTrace();
        }
    }
}

注意:我们可以看到控制台报了一个错,应该是少了个slf4j的依赖,我们导入就好了
<dependency>
	<groupId>org.slf4j</groupId>
	<artifactId>slf4j-simple</artifactId>
	<version>1.7.25</version>
	<scope>compile</scope>
</dependency>
我们查询图形化界面发现消息一经消费,就被删除了.
那么RabbitMQ怎么知道消息已经被我们消费了呢?
如果消费者领取消息后,还没执行操作就挂掉了呢?
或者抛出了异常?消息消费失败,但是 RabbitMQ 无从得知,这样消息就丢失了!
因此,RabbitMQ 有一个 ACK 机制。
当消费者获取消息后,会向 RabbitMQ 发送回执 ACK, 告知消息已经被接收。
不过这种回执 ACK 分两种情况:
- 自动 ACK:消息一旦被接收,消费者自动发送 ACK
- 手动 ACK:消息接收后,不会发送 ACK,需要手动调用
- 如果消息不太重要,丢失也没有影响,那么自动 ACK 会比较方便
- 如果消息非常重要,不容丢失。那么最好在消费完成后手动 ACK,否则接收消息后 就自动 ACK,RabbitMQ 就会把消息从队列中删除。如果此时消费者宕机,那么消 息就丢失了。
手动在consumer中制造一个异常,发现消息依旧被消费了
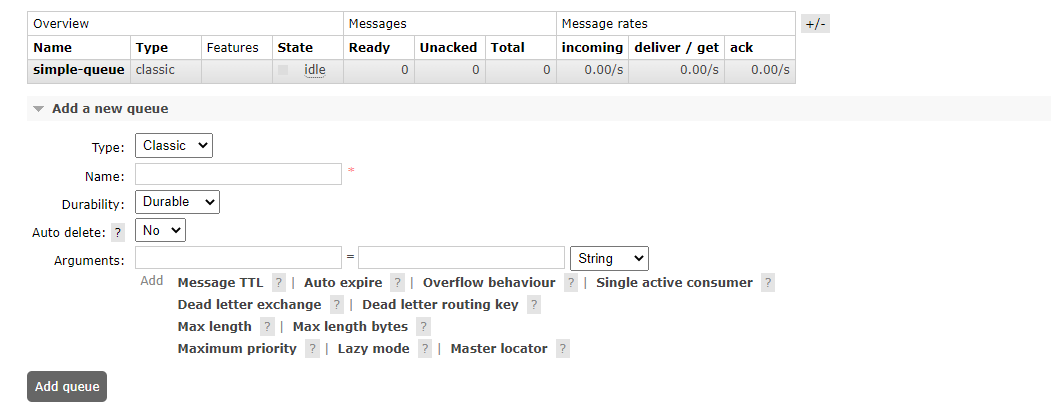
测试一下手动ACK
// 修改consumer端的代码
 Consumer consumer = new DefaultConsumer(channel) {
	 @Override
	 public void handleDelivery(String consumerTag, Envelope envelope, AMQP.BasicProperties properties, byte[] body) throws IOException {
		 String msg = new String(body);
		 int a = 1 / 0;
		 System.out.println(msg);

		 //手动进行ACK
		 channel.basicAck(envelope.getDeliveryTag(), false);
	 }
 };
//监听队列,第二个参数false,手动进行ACK
channel.basicConsume("simple-queue", false, consumer);
可以看出即使出现了异常消息依旧不会被消费丢失

去掉异常重新启动consumer发现消息又被消费了

与入门程序的简单模式相比,多了一个或一些消费端,多个消费端共同消费同一个队列中的消息
应用场景:对于任务过重或任务较多情况使用工作队列可以提高任务处理的速度。
在前面的工程基础上创建两个包,继续编写代码
我们把获取connection对象抽取一个utils工具类
1.编写生产者发送消息
package com.qbb.workqueue;

import com.qbb.utils.MQUtil;
import com.rabbitmq.client.Channel;
import com.rabbitmq.client.Connection;

/**
 * @author QiuQiu&LL (个人博客:https://www.cnblogs.com/qbbit)
 * @version 1.0
 * @date 2022-03-28  19:09
 * @Description:
 */
public class WorkQueueProducer {
    public static void main(String[] args) {
        try {
            Connection connection = MQUtil.getConnection();
            Channel channel = connection.createChannel();
            channel.queueDeclare("work-queue", false, false, false, null);
            // 发送消息
            for (int i = 0; i < 20; i++) {
                String message = "hello QiuQiu work-queue:"+i;
                channel.basicPublish("", "work-queue", null, message.getBytes());
            }
            // 释放资源
            channel.close();
            connection.close();
        } catch (Exception e) {
            e.printStackTrace();
        }
    }
}
2.编写消费者接收消息
**消费者1**
package com.qbb.workqueue;

import com.qbb.utils.MQUtil;
import com.rabbitmq.client.*;

import java.io.IOException;
import java.util.Timer;
import java.util.TimerTask;
import java.util.concurrent.TimeUnit;

/**
 * @author QiuQiu&LL (个人博客:https://www.cnblogs.com/qbbit)
 * @version 1.0
 * @date 2022-03-28  19:21
 * @Description:
 */
public class WorkQueueConsumer1 {
    public static void main(String[] args) {
        try {
            Connection connection = MQUtil.getConnection();
            Channel channel = connection.createChannel();
            channel.queueDeclare("work-queue", false, false, false, null);
            Consumer consumer = new DefaultConsumer(channel) {
                @Override
                public void handleDelivery(String consumerTag, Envelope envelope, AMQP.BasicProperties properties, byte[] body) throws IOException {
                    // 消费者1消费消息
                    try {
                        // 睡50ms秒模拟,此服务性能差一点
                        Thread.sleep(50);
                    } catch (InterruptedException e) {
                        e.printStackTrace();
                    }
                    String msg = new String(body);
                    System.out.println("消费者1消费消息 = " + msg);
                    channel.basicAck(envelope.getDeliveryTag(), false);
                }
            };
            channel.basicConsume("work-queue", false, consumer);
        } catch (Exception e) {
            e.printStackTrace();
        }
    }
}
**消费者2**
package com.qbb.workqueue;

import com.qbb.utils.MQUtil;
import com.rabbitmq.client.*;

import java.io.IOException;
import java.util.concurrent.TimeUnit;

/**
 * @author QiuQiu&LL (个人博客:https://www.cnblogs.com/qbbit)
 * @version 1.0
 * @date 2022-03-28  19:21
 * @Description:
 */
public class WorkQueueConsumer2 {
    public static void main(String[] args) {
        try {
            Connection connection = MQUtil.getConnection();
            Channel channel = connection.createChannel();
            channel.queueDeclare("work-queue", false, false, false, null);
            Consumer consumer = new DefaultConsumer(channel) {
                @Override
                public void handleDelivery(String consumerTag, Envelope envelope, AMQP.BasicProperties properties, byte[] body) throws IOException {
                    // 消费者2消费消息
                    String msg = new String(body);
                    System.out.println("消费者2消费消息 = " + msg);
                    channel.basicAck(envelope.getDeliveryTag(), false);
                }
            };
            channel.basicConsume("work-queue", false, consumer);
        } catch (Exception e) {
            e.printStackTrace();
        }
    }
}
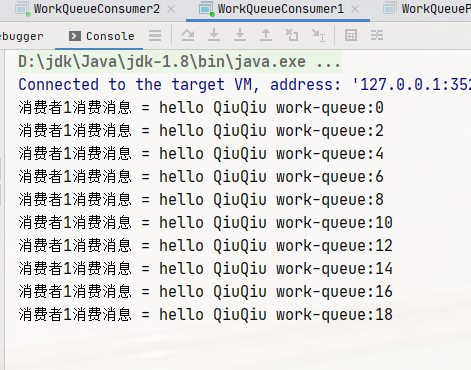
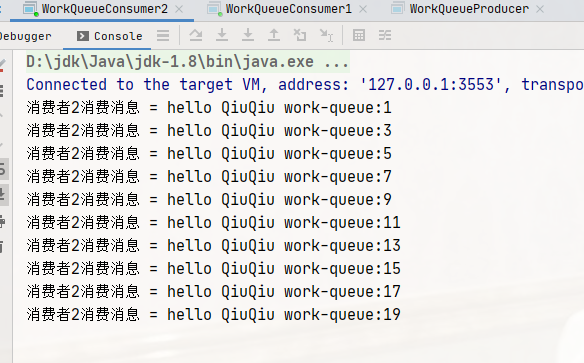
可以发现,两个消费者各自消费了 25 条消息,而且各不相同,这就实现了任务的分发。
但是我现在想让性能差一点的服务器少处理点消息,实现能者多劳怎么办呢? 好办
在比较慢的消费者创建队列后我们可以使用 basicQos 方法和 prefetchCount = n ,告诉RabbitMQ每次给我发送一个消息等我处理完这个消息再给我发一个,一次一个的发消息
... WorkQueueConsumer1.java ...
// 设置每次拉取一条消息消费
channel.basicQos(1);
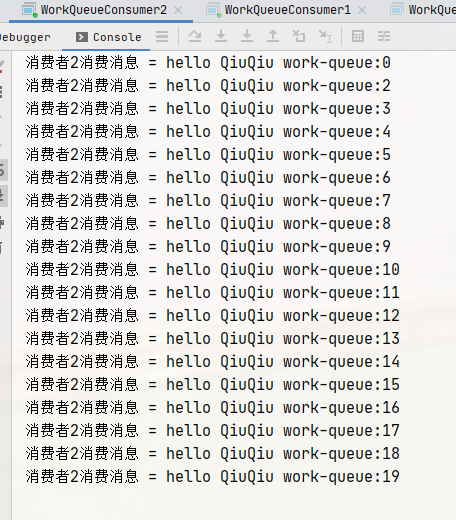
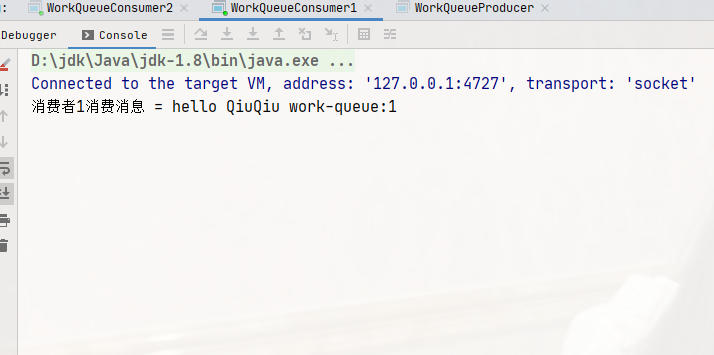
这样就解决了服务器性能差异问题
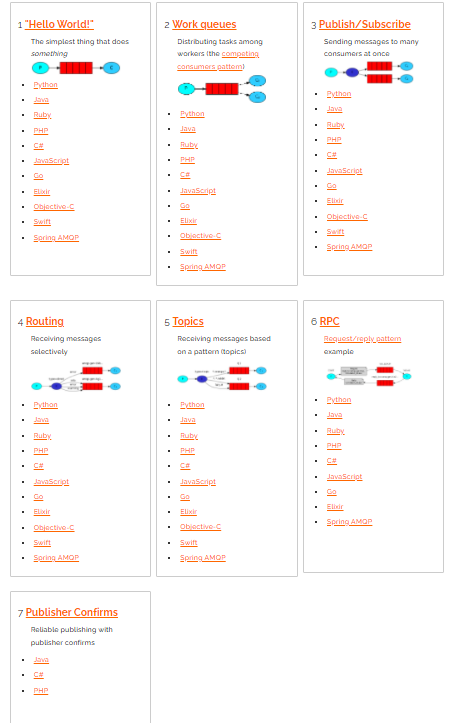
8.RabbitMQ入门之发布订阅模式|Publish/Subscribe(Java操作RabbitMQ)一次同时向多个消费者发送消息,一条消息可以被多个消费者消费

在订阅模型中,多了一个 exchange 角色,而且过程略有变化:
- P:生产者,也就是要发送消息的程序,但是不再发送到队列中,而是发给 X(交换机)
- C:消费者,消息的接受者,会一直等待消息到来。
- Queue:消息队列,接收消息、缓存消息。
- Exchange:交换机,图中的 X。
一方面,接收生产者发送的消息。另一方面,知道如 何处理消息,例如递交给某个特别队列、递交给所有队列、或是将消息丢弃。到底如何 操作,取决于 Exchange 的类型。
Exchange 有常见以下 3 种类型:
- Fanout:广播,将消息交给所有绑定到交换机的队列
- Direct:定向,把消息交给符合指定 routing key 的队列
- Topic:通配符,把消息交给符合 routing pattern(路由模式) 的队列 Exchange(交换机)只负责转发消息,不具备存储消息的能力,因此如果没有任何队列与 Exchange 绑定,或者没有符合路由规则的队列,那么消息会丢失!
在广播模式下,消息发送流程是这样的:
- 可以有多个消费者 -每个消费者有自己的 queue(队列)
- 每个队列都要绑定到 Exchange(交换机)
- 生产者发送的消息,只能发送到交换机,交换机来决定要发给哪个队列,生产者无法决定
- 交换机把消息发送给绑定过的所有队列
- 队列的消费者都能拿到消息。实现一条消息被多个消费者消费
Fanout 交换机

1.队列在绑定到交换机的时候不需要指定 routing key
2.发送消息的时候也不需要指定 routing key
3.凡是发送给交换机的消息都会广播发送到所有与交换机绑定的队列中。
1.编写生产者发送消息
package com.qbb.pubsub;

import com.qbb.utils.MQUtil;
import com.rabbitmq.client.Channel;
import com.rabbitmq.client.Connection;

/**
 * @author QiuQiu&LL (个人博客:https://www.cnblogs.com/qbbit)
 * @version 1.0
 * @date 2022-03-28  19:56
 * @Description:发布订阅模式
 */
public class PubSubProducer {
    public static void main(String[] args) {
        try {
            Connection connection = MQUtil.getConnection();
            Channel channel = connection.createChannel();
            // 声明交换机
            /**
             * 参数1:交换机名
             * 参数2:交换机类型
             */
            channel.exchangeDeclare("fanout-exchange","fanout");

            String message = "hello QiuQiu pubsub";
            channel.basicPublish("fanout-exchange", "pubsub-queue", null, message.getBytes());

            channel.close();
            connection.close();
        } catch (Exception e) {
            e.printStackTrace();
        }
    }
}
2.编写消费者接收消息
**消费者1**
package com.qbb.pubsub;

import com.qbb.utils.MQUtil;
import com.rabbitmq.client.*;

import java.io.IOException;

/**
 * @author QiuQiu&LL (个人博客:https://www.cnblogs.com/qbbit)
 * @version 1.0
 * @date 2022-03-28  20:02
 * @Description:发布订阅消费者
 */
public class PubSubConsumer1 {
    public static void main(String[] args) {
        try {
            // 获取连接
            Connection connection = MQUtil.getConnection();
            // 获取channel通道
            Channel channel = connection.createChannel();
            // 声明队列
            channel.queueDeclare("fanout-queue1", false, false, false, null);
            // 将队列绑定到交换机
            /**
             * 参数1:队列名称
             * 参数2:交换机名称
             * 参数3:路由key
             */
            channel.queueBind("fanout-queue1", "fanout-exchange", "pubsub-queue");
            Consumer consumer = new DefaultConsumer(channel) {
                @Override
                public void handleDelivery(String consumerTag, Envelope envelope, AMQP.BasicProperties properties, byte[] body) throws IOException {
                    System.out.println("消费者唯一标识 = " + consumerTag);
                    System.out.println("交换机名称 = " + envelope.getExchange());
                    System.out.println("消息唯一标识 = " + envelope.getDeliveryTag());
                    System.out.println("路由key = " + envelope.getRoutingKey());

                    System.out.println("消费者1消费消息Message = " + new String(body));
                    // 手动ACK
                    channel.basicAck(envelope.getDeliveryTag(), false);
                }
            };
            channel.basicConsume("fanout-queue1", false, consumer);
        } catch (Exception e) {
            e.printStackTrace();
        }
    }
}
**消费者2**
package com.qbb.pubsub;

import com.qbb.utils.MQUtil;
import com.rabbitmq.client.*;

import java.io.IOException;

/**
 * @author QiuQiu&LL (个人博客:https://www.cnblogs.com/qbbit)
 * @version 1.0
 * @date 2022-03-28  20:02
 * @Description:发布订阅消费者
 */
public class PubSubConsumer2 {
    public static void main(String[] args) {
        try {
            // 获取连接
            Connection connection = MQUtil.getConnection();
            // 获取channel通道
            Channel channel = connection.createChannel();
            // 声明队列
            channel.queueDeclare("fanout-queue2", false, false, false, null);
            // 将队列绑定到交换机
            /**
             * 参数1:队列名称
             * 参数2:交换机名称
             * 参数3:路由key
             */
            channel.queueBind("fanout-queue2", "fanout-exchange", "pubsub-queue");
            Consumer consumer = new DefaultConsumer(channel) {
                @Override
                public void handleDelivery(String consumerTag, Envelope envelope, AMQP.BasicProperties properties, byte[] body) throws IOException {
                    System.out.println("消费者唯一标识 = " + consumerTag);
                    System.out.println("交换机名称 = " + envelope.getExchange());
                    System.out.println("消息唯一标识 = " + envelope.getDeliveryTag());
                    System.out.println("路由key = " + envelope.getRoutingKey());

                    System.out.println("消费者2消费消息Message = " + new String(body));
                    // 手动ACK
                    channel.basicAck(envelope.getDeliveryTag(), false);
                }
            };
            channel.basicConsume("fanout-queue2", false, consumer);
        } catch (Exception e) {
            e.printStackTrace();
        }
    }
}
测试结果:


发布订阅模式与工作队列模式的区别
9.RabbitMQ入门之Routing 路由模式(Java操作RabbitMQ)1、工作队列模式不用定义交换机,而发布/订阅模式需要定义交换机。
2、发布/订阅模式的生产方是面向交换机发送消息,工作队列模式的生产方是面向队列发 送消息(底层使用默认交换机)。
3、发布/订阅模式需要设置队列和交换机的绑定,工作队列模式不需要设置,实际上工作 队列模式会将队列绑 定到默认的交换机 。
有选择性的接收消息
- 在某些场景下,我们希望不同的消息被不同的队列消费。这时就要用到 Direct 类 型的 Exchange。
路由模式特点:
- 队列与交换机的绑定,不能是任意绑定了,而是要指定一个
RoutingKey(路由 key)- 消息的发送方在 向 Exchange 发送消息时,也必须指定消息的
RoutingKey。- Exchange 不再把消息交给每一个绑定的队列,而是根据消息的
Routing Key进行 判断,只有队列的Routingkey与消息的Routing key完全一致,才会接收到消息
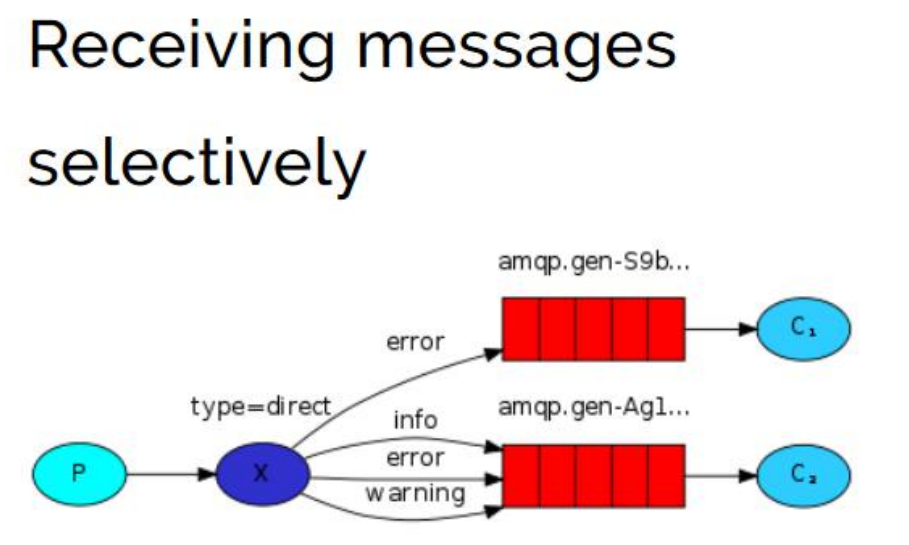
- P:生产者,向 Exchange 发送消息,发送消息时,会指定一个 routing key。
- X:Exchange(交换机),接收生产者的消息,然后把消息递交给 与 routing key 完全匹配的队列
- C1:消费者,其所在队列指定了需要 routing key 为 error 的消息
- C2:消费者,其所在队列指定了需要 routing key 为 info、error、warning 的 消息
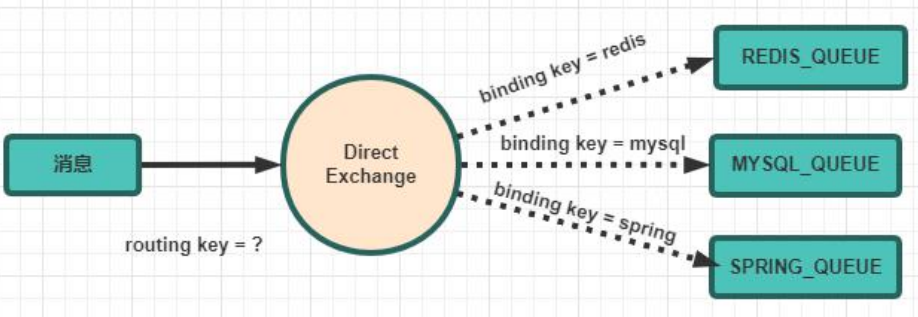
可以看出routing模式和发布订阅模式没多大区别,只是交换机不同而已
1.编写生产者发送消息(发送增 删 改消息)
package com.qbb.routing;

import com.qbb.utils.MQUtil;
import com.rabbitmq.client.Channel;
import com.rabbitmq.client.Connection;

/**
 * @author QiuQiu&LL (个人博客:https://www.cnblogs.com/qbbit)
 * @version 1.0
 * @date 2022-03-28  20:39
 * @Description:
 */
public class RoutingProducer {
    public static void main(String[] args) {
        try {
            Connection connection = MQUtil.getConnection();
            Channel channel = connection.createChannel();
            // 声明交换机
            /**
             * 参数1:交换机名
             * 参数2:交换机类型
             */
            channel.exchangeDeclare("routing-exchange", "direct");

            String message = "hello QiuQiu 添加商品";
            channel.basicPublish("routing-exchange", "insert", null, message.getBytes());
            // String message1 = "hello QiuQiu 删除商品";
            // channel.basicPublish("routing-exchange", "delete", null, message1.getBytes());
            // String message2 = "hello QiuQiu 修改商品";
            // channel.basicPublish("routing-exchange", "update", null, message2.getBytes());

            channel.close();
            connection.close();
        } catch (Exception e) {
            e.printStackTrace();
        }
    }
}
2.编写消费者接收消息
**消费者1**
package com.qbb.routing;

import com.qbb.utils.MQUtil;
import com.rabbitmq.client.*;

import java.io.IOException;

/**
 * @author QiuQiu&LL (个人博客:https://www.cnblogs.com/qbbit)
 * @version 1.0
 * @date 2022-03-28  20:36
 * @Description:routing模式
 */
public class RoutingComsumer1 {
    public static void main(String[] args) {
        try {
            // 获取连接
            Connection connection = MQUtil.getConnection();
            // 获取channel通道
            Channel channel = connection.createChannel();
            // 声明队列
            channel.queueDeclare("routing-queue1", false, false, false, null);
            // 将队列绑定到交换机
            /**
             * 参数1:队列名称
             * 参数2:交换机名称
             * 参数3:路由key
             */
            channel.queueBind("routing-queue1", "routing-exchange", "insert");

            Consumer consumer = new DefaultConsumer(channel) {
                @Override
                public void handleDelivery(String consumerTag, Envelope envelope, AMQP.BasicProperties properties, byte[] body) throws IOException {
                    System.out.println("消费者唯一标识 = " + consumerTag);
                    System.out.println("交换机名称 = " + envelope.getExchange());
                    System.out.println("消息唯一标识 = " + envelope.getDeliveryTag());
                    System.out.println("路由key = " + envelope.getRoutingKey());

                    System.out.println("消费者1消费消息Message = " + new String(body));
                }
            };
            channel.basicConsume("routing-queue1", true, consumer);
        } catch (Exception e) {
            e.printStackTrace();
        }
    }
}
**消费者2**
package com.qbb.routing;

import com.qbb.utils.MQUtil;
import com.rabbitmq.client.*;

import java.io.IOException;

/**
 * @author QiuQiu&LL (个人博客:https://www.cnblogs.com/qbbit)
 * @version 1.0
 * @date 2022-03-28  20:36
 * @Description:
 */
public class RoutingComsumer2 {
    public static void main(String[] args) {
        try {
            // 获取连接
            Connection connection = MQUtil.getConnection();
            // 获取channel通道
            Channel channel = connection.createChannel();
            // 声明队列
            channel.queueDeclare("routing-queue2", false, false, false, null);
            // 将队列绑定到交换机
            /**
             * 参数1:队列名称
             * 参数2:交换机名称
             * 参数3:路由key
             */
            channel.queueBind("routing-queue2", "routing-exchange", "insert");
            channel.queueBind("routing-queue2", "routing-exchange", "delete");
            channel.queueBind("routing-queue2", "routing-exchange", "update");

            Consumer consumer = new DefaultConsumer(channel) {
                @Override
                public void handleDelivery(String consumerTag, Envelope envelope, AMQP.BasicProperties properties, byte[] body) throws IOException {
                    System.out.println("消费者唯一标识 = " + consumerTag);
                    System.out.println("交换机名称 = " + envelope.getExchange());
                    System.out.println("消息唯一标识 = " + envelope.getDeliveryTag());
                    System.out.println("路由key = " + envelope.getRoutingKey());

                    System.out.println("消费者2消费消息Message = " + new String(body));
                }
            };
            channel.basicConsume("routing-queue2", true, consumer);
        } catch (Exception e) {
            e.printStackTrace();
        }
    }
}
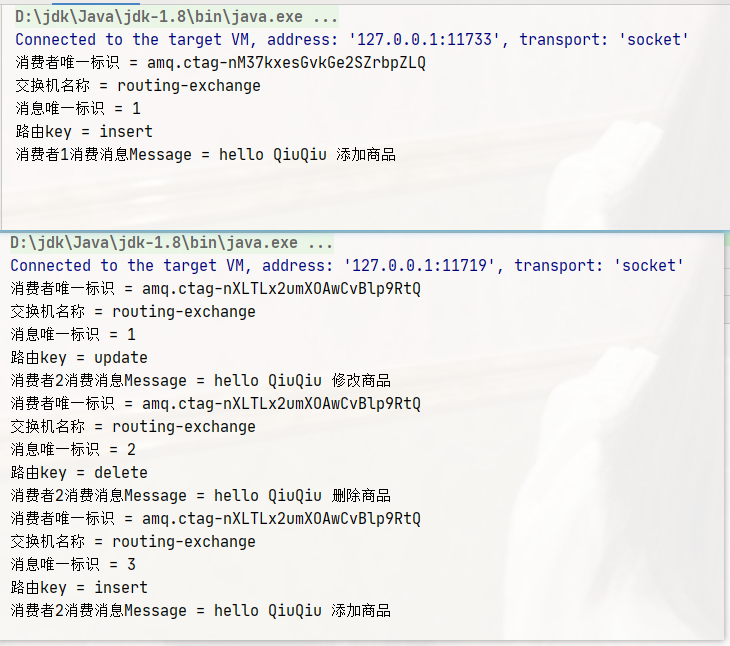
测试结果:
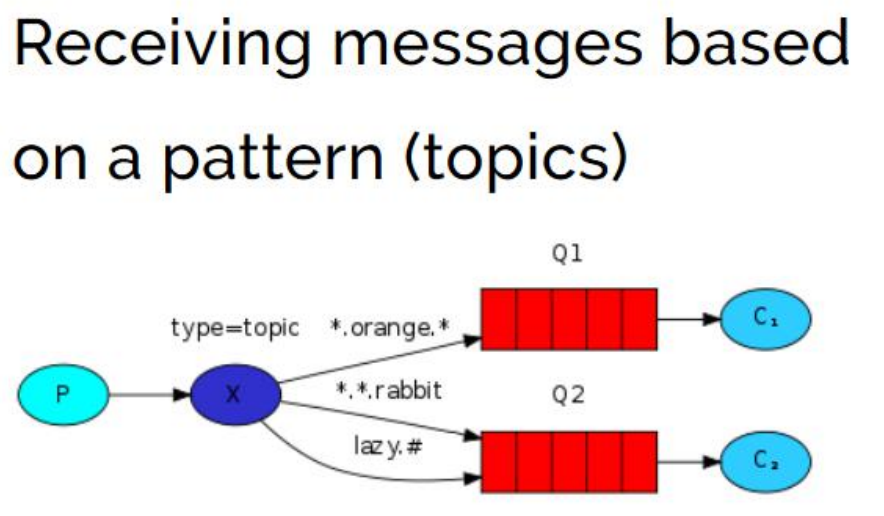
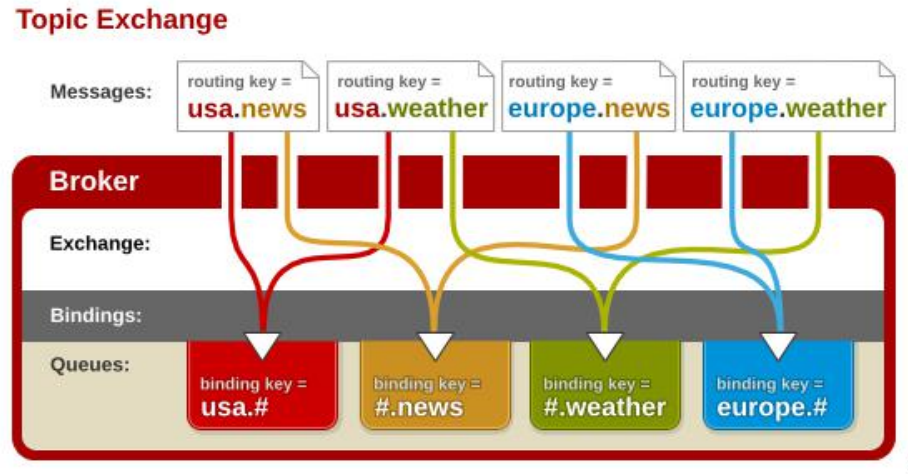
Topic 类型与 Direct 相比,都是可以根据RoutingKey把消息路由到不同的队列。只 不过Topic类型Exchange可以让队列在绑定Routing key 的时候使用通配符! Routingkey 一般都是有一个或多个单词组成,多个单词之间以”.”分割
通配符规则:
#:匹配一个或多个词
*:匹配不多不少恰好 1 个词
1.编写生产者发送消息(发送消息的 routing key 有 3 种: item.insert、 item.update、item.delete)
package com.qbb.topic;

import com.qbb.utils.MQUtil;
import com.rabbitmq.client.Channel;
import com.rabbitmq.client.Connection;

/**
 * @author QiuQiu&LL (个人博客:https://www.cnblogs.com/qbbit)
 * @version 1.0
 * @date 2022-03-28  20:39
 * @Description:
 */
public class TopicProducer {
    public static void main(String[] args) {
        try {
            Connection connection = MQUtil.getConnection();
            Channel channel = connection.createChannel();
            // 声明交换机
            /**
             * 参数1:交换机名
             * 参数2:交换机类型
             */
            channel.exchangeDeclare("topic-exchange", "topic");

            // String message = "hello QiuQiu 添加商品";
            // channel.basicPublish("topic-exchange", "item.insert", null, message.getBytes());
            // String message1 = "hello QiuQiu 删除商品";
            // channel.basicPublish("topic-exchange", "item.delete", null, message1.getBytes());
            String message2 = "hello QiuQiu 修改商品";
            channel.basicPublish("topic-exchange", "item.update.do", null, message2.getBytes());

            channel.close();
            connection.close();
        } catch (Exception e) {
            e.printStackTrace();
        }
    }
}
2.编写消费者接收消息
**消费者1**
package com.qbb.topic;

import com.qbb.utils.MQUtil;
import com.rabbitmq.client.*;

import java.io.IOException;

/**
 * @author QiuQiu&LL (个人博客:https://www.cnblogs.com/qbbit)
 * @version 1.0
 * @date 2022-03-28  20:36
 * @Description:routing模式
 */
public class TopicConsumer1 {
    public static void main(String[] args) {
        try {
            // 获取连接
            Connection connection = MQUtil.getConnection();
            // 获取channel通道
            Channel channel = connection.createChannel();
            // 声明队列
            channel.queueDeclare("topic-queue1", false, false, false, null);
            // 将队列绑定到交换机
            /**
             * 参数1:队列名称
             * 参数2:交换机名称
             * 参数3:路由key
             */
            channel.queueBind("topic-queue1", "topic-exchange", "#.insert");
            channel.queueBind("topic-queue1", "topic-exchange", "#.update.#");


            Consumer consumer = new DefaultConsumer(channel) {
                @Override
                public void handleDelivery(String consumerTag, Envelope envelope, AMQP.BasicProperties properties, byte[] body) throws IOException {
                    System.out.println("消费者唯一标识 = " + consumerTag);
                    System.out.println("交换机名称 = " + envelope.getExchange());
                    System.out.println("消息唯一标识 = " + envelope.getDeliveryTag());
                    System.out.println("路由key = " + envelope.getRoutingKey());

                    System.out.println("消费者1消费消息Message = " + new String(body));
                }
            };
            channel.basicConsume("topic-queue1", true, consumer);
        } catch (Exception e) {
            e.printStackTrace();
        }
    }
}
**消费者2**
package com.qbb.topic;

import com.qbb.utils.MQUtil;
import com.rabbitmq.client.*;

import java.io.IOException;

/**
 * @author QiuQiu&LL (个人博客:https://www.cnblogs.com/qbbit)
 * @version 1.0
 * @date 2022-03-28  20:36
 * @Description:
 */
public class TopicConsumer2 {
    public static void main(String[] args) {
        try {
            // 获取连接
            Connection connection = MQUtil.getConnection();
            // 获取channel通道
            Channel channel = connection.createChannel();
            // 声明队列
            channel.queueDeclare("topic-queue2", false, false, false, null);
            // 将队列绑定到交换机
            /**
             * 参数1:队列名称
             * 参数2:交换机名称
             * 参数3:路由key
             */
            channel.queueBind("topic-queue2", "topic-exchange", "item.*");
            channel.queueBind("topic-queue2", "topic-exchange", "#.delete");

            Consumer consumer = new DefaultConsumer(channel) {
                @Override
                public void handleDelivery(String consumerTag, Envelope envelope, AMQP.BasicProperties properties, byte[] body) throws IOException {
                    System.out.println("消费者唯一标识 = " + consumerTag);
                    System.out.println("交换机名称 = " + envelope.getExchange());
                    System.out.println("消息唯一标识 = " + envelope.getDeliveryTag());
                    System.out.println("路由key = " + envelope.getRoutingKey());

                    System.out.println("消费者2消费消息Message = " + new String(body));
                }
            };
            channel.basicConsume("topic-queue2", true, consumer);
        } catch (Exception e) {
            e.printStackTrace();
        }
    }
}
测试结果:
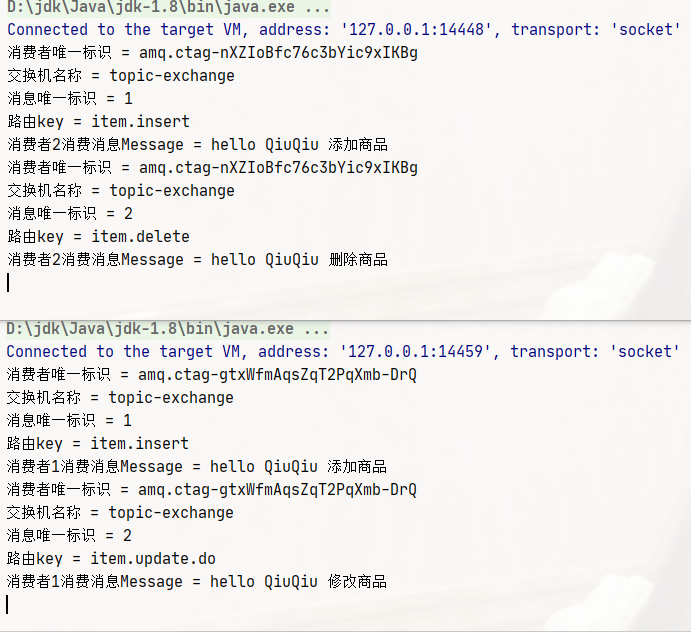
Topic 主题模式可以实现 Publish/Subscribe 发布与订阅模式 和 Routing 路 由模式 的功能;只是 Topic 在配置 routing key 的时候可以使用通配符,显得更加灵 活。
为了避免消息丢失,我们可以将消息持久化!如何持久化消息呢?
要将消息持久化,前提是:队列、Exchange 都持久化
1.持久化交换机
/**
* 参数1:交换机名
* 参数2:交换机类型
* 参数3:是否持久化
*/
channel.exchangeDeclare("topic-exchange", "topic",true);
2.持久化队列
// 声明队列
channel.queueDeclare("topic-queue1", true, false, false, null);
3.持久化消息
channel.basicPublish("topic-exchange", "item.update.do", MessageProperties.PERSISTENT_TEXT_PLAIN, message2.getBytes());
- 1、简单模式 HelloWorld 一个生产者、一个消费者,不需要设置交换机(使用默认的交换机)
- 2、工作队列模式 Work Queue 一个生产者、多个消费者(竞争关系),不需要设置交换机(使用默认的交换机)
- 3、发布订阅模式 Publish/subscribe 需要设置类型为 fanout 的交换机,并且交换机和队列进行绑定,当发送消息到交换机后, 交换机会将消息发送到绑定的队列
- 4、路由模式 Routing 需要设置类型为 direct 的交换机,交换机和队列进行绑定,并且指定 routing key,当 发送消息到交换机后,交换机会根据 routing key 将消息发送到对应的队列
- 5、通配符模式 Topic 需要设置类型为 topic 的交换机,交换机和队列进行绑定,并且指定通配符方式的 routing key,当发送消息到交换机后,交换机会根据 routing key 将消息发送到对应 的队列 消息的可靠性投递 RabbitMQ 集群 消息百分百投递(confirm 和 return、消费者确认 ack 机制)
先写producer消息提供方前面我们使用java代码操作了RabbitMQ,其实操作起来感觉还是有点繁琐,下面使用Spring来整合RabbitMQ,看看能否有不一样的体验
1.创建一个maven项目
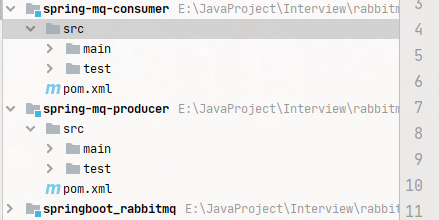
2.导入相关依赖
<?xml version="1.0" encoding="UTF-8"?>
<project xmlns="http://maven.apache.org/POM/4.0.0"
         xmlns:xsi="http://www.w3.org/2001/XMLSchema-instance"
         xsi:schemaLocation="http://maven.apache.org/POM/4.0.0 http://maven.apache.org/xsd/maven-4.0.0.xsd">
    <modelVersion>4.0.0</modelVersion>

    <groupId>com.qbb</groupId>
    <artifactId>spring-mq-producer</artifactId>
    <version>1.0-SNAPSHOT</version>

    <dependencies>
        <dependency>
            <groupId>org.springframework</groupId>
            <artifactId>spring-context</artifactId>
            <version>5.3.16</version>
        </dependency>
        <dependency>
            <groupId>org.springframework.amqp</groupId>
            <artifactId>spring-rabbit</artifactId>
            <version>2.4.2</version>
        </dependency>
        <dependency>
            <groupId>junit</groupId>
            <artifactId>junit</artifactId>
            <version>4.13.2</version>
        </dependency>
        <dependency>
            <groupId>org.springframework</groupId>
            <artifactId>spring-test</artifactId>
            <version>5.3.16</version>
        </dependency>
    </dependencies>
</project>
3.编写rabbitmq.properties配置文件
rabbitmq.host=192.168.137.72
rabbitmq.port=5672
rabbitmq.username=qbb
rabbitmq.password=qbb
rabbitmq.virtual-host=/
4.编写spring-rabbitmq-producer.xml配置文件
<?xml version="1.0" encoding="UTF-8"?>
<beans xmlns="http://www.springframework.org/schema/beans"
       xmlns:xsi="http://www.w3.org/2001/XMLSchema-instance" xmlns:rabbit="http://www.springframework.org/schema/rabbit"
       xmlns:context="http://www.springframework.org/schema/context"
       xsi:schemaLocation="http://www.springframework.org/schema/beans http://www.springframework.org/schema/beans/spring-beans.xsd http://www.springframework.org/schema/rabbit http://www.springframework.org/schema/rabbit/spring-rabbit.xsd http://www.springframework.org/schema/context https://www.springframework.org/schema/context/spring-context.xsd">

    <!--加载rabbitmq.properties-->
    <context:property-placeholder location="classpath:rabbitmq.properties"/>

    <!--配置连接工厂-->
    <rabbit:connection-factory
            id="connectionFactory"
            host="${rabbitmq.host}"
            port="${rabbitmq.port}"
            username="${rabbitmq.username}"
            password="${rabbitmq.password}"
            virtual-host="${rabbitmq.virtual-host}"/>

    <!--配置监听器-->
    <bean id="simpleListener" class="com.qbb.listener.SimpleListener"/>

    <!--将监听器放入rabbit容器-->
    <rabbit:listener-container connection-factory="connectionFactory">
        <rabbit:listener ref="simpleListener" queue-names="spring-simple-queue"/>
    </rabbit:listener-container>

</beans>
5.在test测试包下创建测试类
package com.qbb;

import org.junit.Test;
import org.junit.runner.RunWith;
import org.springframework.amqp.rabbit.core.RabbitTemplate;
import org.springframework.beans.factory.annotation.Autowired;
import org.springframework.test.context.ContextConfiguration;
import org.springframework.test.context.junit4.SpringJUnit4ClassRunner;

/**
 * @author QiuQiu&LL (个人博客:https://www.cnblogs.com/qbbit)
 * @version 1.0
 * @date 2022-03-28  23:56
 * @Description:
 */
@RunWith(SpringJUnit4ClassRunner.class)
@ContextConfiguration(locations = "classpath:spring-rabbitmq-producer.xml")
public class MQTest {

    @Autowired
    private RabbitTemplate rabbitTemplate;

    @Test
    public void testSimple() {
        rabbitTemplate.convertAndSend("spring-simple-queue", "hello QiuQiu Spring-MQ-Simple");
    }
}
1.创建一个maven项目

2.导入相关依赖
<?xml version="1.0" encoding="UTF-8"?>
<project xmlns="http://maven.apache.org/POM/4.0.0"
         xmlns:xsi="http://www.w3.org/2001/XMLSchema-instance"
         xsi:schemaLocation="http://maven.apache.org/POM/4.0.0 http://maven.apache.org/xsd/maven-4.0.0.xsd">
    <modelVersion>4.0.0</modelVersion>

    <groupId>com.qbb</groupId>
    <artifactId>spring-mq-producer</artifactId>
    <version>1.0-SNAPSHOT</version>

    <dependencies>
        <dependency>
            <groupId>org.springframework</groupId>
            <artifactId>spring-context</artifactId>
            <version>5.3.16</version>
        </dependency>
        <dependency>
            <groupId>org.springframework.amqp</groupId>
            <artifactId>spring-rabbit</artifactId>
            <version>2.4.2</version>
        </dependency>
        <dependency>
            <groupId>junit</groupId>
            <artifactId>junit</artifactId>
            <version>4.13.2</version>
        </dependency>
        <dependency>
            <groupId>org.springframework</groupId>
            <artifactId>spring-test</artifactId>
            <version>5.3.16</version>
        </dependency>
    </dependencies>
</project>
3.编写rabbitmq.properties配置文件
rabbitmq.host=192.168.137.72
rabbitmq.port=5672
rabbitmq.username=qbb
rabbitmq.password=qbb
rabbitmq.virtual-host=/
4.编写spring-rabbitmq-producer.xml配置文件
<?xml version="1.0" encoding="UTF-8"?>
<beans xmlns="http://www.springframework.org/schema/beans"
       xmlns:xsi="http://www.w3.org/2001/XMLSchema-instance" xmlns:rabbit="http://www.springframework.org/schema/rabbit"
       xmlns:context="http://www.springframework.org/schema/context"
       xsi:schemaLocation="http://www.springframework.org/schema/beans http://www.springframework.org/schema/beans/spring-beans.xsd http://www.springframework.org/schema/rabbit http://www.springframework.org/schema/rabbit/spring-rabbit.xsd http://www.springframework.org/schema/context https://www.springframework.org/schema/context/spring-context.xsd">

    <!--加载rabbitmq.properties-->
    <context:property-placeholder location="classpath:rabbitmq.properties"/>

    <!--配置连接工厂-->
    <rabbit:connection-factory
            id="connectionFactory"
            host="${rabbitmq.host}"
            port="${rabbitmq.port}"
            username="${rabbitmq.username}"
            password="${rabbitmq.password}"
            virtual-host="${rabbitmq.virtual-host}"/>

    <!--RabbitAdmin 用于远程创建、管理交换机、队列-->
    <rabbit:admin connection-factory="connectionFactory"/>

    <!--声明队列:
        id 属性方便下面引用(当然 id 属性可以省略,通过 name 属性引用也行)
        name 属性执行创建队列的名称(name 属性不可省略,否则无法定义队列名称),
        auto-declare 属性为 true 表示不存在则自动创建-->
    <rabbit:queue id="spring-queue" name="spring-queue" auto-declare="true"></rabbit:queue>

    <!--定义 rabbitTemplate 对象操作可以在代码中方便发送消息-->
    <rabbit:template connection-factory="connectionFactory" id="rabbitTemplate"/>

    <!--==================简单模式==================-->
    <rabbit:queue id="spring-simple-queue" name="spring-simple-queue" durable="false" auto-delete="false" auto-declare="true"/>
</beans>
5.创建一个SimpleListener监听类实现MessageListener监听消息
package com.qbb.listener;

import org.springframework.amqp.core.Message;
import org.springframework.amqp.core.MessageListener;

/**
 * @author QiuQiu&LL (个人博客:https://www.cnblogs.com/qbbit)
 * @version 1.0
 * @date 2022-03-29  0:09
 * @Description:简单模式
 */
public class SimpleListener implements MessageListener {
    @Override
    public void onMessage(Message message) {
        System.out.println("消费者唯一标识 =" + message.getMessageProperties().getConsumerTag());
        System.out.println("消息唯一标识 =" + message.getMessageProperties().getDeliveryTag());
        System.out.println("交换机名称 =" + message.getMessageProperties().getReceivedExchange());
        System.out.println("路由key =" + message.getMessageProperties().getReceivedRoutingKey());

        System.out.println("消息 =" + new String(message.getBody()));
    }
}
6.在test测试包下创建测试类
package com.qbb;

import org.junit.Test;
import org.junit.runner.RunWith;
import org.springframework.test.context.ContextConfiguration;
import org.springframework.test.context.junit4.SpringJUnit4ClassRunner;

/**
 * @author QiuQiu&LL (个人博客:https://www.cnblogs.com/qbbit)
 * @version 1.0
 * @date 2022-03-29  0:14
 * @Description:
 */
@RunWith(SpringJUnit4ClassRunner.class)
@ContextConfiguration(locations = "classpath:spring-rabbitmq-consumer.xml")
public class MQTest {

    @Test
    public void test01() {
        while (true) {

        }
    }
}
测试结果:
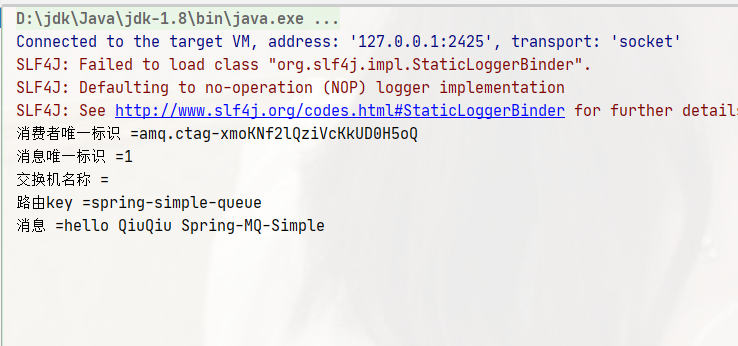
1.修改spring-rabbitmq-producer.xml配置文件
<?xml version="1.0" encoding="UTF-8"?>
<beans xmlns="http://www.springframework.org/schema/beans"
       xmlns:xsi="http://www.w3.org/2001/XMLSchema-instance" xmlns:rabbit="http://www.springframework.org/schema/rabbit"
       xmlns:context="http://www.springframework.org/schema/context"
       xsi:schemaLocation="http://www.springframework.org/schema/beans http://www.springframework.org/schema/beans/spring-beans.xsd http://www.springframework.org/schema/rabbit http://www.springframework.org/schema/rabbit/spring-rabbit.xsd http://www.springframework.org/schema/context https://www.springframework.org/schema/context/spring-context.xsd">

    <!--加载rabbitmq.properties-->
    <context:property-placeholder location="classpath:rabbitmq.properties"/>

    <!--配置连接工厂-->
    <rabbit:connection-factory
            id="connectionFactory"
            host="${rabbitmq.host}"
            port="${rabbitmq.port}"
            username="${rabbitmq.username}"
            password="${rabbitmq.password}"
            virtual-host="${rabbitmq.virtual-host}"/>

    <!--RabbitAdmin 用于远程创建、管理交换机、队列-->
    <rabbit:admin connection-factory="connectionFactory"/>

    <!--声明队列:
        id 属性方便下面引用(当然 id 属性可以省略,通过 name 属性引用也行)
        name 属性执行创建队列的名称(name 属性不可省略,否则无法定义队列名称),
        auto-declare 属性为 true 表示不存在则自动创建-->
    <rabbit:queue id="spring-queue" name="spring-queue" auto-declare="true"></rabbit:queue>

    <!--定义 rabbitTemplate 对象操作可以在代码中方便发送消息-->
    <rabbit:template connection-factory="connectionFactory" id="rabbitTemplate"/>

    <!--==================简单模式==================-->
    <rabbit:queue id="spring-simple-queue" name="spring-simple-queue" durable="false" auto-delete="false" auto-declare="true"/>

    <!--==================工作队列模式==================-->
    <rabbit:queue id="spring-work-queue" name="spring-work-queue" durable="false" auto-delete="false" auto-declare="true"/>
</beans>
2.修改producer测试类
package com.qbb;

import org.junit.Test;
import org.junit.runner.RunWith;
import org.springframework.amqp.rabbit.core.RabbitTemplate;
import org.springframework.beans.factory.annotation.Autowired;
import org.springframework.test.context.ContextConfiguration;
import org.springframework.test.context.junit4.SpringJUnit4ClassRunner;

/**
 * @author QiuQiu&LL (个人博客:https://www.cnblogs.com/qbbit)
 * @version 1.0
 * @date 2022-03-28  23:56
 * @Description:
 */
@RunWith(SpringJUnit4ClassRunner.class)
@ContextConfiguration(locations = "classpath:spring-rabbitmq-producer.xml")
public class MQTest {

    @Autowired
    private RabbitTemplate rabbitTemplate;

    /**
     * 简单模式
     */
    @Test
    public void testSimple() {
        rabbitTemplate.convertAndSend("spring-simple-queue", "hello QiuQiu Spring-MQ-Simple");
    }

    /**
     * 工作队列模式
     */
    @Test
    public void testWorkQueue() {
        for (int i = 0; i < 10; i++) {
            rabbitTemplate.convertAndSend("spring-work-queue", "hello QiuQiu Spring-MQ-WorkQueue"+i);
        }
    }
}
3.修改spring-rabbitmq-consumer.xml配置文件
<?xml version="1.0" encoding="UTF-8"?>
<beans xmlns="http://www.springframework.org/schema/beans"
       xmlns:xsi="http://www.w3.org/2001/XMLSchema-instance" xmlns:rabbit="http://www.springframework.org/schema/rabbit"
       xmlns:context="http://www.springframework.org/schema/context"
       xsi:schemaLocation="http://www.springframework.org/schema/beans http://www.springframework.org/schema/beans/spring-beans.xsd http://www.springframework.org/schema/rabbit http://www.springframework.org/schema/rabbit/spring-rabbit.xsd http://www.springframework.org/schema/context https://www.springframework.org/schema/context/spring-context.xsd">

    <!--加载rabbitmq.properties-->
    <context:property-placeholder location="classpath:rabbitmq.properties"/>

    <!--配置连接工厂-->
    <rabbit:connection-factory
            id="connectionFactory"
            host="${rabbitmq.host}"
            port="${rabbitmq.port}"
            username="${rabbitmq.username}"
            password="${rabbitmq.password}"
            virtual-host="${rabbitmq.virtual-host}"/>

    <!--配置监听器-->
    <!--简单模式-->
    <bean id="simpleListener" class="com.qbb.listener.SimpleListener"/>
    <!--工作队列模式-->
    <bean id="workQueueListener1" class="com.qbb.listener.WorkQueueListener1"/>
    <bean id="workQueueListener2" class="com.qbb.listener.WorkQueueListener2"/>

    <!--将监听器放入rabbit容器-->
    <rabbit:listener-container connection-factory="connectionFactory">
        <!--简单模式-->
        <rabbit:listener ref="simpleListener" queue-names="spring-simple-queue"/>
        <!--工作队列模式-->
        <rabbit:listener ref="workQueueListener1" queue-names="spring-work-queue"/>
        <rabbit:listener ref="workQueueListener2" queue-names="spring-work-queue"/>
    </rabbit:listener-container>

</beans>
4.创建两个监听类
package com.qbb.listener;

import org.springframework.amqp.core.Message;
import org.springframework.amqp.core.MessageListener;

/**
 * @author QiuQiu&LL (个人博客:https://www.cnblogs.com/qbbit)
 * @version 1.0
 * @date 2022-03-29  0:09
 * @Description:消息队列模式
 */
public class WorkQueueListener2 implements MessageListener {
    @Override
    public void onMessage(Message message) {
        System.out.println("消费者2唯一标识 =" + message.getMessageProperties().getConsumerTag());
        System.out.println("消费者2消息唯一标识 =" + message.getMessageProperties().getDeliveryTag());
        System.out.println("消费者2交换机名称 =" + message.getMessageProperties().getReceivedExchange());
        System.out.println("消费者2路由key =" + message.getMessageProperties().getReceivedRoutingKey());

        System.out.println("消费者2消费的消息 =" + new String(message.getBody()));
    }
}

------------


package com.qbb.listener;

import org.springframework.amqp.core.Message;
import org.springframework.amqp.core.MessageListener;

/**
 * @author QiuQiu&LL (个人博客:https://www.cnblogs.com/qbbit)
 * @version 1.0
 * @date 2022-03-29  0:09
 * @Description:消息队列模式
 */
public class WorkQueueListener1 implements MessageListener {
    @Override
    public void onMessage(Message message) {
        System.out.println("消费者1唯一标识 =" + message.getMessageProperties().getConsumerTag());
        System.out.println("消费者1消息唯一标识 =" + message.getMessageProperties().getDeliveryTag());
        System.out.println("消费者1交换机名称 =" + message.getMessageProperties().getReceivedExchange());
        System.out.println("消费者1路由key =" + message.getMessageProperties().getReceivedRoutingKey());

        System.out.println("消费者1消费的消息 =" + new String(message.getBody()));
    }
}
执行测试类测试结果:
消费者1唯一标识 =amq.ctag-Jh86rHgn7_CftQS9Klseew
消费者1消息唯一标识 =1
消费者1交换机名称 =
消费者1路由key =spring-work-queue
消费者2唯一标识 =amq.ctag-CP-q5LpFxWo9RY4yOpgMGQ
消费者2消息唯一标识 =1
消费者2交换机名称 =
消费者1消费的消息 =hello QiuQiu Spring-MQ-WorkQueue0
消费者2路由key =spring-work-queue
消费者2消费的消息 =hello QiuQiu Spring-MQ-WorkQueue1
消费者2唯一标识 =amq.ctag-CP-q5LpFxWo9RY4yOpgMGQ
消费者2消息唯一标识 =2
消费者2交换机名称 =
消费者2路由key =spring-work-queue
消费者2消费的消息 =hello QiuQiu Spring-MQ-WorkQueue3
消费者2唯一标识 =amq.ctag-CP-q5LpFxWo9RY4yOpgMGQ
消费者2消息唯一标识 =3
消费者2交换机名称 =
消费者2路由key =spring-work-queue
消费者2消费的消息 =hello QiuQiu Spring-MQ-WorkQueue5
消费者2唯一标识 =amq.ctag-CP-q5LpFxWo9RY4yOpgMGQ
消费者2消息唯一标识 =4
消费者2交换机名称 =
消费者2路由key =spring-work-queue
消费者2消费的消息 =hello QiuQiu Spring-MQ-WorkQueue7
消费者2唯一标识 =amq.ctag-CP-q5LpFxWo9RY4yOpgMGQ
消费者2消息唯一标识 =5
消费者2交换机名称 =
消费者2路由key =spring-work-queue
消费者2消费的消息 =hello QiuQiu Spring-MQ-WorkQueue9
消费者1唯一标识 =amq.ctag-Jh86rHgn7_CftQS9Klseew
消费者1消息唯一标识 =2
消费者1交换机名称 =
消费者1路由key =spring-work-queue
消费者1消费的消息 =hello QiuQiu Spring-MQ-WorkQueue2
消费者1唯一标识 =amq.ctag-Jh86rHgn7_CftQS9Klseew
消费者1消息唯一标识 =3
消费者1交换机名称 =
消费者1路由key =spring-work-queue
消费者1消费的消息 =hello QiuQiu Spring-MQ-WorkQueue4
消费者1唯一标识 =amq.ctag-Jh86rHgn7_CftQS9Klseew
消费者1消息唯一标识 =4
消费者1交换机名称 =
消费者1路由key =spring-work-queue
消费者1消费的消息 =hello QiuQiu Spring-MQ-WorkQueue6
消费者1唯一标识 =amq.ctag-Jh86rHgn7_CftQS9Klseew
消费者1消息唯一标识 =5
消费者1交换机名称 =
消费者1路由key =spring-work-queue
消费者1消费的消息 =hello QiuQiu Spring-MQ-WorkQueue8
可以看出10条消息平均分配个两个消费者
14.Spring 整合 RabbitMQ(发布订阅模式,routing(路由模式),topic模式),这里我就把三种情况写一起啦,代码和配置文件中都有详细的注释.不然太长了阅读也不方便spring-rabbitmq-producer.xml配置文件
<?xml version="1.0" encoding="UTF-8"?>
<beans xmlns="http://www.springframework.org/schema/beans"
       xmlns:xsi="http://www.w3.org/2001/XMLSchema-instance" xmlns:rabbit="http://www.springframework.org/schema/rabbit"
       xmlns:context="http://www.springframework.org/schema/context"
       xsi:schemaLocation="http://www.springframework.org/schema/beans http://www.springframework.org/schema/beans/spring-beans.xsd http://www.springframework.org/schema/rabbit http://www.springframework.org/schema/rabbit/spring-rabbit.xsd http://www.springframework.org/schema/context https://www.springframework.org/schema/context/spring-context.xsd">

    <!--加载rabbitmq.properties-->
    <context:property-placeholder location="classpath:rabbitmq.properties"/>

    <!--配置连接工厂-->
    <rabbit:connection-factory
            id="connectionFactory"
            host="${rabbitmq.host}"
            port="${rabbitmq.port}"
            username="${rabbitmq.username}"
            password="${rabbitmq.password}"
            virtual-host="${rabbitmq.virtual-host}"/>

    <!--RabbitAdmin 用于远程创建、管理交换机、队列-->
    <rabbit:admin connection-factory="connectionFactory"/>

    <!--声明队列:
        id 属性方便下面引用(当然 id 属性可以省略,通过 name 属性引用也行)
        name 属性执行创建队列的名称(name 属性不可省略,否则无法定义队列名称),
        auto-declare 属性为 true 表示不存在则自动创建-->
    <rabbit:queue id="spring-queue" name="spring-queue" auto-declare="true"></rabbit:queue>

    <!--定义 rabbitTemplate 对象操作可以在代码中方便发送消息-->
    <rabbit:template connection-factory="connectionFactory" id="rabbitTemplate"/>

    <!--==================简单模式==================-->
    <rabbit:queue id="spring-simple-queue" name="spring-simple-queue" durable="false" auto-delete="false" auto-declare="true"/>

    <!--==================工作队列模式==================-->
    <rabbit:queue id="spring-work-queue" name="spring-work-queue" durable="false" auto-delete="false" auto-declare="true"/>

    <!--==================发布订阅模式==================-->
    <rabbit:queue id="spring-fanout-queue1" name="spring-fanout-queue1" durable="false" auto-delete="false" auto-declare="true"/>
    <rabbit:queue id="spring-fanout-queue2" name="spring-fanout-queue2" durable="false" auto-delete="false" auto-declare="true"/>

    <!--创建交换机-->
    <rabbit:fanout-exchange name="spring-fanout-exchange">
        <!--绑定队列-->
        <rabbit:bindings>
            <rabbit:binding queue="spring-fanout-queue1"/>
            <rabbit:binding queue="spring-fanout-queue2"/>
        </rabbit:bindings>
    </rabbit:fanout-exchange>

    <!--==================routing模式==================-->
    <rabbit:queue id="spring-routing-queue1" name="spring-routing-queue1" durable="false" auto-delete="false" auto-declare="true"/>
    <rabbit:queue id="spring-routing-queue2" name="spring-routing-queue2" durable="false" auto-delete="false" auto-declare="true"/>

    <!--创建交换机-->
    <rabbit:direct-exchange name="spring-routing-exchange">
        <!--绑定队列-->
        <rabbit:bindings>
            <rabbit:binding queue="spring-routing-queue1" key="error"/>

            <rabbit:binding queue="spring-routing-queue2" key="error"/>
            <rabbit:binding queue="spring-routing-queue2" key="info"/>
            <rabbit:binding queue="spring-routing-queue2" key="warning"/>
        </rabbit:bindings>
    </rabbit:direct-exchange>

    <!--==================topic模式==================-->
    <rabbit:queue id="spring-topic-queue1" name="spring-topic-queue1" durable="false" auto-delete="false" auto-declare="true"/>
    <rabbit:queue id="spring-topic-queue2" name="spring-topic-queue2" durable="false" auto-delete="false" auto-declare="true"/>

    <!--创建交换机-->
    <rabbit:topic-exchange name="spring-topic-exchange">
        <!--绑定队列-->
        <rabbit:bindings>
            <rabbit:binding pattern="*.orange.*" queue="spring-topic-queue1"></rabbit:binding>

            <rabbit:binding pattern="*.*.rabbit" queue="spring-topic-queue2"></rabbit:binding>
            <rabbit:binding pattern="lazy.#" queue="spring-topic-queue2"></rabbit:binding>
        </rabbit:bindings>
    </rabbit:topic-exchange>

</beans>
producer生产者的MQTest.java
package com.qbb;

import org.junit.Test;
import org.junit.runner.RunWith;
import org.springframework.amqp.rabbit.core.RabbitTemplate;
import org.springframework.beans.factory.annotation.Autowired;
import org.springframework.test.context.ContextConfiguration;
import org.springframework.test.context.junit4.SpringJUnit4ClassRunner;

/**
 * @author QiuQiu&LL (个人博客:https://www.cnblogs.com/qbbit)
 * @version 1.0
 * @date 2022-03-28  23:56
 * @Description:
 */
@RunWith(SpringJUnit4ClassRunner.class)
@ContextConfiguration(locations = "classpath:spring-rabbitmq-producer.xml")
public class MQTest {

    @Autowired
    private RabbitTemplate rabbitTemplate;

    /**
     * 简单模式
     */
    @Test
    public void testSimple() {
        rabbitTemplate.convertAndSend("spring-simple-queue", "hello QiuQiu Spring-MQ-Simple");
    }

    /**
     * 工作队列模式
     */
    @Test
    public void testWorkQueue() {
        for (int i = 0; i < 10; i++) {
            rabbitTemplate.convertAndSend("spring-work-queue", "hello QiuQiu Spring-MQ-WorkQueue" + i);
        }
    }

    /**
     * 发布订阅模式
     */
    @Test
    public void testFanout() {
        rabbitTemplate.convertSendAndReceive("spring-fanout-exchange", "", "hello QiuQiu Spring-MQ-PubSub");
    }

    /**
     * routing模式
     */
    @Test
    public void testRouting() {
        rabbitTemplate.convertSendAndReceive("spring-routing-exchange", "error", "hello QiuQiu Spring-MQ-Routing-AAA");
        rabbitTemplate.convertSendAndReceive("spring-routing-exchange", "info", "hello QiuQiu Spring-MQ-Routing-BBB");
    }

    /**
     * topic模式
     */
    @Test
    public void testTopic() {
        rabbitTemplate.convertSendAndReceive("spring-topic-exchange", "lazy.orange.qiu", "hello QiuQiu Spring-MQ-Topic-AAA");
        rabbitTemplate.convertSendAndReceive("spring-topic-exchange", "qiu.ll.rabbit", "hello QiuQiu Spring-MQ-Topic-BBB");
    }
}
spring-rabbitmq-consumer.xml配置文件
<?xml version="1.0" encoding="UTF-8"?>
<beans xmlns="http://www.springframework.org/schema/beans"
       xmlns:xsi="http://www.w3.org/2001/XMLSchema-instance" xmlns:rabbit="http://www.springframework.org/schema/rabbit"
       xmlns:context="http://www.springframework.org/schema/context"
       xsi:schemaLocation="http://www.springframework.org/schema/beans http://www.springframework.org/schema/beans/spring-beans.xsd http://www.springframework.org/schema/rabbit http://www.springframework.org/schema/rabbit/spring-rabbit.xsd http://www.springframework.org/schema/context https://www.springframework.org/schema/context/spring-context.xsd">

    <!--加载rabbitmq.properties-->
    <context:property-placeholder location="classpath:rabbitmq.properties"/>

    <!--配置连接工厂-->
    <rabbit:connection-factory
            id="connectionFactory"
            host="${rabbitmq.host}"
            port="${rabbitmq.port}"
            username="${rabbitmq.username}"
            password="${rabbitmq.password}"
            virtual-host="${rabbitmq.virtual-host}"/>

    <!--配置监听器-->
    <!--简单模式-->
    <bean id="simpleListener" class="com.qbb.listener.SimpleListener"/>

    <!--工作队列模式-->
    <bean id="workQueueListener1" class="com.qbb.listener.WorkQueueListener1"/>
    <bean id="workQueueListener2" class="com.qbb.listener.WorkQueueListener2"/>

    <!--发布订阅模式-->
    <bean id="fanoutListener1" class="com.qbb.listener.FanoutListener1"/>
    <bean id="fanoutListener2" class="com.qbb.listener.FanoutListener2"/>

    <!--routing模式-->
    <bean id="routingListener1" class="com.qbb.listener.RoutingListener1"/>
    <bean id="routingListener2" class="com.qbb.listener.RoutingListener2"/>

    <!--topic模式-->
    <bean id="topicListener1" class="com.qbb.listener.TopicListener1"/>
    <bean id="topicListener2" class="com.qbb.listener.TopicListener2"/>


    <!--将监听器放入rabbit容器-->
    <rabbit:listener-container connection-factory="connectionFactory">
        <!--简单模式-->
        <rabbit:listener ref="simpleListener" queue-names="spring-simple-queue"/>

        <!--工作队列模式-->
        <rabbit:listener ref="workQueueListener1" queue-names="spring-work-queue"/>
        <rabbit:listener ref="workQueueListener2" queue-names="spring-work-queue"/>

        <!--发布订阅模式-->
        <rabbit:listener ref="fanoutListener1" queue-names="spring-fanout-queue1"/>
        <rabbit:listener ref="fanoutListener2" queue-names="spring-fanout-queue2"/>

        <!--routing模式-->
        <rabbit:listener ref="routingListener1" queue-names="spring-routing-queue1"/>
        <rabbit:listener ref="routingListener2" queue-names="spring-routing-queue2"/>

        <!--topic模式-->
        <rabbit:listener ref="topicListener1" queue-names="spring-topic-queue1"/>
        <rabbit:listener ref="topicListener2" queue-names="spring-topic-queue2"/>
    </rabbit:listener-container>

</beans>
FanoutListener1监听器
package com.qbb.listener;

import org.springframework.amqp.core.Message;
import org.springframework.amqp.core.MessageListener;

/**
 * @author QiuQiu&LL (个人博客:https://www.cnblogs.com/qbbit)
 * @version 1.0
 * @date 2022-03-29  0:09
 * @Description:发布订阅模式
 */
public class FanoutListener1 implements MessageListener {
    @Override
    public void onMessage(Message message) {
        System.out.println("消费者1唯一标识 =" + message.getMessageProperties().getConsumerTag());
        System.out.println("消费者1消息唯一标识 =" + message.getMessageProperties().getDeliveryTag());
        System.out.println("消费者1交换机名称 =" + message.getMessageProperties().getReceivedExchange());
        System.out.println("消费者1路由key =" + message.getMessageProperties().getReceivedRoutingKey());

        System.out.println("消费者1消费的消息 =" + new String(message.getBody()));
    }
}
FanoutListener2监听器
package com.qbb.listener;

import org.springframework.amqp.core.Message;
import org.springframework.amqp.core.MessageListener;

/**
 * @author QiuQiu&LL (个人博客:https://www.cnblogs.com/qbbit)
 * @version 1.0
 * @date 2022-03-29  0:09
 * @Description:发布订阅模式
 */
public class FanoutListener2 implements MessageListener {
    @Override
    public void onMessage(Message message) {
        System.out.println("消费者2唯一标识 =" + message.getMessageProperties().getConsumerTag());
        System.out.println("消费者2消息唯一标识 =" + message.getMessageProperties().getDeliveryTag());
        System.out.println("消费者2交换机名称 =" + message.getMessageProperties().getReceivedExchange());
        System.out.println("消费者2路由key =" + message.getMessageProperties().getReceivedRoutingKey());

        System.out.println("消费者2消费的消息 =" + new String(message.getBody()));
    }
}
RoutingListener1监听器
package com.qbb.listener;

import org.springframework.amqp.core.Message;
import org.springframework.amqp.core.MessageListener;

/**
 * @author QiuQiu&LL (个人博客:https://www.cnblogs.com/qbbit)
 * @version 1.0
 * @date 2022-03-29  0:09
 * @Description:routing模式
 */
public class RoutingListener1 implements MessageListener {
    @Override
    public void onMessage(Message message) {
        System.out.println("消费者1唯一标识 =" + message.getMessageProperties().getConsumerTag());
        System.out.println("消费者1消息唯一标识 =" + message.getMessageProperties().getDeliveryTag());
        System.out.println("消费者1交换机名称 =" + message.getMessageProperties().getReceivedExchange());
        System.out.println("消费者1路由key =" + message.getMessageProperties().getReceivedRoutingKey());

        System.out.println("消费者1消费的消息 =" + new String(message.getBody()));
    }
}
RoutingListener2监听器
package com.qbb.listener;

import org.springframework.amqp.core.Message;
import org.springframework.amqp.core.MessageListener;

/**
 * @author QiuQiu&LL (个人博客:https://www.cnblogs.com/qbbit)
 * @version 1.0
 * @date 2022-03-29  0:09
 * @Description:routing模式
 */
public class RoutingListener2 implements MessageListener {
    @Override
    public void onMessage(Message message) {
        System.out.println("消费者2唯一标识 =" + message.getMessageProperties().getConsumerTag());
        System.out.println("消费者2消息唯一标识 =" + message.getMessageProperties().getDeliveryTag());
        System.out.println("消费者2交换机名称 =" + message.getMessageProperties().getReceivedExchange());
        System.out.println("消费者2路由key =" + message.getMessageProperties().getReceivedRoutingKey());

        System.out.println("消费者2消费的消息 =" + new String(message.getBody()));
    }
}
TopicListener1监听器
package com.qbb.listener;

import org.springframework.amqp.core.Message;
import org.springframework.amqp.core.MessageListener;

/**
 * @author QiuQiu&LL (个人博客:https://www.cnblogs.com/qbbit)
 * @version 1.0
 * @date 2022-03-29  0:09
 * @Description:topic模式
 */
public class TopicListener1 implements MessageListener {
    @Override
    public void onMessage(Message message) {
        System.out.println("消费者1唯一标识 =" + message.getMessageProperties().getConsumerTag());
        System.out.println("消费者1消息唯一标识 =" + message.getMessageProperties().getDeliveryTag());
        System.out.println("消费者1交换机名称 =" + message.getMessageProperties().getReceivedExchange());
        System.out.println("消费者1路由key =" + message.getMessageProperties().getReceivedRoutingKey());

        System.out.println("消费者1消费的消息 =" + new String(message.getBody()));
    }
}
TopicListener2监听器
package com.qbb.listener;

import org.springframework.amqp.core.Message;
import org.springframework.amqp.core.MessageListener;

/**
 * @author QiuQiu&LL (个人博客:https://www.cnblogs.com/qbbit)
 * @version 1.0
 * @date 2022-03-29  0:09
 * @Description:topic模式
 */
public class TopicListener2 implements MessageListener {
    @Override
    public void onMessage(Message message) {
        System.out.println("消费者2唯一标识 =" + message.getMessageProperties().getConsumerTag());
        System.out.println("消费者2消息唯一标识 =" + message.getMessageProperties().getDeliveryTag());
        System.out.println("消费者2交换机名称 =" + message.getMessageProperties().getReceivedExchange());
        System.out.println("消费者2路由key =" + message.getMessageProperties().getReceivedRoutingKey());

        System.out.println("消费者2消费的消息 =" + new String(message.getBody()));
    }
}
consumer消息消费者的MQTest.java
package com.qbb;

import org.junit.Test;
import org.junit.runner.RunWith;
import org.springframework.test.context.ContextConfiguration;
import org.springframework.test.context.junit4.SpringJUnit4ClassRunner;

/**
 * @author QiuQiu&LL (个人博客:https://www.cnblogs.com/qbbit)
 * @version 1.0
 * @date 2022-03-29  0:14
 * @Description:
 */
@RunWith(SpringJUnit4ClassRunner.class)
@ContextConfiguration(locations = "classpath:spring-rabbitmq-consumer.xml")
public class MQTest {

    @Test
    public void test01() {
        while (true) {

        }
    }
}
发布订阅模式测试据结果:
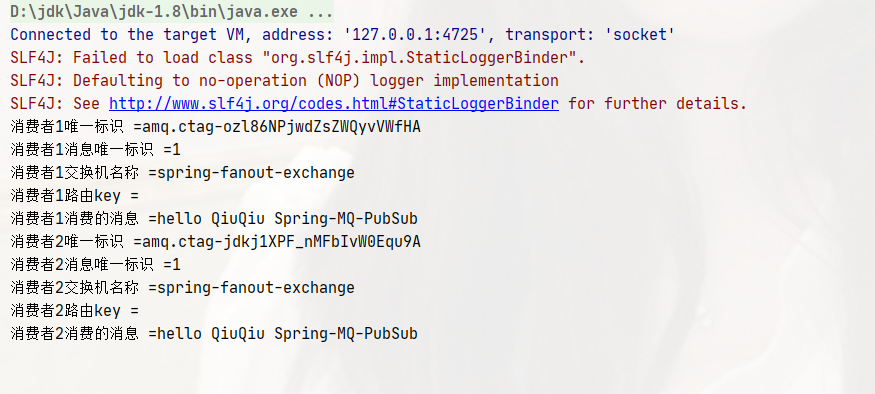
routing路由模式测试结果:
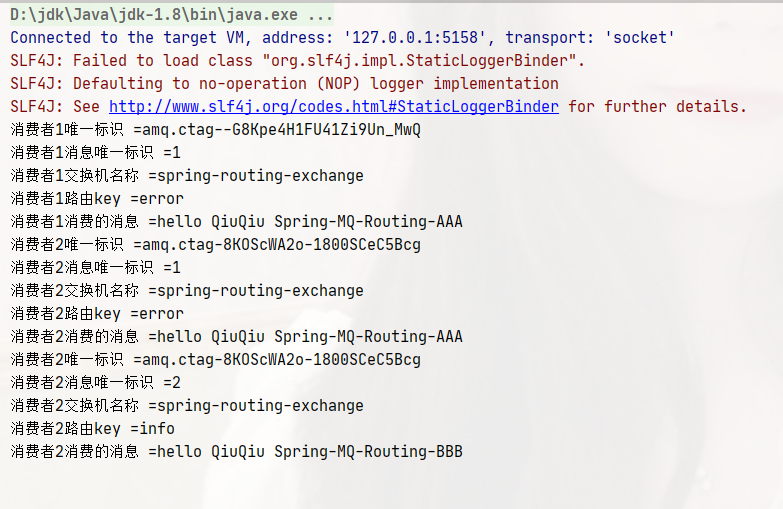
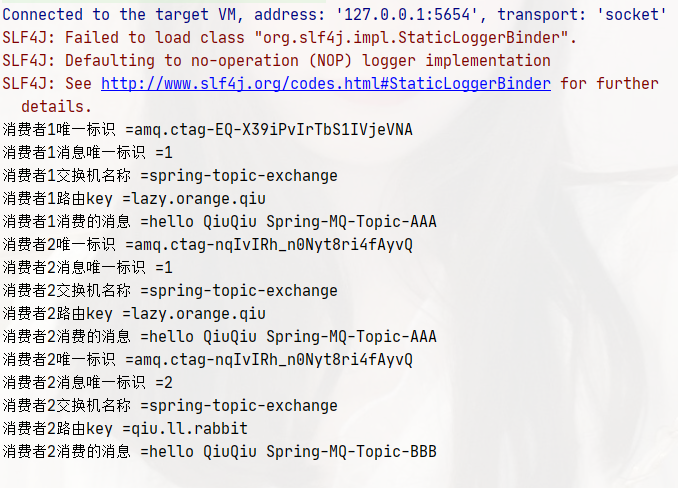
topic模式测试结果:
在使用 RabbitMQ 的时候,我们当然希望杜绝任何消息丢失或者投递失败情况。 RabbitMQ 为我们提供了两种方式用来控制消息的投递可靠性模式
- confirm 确认模式
- return 退回模式
rabbitmq 整个消息投递的路径为:
producer—>rabbitmq broker—>exchange—>queue—>consumer
l.消息从 producer 到 exchange 则会返回一个 confirmCallback 。
2.消息从 exchange–>queue 投递失败则会返回一个 returnCallback 。
confirm 确认模式
修改spring-rabbitmq-producer.xml
<!--配置连接工厂-->
    <rabbit:connection-factory
            id="connectionFactory"
            host="${rabbitmq.host}"
            port="${rabbitmq.port}"
            username="${rabbitmq.username}"
            password="${rabbitmq.password}"
            virtual-host="${rabbitmq.virtual-host}"

			添加如下两行设置,开启confirm和return模式
            publisher-returns="true"
            confirm-type="CORRELATED"/>
修改测试类MQTest.java
/**
     * topic模式
     */
    @Test
    public void testTopic() {
        // 发送消息之前设置ConfirmCallBack回调方法
        rabbitTemplate.setConfirmCallback(new RabbitTemplate.ConfirmCallback() {
            /**
             * CorrelationData correlationData
             * boolean ack : 当消费者成功把消息发送给交换机 ack=true 发送失败 ack=false
             * String cause : 消息发送失败的原因
             */
            @Override
            public void confirm(CorrelationData correlationData, boolean ack, String cause) {
                if (ack) {
                    System.out.println("消息发送成功:cause="+cause);
                }else {
			// 发送失败我们可以做其他的补救措施,例如发送给其他的交换机
                    System.out.println("消息发送失败:cause=" + cause);
                }
            }
        });
        rabbitTemplate.convertSendAndReceive("spring-topic-exchange", "lazy.orange.qiu", "hello QiuQiu Spring-MQ-Topic-AAA");
        // rabbitTemplate.convertSendAndReceive("spring-topic-exchange", "qiu.ll.rabbit", "hello QiuQiu Spring-MQ-Topic-BBB");
    }

上面看到的是发送成功的情况,我们把交换机名字故意写错,看看会有什么效果
rabbitTemplate.convertSendAndReceive("spring-topic-exchange-111", "lazy.orange.qiu", "hello QiuQiu Spring-MQ-Topic-AAA");

return 退回模式
开启return 退回模式支持,上面我们已经开启了
发送消息之前设置ReturnCallBack回调方法
rabbitTemplate.setReturnsCallback(new RabbitTemplate.ReturnsCallback() {
            @Override
            public void returnedMessage(ReturnedMessage returnedMessage) {
			// 出错了可以指定发送给其他的queue
                System.out.println("returnedMessage.getExchange() = " + returnedMessage.getExchange());
                System.out.println("returnedMessage.getMessage() = " + returnedMessage.getMessage());
                System.out.println("returnedMessage.getReplyCode() = " + returnedMessage.getReplyCode());
                System.out.println("returnedMessage.getReplyText() = " + returnedMessage.getReplyText());
                System.out.println("returnedMessage.getRoutingKey() = " + returnedMessage.getRoutingKey());
            }
        });
设置交换机把消息发送给队列失败时,强制把消息回退给消息发送者(默认为false即丢失消息)
rabbitTemplate.setMandatory(true);

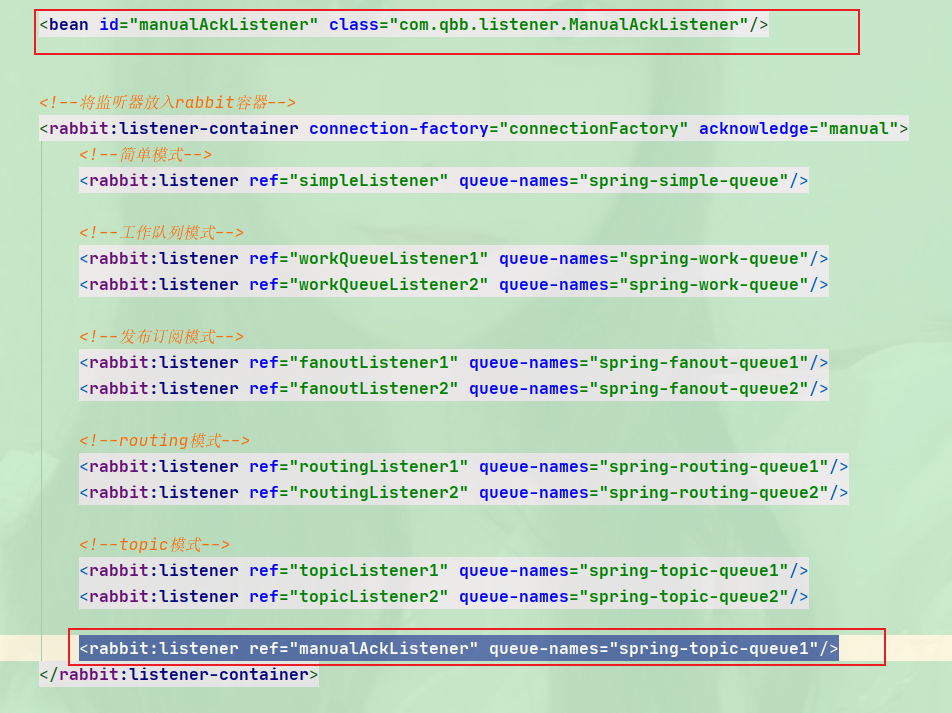
前面两种模式我们是确保了producer->exchange和exchange->queue的消息可靠性,但是我们消息从queue->consumer我们怎么办证消息一定投递成功呢?下面我们就解决一下这个问题
其实也简单,我们只需要关闭自动ACK,然后再处理完业务逻辑后手动ACK即可
- 修改spring-rabbitmq-consumer.xml
...
<bean id="manualAckListener" class="com.qbb.listener.ManualAckListener"/>
...
<rabbit:listener ref="manualAckListener" queue-names="spring-topic-queue1"/>
- 实现ChannelAwareMessageListener监听器
package com.qbb.listener;

import com.rabbitmq.client.Channel;
import org.springframework.amqp.core.Message;
import org.springframework.amqp.rabbit.listener.api.ChannelAwareMessageListener;

import java.io.IOException;

/**
 * @author QiuQiu&LL (个人博客:https://www.cnblogs.com/qbbit)
 * @version 1.0
 * @date 2022-03-29  23:27
 * @Description:
 */
public class ManualAckListener implements ChannelAwareMessageListener {
    @Override
    public void onMessage(Message message, Channel channel) throws Exception {
        try {
            System.out.println("消费者消费的消息为:"+new String(message.getBody()));

            // ....业务逻辑... 此处有可能出现异常从而导致消息无法正常手动确认

            // 手动确认
            channel.basicAck(message.getMessageProperties().getDeliveryTag(), false);
        } catch (IOException e) {
            e.printStackTrace();
            /**
             * 参数1: 消息唯一标识
             * 参数2: 是否重新入队列
             */
            // channel.basicReject(message.getMessageProperties().getDeliveryTag(), false);
            /**
             * 参数1: 消息唯一标识
             * 参数2: 不需要多个消费与队列确认,只要有一个消费者消费了就证明消息被消费了
             * 参数3: 是否重新入队列,注意如果设置为true则会出现反复死循环般的消费消息
             */
            channel.basicNack(message.getMessageProperties().getDeliveryTag(), false, false);
        }
    }
}
测试结果:消息即可有正常消费,出现错误了也可以进行响应的补救措施,保证了消息从queue->consumer的可靠性

消息可靠性总结
1.持久化 exchange和queue持久化设置: durable="true",Spring整合RabbitMQ消息本身就是持久化的
2.生产方确认 ConfirmCallBack 和 returnCallBack
3.消费方确认 手动Ack
4.Broker 高可用,搭建集群
RabbitMQ 应用性问题
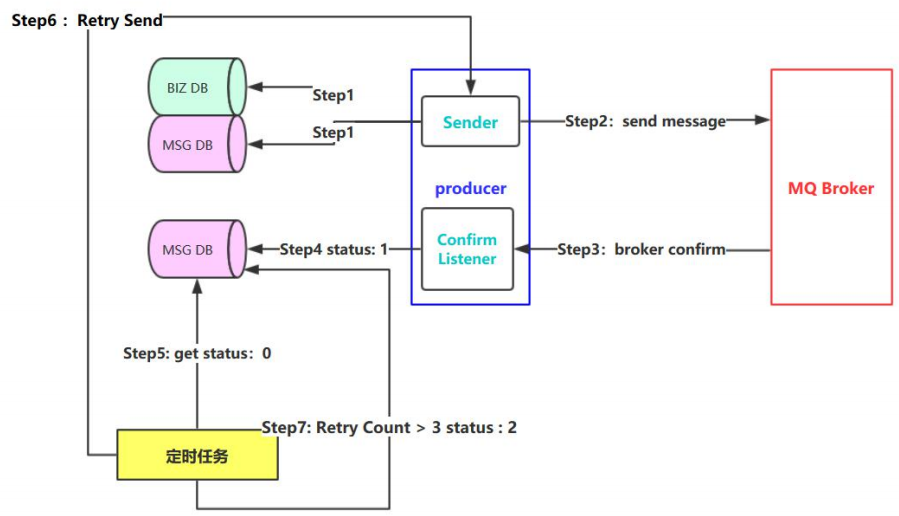
- 消息百分百投递
假如在发送的过程中出现了网络抖动或者其他的不可逆因素,如何保证消息不丢失呢?
从上图我们可以将要消费的消息存入一个MSGDB的数据库,给它设置一个状态status=0代表未消费,当出现消费成功则修改状态为status=1,如果出现了网络故障status=0我们编写一个定时任务,指定时间把status=0的消息查询出来再次执行即可
上面的定时任务和存入将消息数据库确实可以解决一些问题,但是同时也带来了消息重复消费的问题,也就是消息幂等性问题,如何解决消息幂等性问题呢?
16.消费端限流
- 业务ID
- 乐观锁
修改配置文件
prefetch="1"
package com.qbb.listener;

import com.rabbitmq.client.Channel;
import org.springframework.amqp.core.Message;
import org.springframework.amqp.rabbit.listener.api.ChannelAwareMessageListener;

/**
 * @author QiuQiu&LL (个人博客:https://www.cnblogs.com/qbbit)
 * @version 1.0
 * @date 2022-03-30  0:40
 * @Description:
 */
public class LimitListener1 implements ChannelAwareMessageListener {
    @Override
    public void onMessage(Message message, Channel channel) throws Exception {
        System.out.println("消费者1消息为:" + new String(message.getBody()));

        channel.basicAck(message.getMessageProperties().getDeliveryTag(), false);
    }
}

package com.qbb.listener;

import com.rabbitmq.client.Channel;
import org.springframework.amqp.core.Message;
import org.springframework.amqp.rabbit.listener.api.ChannelAwareMessageListener;

/**
 * @author QiuQiu&LL (个人博客:https://www.cnblogs.com/qbbit)
 * @version 1.0
 * @date 2022-03-30  0:40
 * @Description:
 */
public class LimitListener2 implements ChannelAwareMessageListener {
    @Override
    public void onMessage(Message message, Channel channel) throws Exception {
        System.out.println("消费者2消息为:" + new String(message.getBody()));

        channel.basicAck(message.getMessageProperties().getDeliveryTag(), false);
    }
}
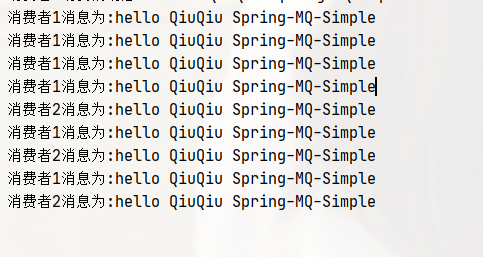
测试结果
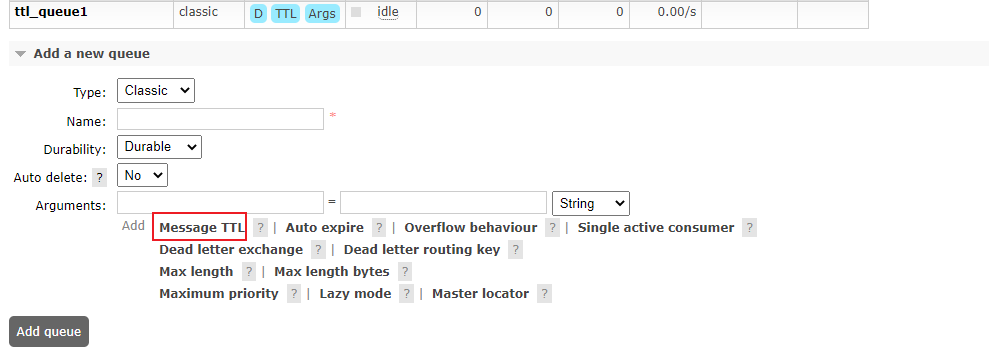
控制台方式操作:添加相应的队列设置过期时间,发送消息测试
代码方式操作之指定所有消息过期时间
 <!--==================TTL-QUEUE==================-->
    <rabbit:queue id="ttl-queue1" name="ttl-queue2" auto-declare="true">
        <rabbit:queue-arguments>
            <entry key="x-message-ttl" value="10000" value-type="java.lang.Integer"></entry>
        </rabbit:queue-arguments>
    </rabbit:queue>

代码方式操作之指定某个消息过期时间
@Test
    public void testTTL2() {
        MessagePostProcessor messagePostProcessor = new MessagePostProcessor() {
            @Override
            public Message postProcessMessage(Message message) throws AmqpException {
                message.getMessageProperties().setExpiration("10000");
                return message;
            }
        };
        rabbitTemplate.convertAndSend("ttl-queue2", (Object) "qiuqiu", messagePostProcessor);
    }
注意:RabbitMQ只会检查队列头部的那个信息是否过期,过期及剔除,队列后面的消息即使过期了也不会剔除
18.死信队列死信,顾名思义就是无法被消费的消息,字面意思可以这 样理解,一般来说,producer 将消息投递到 broker 或者直接到 queue 里了,consumer 从 queue 取出消息进行消费,但某些时候由于特定的原因导致 queue 中的某些消息无法被 消费,这样的消息如果没有后续的处理,就变成了死信,有死信,自然就有了死信队列;
消息成为死信的三种情况:
1.队列消息数量到达限制;比如给队列最大只能存储10条消息,当第11条消息进来的时候存 不下了,第1条消息就被称为死信
2.消费者拒接消费消息,basicNack/basicReject,并且不把消息重新放入原目标队列, requeue=false;
3.原队列存在消息过期设置,消息到达超时时间未被消费;
<!--==================正常QUEUE EXCHANGE==================-->
    <rabbit:queue id="normal-queue" name="normal-queue">
        <rabbit:queue-arguments>
            <!--绑定死信交换机-->
            <entry key="x-dead-letter-exchange" value="dead-exchange"/>
            <!--绑定routing-key-->
            <entry key="x-dead-letter-routing-key" value="b.c"/>
            <!--设置消息容量-->
            <entry key="x-max-length" value="10" value-type="java.lang.Integer"/>
            <!--统一的过期时间-->
            <entry key="x-message-ttl" value="10000" value-type="java.lang.Integer"/>
        </rabbit:queue-arguments>
    </rabbit:queue>
    <rabbit:topic-exchange name="normal-exchange">
        <rabbit:bindings>
            <rabbit:binding pattern="a.#" queue="normal-queue"></rabbit:binding>
        </rabbit:bindings>
    </rabbit:topic-exchange>

    <!--==================死信QUEUE EXCHANGE==================-->
    <rabbit:queue id="dead-queue" name="dead-queue"/>
    <rabbit:topic-exchange name="dead-exchange">
        <rabbit:bindings>
            <rabbit:binding pattern="b.#" queue="dead-queue"></rabbit:binding>
        </rabbit:bindings>
    </rabbit:topic-exchange>
@Test
    public void testDeadQueue() {
        for (int i = 0; i < 12; i++) {
            rabbitTemplate.convertAndSend("normal-exchange", "a.qiu","qiuqiu" + i);
        }
    }

代码配置方式和上面的一样,就是把正常队列设置了一个消息过期时间

生产者:
到入依赖
<?xml version="1.0" encoding="UTF-8"?>
<project xmlns="http://maven.apache.org/POM/4.0.0"
         xmlns:xsi="http://www.w3.org/2001/XMLSchema-instance"
         xsi:schemaLocation="http://maven.apache.org/POM/4.0.0 http://maven.apache.org/xsd/maven-4.0.0.xsd">
    <modelVersion>4.0.0</modelVersion>

    <parent>
        <groupId>org.springframework.boot</groupId>
        <artifactId>spring-boot-starter-parent</artifactId>
        <version>2.6.4</version>
    </parent>


    <groupId>com.qbb</groupId>
    <artifactId>springboot-mq-producer</artifactId>
    <version>1.0-SNAPSHOT</version>

    <dependencies>
        <dependency>
            <groupId>org.springframework.boot</groupId>
            <artifactId>spring-boot-starter-web</artifactId>
        </dependency>
        <dependency>
            <groupId>org.springframework.boot</groupId>
            <artifactId>spring-boot-starter-amqp</artifactId>
        </dependency>
        <dependency>
            <groupId>org.springframework.boot</groupId>
            <artifactId>spring-boot-starter-test</artifactId>
        </dependency>
    </dependencies>

</project>
编写配置类
package com.qbb.mq.config;

import org.springframework.amqp.core.*;
import org.springframework.beans.factory.annotation.Qualifier;
import org.springframework.boot.SpringBootConfiguration;
import org.springframework.context.annotation.Bean;

/**
 * @author QiuQiu&LL (个人博客:https://www.cnblogs.com/qbbit)
 * @version 1.0
 * @date 2022-03-30  1:56
 * @Description:
 */
@SpringBootConfiguration
public class MQProducerConfig {
    public static final String EXCHANGE_NAME = "boot_topic_exchange";
    public static final String QUEUE_NAME = "boot_queue";

    //1.交换机
    @Bean("bootExchange")
    public Exchange bootExchange() {
        return ExchangeBuilder.topicExchange(EXCHANGE_NAME).durable(true).build();
    }

    //2.Queue 队列
    @Bean("bootQueue")
    public Queue bootQueue() {
        return QueueBuilder.durable(QUEUE_NAME).build();
    }

    //3. 队列和交互机绑定关系 Binding
    /* 1. 知道哪个队列 2. 知道哪个交换机 3. routing key */
    @Bean
    public Binding bindQueueExchange(@Qualifier("bootQueue") Queue queue, @Qualifier("bootExchange") Exchange exchange) {
        return BindingBuilder.bind(queue).to(exchange).with("boot.#").noargs();
    }
}
测试一下
package com.qbb.mq;

import org.junit.jupiter.api.Test;
import org.springframework.amqp.rabbit.core.RabbitTemplate;
import org.springframework.beans.factory.annotation.Autowired;
import org.springframework.boot.test.context.SpringBootTest;

/**
 * @author QiuQiu&LL (个人博客:https://www.cnblogs.com/qbbit)
 * @version 1.0
 * @date 2022-03-30  1:58
 * @Description:
 */
@SpringBootTest
public class ProducerTest {

    @Autowired
    private RabbitTemplate rabbitTemplate;

    @Test
    public void test01() {
        rabbitTemplate.convertSendAndReceive("boot_topic_exchange", "boot.qiu", "等我完成目标就来找你...");
    }
}
消费者:
配置监听器类BootMessageListener
@Component
public class BootMessageListener {

    @RabbitListener(queues = "boot_queue")
    public void consumeMessage(Message message) {
        System.out.println("消息为:" + new String(message.getBody()));
    }
}
测试结果


