之前的文章介绍了使用 yapi-to-typescript (下文简称 ytt)生成接口类型定义文件,方便我们直接使用接口的请求和响应类型,能减少很多写接口类型的时间。
使用 yapi-to-typescript 生成接口响应数据的 TS 类型声明
既然能生成接口类型定义文件,那也就可以生成接口请求代码文件咯,可是网上找了下没找到有相关的工具库,想必是每个公司的项目接口请求代码风格差异较大,要开发一个可以灵活配置生成对应代码的库也略显麻烦,比如这篇文章就是教大家如何写出生成请求代码的文件,而我也没有写一个这样的库。
前置条件首先需要了解两个工具库,一个是 ytt,一个是 shelljs。因为 ytt 已经帮我们请求 yapi 拿到了接口数据,我们就没有必要再去获取一次了。
shelljs 是一个具有 shell 功能的工具库,很强大,这里主要用来操作文件系统。
ytt 中提供了钩子函数,在类型文件生成完成后会调用,但是这个函数中我们拿不到 yapi 上的接口,所以需要在 ytt 的 outputFilePath 中手动保存下来。
首先,我们定义两个变量和一个方法:
// 所有接口信息
let interfaceInfos: MyInterface[] = [];
// 所有生成的文件名。方便每次生成的时候先删除
let filesName = new Set<string>();
// 存储所有接口信息。在类型定义文件生成成功后的 success 钩子函数中遍历生成接口调用文件。
const saveInterface = (interfaceInfo: Interface, name: string) => {
  filesName.add(name);
  interfaceInfo.fileName = name;  // 接口数据中增加 fileName 字段,告知这个接口属于哪个文件
  interfaceInfos.push(interfaceInfo as MyInterface);
};
在 outputFilePath 将所有接口保存下来:
      outputFilePath: (interfaceInfo: Interface) => {
        // 接口文档中分类有中文,使用拼音库转成英文拼音
        let nameArr: string[] = pinyin(interfaceInfo._category.name, {
          toneType: 'none',
          nonZh: 'consecutive',
          type: 'array',
        });
        let name: string = camelCase(nameArr.join('-'));

        // 这个函数就是保存所有接口信息的函数
        saveInterface(interfaceInfo, name);

        return `src/types/api/${name}.ts`;
      },
在 ytt 的 success 钩子函数中我们就可以编写生成请求代码的代码了:
  // 这里是 ytt 完成的钩子函数
  {
    success() {
      shelljs.echo('--------------------接口请求代码生成中...');
      // 先删除文件,每次重新生成
      filesName.forEach((fileName) => {
        shelljs.rm('-f', getFilePath(fileName));
      });
      // 遍历接口信息生成接口代码
      interfaceInfos.forEach((item) => {
        generatorRequest(item);
      });
      shelljs.echo('--------------------接口请求代码生成完成');
    },
  }
生成接口代码有几点要注意:
- 接口文件只能生成一次,在第一次生成的时候往里面写入公共代码,如 import 语句。
- 在遍历每个接口数据的时候,可以通过上面往接口数据中添加的 fileName 字段知道这个接口属于哪个文件。
- 对 rest 风格地址的处理。
入口函数:
// 生成接口请求代码
const generatorRequest = (data: MyInterface): void => {
  const filePath = getFilePath(data.fileName);
  writeCommon(data.fileName, filePath);
  const fnName = getFnName(data);
  const [reqType, resType] = getReqResType(fnName);
  const str = `
export const ${fnName} = (${getRest(data)}data?: Types.${reqType}, options?: Options) => {
  return ${getMethod(data)}<Types.${resType}>(
    \`${getReqPath(data)}\`,
    data,
    options
  );
};
`;
  shelljs.ShellString(str).toEnd(filePath);
};
封装 getFilePath 获取操作的文件路径,我把所有文件写在 src/services 中。
type MyInterface = Interface & { fileName: string };

// 生成文件目录路径
const basePath = './src/services';

// 获取编辑的文件的相对路径
export const getFilePath = (fileName: string): string => {
  return `${basePath}/${fileName}.ts`;
};
写入公共内容:
// 写入公共内容,如 import 的依赖,只写一次
const writeCommon = (fileName: string, filePath: string): void => {
  // 使用 shelljs.find 方法判断文件是否存在,从而一些公共内容在首次创建时写入
  const res = shelljs.find(filePath);
  // 0 是找到了,1 是没找到
  if (res.code === 1) {
    // 写入 import 代码
    shelljs
      .ShellString(
        `
import * as Types from '@/types/api/${fileName}';
import request, { Options } from '@/utils/request';
`
      )
      .to(filePath);
  }
};
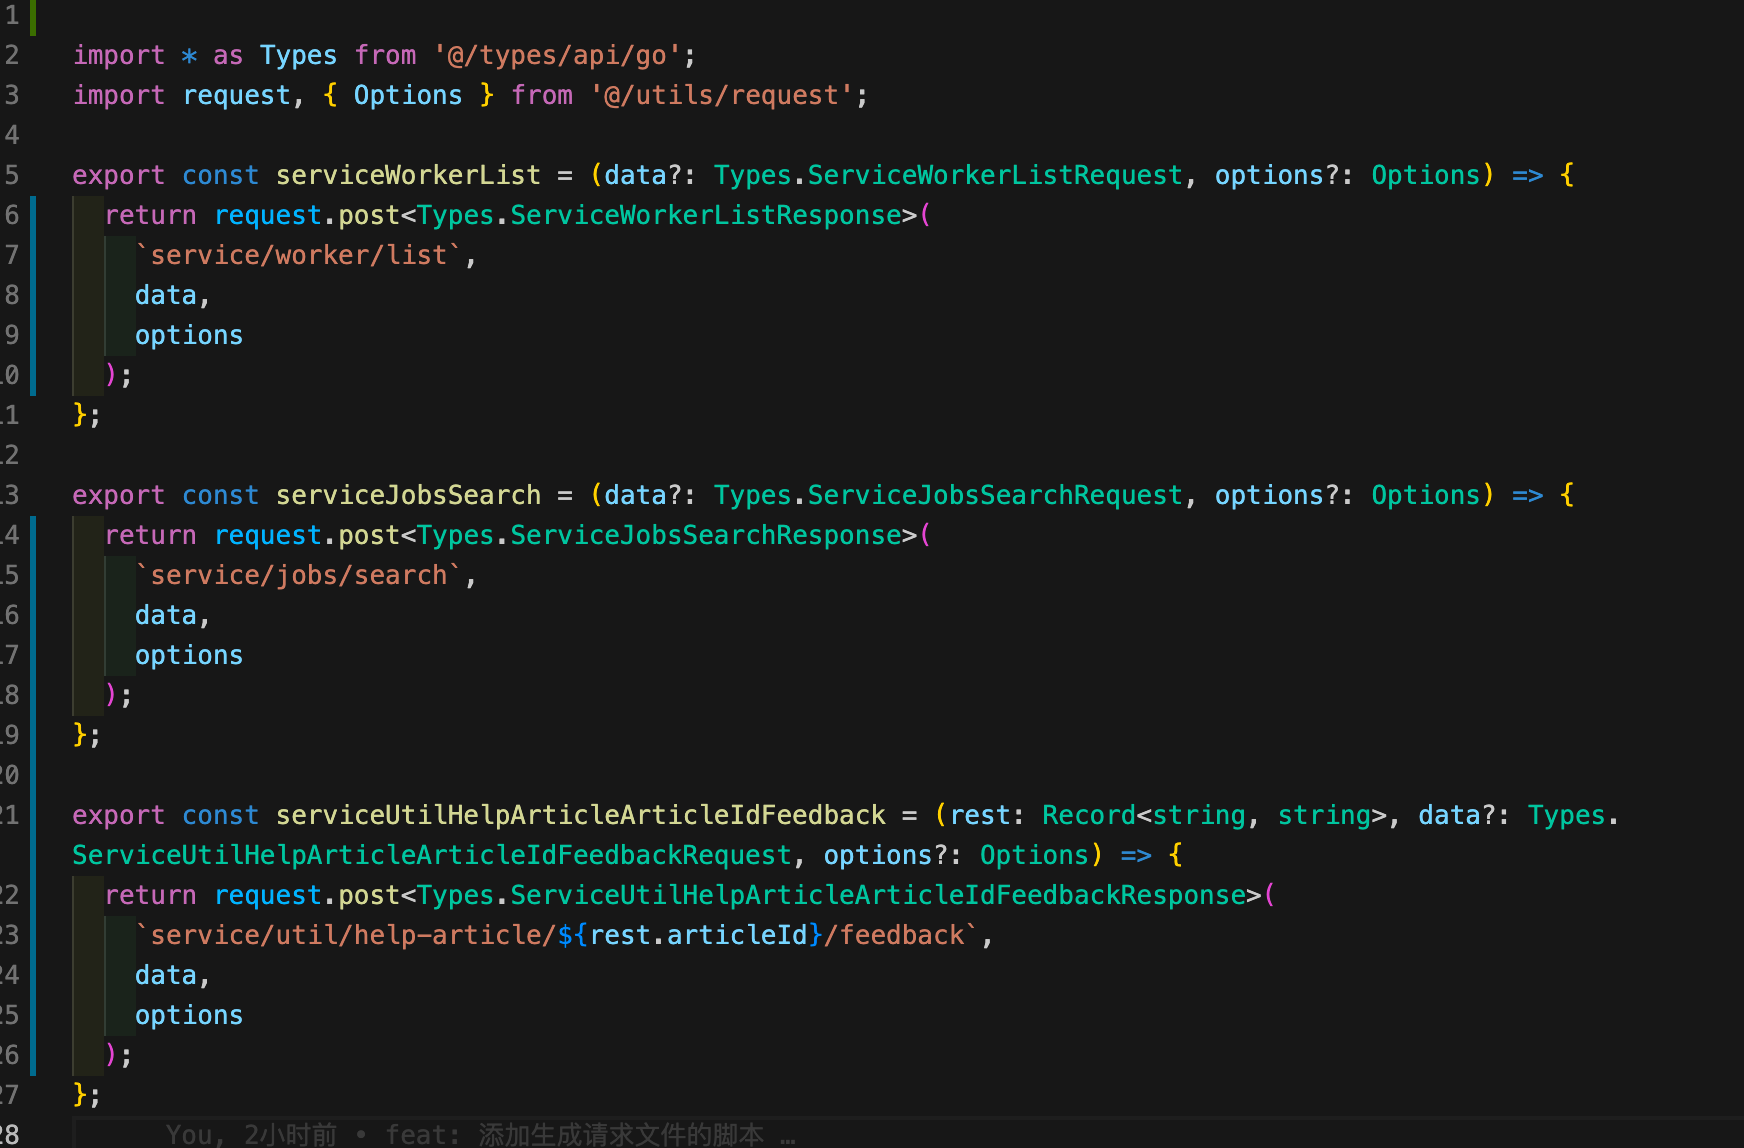
写入公共代码后,generatorRequest 中以下的代码就是生成每条请求语句,追加到对应的文件中:
  const fnName = getFnName(data);
  const [reqType, resType] = getReqResType(fnName);
  const str = `
export const ${fnName} = (${getRest(data)}data?: Types.${reqType}, options?: Options) => {
  return ${getMethod(data)}<Types.${resType}>(
    \`${getReqPath(data)}\`,
    data,
    options
  );
};
`;
  shelljs.ShellString(str).toEnd(filePath);
通过请求地址生成请求的函数名:
// 生成函数名
const getFnName = (data: Interface): string => {
  const { path } = data;
  return camelCase(path);
};
由于 ytt 生成的类型名称也是通过路径生成的,所以我们将路径生成的函数名再稍加处理就可以生成请求和响应的类型名称了
// 生成请求和响应类型的字符串。路径生成的函数名首字符大写,然后加 Request 或 Response
const getReqResType = (fnName: string): string[] => {
  const name = fnName.charAt(0).toUpperCase() + fnName.slice(1);
  return [`${name}Request`, `${name}Response`];
};
最后一点要注意的是,由于项目中一些请求路径是 rest 风格的,需要对其进行处理。如 service/getUserInfo/:uid 这样的请求地址。
这里我通过正则匹配替换,将 :uid 替换成 \${rest.uid} 这样的字符串。然后函数中添加一个参数 rest。当然,也可以直接生成 ${data.uid},只是这样又得去给请求参数的类型添加联合类型了。
// 获取请求地址
const getReqPath = (data: Interface): string => {
  let path = data.path;
  if (path.startsWith('/')) {
    path = path.substring(1);
  }
  path = convertReqPath(path);
  return path;
};

// 转换请求地址中的 :xxx 为 ${rest.xxx}
const convertReqPath = (path: string): string => {
  return path.replace(/:\w+/, (str) => {
    return `\${rest.${str.slice(1)}}`;
  });
};
最后在写一个函数生成请求函数中的 rest 参数:
// 请求 url 中有 :xxx 的时候,添加第一个参数 rest
const getRest = (data: Interface): string => {
  if (/:\w+/.test(data.path)) {
    return 'rest: Record<string, string>, ';
  } else {
    return '';
  }
};
以上这些函数就用在了这个模板字符串中:
  const str = `
export const ${fnName} = (${getRest(data)}data?: Types.${reqType}, options?: Options) => {
  return ${getMethod(data)}<Types.${resType}>(
    \`${getReqPath(data)}\`,
    data,
    options
  );
};
`;