Ingress简介:说明:
1.k8s版本:v1.23;
2.内网测试环境1台master,2台node节点,使用 DaemonSet+HostNetwork+nodeSelector 方式部署 ingress-nginx 到 node02 节点,node02打标签作为边缘节点;
3.测试了https配置;
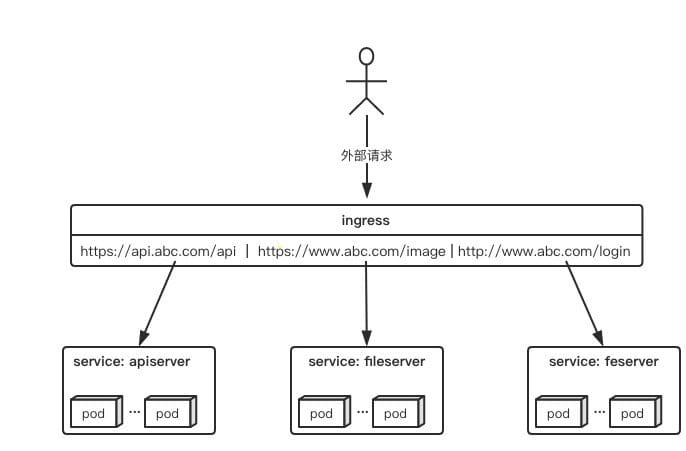
Ingress 是Kubernetes 1.1 版本新增的资源对象,用于将不用URL的访问请求转发到后端不同的Service,以实现HTTP 层(7层)的业务路由机制。简单点说:Ingress 是 HTTP 层的服务暴露规则。也可以理解为Service的Service。对于Ingress来说,必须要绑定一个域名。
它由两部分组成:
-
Ingress Controller:
Ingress Controller:是Service的入口网关,有很多种,最常见的就是Ingress-Nginx;- 以
pod形式运行的;
-
Ingress策略设置(k8s中的ingress资源):
- 以
yaml形式为载体的一组声明式的策略;(可使用 kubectl get ingress -n namespaces 查看)
- 以
-
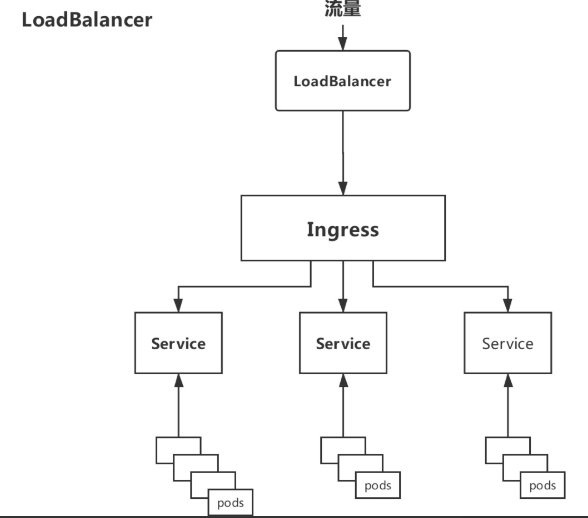
Deployment+LoadBalancer模式的Service
如果要把
ingress部署在公有云,那可以选择这种方式。用Deployment部署ingress-controller,创建一个type为LoadBalancer的service关联这组pod。大部分公有云,都会为LoadBalancer的service自动创建一个负载均衡器,通常还绑定了公网地址。只要把域名解析指向该地址,就实现了集群服务的对外暴露。缺点:需要额外购买公有云的负载均衡服务,不适用于没有负载均衡器的非公有云服务;

-
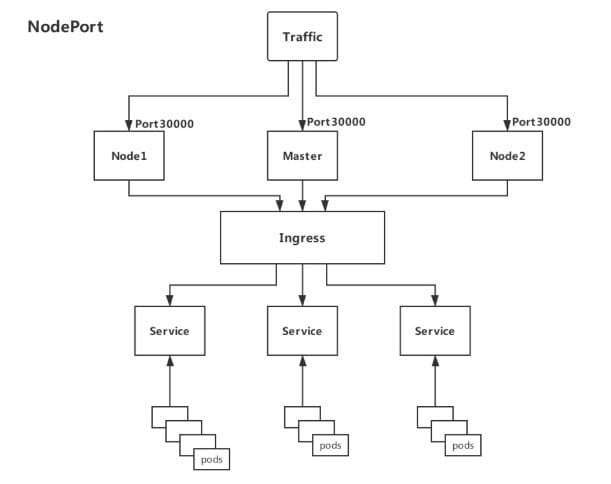
Deployment+NodePort模式的Service
同样用
deployment模式部署ingress-controller,并创建对应的服务,但是type为NodePort。这样,ingress就会暴露在集群节点ip的特定端口上。由于nodeport暴露的端口是随机端口(端口数会大于30000),一般会在前面再搭建一套负载均衡器来转发请求。该方式一般用于宿主机是相对固定的环境ip地址不变的场景。缺点:
NodePort方式暴露ingress虽然简单方便,但是NodePort多了一层NAT,在请求量级很大时可能对性能会有一定影响。- 请求节点会是类似
https://www.xx.com:30076,其中30076是kubectl get svc -n ingress-nginx的svc暴露出来的nodeport端口。

-
DaemonSet+HostNetwork+nodeSelector(推荐)
用
DaemonSet结合nodeselector来部署ingress-controller到特定的node上(边缘节点),然后使用HostNetwork直接把该pod与宿主机node的网络打通,直接使用宿主机的80/433端口就能访问服务。这时,ingress-controller所在的node机器就很类似传统架构的边缘节点,比如机房入口的nginx服务器。优点:
- 该方式整个请求链路最简单,性能相对
NodePort模式更好。
缺点:
- 由于直接利用宿主机节点的网络和端口,一个
node只能部署一个ingress-controller pod。

因为此次是内网测试环境,所以使用第3中方法部署测试
- 该方式整个请求链路最简单,性能相对
-
使用Helm以DaemonSet+HostNetwork+nodeSelector的方式部署ingress-nginx
nginx-ingress-controall官网:https://kubernetes.github.io/ingress-nginx/
现有的测试环境是1台master+2台node,我们选择node02做为边缘节点,给他打上边缘节点的标签,这样部署的ingress-controall的pod会只跑在node02这个节点上。(如果是生产环境,可以选择2台node作为边缘节点,为了避免单点故障,可使用keepalive提高高可用)
#给node02节点打上边缘节点的标签
kubectl label nodes node02 edgenode=true

#查看各节点的标签
kubectl get node --show-labels
拉取helm源:
#添加helm源
helm repo add ingress-nginx https://kubernetes.github.io/ingress-nginx

#更新源
helm repo update

#拉取相关配置修改values.yaml
helm pull ingress-nginx/ingress-nginx
修改values.yaml:
commonLabels: {}
controller:
  name: controller
  image:
    registry: k8s.gcr.io		#如果怕墙此处可换为阿里镜像源
    image: ingress-nginx/controller
    tag: "v1.1.1"
    digest: sha256:0bc88eb15f9e7f84e8e56c14fa5735aaa488b840983f87bd79b1054190e660de
    pullPolicy: IfNotPresent
    runAsUser: 101
    allowPrivilegeEscalation: true
  existingPsp: ""
  containerName: controller
  containerPort:
    http: 80
    https: 443
  config: {}
  configAnnotations: {}
  proxySetHeaders: {}
  addHeaders: {}
  dnsConfig: {}
  hostname: {}
  dnsPolicy: ClusterFirst
  reportNodeInternalIp: false
  watchIngressWithoutClass: false
  ingressClassByName: false
  allowSnippetAnnotations: true
  hostNetwork: true			#此处改为true
  hostPort:
    enabled: false
    ports:
      http: 80
      https: 443
  electionID: ingress-controller-leader
  ingressClassResource:
    name: nginx
    enabled: true
    default: false
    controllerValue: "k8s.io/ingress-nginx"
    parameters: {}
  ingressClass: nginx
  podLabels: {}
  podSecurityContext: {}
  sysctls: {}
  publishService:
    enabled: true
    pathOverride: ""
  scope:
    enabled: false
    namespace: ""
    namespaceSelector: ""
  configMapNamespace: ""
  tcp:
    configMapNamespace: ""
    annotations: {}
  udp:
    configMapNamespace: ""
    annotations: {}
  maxmindLicenseKey: ""
  extraArgs: {}
  extraEnvs: []
  kind: DaemonSet			#此处改为DaemonSet,控制器将以DaemonSet方式运行在特定node
  annotations: {}
  labels: {}
  updateStrategy: {}
  minReadySeconds: 0
  tolerations: []
  affinity: {}
  topologySpreadConstraints: []
  terminationGracePeriodSeconds: 300
  nodeSelector:
    kubernetes.io/os: linux
    edgenode: 'true'			#此处加上刚才给node02打的标签,控制器将运行在node02上
  livenessProbe:
    httpGet:
      path: "/healthz"
      port: 10254
      scheme: HTTP
    initialDelaySeconds: 10
    periodSeconds: 10
    timeoutSeconds: 1
    successThreshold: 1
    failureThreshold: 5
  readinessProbe:
    httpGet:
      path: "/healthz"
      port: 10254
      scheme: HTTP
    initialDelaySeconds: 10
    periodSeconds: 10
    timeoutSeconds: 1
    successThreshold: 1
    failureThreshold: 3
  healthCheckPath: "/healthz"
  healthCheckHost: ""
  podAnnotations: {}
  replicaCount: 1
  minAvailable: 1
  resources:
    requests:
      cpu: 100m
      memory: 90Mi
  autoscaling:
    enabled: false
    minReplicas: 1
    maxReplicas: 11
    targetCPUUtilizationPercentage: 50
    targetMemoryUtilizationPercentage: 50
    behavior: {}
  autoscalingTemplate: []
  keda:
    apiVersion: "keda.sh/v1alpha1"
    enabled: false
    minReplicas: 1
    maxReplicas: 11
    pollingInterval: 30
    cooldownPeriod: 300
    restoreToOriginalReplicaCount: false
    scaledObject:
      annotations: {}
    triggers: []
    behavior: {}
  enableMimalloc: true
  customTemplate:
    configMapName: ""
    configMapKey: ""
  service:
    enabled: true
    appProtocol: true
    annotations: {}
    labels: {}
    externalIPs: []
    loadBalancerSourceRanges: []
    enableHttp: true
    enableHttps: true
    ipFamilyPolicy: "SingleStack"
    ipFamilies:
      - IPv4
    ports:
      http: 80
      https: 443
    targetPorts:
      http: http
      https: https
    type: ClusterIP			#此处改为ClusterIP,默认为LoadBalancer
    nodePorts:
      http: ""
      https: ""
      tcp: {}
      udp: {}
    external:
      enabled: true
    internal:
      enabled: false
      annotations: {}
      loadBalancerSourceRanges: []
  extraContainers: []
  extraVolumeMounts: []
  extraVolumes: []
  extraInitContainers: []
  extraModules: []
  admissionWebhooks:
    annotations: {}
    enabled: true
    failurePolicy: Fail
    port: 8443
    certificate: "/usr/local/certificates/cert"
    key: "/usr/local/certificates/key"
    namespaceSelector: {}
    objectSelector: {}
    labels: {}
    existingPsp: ""
    service:
      annotations: {}
      externalIPs: []
      loadBalancerSourceRanges: []
      servicePort: 443
      type: ClusterIP
    createSecretJob:
      resources: {}
    patchWebhookJob:
      resources: {}
    patch:
      enabled: true
      image:
        registry: k8s.gcr.io
        image: ingress-nginx/kube-webhook-certgen
        tag: v1.1.1
        digest: sha256:64d8c73dca984af206adf9d6d7e46aa550362b1d7a01f3a0a91b20cc67868660
        pullPolicy: IfNotPresent
      priorityClassName: ""
      podAnnotations: {}
      nodeSelector:
        kubernetes.io/os: linux
      tolerations: []
      labels: {}
      runAsUser: 2000
  metrics:
    port: 10254
    enabled: false
    service:
      annotations: {}
      externalIPs: []
      loadBalancerSourceRanges: []
      servicePort: 10254
      type: ClusterIP
    serviceMonitor:
      enabled: false
      additionalLabels: {}
      namespace: ""
      namespaceSelector: {}
      scrapeInterval: 30s
      targetLabels: []
      relabelings: []
      metricRelabelings: []
    prometheusRule:
      enabled: false
      additionalLabels: {}
      rules: []
  lifecycle:
    preStop:
      exec:
        command:
          - /wait-shutdown
  priorityClassName: ""
revisionHistoryLimit: 10
defaultBackend:
  enabled: true			#此处改为true,说明创建个默认的页面,如果有不匹配的请求将返回这个页面
  name: defaultbackend
  image:
    registry: k8s.gcr.io
    image: defaultbackend-amd64
    tag: "1.5"
    pullPolicy: IfNotPresent
    runAsUser: 65534
    runAsNonRoot: true
    readOnlyRootFilesystem: true
    allowPrivilegeEscalation: false
  existingPsp: ""
  extraArgs: {}
  serviceAccount:
    create: true
    name: ""
    automountServiceAccountToken: true
  extraEnvs: []
  port: 8080
  livenessProbe:
    failureThreshold: 3
    initialDelaySeconds: 30
    periodSeconds: 10
    successThreshold: 1
    timeoutSeconds: 5
  readinessProbe:
    failureThreshold: 6
    initialDelaySeconds: 0
    periodSeconds: 5
    successThreshold: 1
    timeoutSeconds: 5
  tolerations: []
  affinity: {}
  podSecurityContext: {}
  containerSecurityContext: {}
  podLabels: {}
  nodeSelector:
    kubernetes.io/os: linux
  podAnnotations: {}
  replicaCount: 1
  minAvailable: 1
  resources: {}
  extraVolumeMounts: []
  extraVolumes: []
  autoscaling:
    annotations: {}
    enabled: false
    minReplicas: 1
    maxReplicas: 2
    targetCPUUtilizationPercentage: 50
    targetMemoryUtilizationPercentage: 50
  service:
    annotations: {}
    externalIPs: []
    loadBalancerSourceRanges: []
    servicePort: 80
    type: ClusterIP
  priorityClassName: ""
  labels: {}
rbac:
  create: true
  scope: false
podSecurityPolicy:
  enabled: false
serviceAccount:
  create: true
  name: ""
  automountServiceAccountToken: true
  annotations: {}
imagePullSecrets: []
tcp: {}
udp: {}
dhParam:
使用helm安装:
#创建个ingress-nginx的命名空间
kubectl create ns ingress-nginx

#使用helm执行安装
helm install ingress-nginx ingress-nginx/ingress-nginx -f values.yaml -n ingress-nginx
查看创建的资源:
kubectl get all -n ingress-nginx
可以看到启动了2个pod,一个为ingress-controller,一个为默认的后端defaultbackend
NAME                                                READY   STATUS    RESTARTS   AGE
pod/ingress-nginx-controller-kqqgj                  1/1     Running   0          21m
pod/ingress-nginx-defaultbackend-7df596dbc9-9c6ws   1/1     Running   0          21m

NAME                                         TYPE        CLUSTER-IP      EXTERNAL-IP   PORT(S)          AGE
service/ingress-nginx-controller             ClusterIP   10.106.80.36    <none>        80/TCP,443/TCP   21m
service/ingress-nginx-controller-admission   ClusterIP   10.111.63.107   <none>        443/TCP          21m
service/ingress-nginx-defaultbackend         ClusterIP   10.96.124.173   <none>        80/TCP           21m

NAME                                      DESIRED   CURRENT   READY   UP-TO-DATE   AVAILABLE   NODE SELECTOR                          AGE
daemonset.apps/ingress-nginx-controller   1         1         1       1            1           edgenode=true,kubernetes.io/os=linux   21m

NAME                                           READY   UP-TO-DATE   AVAILABLE   AGE
deployment.apps/ingress-nginx-defaultbackend   1/1     1            1           21m

NAME                                                      DESIRED   CURRENT   READY   AGE
replicaset.apps/ingress-nginx-defaultbackend-7df596dbc9   1         1         1       21m
ingress-controall部署好之后,我们使用nginx镜像部署个测试后端,之后再部署个ingress资源把后测试后端的server通过ingress暴露出去。
我们创建个test-nginx.yaml,定义了个nginx的pod和他对应的service,service使用ClusterIP方式暴露80端口。
#test-nginx.yaml
apiVersion: v1
kind: Service
metadata:
  name: nginx-test-service
  namespace: nginx-test
spec:
  selector:
    app: nginx-test
  ports:
  - name: http
    port: 81	# 后端Pod的端口
    targetPort: 80	# svc暴露的端口
---
apiVersion: apps/v1
kind: Deployment
metadata:
  name: nginx-test-deployment
  namespace: nginx-test
spec:
  replicas: 1
  selector:
    matchLabels:
      app: nginx-test
  template:
    metadata:
      labels:
        app: nginx-test
    spec:
      containers:
      - name: nginx-test
        image: nginx:1.15-alpine
        imagePullPolicy: IfNotPresent
        lifecycle:
          postStart:
            exec:
              command: ["/bin/sh","-c","echo nginx-test.wdyxgames.com > /usr/share/nginx/html/index.html"]
        ports:
        - name: httpd
          containerPort: 81		#pod暴露出来的端口
创建测试后端pod和service:
#创建nginx-test命名空间
kubectl create ns nginx-test

#使用yaml创建pod和svc
kubectl apply -f test-nginx.yaml

#查看创建的资源
kubectl get all -n nginx-test

#####
NAME                                       READY   STATUS    RESTARTS   AGE
pod/nginx-test-deployment-fdf785bb-k6xxl   1/1     Running   0          24s

NAME                         TYPE        CLUSTER-IP      EXTERNAL-IP   PORT(S)   AGE
service/nginx-test-service   ClusterIP   10.97.180.229   <none>        80/TCP    24s

NAME                                    READY   UP-TO-DATE   AVAILABLE   AGE
deployment.apps/nginx-test-deployment   1/1     1            1           24s

NAME                                             DESIRED   CURRENT   READY   AGE
replicaset.apps/nginx-test-deployment-fdf785bb   1         1         1       24s
至此,我们创建好了后端测试资源和ingress-controall,我们再创建ingress资源,把后端测试的service暴露到公网中去
#test-nginx-ingress.yaml
apiVersion: networking.k8s.io/v1
kind: Ingress
metadata:
  annotations:
    kubernetes.io/ingress.class: "nginx"
  name: example
spec:
  rules: # 一个ingress可以配置多个rules
  - host: nginx-test.wdyxgames.com # 域名配置,可以不写,匹配*,此域名就是浏览器里访问的URL
    http:
      paths: # 相当于nginx的location,同一个host可以配置多个path,此处我们写所有
      - backend:
          service:
            name: nginx-test-service  # 代理到哪个svc,与上面创建的测试后端svc对应
            port:
              number: 80 # svc暴露出来的端口,与上面创建的测试后端svc对应
        path: /
        pathType: Prefix
#执行文件安装
kubectl apply -f  test-nginx-ingress.yaml  -n nginx-test
绑定host测试,此处我们绑到了2个host到node02边缘节点的ip上去,一个是在ingress中定义了的nginx-test.wdyxgames.com,一个是没有定义了的nginx-test1.wdyxgames.com,使用浏览器访问:


可以看见http://nginx-test.wdyxgames.com访问成功,http://nginx-test1.wdyxgames.com因为没有在ingress中定义返回的是defaultbakend中的nginx返回的页面
-
首先把证书导入到
k8s的secret中去:kubectl create secret tls wdyxgames-tls --key _.wdyxgames.com.key --cert _.wdyxgames.com.crt -n nginx-test -
再创建个
ingress资源文件指定使用https:#test-nginx-ingress-https.yaml apiVersion: networking.k8s.io/v1 kind: Ingress metadata: annotations: kubernetes.io/ingress.class: "nginx" name: example spec: rules: # 一个ingress可以配置多个rules - host: nginx-test.wdyxgames.com # 域名配置,可以不写,匹配*,此域名就是浏览器里访问的URL http: paths: # 相当于nginx的location,同一个host可以配置多个path,此处我们写所有 - backend: service: name: nginx-test-service # 代理到哪个svc,与上面创建的测试后端svc对应 port: number: 80 # svc暴露出来的端口,与上面创建的测试后端svc对应 path: / pathType: Prefix tls: - hosts: - nginx-test.wdyxgames.com secretName: wdyxgames-tls对比上面,只是添加了
tls处的内容:#使用命令创建 kubectl apply -f test-nginx-ingress-https.yaml -n nginx-test ##### Error from server (BadRequest): error when creating "test-nginx-ingress-https.yaml": admission webhook "validate.nginx.ingress.kubernetes.io" denied the request: host "nginx-test.wdyxgames.com" and path "/" is already defined in ingress nginx-test/example #会有报错,是因为的http的ingress已经创建对应的转发关系,不可再创建 #删掉之前http的ingress,再创建 kubectl delete -f test-nginx-ingress.yaml -n nginx-test -
使用浏览器访问,可见已经支持
https访问了:
