当前位置 : 主页 > 操作系统 > centos >

FTP连接的详细步骤及连接模式

来源:互联网 收集:自由互联 发布时间:2022-06-20
FTP连接及连接模式 控制连接:TCP21,用于发送FTP命令信息 数据连接:TCP20,用于上传、下载数据 数据连接的建立类型: 主动模式:服务端从20 端口主动向客户端发起连接 被动模式:服

FTP连接及连接模式

控制连接:TCP21,用于发送FTP命令信息

数据连接:TCP20,用于上传、下载数据

数据连接的建立类型:

主动模式:服务端从20 端口主动向客户端发起连接

被动模式:服务端在指定范围内某个端口被动等待客户端连接

FTP传输模式

文本模式:ASCII模式,以文本序列传输数据

二进制模式:Binary模式,以二进制序列传输数据

基于系统用户的FTP 服务(匿名用户)

首先挂载光盘
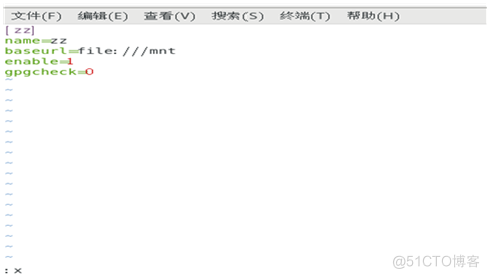
切换到/yum.repos.d/目录 删除所有文件 修改文件

然后安装ftp服务器

(如果能直接使用yum安装或其他安装下来 vsftpd 就不用这个方法了)

root'localhost mount Idev(cdrom I—nt/ 
mount: /dev,'sro 
I root810caIhost cd letc yum. repos.d/ 
root810caIhost yum. repos. 
I root root 53 
-rwr--r--. 
I root810calhOSt yum. repos. d] # 
I root810calhOSt yum. repos. d] * 
I yum. repos. d] g 
12 17:57 aa. repo 
rm-rf• 
Vim 22. repo 
yum install vsftpd• . y


FTP连接的详细步骤及连接模式_配置文件


切换到vsftpd目录
重启发ftp服务 关闭防火墙和安全Linux


rootetocalhost yum. repos.dlg cd /etc/vsftpd 
root810caIhost vsftpd systemctl restart vsftpd 
root810caIhost vsftpd systemctl stop firevaUd 
root810cathost vsftpd setenforce O 
setenforce: SELinux is disabled

切换到/ftp/pub目录下
创建一个文件 然后登录ftp可以下载


root8tocaIhost vsftpdl# cd /var/ftp 
root810caIhost ftp) g 
xr-x 2 root root 6 IOA 14 2020 pub 
[ root8tocaIhost ftp) g cd 'pub 
bash: cd: 'pub: 
root8tocathost ftp] # cd pub 
publ touch qqq 
root8tocaIhOSt publ g


FTP连接的详细步骤及连接模式_配置文件_02

切换到vsftpd目录下
复制一份配置文件 然后进ftp服务的配置文件


I publ# cd / etc/vsftpd 
root'localhost vsftpdl# 
20 
- I root root 125 IOA 14 2020 ftpusers 
- I root root 361 IOA 14 2020 user _ list 
- root root 5116 IOA 14 2020 vsftpd. conf 
I root root 338 IOA 14 2020 sh 
- rwxr--r-- 
I root810caIhost vsftpdl cp vsftpd. conf vsftpd. conf. bak 
I root*locathost vsftpdl# vim vsftpd. conf 
I VS ftpdl# systemctl restart VS ftpd

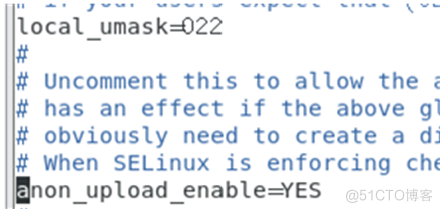
开启匿名用户:去掉前面#符号
保存退出 重启ftp服务


local umask•022 
Uncomment this to the 
has an effect if the above 91 
obviously need to create a d; 
i S enforcing Ch. 
g When *Linux 
on upload enable4ES

切换到ftp目录下
给pub这个目录可以上传的权限


FTP连接的详细步骤及连接模式_重启_03

随便拖一个文件上传到ftp


root'localhost publg 
• 1 ftp ftp 5071 9g 
I root root 
26 11:57 LAYP.7.3.txt 
26 11:25 qqq

再切换到vsftpd目录,进配置文件修改


root8tocathost ftplg cd /etc/vsftpd 
rootAocaIhost vsftpd Vim vsftpd.cont 
root•łocalhost vsftpd vsftpd.conf 
I root8LoCalhOSt șyStemCt1 restart vsftpd

开启用户


FTP连接的详细步骤及连接模式_重启_04

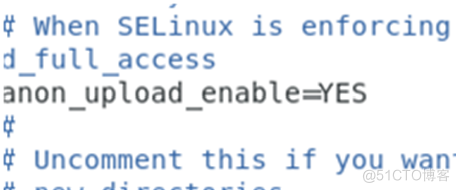
允许上传

When SELinux is enforcing 
d full access 
anon _up oad 
this if you

创建目录权限,其他写入和删除权限,传输速率

uncoMent this if you want the 
new directories. 
anon mkdir write 
anon other write enabledES 
anon max rate-*024

基于系统用户的FTP 服务(实名用户)

切换到vsftpd目录
然后编辑ftp配置文件 重启发ftp服务 并创建一个用户


I root•łocalhost 
I rootAocalhost 
I rootAocalhost 
I rootAocalhost 
I rootAocalhost 
I rootAocalhost 
ftpl vsftpd.conf 
ftpl cd 
vsftpdl # 
vsftpdl # 
vsftpdl # 
vsftpdl # 
/ etc/ vsftpd 
vsftpd.conf 
systemctl restart vsftpd 
useradd 
passwd

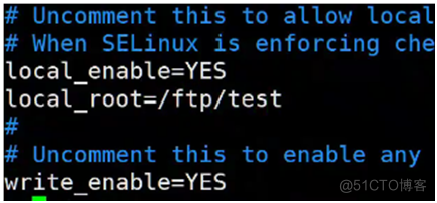
编辑配置文件

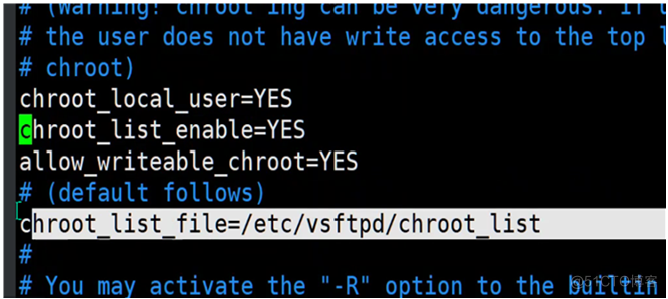
将用户禁锢在主目录
允许家目录具有写入权限 白名单


# the user does not have write access to the top 
# chroot) 
chroot local user=YES 
allow writeable chroot=YES 
(deFault f0118ws) 
hroot_list_file=/etc/vsftpd/chroot_list 
# You may activate the option to the builtin

创建黑名单
然后切换到用户查看上传的文件


rootmocalhost vsftpdl touch chroot_list 
root'localhost vsftpdl syste•ctt restart vsftpd 
root'localhost vsftpdl cd "home/ tom/ 
root•tocalhost tomlg 
ton tom 5071 9B 27 13:42

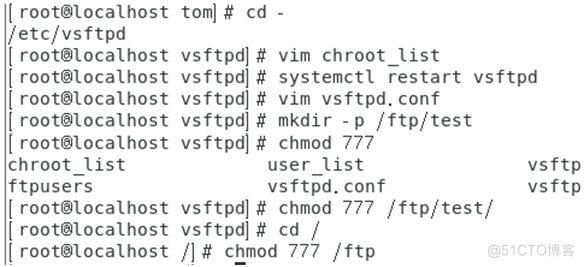
切换到上行目录不让他进去家目录,修改黑名单的配置,就添加用户tom到列表里,就不会被锁定

重启ftp服务
如果要换一个目录就修改ftp配置文件 创建目录 给他权限 重启一下服务

最后给ftp目录所有权限
可以实现在目录下可以上传下载删除等

I rooťlocalhost 
/etc/vsftpd 
rootaocalhost 
root810caIhost 
I root810caIhost 
I root810eathost 
I rOOtâlOtałhOSt 
Chroot list 
ftpusers 
I rootaocalhost 
I rootaocalhost 
I rooťlocalhost 
toml# cd • 
vsftpd # 
vim chroot list 
vsftpd g 
systemctl restart vsftpd 
vsftpdl g 
virn vsftpd. conf 
vs ftpdl g 
mkdlr -p / ftp/test 
vsftpdl 
Chmod 777 
user 
vsftpd.conf 
vs ftpdl# chmod 777 / ftp/test/ 
vsftpdl# cd / 
Qmod 777 / ftp 
vs ftp 
vs ftp


Uncomment t 'us to a ow oca 
When SELInux is enforcing che 
Ocal enable=YES 
oca I _ root=/ftp/test 
Uncomment this to enable any 
rite enable=YES


2 , 46 | Henot„. 
2021 9 / 27 … 
0 文 件 
2021 9 / 2 
0 0 
文 件 
2021 / 9 / 27 一


构建基于虚拟用户的FTP 服务

切换到vsftpd目录下
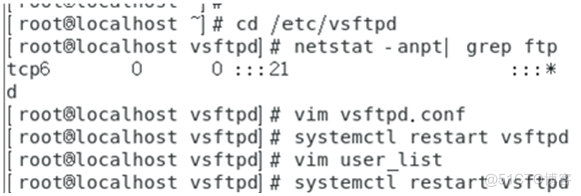
过滤监听ftp端口号 然后修改ftp的配置文件 重启服务

I rootBLocalhOSt 
t CPC 
I root810cathOSt 
I root810cathost 
root810cathost 
root810cathost 
Cd letc/vsftpd 
vs ftp-dl # 
vsft 
vsft 
vsft 
vsft 
netStat anptl grep ftp 
vim vsftpd. conf 
systemctt restart vsftpd 
vim user t ist 
systemcti restart vsftpd

独立运行的监听服务
地址 和端口号 去掉ipv6


isten—yES 
listen address* 92.168-1


addresses) then you must run copies Of vs f 
files. 
Z Make s 
user List 
hat one of the 1 IS ten o


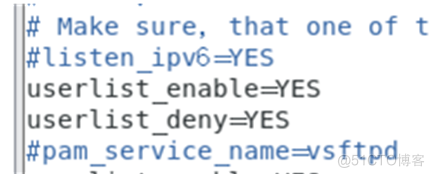
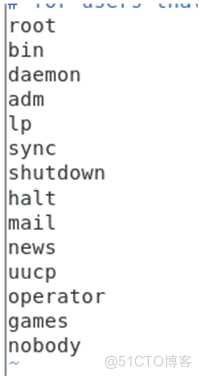
启用
user_list 列表文件 禁用 user_list 中的用户


Make sure, that one of t 
user list enable=YES 
user Lis t _deny=YES

用户加入到里就不能连接


ocalhost 
root*localhost 
root'localhost 
root'localhost 
vs ftpd 
vs ftpd 
vsftpd 
vsftpd 
vim user list 
systemctl restart 
vim user list 
systemctl restart 
vsftpd 
vs ftpd


FTP连接的详细步骤及连接模式_重启_05


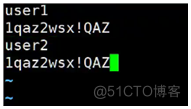
配置虚拟用户密码
转换成数据库文件 更改权限 指定家目录不能登入操作系统并添加用户


I rootblocalhost vs ftpdl# 
m vusers. txt 
I vs ftpdl# db _ load . T t hash -f "users. Vusers. db 
host v s f t Chmod 600 V users. • 
root8tocathost v st t useradd - d / srv/ -s /sbin/notogin vuser 
useradd:


user 
Iqaz2wsx!QAZ 
user2 
Iqaz2wsx!QAZI

编辑虚拟用户的认证模块
重启服务


rootstocalhost vs f t vi / etc/ pam. d/vsftpd. vu 
rootstocalhost vs f t vim c sttpd. conf 
root'localhost vs ftpdl# vim vs ftp-d. conf 
I root'localhost vs ftpdl# systemctl restart vs ftpd


auth 
account 
req u i red 
pam_userdb.so db—/etc/vsftpd/vusers 
db=/etc/vsftpd/vusers• 
requ red 
pam_userdb. so

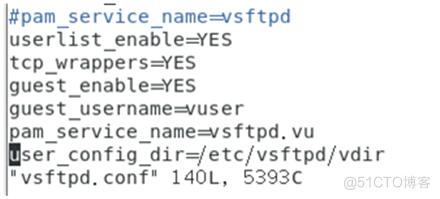
编辑ftp配置文件


pam_service 
user list 
t c p _wrappers =YES 
uest enable4ES 
uest username4user 
ser_config _dir=/etc/vsftpd/vdir 
140L,

再次修改配置文件
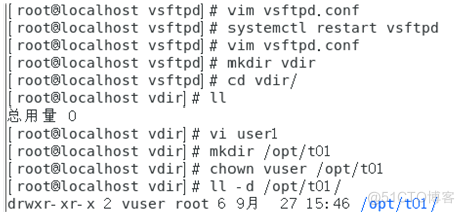
创建vdir目录 切换到vdir目录 然后在/opt/创建t01目录

再给那个目录属主为vuser权限

[ root•tocalhost 
root•tocalhost 
root'loca thost 
[ root810ca thost 
root8toca Ihost 
[ root'localhost 
root•tocalhost 
vsftpdl # 
vsftpdl # 
vsftpd # 
vsftpd 
vsftpdl g 
Vim vsftpd_ conf 
systemctl restart vsftpd 
vim vsftpd. conf 
mkdir vdir 
cd vdir/ 
vdirlg u 
vdirlg vi 
vdirl# / Opt/tOl 
Vdirl# chown "user 
vdirl# -d /opt/tOI/ 
ruxr- xr-x 2 vuser root 6 9k 27 1 S; 46 / opt/tOI/

修改后重启


FTP连接的详细步骤及连接模式_上传_06

编辑用户user1


anon_upl 
anon mkdir write enable—YES

切换目录
修改配置文件 重启服务后切换到/opt/目录下查看


root'localhost 
root'localhost 
root•tocalhost 
I rootmoCaLhoSt 
host 
40 
vdirl% cd / 
vsftpd # vim vsftpd.conf 
vsftpd systemctl restart vSftpd 
vsftpdl# Cd / Opt/ 
optlg


# chroot) 
#chroot local user—YES 
#chroot List enable—YES 
allow writeable chroot=YES 
# (default follows) 
#chroo st


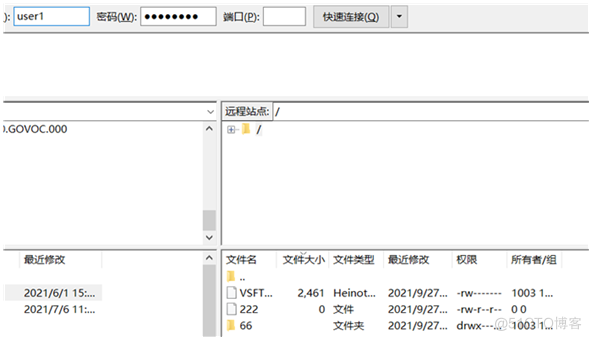
最后测试查看
user1


rootmocathost 
SFR o 
root8t ocalhost 
[ root8tocaIhost 
optlg cd 
toll* 
tot g 
touch 1112 
tot cd


FTP连接的详细步骤及连接模式_重启_07


切换目录
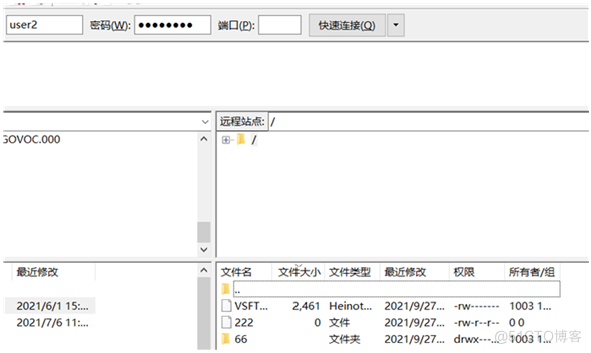
再编辑user2 创建目录 属主改为vuser 切换到目录下做测试
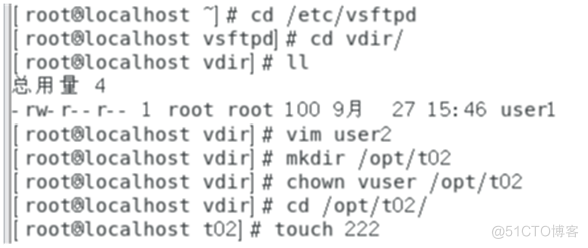
I rootstocalhost cd /etc/vsttpd 
I rm)t'localhost vsttpdlS cd "dir/ 
root'tocathost vdirl: 
root root 100 9B 27 15:46 userl 
I rm)t8tocathost vdirl# vim user2 
I mkdir / opt/t02 
I Chown / opt/t02 
I vdirl# Cd / opt/t02/ 
I touch 222


anon mkdir write enable—YES 
enable—YES 
Local _ root=/opt


202u7 、 511 「 
2021 、 - 1 「 
乚 乄 FT - ; 461 Henot— 21 ~ 27 ! 
0 2021 ~ 27 ! •w-r--r— 0 0 
2021 、 W27 ! drwv• 
1-


上一篇:K8S之list-watch机制+节点以及亲和性调度
下一篇:没有了
网友评论