一、虚拟机环境
在一台配置较高的物理机上搭建虚拟机,进行Ceph存储系统的搭建。
1.1 虚拟机硬件设置
本次测试在VMware Workstation Pro 16上使用ubuntu-18.04.5-server-amd64.iso搭建虚拟机进行,虚拟机需要配置双网卡,安装时添加ceph用户。在系统安装的时候,加载ISO后虚拟机自动最小化安装,中间没有手动配置的机会,本次操作系统安装部分,着重记录下对最小化安装后的ubuntu系统如何进行配置调整。
1.1.1 虚拟机双网卡配置
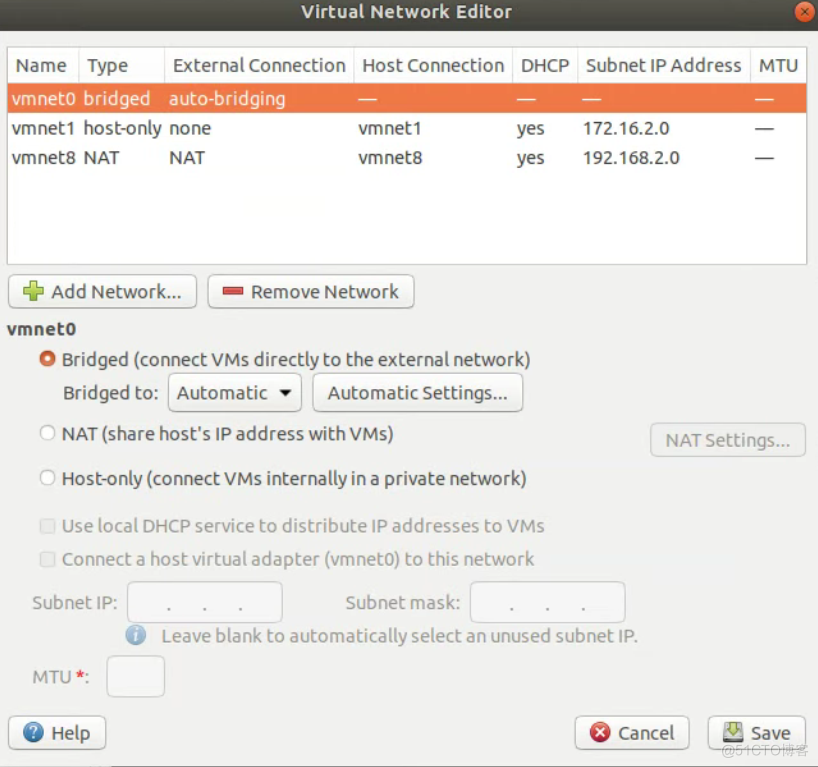
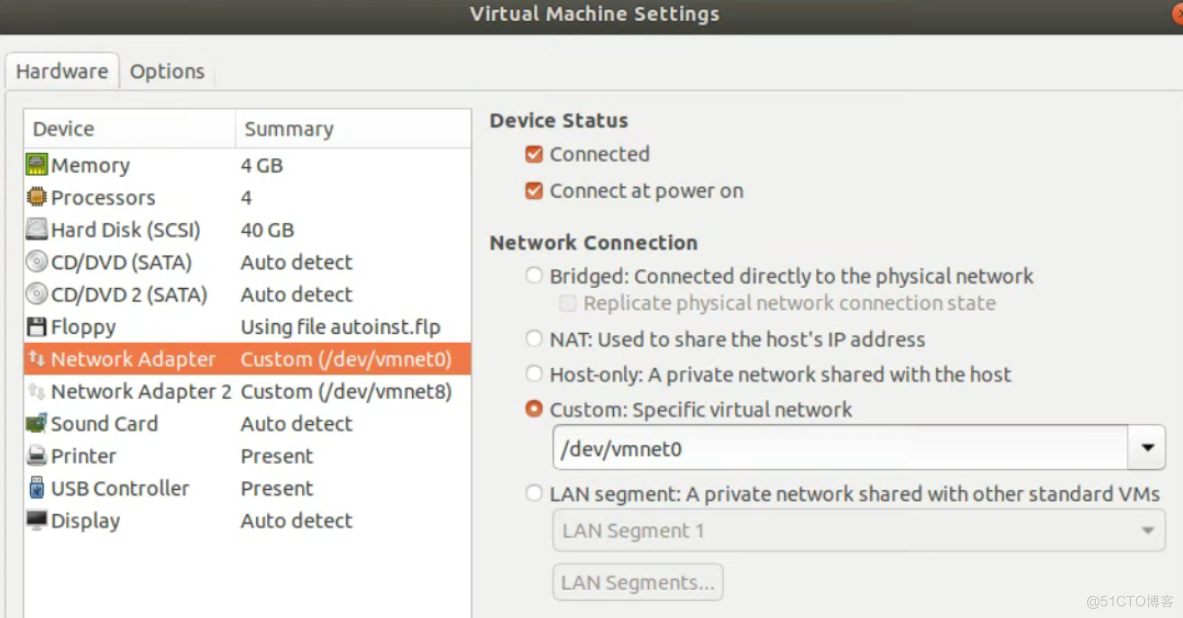
搭建Ceph存储系统需要在每台虚拟机配置双网卡,首先查看VMware Workstation的虚拟网络情况。 将第一块网卡配置在vmnet0网络
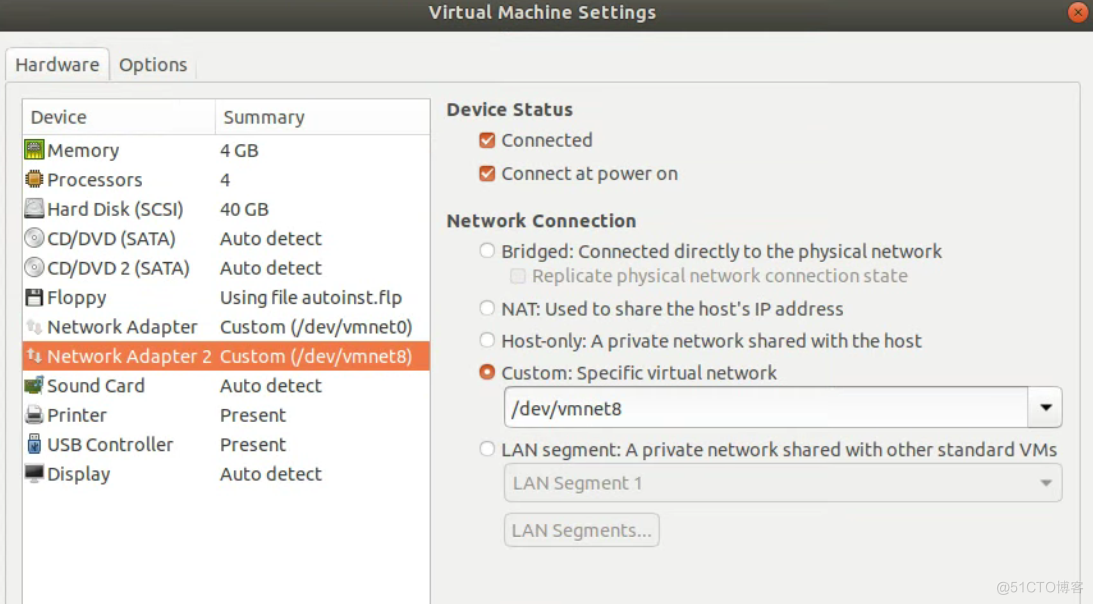
 第二块网卡配置在vmnet8网络
 这样虚拟机安装好之后,第一块网卡会获得与物理主机相同网段的ip,并与物理主机一样,能够与外网联通,用于软件安装。
1.1.2 Ceph-node节点磁盘
ceph-node节点除系统盘外,添加5块磁盘,用于OSD。
1.2 虚拟机系统设置
1.2.1 更改主机名
更改主机名称,显示其在ceph系统中的角色与作用。
# hostnamectl set-hostname ceph-deploy1.2.2 安装openssh-server、vim以及net-tools
最小化安装的系统没有sshd服务,需要手动安装,这里先安装openssh-server,然后再改新国内软件源。刚安装好的系统,软件源指向国外,安装软件时等待时间较长。
# apt isntall openssh-server # apt install net-tools # apt install vim配置sshd服务允许root登录
# vim /etc/ssh/sshd_config PermitRootLogin yes配置ssh首次登录不显示检查提示
# vim /etc/ssh/ssd_config StrictHostKeyChecking no1.2.3 更改网卡名称并设置ip
# vim /etc/default/grub GRUB_CMDLINE_LINUX="find_preseed=/preseed.cfg noprompt net.ifnames=0 biosdevname=0" # update-grub # rboot重启之后,给网卡配置固定IP
# vim /etc/netplan/01-netcfg.yaml # This file describes the network interfaces available on your system # For more information, see netplan(5). network: version: 2 renderer: networkd ethernets: eth0: dhcp4: no addresses: [10.1.192.186/24] gateway4: 10.1.192.13 nameservers: addresses: [10.1.192.13] eth1: dhcp4: no addresses: [192.168.2.3/24] # netplan apply1.2.4 配置国内软件源
https://developer.aliyun.com/mirror/ubuntu?spm=a2c6h.13651102.0.0.3e221b11bW5NOC
# vim /etc/apt/sources.list deb http://mirrors.aliyun.com/ubuntu/ bionic main restricted universe multiverse deb-src http://mirrors.aliyun.com/ubuntu/ bionic main restricted universe multiverse deb http://mirrors.aliyun.com/ubuntu/ bionic-security main restricted universe multiverse deb-src http://mirrors.aliyun.com/ubuntu/ bionic-security main restricted universe multiverse deb http://mirrors.aliyun.com/ubuntu/ bionic-updates main restricted universe multiverse deb-src http://mirrors.aliyun.com/ubuntu/ bionic-updates main restricted universe multiverse deb http://mirrors.aliyun.com/ubuntu/ bionic-proposed main restricted universe multiverse deb-src http://mirrors.aliyun.com/ubuntu/ bionic-proposed main restricted universe multiverse deb http://mirrors.aliyun.com/ubuntu/ bionic-backports main restricted universe multiverse deb-src http://mirrors.aliyun.com/ubuntu/ bionic-backports main restricted universe multiverse # apt update1.2.5 配置国内ceph源
https://developer.aliyun.com/mirror/ceph?spm=a2c6h.13651102.0.0.3e221b11bW5NOC
# apt install lsb-core # wget -q -O- 'https://mirrors.aliyun.com/ceph/keys/release.asc' | sudo apt-key add - # ceph_stable_release=octopus # echo deb https://mirrors.aliyun.com/ceph/debian-$ceph_stable_release/ $(lsb_release -sc)\ main | sudo tee /etc/apt/sources.list.d/ceph.list # apt update -y && sudo apt install -y ceph-deploy ceph # apt update1.2.6 安装常用命令
# apt install -y iproute2 ntpdate tcpdump telnet traceroute nfs-kernel-server nfs-common lrzsz tree openssl libssl-dev libpcre3 libpcre3-dev zlib1g-dev ntpdate tcpdump telnet traceroute gcc openssh-server lrzsz tree openssl libssl-dev libpcre3 libpcre3-dev zlib1g-dev ntpdate tcpdump telnet traceroute iotop unzip zip1.2.7 调整内核参数
# vim /etc/sysctl.conf # Controls source route verification net.ipv4.ip_forward = 11.2.8 配置时间同步
#查看时区 # ls -l /etc/localtime lrwxrwxrwx 1 root root 39 Nov 13 18:34 /etc/localtime -> /usr/share/zoneinfo/America/Los_Angeles # 更改时区 # timedatectl set-timezone Asia/Shanghai # 设置每5分钟与ntp同步一次时间 # crontab -e crontab(5) and cron(8) # # m h dom mon dow command */5 * * * * root /usr/sbin/ntpdate ntp.aliyun.com &> /dev/null && /sbin/hwclock -w &> /dev/null1.2.9 安装ceph-common
# apt install ceph-common安装程序将ceph用户的home目录由/home/ceph改到/var/lib/ceph下,后续ceph安装均用ceph账户进行。
1.2.10 安装Python2.7
#安装python2.7 # apt install python2.7 -y # ln -sv /usr/bin/python2.7 /usr/bin/python21.2.11 配置/etc/sudoers
# vim /etc/sudoers # User privilege specification root ALL=(ALL:ALL) ALL ceph ALL=(ALL:ALL) NOPASSWD:ALL1.2.12 配置/etc/hosts
# vim /etc/hosts # The following lines are desirable for IPv6 capable hosts ::1 localhost ip6-localhost ip6-loopback ff02::1 ip6-allnodes ff02::2 ip6-allrouters 10.1.192.186 ceph-deploy.test.local ceph-deploy 10.1.192.187 ceph-mon1.test.local ceph-mon1 10.1.192.188 ceph-mon2.test.local ceph-mon2 10.1.192.189 ceph-mon3.test.local ceph-mon3 10.1.192.190 ceph-mgr1.test.local ceph-mgr1 10.1.192.191 ceph-mgr2.test.local ceph-mgr2 10.1.192.192 ceph-mode1.test.local ceph-node1 10.1.192.195 ceph-node2.test.local ceph-node2 10.1.192.196 ceph-node3.test.local ceph-node3 10.1.192.197 ceph-client1.test.local ceph-client1配置好的虚拟准备好之后,clone出其他虚拟机,clone出来的虚拟启动后,需要更改hostname以及ip。
二、Ceph单机环境搭建
https://docs.ceph.com/en/latest/releases/#active-releases 查看ceph版本与操作系统版本兼容性。
2.1 安装Ceph deploy部署工具
#查看ceph-deploy版本 # apt-cache madison ceph-deploy ceph-deploy | 1.5.38-0ubuntu1 | http://mirrors.aliyun.com/ubuntu bionic/universe amd64 Packages ceph-deploy | 1.5.38-0ubuntu1 | http://mirrors.aliyun.com/ubuntu bionic/universe i386 Packages ceph-deploy | 1.5.38-0ubuntu1 | http://mirrors.aliyun.com/ubuntu bionic/universe Sources #查看操作系统版本 # lsb_release -a LSB Version: core-9.20170808ubuntu1-noarch:security-9.20170808ubuntu1-noarch Distributor ID: Ubuntu Description: Ubuntu 18.04.5 LTS Release: 18.04 Codename: bionic #安装ceph-deploy,在ceph用户下进行 $ sudo apt install -y ceph-deploy2.2 初始化新的Ceph集群
$ sudo ceph-deploy new --cluster-network 192.168.2.0/24 --public-network 10.1.192.0/24 ceph-mon1在ceph用户下,实现ceph-deploy与其他节点基于证书登录。
$ ssh-keygen $ ssh-copy-id ceph-mon1 $ ssh-copy-id ceph-mon2 $ ssh-copy-id ceph-mon3 $ ssh-copy-id ceph-mgr1 $ ssh-copy-id ceph-mgr2 $ ssh-copy-id ceph-node1 $ ssh-copy-id ceph-node2推送并设置ceph集群管理证书
$ sudo ceph-deploy admin ceph-deploy $ sudo apt install acl $ sudo setfacl -m u:ceph:rw /etc/ceph/ceph.client.admin.keyring2.3 部署mon节点
在ceph-deploy上用ceph用户登录,初始化ceph-mon。
$ sudo ceph-deploy mon create-initial2.4 检查部署情况
#查看ceph集群状态 $ ceph -s cluster: id: 61275176-77ff-4aeb-883b-3591ab1a802f health: HEALTH_OK services: mon: 1 daemons, quorum ceph-mon1 mgr: no daemons active osd: 0 osds: 0 up, 0 in data: pools: 0 pools, 0 pgs objects: 0 objects, 0B usage: 0B used, 0B / 0B avail pgs:2.5 部署ceph-mgr
在ceph-mgr1上安装ceph-mgr
$ sudo apt install ceph-mgr在ceph-deploy上初始化ceph-mgr
$ ceph-deploy mgr create ceph-mgr1在ceph-mgr1节点上检初始化情况
# ps -ef | grep ceph ceph 8595 1 0 21:37 ? 00:00:00 /usr/bin/ceph-mgr -f --cluster ceph --id ceph-mgr1 --setuser ceph --setgroup ceph root 8646 794 0 21:37 pts/0 00:00:00 grep --color=auto ceph在ceph-deploy上查看集群状态
ceph@ceph-deploy:~$ ceph -s cluster: id: 61275176-77ff-4aeb-883b-3591ab1a802f health: HEALTH_WARN OSD count 0 < osd_pool_default_size 3 services: mon: 1 daemons, quorum ceph-mon1 mgr: ceph-mgr1(active) osd: 0 osds: 0 up, 0 in data: pools: 0 pools, 0 pgs objects: 0 objects, 0B usage: 0B used, 0B / 0B avail pgs:2.6 部署ceph-node
在ceph-deploy节点上,初始化ceph-node1节点
$ sudo ceph-deploy install --no-adjust-repos --nogpgcheck ceph-node1 # 分发admin秘钥 $ ceph-deploy admin ceph-node1在ceph-node1节点上,设置秘钥权限
root@ceph-node1:~# ls -l /etc/ceph total 12 -rw------- 1 root root 63 Nov 14 06:25 ceph.client.admin.keyring -rw-r--r-- 1 root root 263 Nov 14 06:25 ceph.conf -rw-r--r-- 1 root root 92 Sep 24 06:46 rbdmap -rw------- 1 root root 0 Nov 14 06:25 tmpnIYlB1 root@ceph-node1:~# setfacl -m u:ceph:rw /etc/ceph/ceph.client.admin.keyring2.7 部署OSD节点
在ceph-deploy节点上为ceph-node1安装运行环境
$ sudo ceph-deploy install --release pacific ceph-node1 # 查看ceph-node1上的磁盘 $ sudo ceph-deploy disk list ceph-node1 [ceph-node1][DEBUG ] connected to host: ceph-node1 [ceph-node1][DEBUG ] detect platform information from remote host [ceph-node1][DEBUG ] detect machine type [ceph-node1][DEBUG ] find the location of an executable [ceph-node1][INFO ] Running command: fdisk -l [ceph-node1][INFO ] Disk /dev/sda: 40 GiB, 42949672960 bytes, 83886080 sectors [ceph-node1][INFO ] Disk /dev/sdb: 4 GiB, 4294967296 bytes, 8388608 sectors [ceph-node1][INFO ] Disk /dev/sdc: 4 GiB, 4294967296 bytes, 8388608 sectors [ceph-node1][INFO ] Disk /dev/sdd: 4 GiB, 4294967296 bytes, 8388608 sectors [ceph-node1][INFO ] Disk /dev/sde: 4 GiB, 4294967296 bytes, 8388608 sectors [ceph-node1][INFO ] Disk /dev/sdf: 4 GiB, 4294967296 bytes, 8388608 sectors格式化ceph-node1上的磁盘
$ sudo ceph-deploy disk zap ceph-node1 /dev/sdb $ sudo ceph-deploy disk zap ceph-node1 /dev/sdc $ sudo ceph-deploy disk zap ceph-node1 /dev/sdd $ sudo ceph-deploy disk zap ceph-node1 /dev/sde $ sudo ceph-deploy disk zap ceph-node1 /dev/sdf向集群中添加OSD
$ sudo ceph-deploy osd create ceph-node1 --data /dev/sdb $ sudo ceph-deploy osd create ceph-node1 --data /dev/sdc $ sudo ceph-deploy osd create ceph-node1 --data /dev/sdd $ sudo ceph-deploy osd create ceph-node1 --data /dev/sde $ sudo ceph-deploy osd create ceph-node1 --data /dev/sdf查看集群状态
ceph@ceph-deploy:~$ ceph -s cluster: id: c5041fac-aac4-4ebb-be3a-1e7dea4c943e health: HEALTH_WARN mon is allowing insecure global_id reclaim Degraded data redundancy: 1 pg undersized services: mon: 1 daemons, quorum ceph-mon1 (age 11h) mgr: ceph-mgr1(active, since 10h) osd: 5 osds: 5 up (since 2m), 5 in (since 2m); 1 remapped pgs data: pools: 1 pools, 1 pgs objects: 0 objects, 0 B usage: 5.0 GiB used, 15 GiB / 20 GiB avail pgs: 1 active+undersized+remapped progress: Rebalancing after osd.1 marked in (3m) [............................]用2.6、2.7的方法部署ceph-node2和ceph-node3
ceph@ceph-deploy:~$ ceph -s cluster: id: c5041fac-aac4-4ebb-be3a-1e7dea4c943e health: HEALTH_WARN mon is allowing insecure global_id reclaim noout flag(s) set services: mon: 1 daemons, quorum ceph-mon1 (age 27m) mgr: ceph-mgr1(active, since 27m) osd: 15 osds: 15 up (since 26m), 15 in (since 26m) flags noout data: pools: 2 pools, 17 pgs objects: 6 objects, 261 B usage: 5.5 GiB used, 54 GiB / 60 GiB avail pgs: 17 active+clean三、Ceph存储的使用
3.1 ceph存储的rbd(块存储)应用
# 创建pool $ ceph osd pool create rbd-pool 16 16 # 查看pool $ ceph osd pool ls device_health_metrics rbd-pool # 查看PG ceph@ceph-deploy:~$ ceph pg ls-by-pool rbd-pool | awk '{print $1,$2,$15}' PG OBJECTS ACTING 2.0 0 [10,3]p10 2.1 0 [2,13,9]p2 2.2 0 [5,1,10]p5 2.3 0 [5,14]p5 2.4 0 [1,12,6]p1 2.5 0 [12,4,8]p12 2.6 0 [1,13,9]p1 2.7 0 [13,2]p13 2.8 0 [8,13,0]p8 2.9 0 [9,12]p9 2.a 0 [11,4,8]p11 2.b 0 [13,7,4]p13 2.c 0 [12,0,5]p12 2.d 0 [12,8,3]p12 2.e 0 [2,13,8]p2 2.f 0 [11,8,0]p11 * NOTE: afterwards # 查看OSD对应关系 eph@ceph-deploy:~$ ceph osd tree ID CLASS WEIGHT TYPE NAME STATUS REWEIGHT PRI-AFF -1 0.05836 root default -3 0.01945 host ceph-node1 0 hdd 0.00389 osd.0 up 1.00000 1.00000 1 hdd 0.00389 osd.1 up 1.00000 1.00000 2 hdd 0.00389 osd.2 up 1.00000 1.00000 3 hdd 0.00389 osd.3 up 1.00000 1.00000 4 hdd 0.00389 osd.4 up 1.00000 1.00000 -5 0.01945 host ceph-node2 5 hdd 0.00389 osd.5 up 1.00000 1.00000 6 hdd 0.00389 osd.6 up 1.00000 1.00000 7 hdd 0.00389 osd.7 up 1.00000 1.00000 8 hdd 0.00389 osd.8 up 1.00000 1.00000 9 hdd 0.00389 osd.9 up 1.00000 1.00000 -7 0.01945 host ceph-node3 10 hdd 0.00389 osd.10 up 1.00000 1.00000 11 hdd 0.00389 osd.11 up 1.00000 1.00000 12 hdd 0.00389 osd.12 up 1.00000 1.00000 13 hdd 0.00389 osd.13 up 1.00000 1.00000 14 hdd 0.00389 osd.14 up 1.00000 1.00000存储池启用rbd
ceph@ceph-deploy:~$ ceph osd pool application enable rbd-pool rbd enabled application 'rbd' on pool 'rbd-pool'初始化rbd
eph@ceph-deploy:~$ rbd pool init -p rbd-pool创建image
ceph@ceph-deploy:~$ rbd create rbd-img1 --size 3G --pool rbd-pool --image-format 2 --image-feature layering查看image
ceph@ceph-deploy:~$ ceph df --- RAW STORAGE --- CLASS SIZE AVAIL USED RAW USED %RAW USED hdd 60 GiB 54 GiB 502 MiB 5.5 GiB 9.16 TOTAL 60 GiB 54 GiB 502 MiB 5.5 GiB 9.16 --- POOLS --- POOL ID PGS STORED OBJECTS USED %USED MAX AVAIL device_health_metrics 1 1 0 B 0 0 B 0 14 GiB rbd-pool 2 16 10 KiB 5 175 KiB 0 14 GiB ceph@ceph-deploy:~$ rbd ls --pool rbd-pool rbd-img1 ceph@ceph-deploy:~$ rbd --image rbd-img1 --pool rbd-pool info rbd image 'rbd-img1': size 3 GiB in 768 objects order 22 (4 MiB objects) snapshot_count: 0 id: 376db21d21f2 block_name_prefix: rbd_data.376db21d21f2 format: 2 features: layering op_features: flags: create_timestamp: Mon Nov 15 16:42:43 2021 access_timestamp: Mon Nov 15 16:42:43 2021 modify_timestamp: Mon Nov 15 16:42:43 2021将ceph-deploy上的认证文件拷贝ceph-client1上
ceph@ceph-deploy:~$ scp ceph.conf ceph.client.admin.keyring root@10.1.192.197:/etc/ceph挂载rbd-img1
root@ceph-client1:~# rbd -p rbd-pool map rbd-img1 /dev/rbd0查看ceph-client1的磁盘
root@ceph-client1:~# lsblk -f NAME FSTYPE LABEL UUID MOUNTPOINT sda └─sda1 ext4 3be8260d-cbaa-4665-83f6-d1d29565a463 / sr0 rbd0格式化磁盘并挂载文件系统
root@ceph-client1:~# mkfs.xfs /dev/rbd0 meta-data=/dev/rbd0 isize=512 agcount=9, agsize=97280 blks = sectsz=512 attr=2, projid32bit=1 = crc=1 finobt=1, sparse=0, rmapbt=0, reflink=0 data = bsize=4096 blocks=786432, imaxpct=25 = sunit=1024 swidth=1024 blks naming =version 2 bsize=4096 ascii-ci=0 ftype=1 log =internal log bsize=4096 blocks=2560, version=2 = sectsz=512 sunit=8 blks, lazy-count=1 realtime =none extsz=4096 blocks=0, rtextents=0 root@ceph-client1:~# mount /dev/rbd0 /mnt root@ceph-client1:/mnt# df -Th Filesystem Type Size Used Avail Use% Mounted on udev devtmpfs 1.9G 0 1.9G 0% /dev tmpfs tmpfs 393M 9.1M 384M 3% /run /dev/sda1 ext4 40G 4.1G 34G 12% / tmpfs tmpfs 2.0G 0 2.0G 0% /dev/shm tmpfs tmpfs 5.0M 0 5.0M 0% /run/lock tmpfs tmpfs 2.0G 0 2.0G 0% /sys/fs/cgroup tmpfs tmpfs 393M 0 393M 0% /run/user/0 /dev/rbd0 xfs 3.0G 36M 3.0G 2% /mnt存储文件测试
root@ceph-client1:/mnt# dd if=/dev/zero of=/mnt/file bs=1M count=40 40+0 records in 40+0 records out 41943040 bytes (42 MB, 40 MiB) copied, 0.0278143 s, 1.5 GB/s ceph@ceph-deploy:~$ ceph df --- RAW STORAGE --- CLASS SIZE AVAIL USED RAW USED %RAW USED hdd 60 GiB 54 GiB 660 MiB 5.6 GiB 9.42 TOTAL 60 GiB 54 GiB 660 MiB 5.6 GiB 9.42 --- POOLS --- POOL ID PGS STORED OBJECTS USED %USED MAX AVAIL device_health_metrics 1 1 0 B 0 0 B 0 14 GiB rbd-pool 2 16 50 MiB 28 152 MiB 0.36 14 GiB3.2 Ceph-FS
要使用ceph-fs,需要部署MDS服务,本次在ceph-mgr1上部署MDS服务。
root@ceph-mgr1:~# apt install ceph-mds在ceph-deploy上部署MDS
ceph@ceph-deploy:~$ sudo ceph-deploy mds create ceph-mgr1 ceph@ceph-deploy:~$ ceph mds stat 1 up:standby创建CephFS的metadata和data存储池
ceph@ceph-deploy:~$ ceph osd pool create cephfs-metadata 16 16 pool 'cephfs-metadata' created ceph@ceph-deploy:~$ ceph osd pool create cephfs-data 16 16 pool 'cephfs-data' created ceph@ceph-deploy:~$ ceph osd pool ls device_health_metrics rbd-pool cephfs-metadata cephfs-data # 查看集群状态 ceph@ceph-deploy:~$ ceph -s cluster: id: c5041fac-aac4-4ebb-be3a-1e7dea4c943e health: HEALTH_OK services: mon: 1 daemons, quorum ceph-mon1 (age 5h) mgr: ceph-mgr1(active, since 5h) mds: 1 up:standby osd: 15 osds: 15 up (since 5h), 15 in (since 5h) data: pools: 4 pools, 49 pgs objects: 28 objects, 54 MiB usage: 5.7 GiB used, 54 GiB / 60 GiB avail pgs: 49 active+clean创建cephFS
ceph@ceph-deploy:~$ ceph fs new cephfs01 cephfs-metadata cephfs-data new fs with metadata pool 3 and data pool 4 ceph@ceph-deploy:~$ ceph fs status cephfs01 cephfs01 - 0 clients ======== RANK STATE MDS ACTIVITY DNS INOS 0 active ceph-mgr1 Reqs: 0 /s 10 13 POOL TYPE USED AVAIL cephfs-metadata metadata 576k 13.5G cephfs-data data 0 13.5G MDS version: ceph version 15.2.15 (2dfb18841cfecc2f7eb7eb2afd65986ca4d95985) octopus (stable) ceph@ceph-deploy:~$ ceph mds stat cephfs01:1 {0=ceph-mgr1=up:active}客户端挂载cephFS
# 查看admin对应的key ceph@ceph-deploy:~$ sudo cat ceph.client.admin.keyring [client.admin] key = AQDyMJFh8QmjJRAALV1xIGaNIle2gklamC7H4w== caps mds = "allow *" caps mgr = "allow *" caps mon = "allow *" caps osd = "allow *" # 挂载 root@ceph-client1:~# mount -t ceph 10.1.192.187:6789:/ /ceph-fs -o name=admin,secret=AQDyMJFh8QmjJRAALV1xIGaNIle2gklamC7H4w== root@ceph-client1:~# df -Th Filesystem Type Size Used Avail Use% Mounted on udev devtmpfs 1.9G 0 1.9G 0% /dev tmpfs tmpfs 393M 9.1M 384M 3% /run /dev/sda1 ext4 40G 4.1G 34G 12% / tmpfs tmpfs 2.0G 0 2.0G 0% /dev/shm tmpfs tmpfs 5.0M 0 5.0M 0% /run/lock tmpfs tmpfs 2.0G 0 2.0G 0% /sys/fs/cgroup /dev/rbd0 xfs 3.0G 76M 3.0G 3% /mnt tmpfs tmpfs 393M 0 393M 0% /run/user/0 10.1.192.187:6789:/ ceph 14G 0 14G 0% /ceph-fs # 测试读写 root@ceph-client1:/ceph-fs# dd if=/dev/zero of=/ceph-fs/file-fs bs=1M count=50 50+0 records in 50+0 records out 52428800 bytes (52 MB, 50 MiB) copied, 0.0690323 s, 759 MB/s接下来将对ceph系统中的各项服务进行双机扩展测试。
【文章转自:新加坡服务器 http://www.558idc.com/sin.html 复制请保留原URL】