Zabbix5.0(从0到1[HYXR]) 1.Zabbix测试环境部署 主机IP地址配置操作系统版本部署服务 Zabbix10.0.0.1002核4GCentOS 7.6Zabbix-server+Zabbix-server+GrafanaNode110.0.0.111核1GCentOS 7.6Zabbix-agentNode210.0.0.121核1GCentOS
Zabbix5.0(从0到1[HYXR])
1.Zabbix测试环境部署
主机 IP地址 配置 操作系统版本 部署服务 Zabbix 10.0.0.100 2核4G CentOS 7.6 Zabbix-server+Zabbix-server+Grafana Node1 10.0.0.11 1核1G CentOS 7.6 Zabbix-agent Node2 10.0.0.12 1核1G CentOS 7.6 Zabbix-agent2 Node3 10.0.0.13 1核1G CentOS 7.6 Zabbix-agent2 Node4 10.0.0.14 1核1G CentOS 7.6 Zabbix-agent22.安装Zabbix运行环境
2.0 安装PHP7.2
##要求PHP版本7.2以上+ #安装PHP第三方源 yum install epel-release -y rpm -Uvh https://mirror.webtatic.com/yum/el7/webtatic-release.rpm #安装并且下载PHP7.2 yum install php72w-fpm php72w-gd.x86_64 php72w-bcmath.x86_64 php72w-xml.x86_64 php72w-mbstring.x86_64 php72w-ldap.x86_64 php72w-mysqlnd.x86_64 -y #安装完成查看PHP版本信息 php-fpm -v #启动PHP systemctl start php-fpm systemctl enable php-fpm
2.1 安装PHP7.4
##要求PHP版本7.2以上+ #安装PHP第三方源 yum -y install epel-release yum -y install https://rpms.remirepo.net/enterprise/remi-release-7.rpm #在CentOS 7上安装PHP 7.4版本 yum -y install yum-utils yum repolist all |grep php yum-config-manager --enable remi-php74 yum -y install php php-cli php-fpm php-mysqlnd php-zip php-devel php-gd php-mcrypt php-mbstring php-curl php-xml php-pear php-bcmath php-json php-redis #安装完成查看PHP版本信息 php -v #启动PHP systemctl start php-fpm systemctl enable php-fpm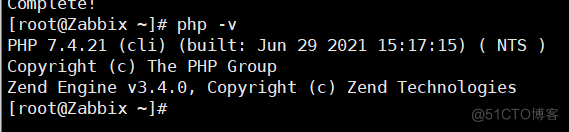
2.2 安装Nginx并编写配置文件
#下载安装Nginx yum -y install nginx #修改nginx的配置文件 vim /etc/nginx/nginx.conf worker_processes 1; events { worker_connections 1024; } http { include mime.types; default_type application/octet-stream; sendfile on; keepalive_timeout 65; server { listen 80; server_name localhost; location / { root /html; index index.php index.html index.htm; } location ~ \.php$ { root /html; fastcgi_pass 127.0.0.1:9000; fastcgi_index index.php; fastcgi_param SCRIPT_FILENAME /html$fastcgi_script_name; include fastcgi_params; } } } #检查Nginx语法是否正确 nginx -t #启动Nginx systemctl start nginx systemctl enable nginx2.3 安装MySQL[mariadb]
#下载安装数据库 yum install mariadb-server -y #启动并且初始化数据库 systemctl start mariadb systemctl enable mariadb mysql_secure_installation 先回车 再n 然后一路y #创库授权 create database zabbix character set utf8 collate utf8_bin; create user 'zabbix'@'localhost' identified by '123456'; grant all privileges on zabbix.* to 'zabbix'@'localhost';2.4 部署zabbix-web的PHP代码
#创建代码目录 mkdir /html #准备zabbix-web的php代码 https://cdn.zabbix.com/zabbix/sources/stable/5.0/ wget https://cdn.zabbix.com/zabbix/sources/stable/5.0/zabbix-5.0.8.tar.gz tar xf zabbix-5.0.8.tar.gz cd zabbix-5.0.8/ui/ cp -a * /html/ chown -R nginx:nginx /html2.5 启动故障总结
#解决首次访问 zabbix-web安装界面 error 500的错误 mkdir /var/lib/php/session -p chown -R nginx:nginx /var/lib/php/session/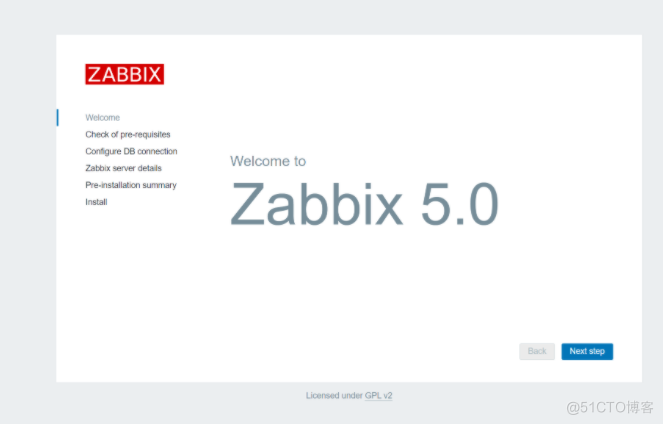
3.安装Zabbix-server
3.1 配置zabbix 5.0源
#配置zabbix 5.0源 rpm -ivh https://mirrors.tuna.tsinghua.edu.cn/zabbix/zabbix/5.0/rhel/7/x86_64/zabbix-release-5.0-1.el7.noarch.rpm sed -i 's#http://repo.zabbix.com#https://mirrors.tuna.tsinghua.edu.cn/zabbix#g' /etc/yum.repos.d/zabbix.repo3.2 安装Zabbix_server
#安装zabbix-server yum install zabbix-server-mysql -y3.3 导入Zabbix初始化数据
#导入zabbix初始化数据 zcat /usr/share/doc/zabbix-server-mysql-*/create.sql.gz|mysql -uzabbix -p123456 zabbix3.4 配置并且启动Zabbix-server
#配置zabbix-server vim /etc/zabbix/zabbix_server.conf DBHost=localhost DBName=zabbix DBUser=zabbix DBPassword=123456 DBSocket=/tmp/mysql.sock #软连接/tmp/mysql.sock ln -s /var/lib/mysql/mysql.sock /tmp/ #启动zabbix-server systemctl start zabbix-server.service systemctl enable zabbix-server.service netstat -lntup|grep 100514.安装Zabbix-web
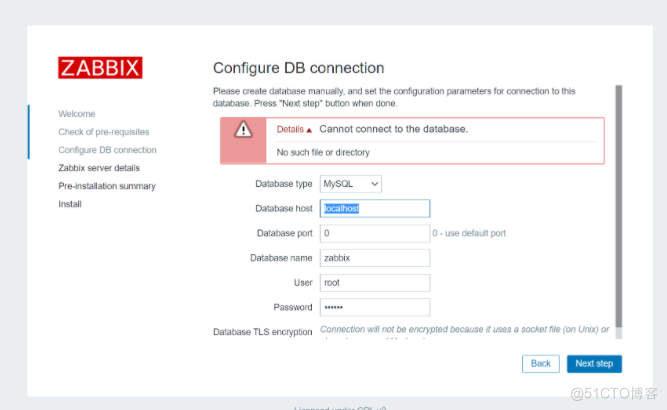
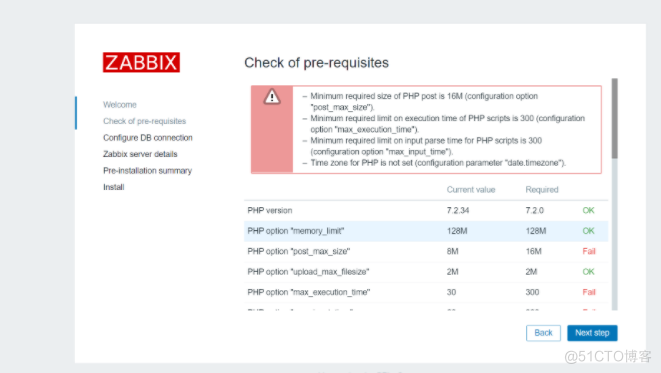
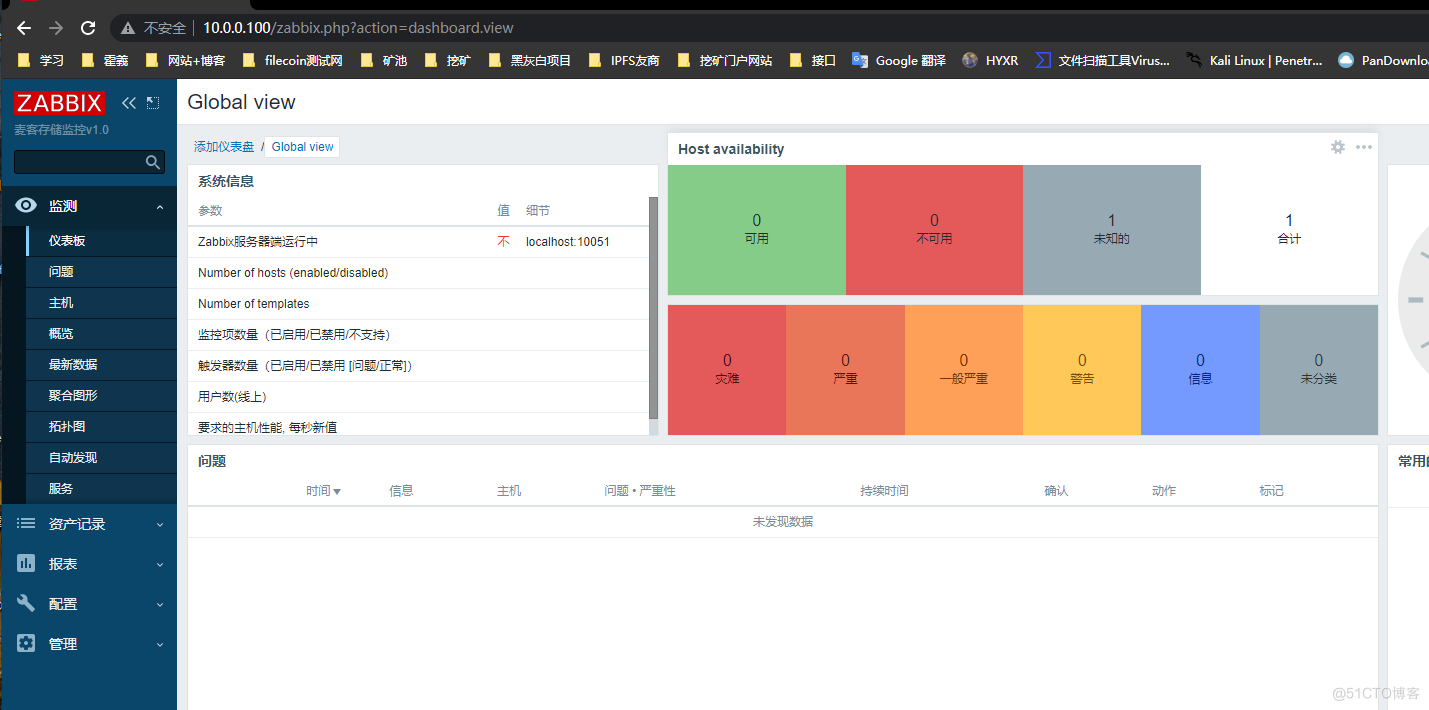
5.浏览器登录Zabbix
6.监控一台服务器主机
6.1 监控Zabbix本机
#监控zabbix自己 #下载监控模块 wget https://mirrors.aliyun.com/zabbix/zabbix/5.0/rhel/7/x86_64/zabbix-agent-5.0.6-1.el7.x86_64.rpm #安装监控模块 rpm -ivh zabbix-agent-5.0.6-1.el7.x86_64.rpm #启动并加入到开机自启 systemctl start zabbix-agent.service systemctl enable zabbix-agent.service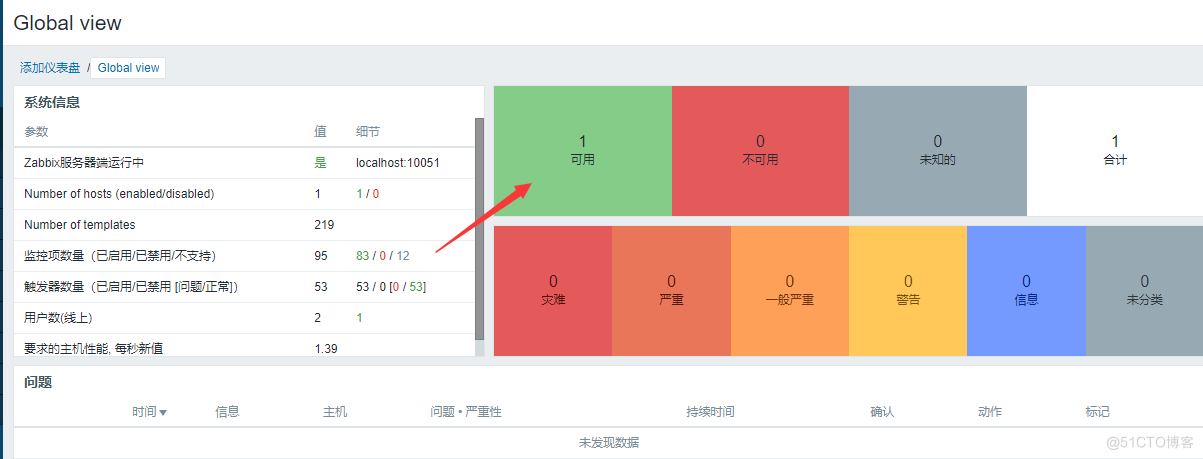

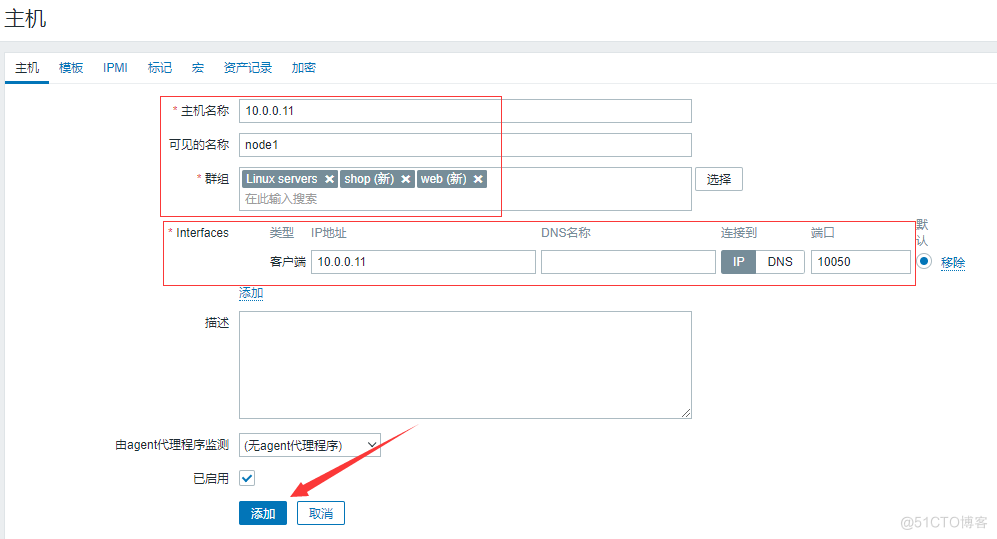
6.2 添加其他的主机
#添加其他的主机监控 #下载并且安装服务 wget https://mirrors.aliyun.com/zabbix/zabbix/5.0/rhel/7/x86_64/zabbix-agent-5.0.6-1.el7.x86_64.rpm #修改配置文件 vim /etc/zabbix/zabbix_agentd.conf ... Server=10.0.0.100 #Zabbix监控主节点IP地址 ... #启动并加入开机自启 systemctl start zabbix-agent.service systemctl enable zabbix-agent.service

6.3 Zabbix-agent2的介绍及安装
Zabbix-agent2作为一款新的agent服务,未来可能会替代原有的agent 特性: 降低了TCP连接的数量. Zabbix-agent2使用Go语言开发. 集成了Zabbix-agent原有的所有功能. 易于通过插件扩展使用第三方功能.6.3.1 安装Zabbix-agent2
#配置zabbix源 rpm -ivh https://mirrors.tuna.tsinghua.edu.cn/zabbix/zabbix/5.0/rhel/7/x86_64/zabbix-release-5.0-1.el7.noarch.rpm sed -i 's#http://repo.zabbix.com#https://mirrors.tuna.tsinghua.edu.cn/zabbix#g' /etc/yum.repos.d/zabbix.repo #下载安装Zabbix-agent2 yum -y install zabbix-agent2 #启动并且加入开机自启 systemctl start zabbix-agent2.service systemctl enable zabbix-agent2.service
6.3.2 Zabbix-agent2重要目录
[root@node4 zabbix]# rpm -ql zabbix-agent2 /etc/logrotate.d/zabbix-agent2 /etc/zabbix/zabbix_agent2.conf /etc/zabbix/zabbix_agent2.d /usr/lib/systemd/system/zabbix-agent2.service /usr/lib/tmpfiles.d/zabbix_agent2.conf /usr/sbin/zabbix_agent2 /usr/share/doc/zabbix-agent2-5.0.13 /var/log/zabbix /var/run/zabbix7.自定义监控项
7.1 什么是监控项
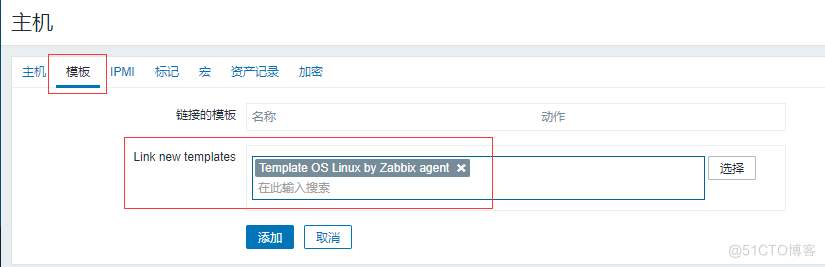
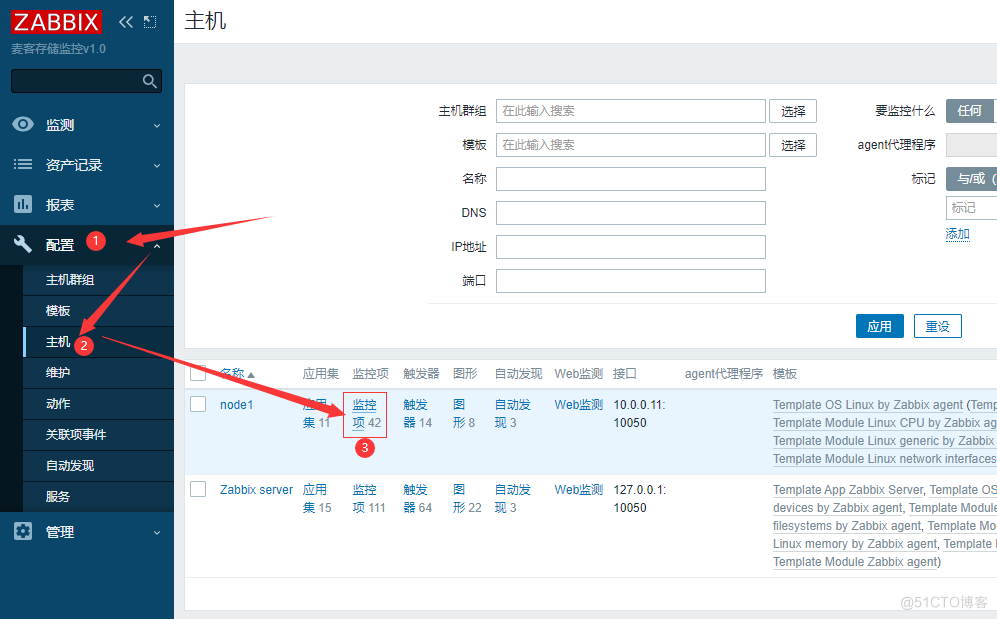
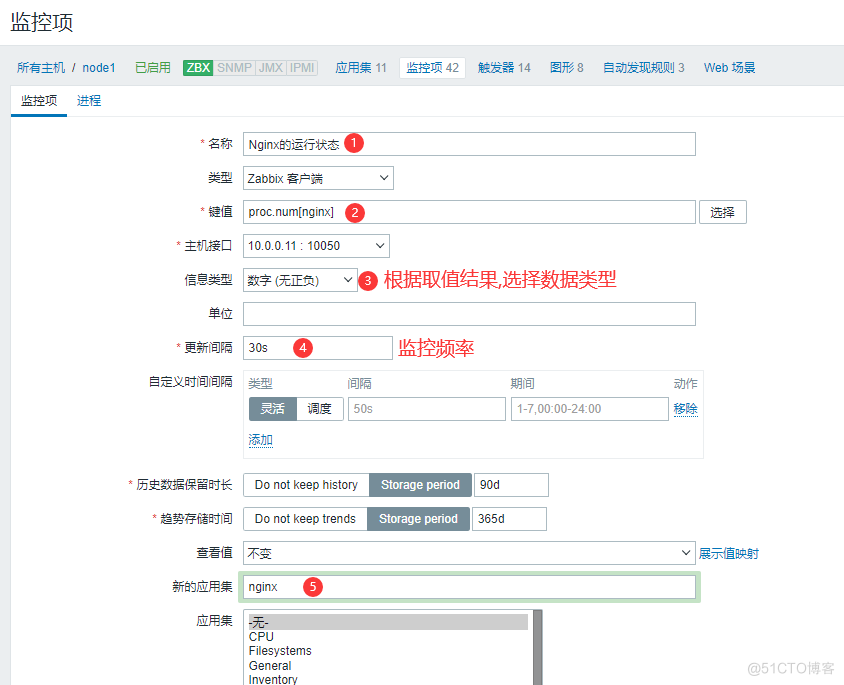
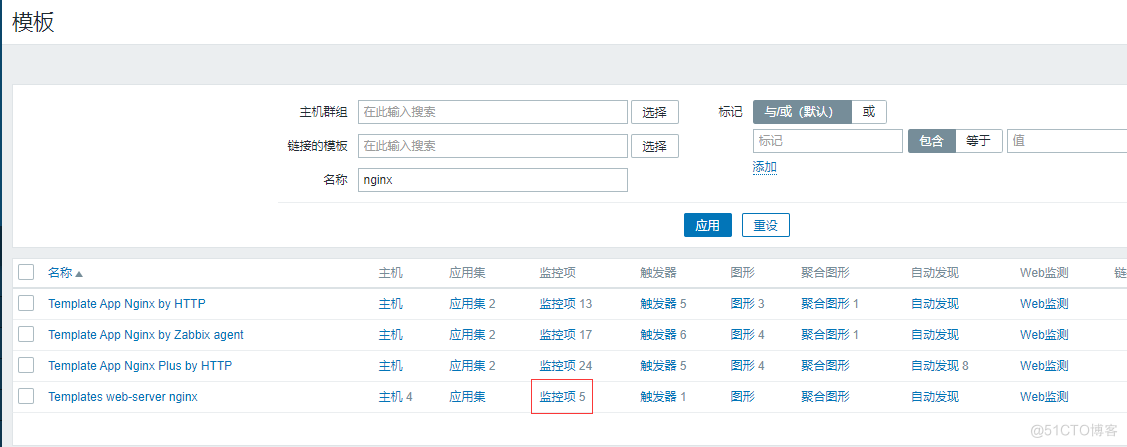
监控项:就是我们想要监控的指标,例如剩余内存,磁盘空间,服务的状态等等 每一个监控项,都有一个唯一的key,简洁明了(相当于shell脚本的变量名) 只需要安装zabbix-agent,默认就支持大量的监控项,但是linux模板并没有使用所有监控项 Template OS Linux by Zabbix agent主要监控了cpu,内存,磁盘,网卡,安全,它们都属于通用监控 应用集是监控项的分组7.2 使用内置Key监控Nginx的状态
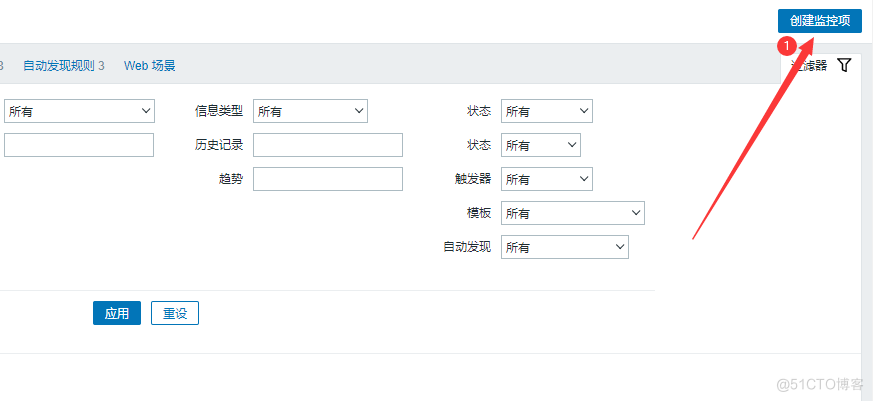
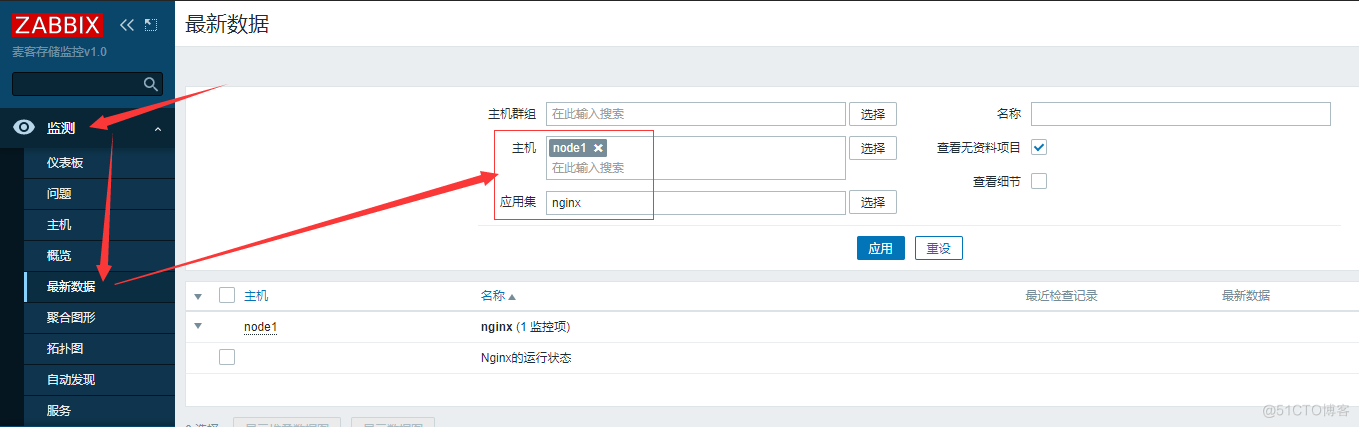
7.3 安装Zabbix-get测试取值[master]
#只在Zabbix-server上安装 wget https://mirrors.aliyun.com/zabbix/zabbix/5.0/rhel/7/x86_64/zabbix-get-5.0.13-1.el7.x86_64.rpm rpm -ivh zabbix-get-5.0.13-1.el7.x86_64.rpm #测试取值 zabbix_get -s 127.0.0.1 -k proc.num[nginx] #参数 -s 被监控主机的ip地址 -p 端口 -k 指定监控项的key7.4 自定义带参数的监控项[node]
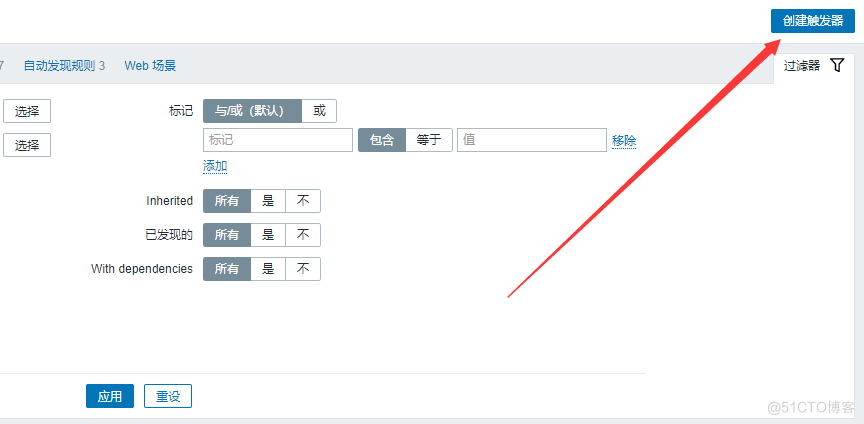
#建议把agent自定义监控项独立成一个配置文件 vim /etc/zabbix/zabbix_agentd.d/nginx_status.conf UserParameter=nginx_status,netstat -lntp|grep -c nginx8.自定义触发器
#触发器:设置一个报警条件 #注意:一个触发器至少对应一个监控项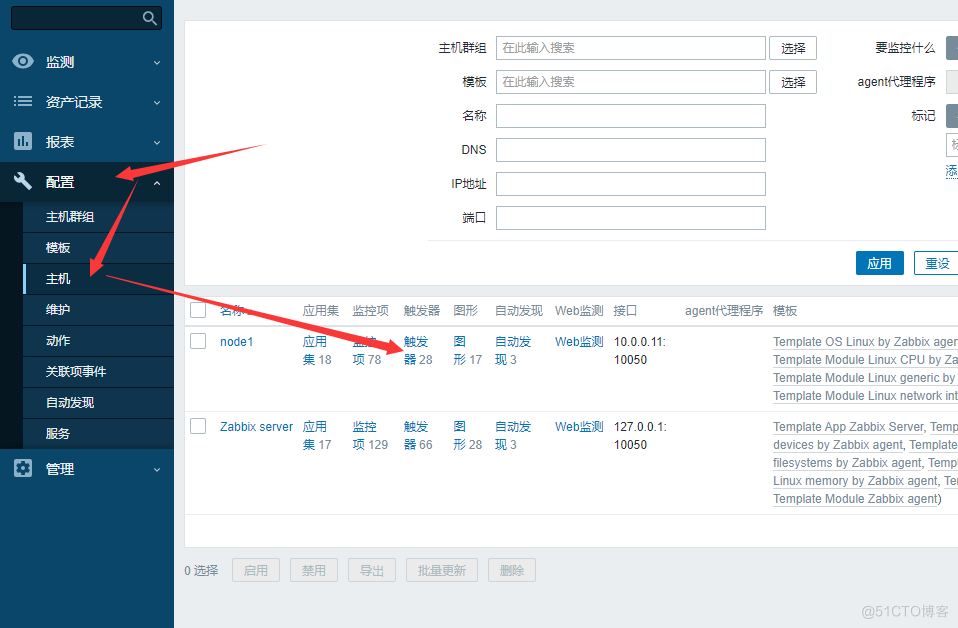
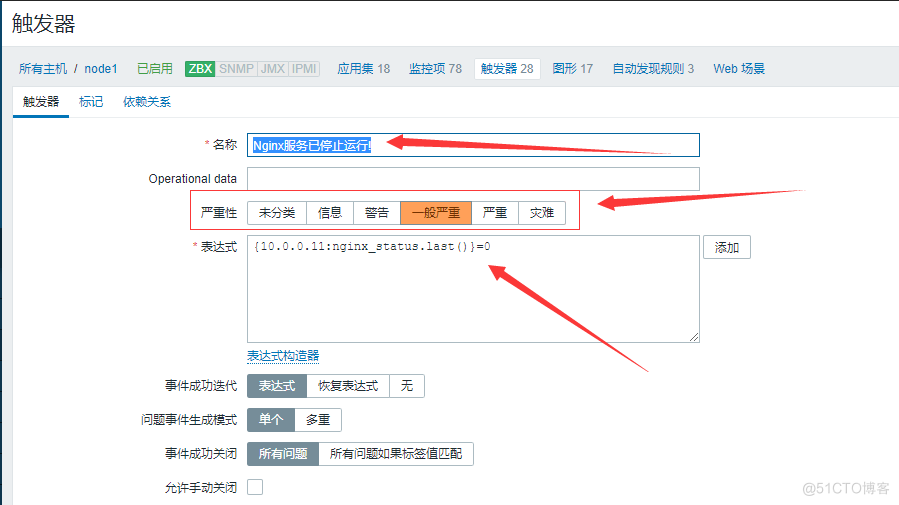
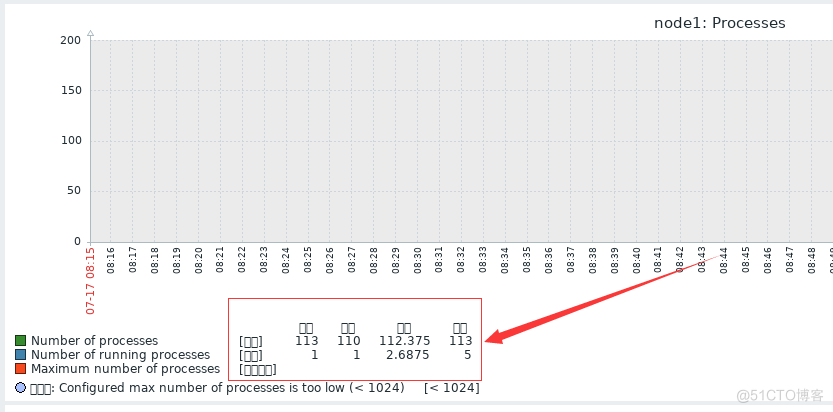
8.1 测试添加的触发器是否能触发自定义监控项
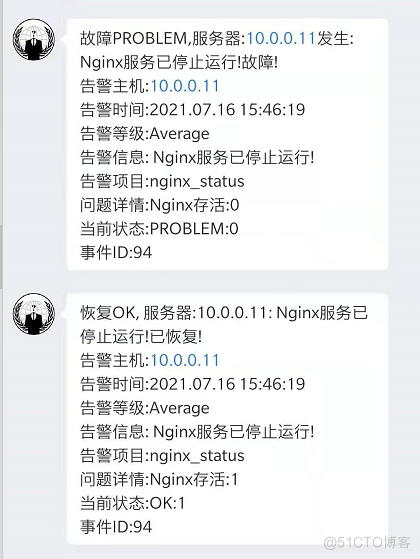
#node1[10.0.0.11] systemctl stop nginx #可以看下图,当Nginx停止后,Zabbix马上监测到并立马报警.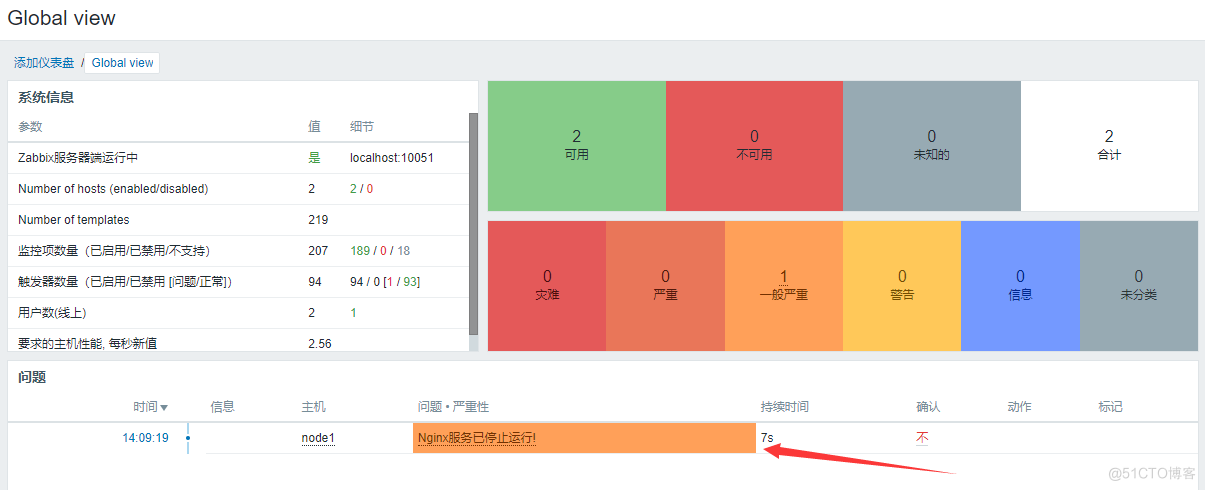
9.自定义报警
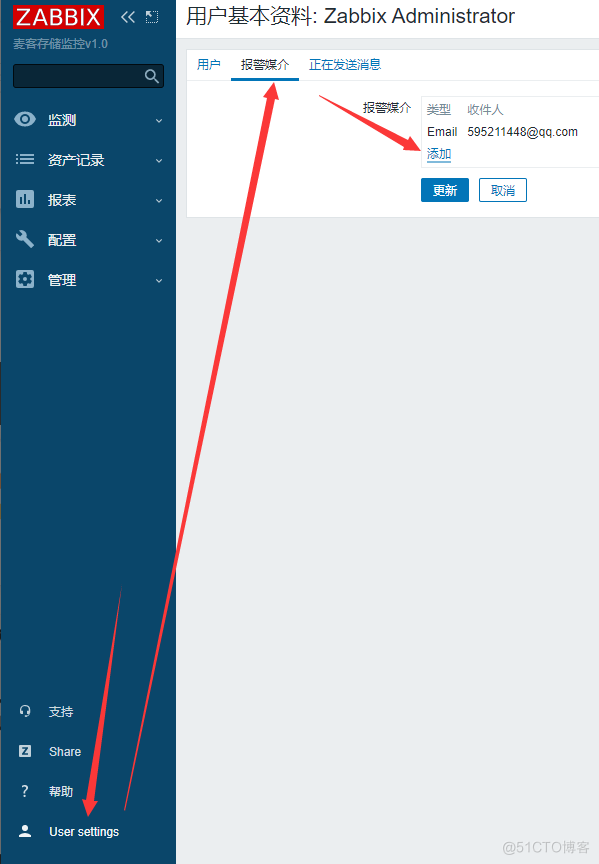
9.1 邮件报警
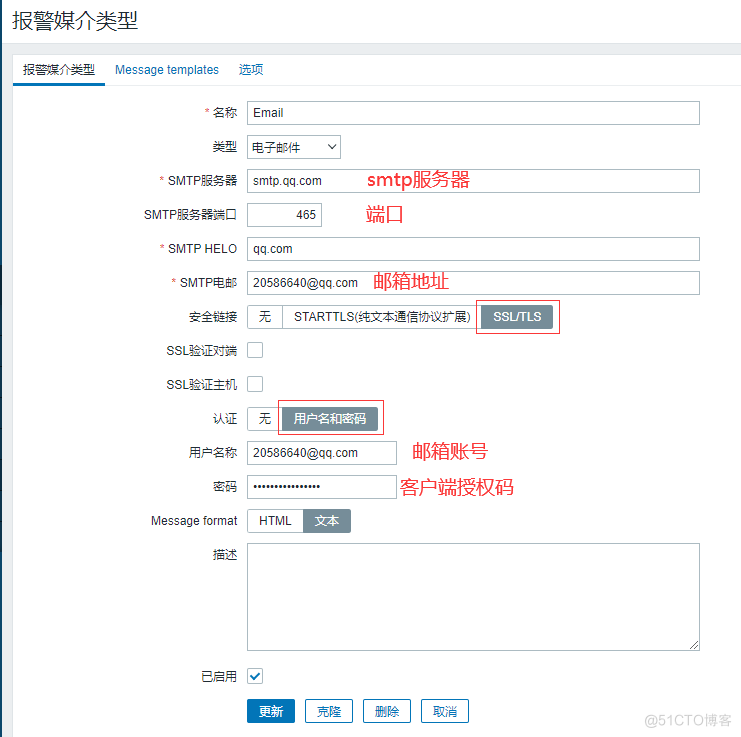
9.1.1 配置邮箱发件人
#配置邮箱发件人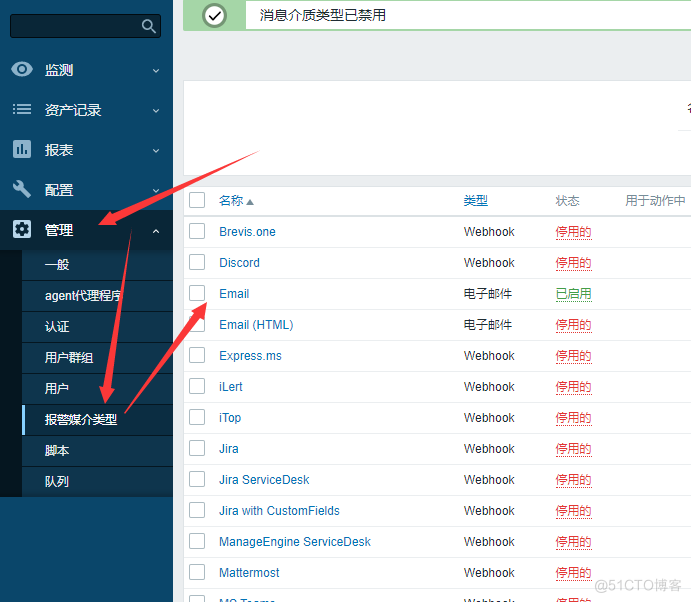

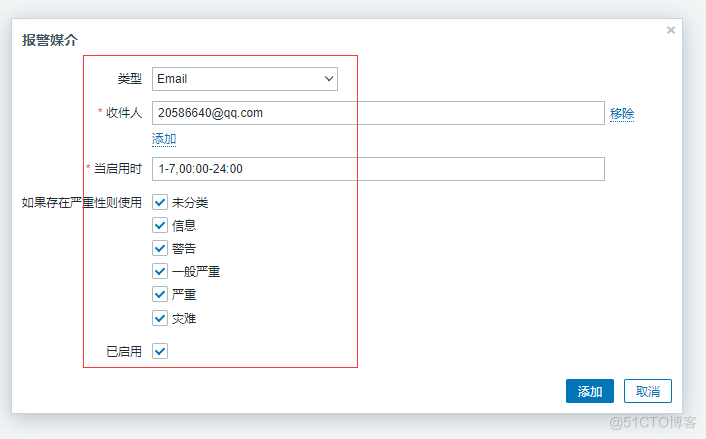
9.1.2 配置收件人
#配置收件人
9.1.3 配置触发器动作
#配置触发器动作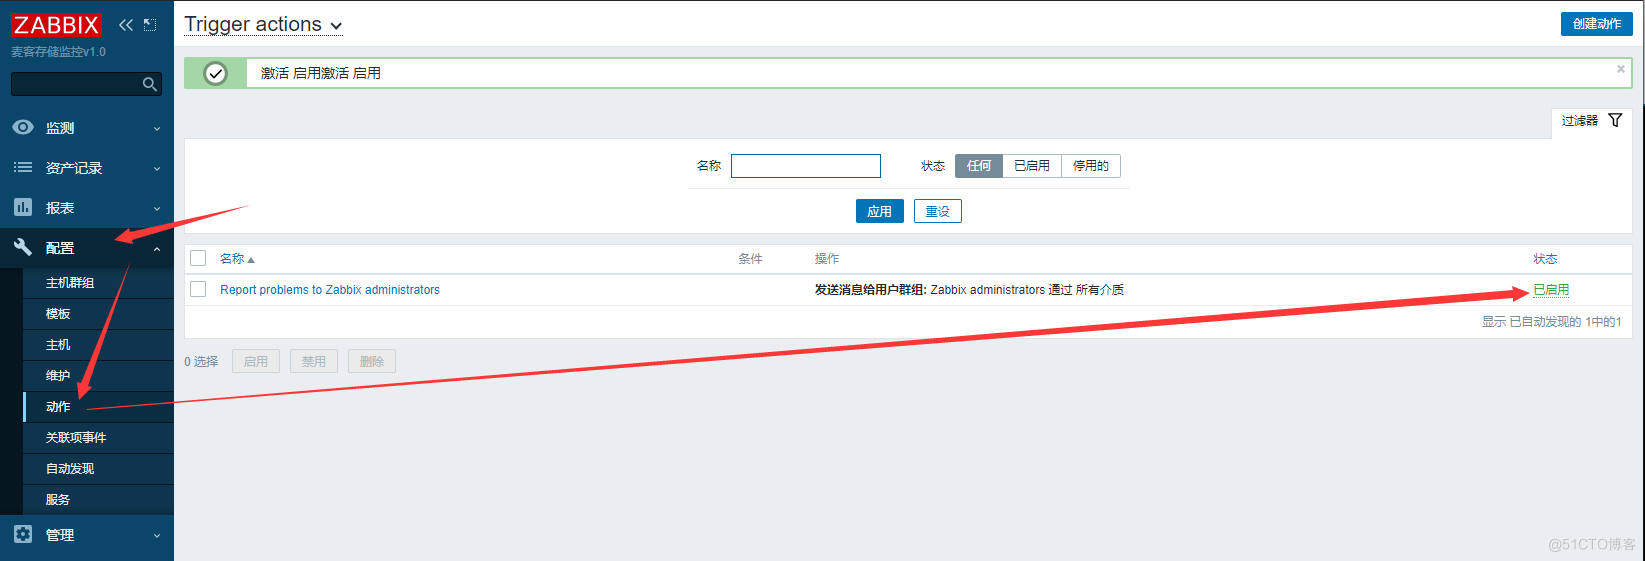
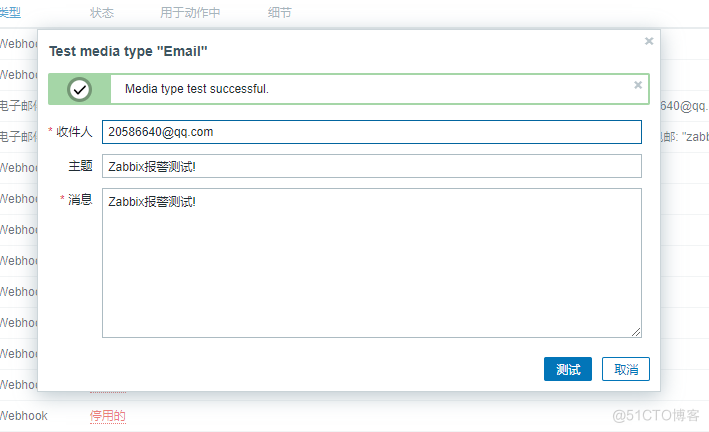
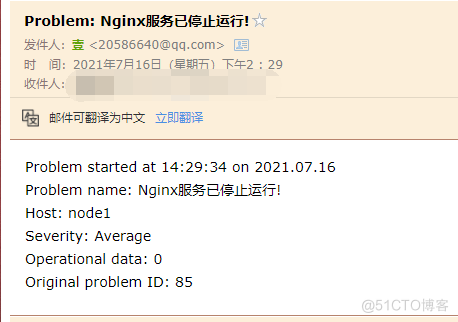
9.1.4 测试触发报警
#node1[10.0.0.11] systemctl stop nginx
9.1.5 自定义告警规则
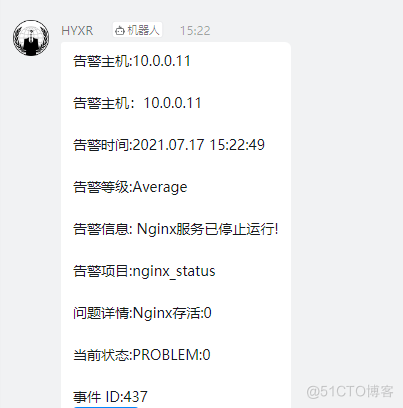
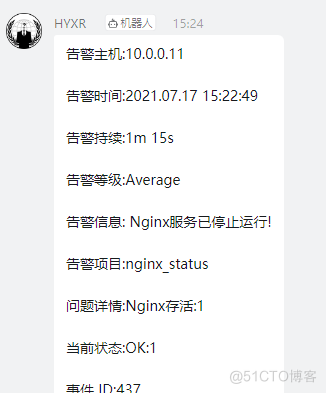
##故障告警自定义 #[标题] 故障{TRIGGER.STATUS},服务器:{HOSTNAME1}发生: {TRIGGER.NAME}故障! #[内容] 告警主机:{HOSTNAME1} 告警主机:{HOST.IP} 告警时间:{EVENT.DATE} {EVENT.TIME} 告警等级:{TRIGGER.SEVERITY} 告警信息: {TRIGGER.NAME} 告警项目:{TRIGGER.KEY1} 问题详情:{ITEM.NAME}:{ITEM.VALUE} 当前状态:{TRIGGER.STATUS}:{ITEM.VALUE1} 事件 ID:{EVENT.ID} #恢复告警自定义 #[标题] 恢复{TRIGGER.STATUS}, 服务器:{HOSTNAME1}: {TRIGGER.NAME}已恢复! #[内容] 告警主机:{HOSTNAME1} 告警时间:{EVENT.DATE} {EVENT.TIME} 告警持续:{EVENT.DURATION} 告警等级:{TRIGGER.SEVERITY} 告警信息: {TRIGGER.NAME} 告警项目:{TRIGGER.KEY1} 问题详情:{ITEM.NAME}:{ITEM.VALUE} 当前状态:{TRIGGER.STATUS}:{ITEM.VALUE1} 事件 ID:{EVENT.ID}9.2 企业微信报警(自定义脚本报警)
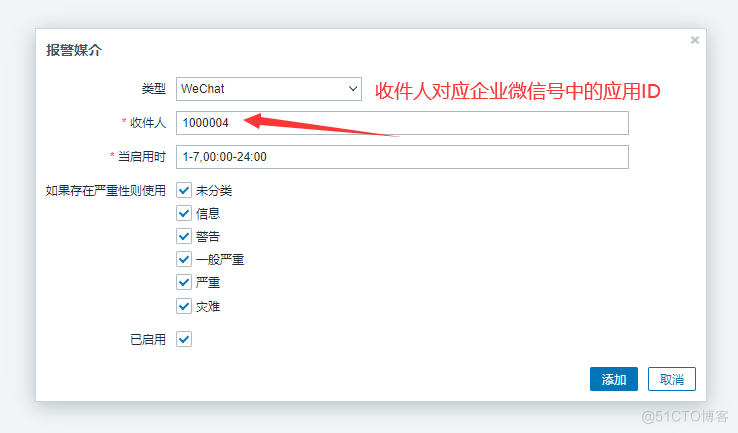
9.2.1 企业微信信息收集
##微信企业号设置 #通讯录设置 登陆微信企业号控制台 点击左侧“通讯录”,新增部门(技术部)与子部门(运维部),并添加用户 点击(运维部)后方的三角,修改部门,记录部门ID #创建应用 点击左侧“应用中心”,新建消息型应用,应用名称为“zabbix报警” “应用可见范围”,添加刚刚新建的子部门(运维部) 点击“zabbix报警”,记录应用ID #应用权限设置 点击左侧“设置”,权限管理,新建普通管理组,名称填写“zabbix报警组” 点击修改“通讯录权限”,勾选(技术部)后方的管理 点击修改“应用权限”,勾选刚刚创建的“zabbix报警” 点击刚刚创建的“zabbix报警组”,记录左侧的CorpID与Secret #收集微信相关信息 1.记录应用ID 3.记录CorpID与Secret 4.记录子部门(运维部)ID #企业ID ww8d907d93e5cdb1fa #AgentId 1000004 #Secret EzTcGJ2sxmO_b_LNLyaUAtEnKZm5d_vGbi9aDgJuz3A9.2.2 Zabbix-server配置
#修改配置文件 vim /etc/zabbix/zabbix_server.conf AlertScriptsPath=/usr/lib/zabbix/alertscripts #[如果不存在则自动创建]9.2.3 安装组件requests
#方法一 yum -y install python-pip pip install requests pip install --upgrade requests #方法二 wget https://pypi.python.org/packages/c3/38/d95ddb6cc8558930600be088e174a2152261a1e0708a18bf91b5b8c90b22/requests-2.18.3.tar.gz tar zxvf requests-2.18.3.tar.gz cd requests-2.18.3 python setup.py build python setup.py install9.2.4 下载WeChat报警脚本
git clone https://github.com/X-Mars/Zabbix-Alert-WeChat.git cp Zabbix-Alert-WeChat/wechat.py /usr/lib/zabbix/alertscripts chmod +x /usr/lib/zabbix/alertscripts/wechat.py9.2.5 修改WeChat报警脚本
#!/usr/bin/python2.7 #_*_coding:utf-8 _*_ #auther:火星小刘 import requests,sys,json import urllib3 urllib3.disable_warnings() reload(sys) sys.setdefaultencoding('utf-8') def GetTokenFromServer(Corpid,Secret): Url = "https://qyapi.weixin.qq.com/cgi-bin/gettoken" Data = { "corpid":Corpid, "corpsecret":Secret } r = requests.get(url=Url,params=Data,verify=False) print(r.json()) if r.json()['errcode'] != 0: return False else: Token = r.json()['access_token'] file = open('/tmp/zabbix_wechat_config.json', 'w') file.write(r.text) file.close() return Token def SendMessage(User,Agentid,Subject,Content): try: file = open('/tmp/zabbix_wechat_config.json', 'r') Token = json.load(file)['access_token'] file.close() except: Token = GetTokenFromServer(Corpid, Secret) n = 0 Url = "https://qyapi.weixin.qq.com/cgi-bin/message/send?access_token=%s" % Token Data = { "touser": User, # 企业号中的用户帐号,在zabbix用户Media中配置,如果配置不正常,将按部门发送。 #"totag": Tagid, # 企业号中的标签id,群发使用(推荐) #"toparty": Partyid, # 企业号中的部门id,群发时使用。 "msgtype": "text", # 消息类型。 "agentid": Agentid, # 企业号中的应用id。 "text": { "content": Subject + '\n' + Content }, "safe": "0" } r = requests.post(url=Url,data=json.dumps(Data),verify=False) while r.json()['errcode'] != 0 and n < 4: n+=1 Token = GetTokenFromServer(Corpid, Secret) if Token: Url = "https://qyapi.weixin.qq.com/cgi-bin/message/send?access_token=%s" % Token r = requests.post(url=Url,data=json.dumps(Data),verify=False) print(r.json()) return r.json() if __name__ == '__main__': User = sys.argv[1] # zabbix传过来的第一个参数 Subject = str(sys.argv[2]) # zabbix传过来的第二个参数 Content = str(sys.argv[3]) # zabbix传过来的第三个参数 Corpid = "wxaf" # CorpID是企业号的标识 Secret = "aKDdCRT76" # Secret是管理组凭证密钥 #Tagid = "1" # 通讯录标签ID Agentid = "1000001" # 应用ID #Partyid = "1" # 部门ID Status = SendMessage(User,Agentid,Subject,Content) print Status9.2.6 测试脚本是否可用
[root@Zabbix ~]# python /usr/lib/zabbix/alertscripts/wechat.py www web 123
9.2.7 Zabbix-Web界面配置
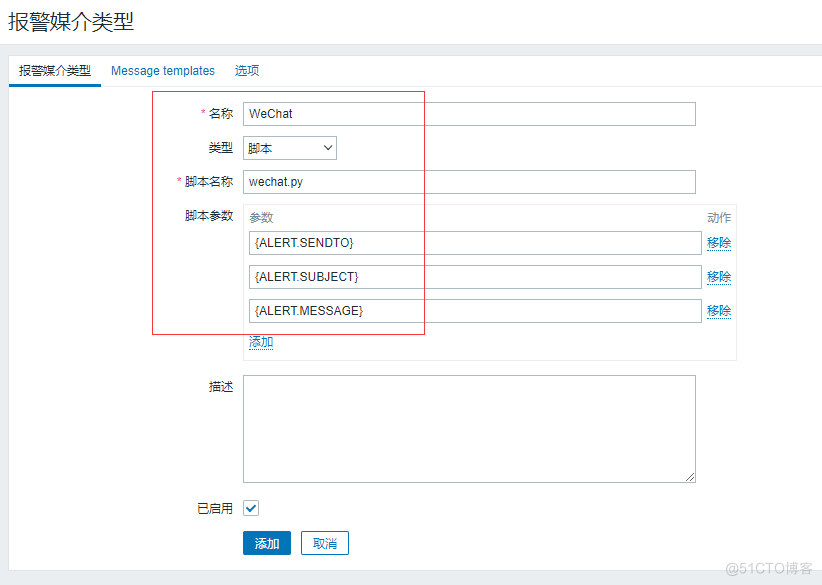
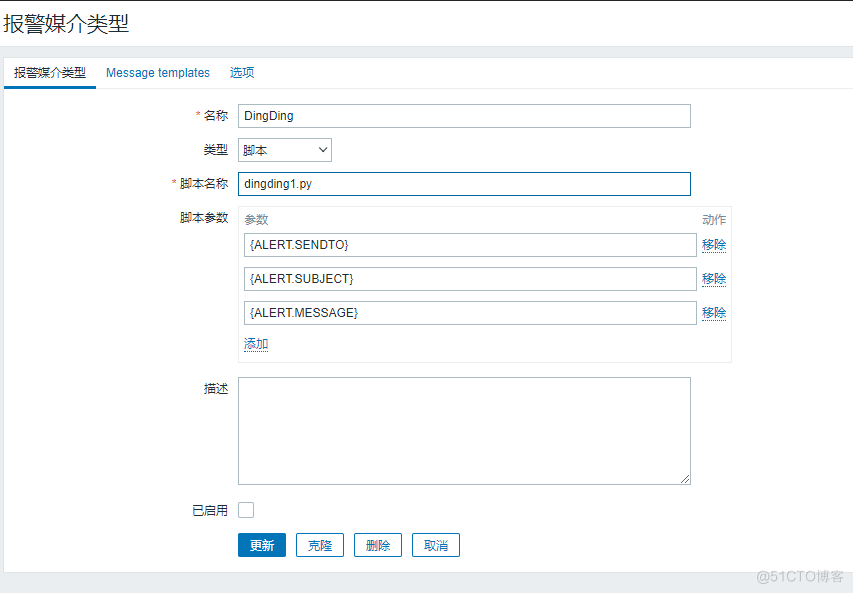
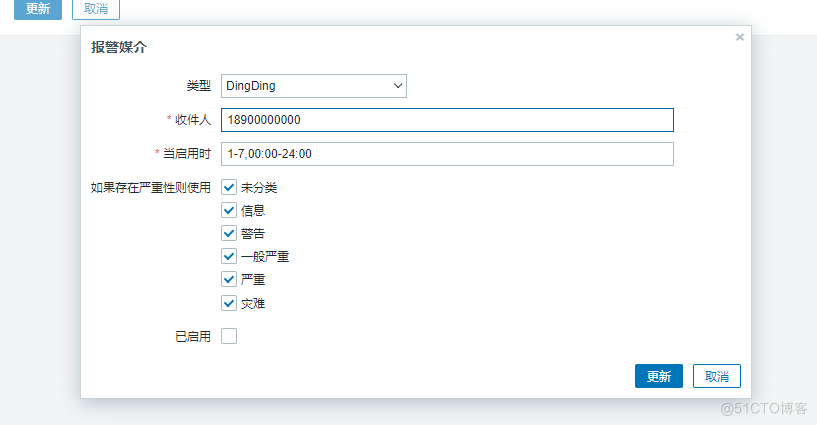
#进入:管理-->报警媒介类型-->创建媒体类型
9.2.8 测试触发报警
#node1[10.0.0.11] systemctl stop nginx
9.2.9 自定义告警规则
##故障告警自定义 #[标题] 故障{TRIGGER.STATUS},服务器:{HOSTNAME1}发生: {TRIGGER.NAME}故障! #[内容] 告警主机:{HOSTNAME1} 告警主机:{HOST.IP} 告警时间:{EVENT.DATE} {EVENT.TIME} 告警等级:{TRIGGER.SEVERITY} 告警信息: {TRIGGER.NAME} 告警项目:{TRIGGER.KEY1} 问题详情:{ITEM.NAME}:{ITEM.VALUE} 当前状态:{TRIGGER.STATUS}:{ITEM.VALUE1} 事件 ID:{EVENT.ID} #恢复告警自定义 #[标题] 恢复{TRIGGER.STATUS}, 服务器:{HOSTNAME1}: {TRIGGER.NAME}已恢复! #[内容] 告警主机:{HOSTNAME1} 告警时间:{EVENT.DATE} {EVENT.TIME} 告警持续:{EVENT.DURATION} 告警等级:{TRIGGER.SEVERITY} 告警信息: {TRIGGER.NAME} 告警项目:{TRIGGER.KEY1} 问题详情:{ITEM.NAME}:{ITEM.VALUE} 当前状态:{TRIGGER.STATUS}:{ITEM.VALUE1} 事件 ID:{EVENT.ID}9.3 钉钉报警(自定义脚本报警)
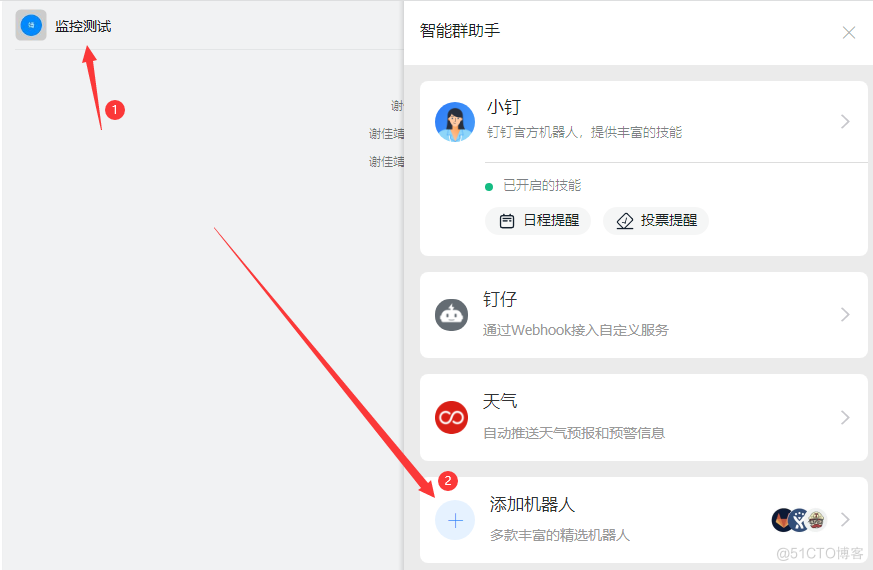
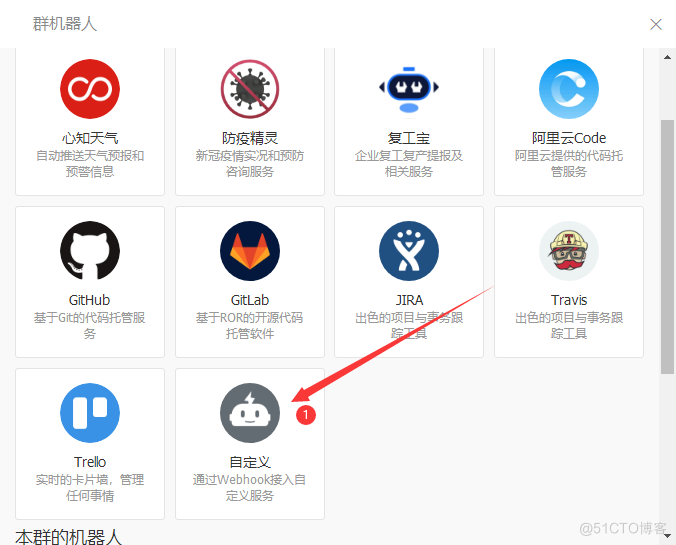
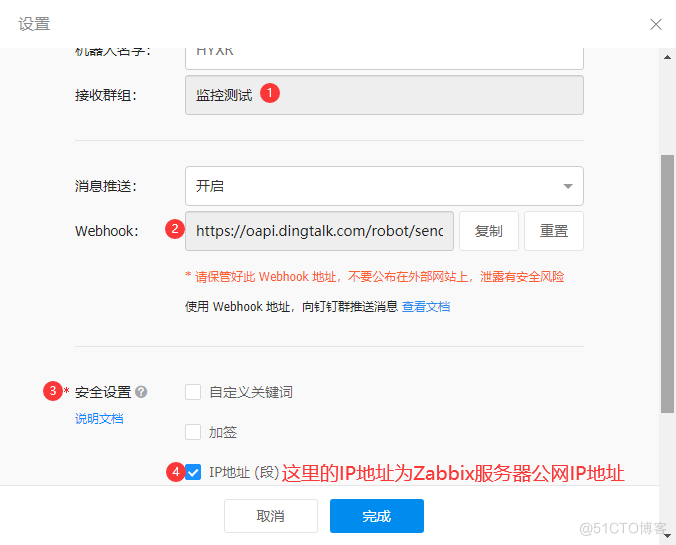
9.3.1 钉钉机器人创建
9.3.2 Zabbix-server配置
#修改配置文件 vim /etc/zabbix/zabbix_server.conf AlertScriptsPath=/usr/lib/zabbix/alertscripts #[如果不存在则自动创建]9.3.3 编写钉钉报警脚本
vim /usr/lib/zabbix/alertscripts/dingding.py #!/bin/python #coding:utf-8 #zabbix钉钉报警 import requests,json,sys,os,datetime webhook="https://oapi.dingtalk.com/robot/send?access_token=8ea7abd3db4b49a9e898e911920d4899c526ae78f5794c977cfca8b6c0bjsdd" #说明:这里改为自己创建的机器人的webhook的值 user=sys.argv[1] text=sys.argv[3] data={ "msgtype": "text", "text": { "content": text }, "at": { "atMobiles": [ user ], "isAtAll": False #False会@一个人.Ture会@所有人 } } headers = {'Content-Type': 'application/json'} x=requests.post(url=webhook,data=json.dumps(data, ensure_ascii=False),headers=headers) if os.path.exists("/usr/local/zabbix/log/dingding.log"): f=open("/usr/local/zabbix/log/dingding.log","a+") else: f=open("/usr/local/zabbix/log/dingding.log","w+") f.write("\n"+"--"*30) if x.json()["errcode"] == 0: f.write("\n"+str(datetime.datetime.now())+" "+str(user)+" "+"发送成功"+"\n"+str(text)) f.close() else: f.write("\n"+str(datetime.datetime.now()) + " " + str(user) + " " + "发送失败" + "\n" + str(text)) f.close()9.3.4 钉钉报警脚本修改权限
#赋予脚本执行权限 [root@Zabbix alertscripts]# chmod +x dingding.py 创建上面脚本中的日志路径 [root@Zabbix alertscripts]# cd /var/log/zabbix/ [root@Zabbix alertscripts]# touch /var/log/zabbix/zabbix_dingding.log [root@Zabbix alertscripts]# chown zabbix.zabbix /var/log/zabbix/zabbix_dingding.log #手动测试脚本是否可以正常发送消息[这个条文档记录的测试信息,忽略] [root@Zabbix alertscripts]# ./dingding.py A B "测试"9.3.5 Zabbix-server配置
#进入:管理-->报警媒介类型-->创建媒体类型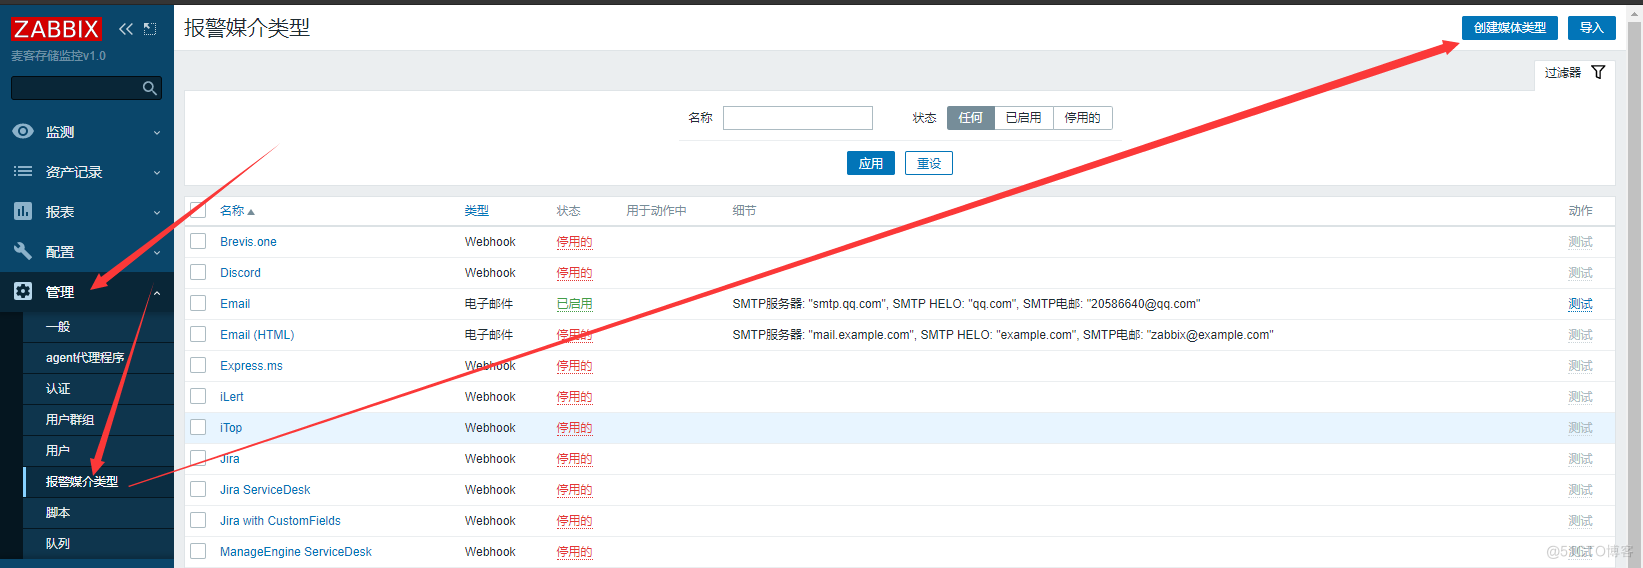

9.3.6 测试触发报警
#node1[10.0.0.11] systemctl stop nginx
9.3.7 自定义告警规则
##故障告警自定义 #[标题] 故障{TRIGGER.STATUS},服务器:{HOSTNAME1}发生: {TRIGGER.NAME}故障! #[内容] 告警主机:{HOSTNAME1} 告警主机:{HOST.IP} 告警时间:{EVENT.DATE} {EVENT.TIME} 告警等级:{TRIGGER.SEVERITY} 告警信息: {TRIGGER.NAME} 告警项目:{TRIGGER.KEY1} 问题详情:{ITEM.NAME}:{ITEM.VALUE} 当前状态:{TRIGGER.STATUS}:{ITEM.VALUE1} 事件 ID:{EVENT.ID} #恢复告警自定义 #[标题] 恢复{TRIGGER.STATUS}, 服务器:{HOSTNAME1}: {TRIGGER.NAME}已恢复! #[内容] 告警主机:{HOSTNAME1} 告警时间:{EVENT.DATE} {EVENT.TIME} 告警持续:{EVENT.DURATION} 告警等级:{TRIGGER.SEVERITY} 告警信息: {TRIGGER.NAME} 告警项目:{TRIGGER.KEY1} 问题详情:{ITEM.NAME}:{ITEM.VALUE} 当前状态:{TRIGGER.STATUS}:{ITEM.VALUE1} 事件 ID:{EVENT.ID}10.自定义图形和Grafana出图
10.1 解决中文乱码问题
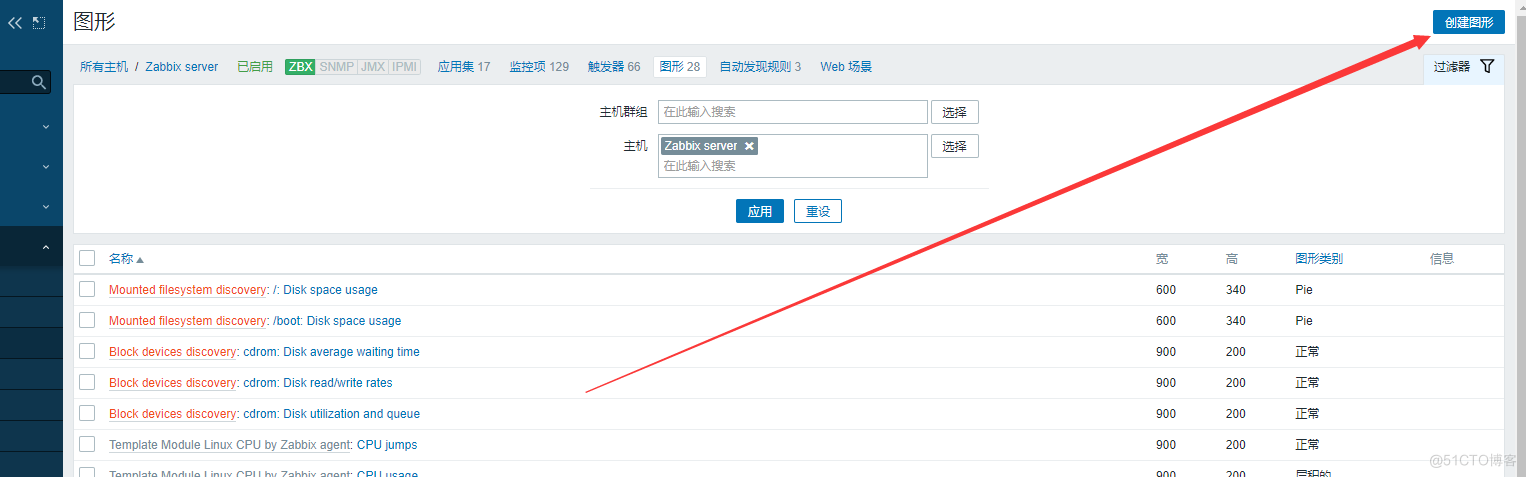
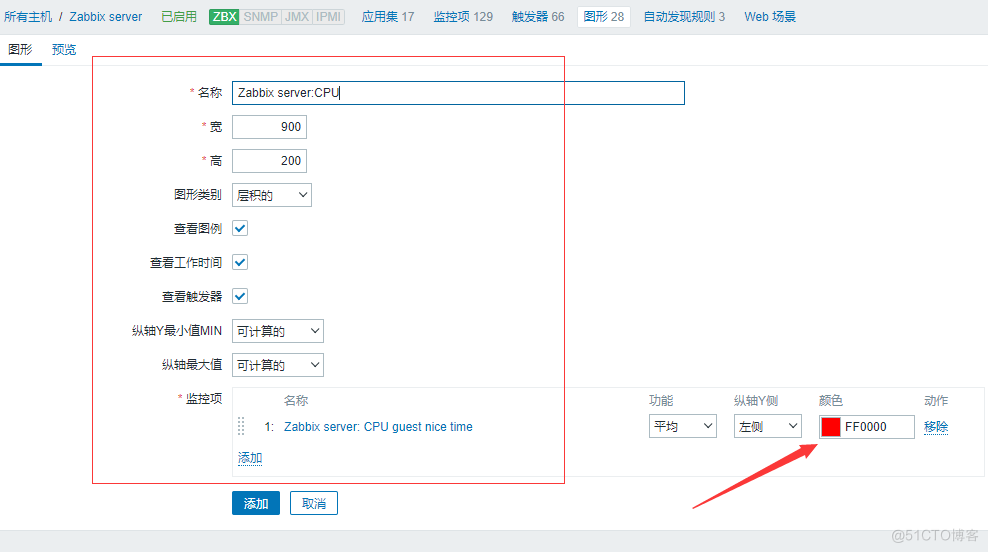
10.2 自定义图形
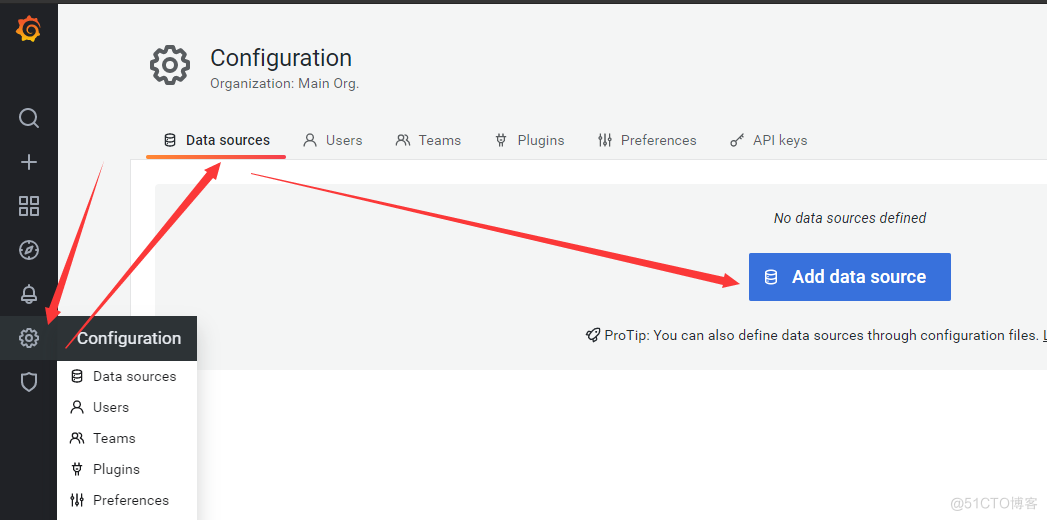
10.3 安装Grafana
#grafana出图 gtafana:插件/数据源(设置Zabbix) #下载gtafana的rpm包 wget https://dl.grafana.com/oss/release/grafana-8.0.5-1.x86_64.rpm #yum安装gtafana yum localinstall grafana-8.0.5-1.x86_64.rpm -y #启动并且设置为开机自启 systemctl enable grafana-server.service systemctl start grafana-server.service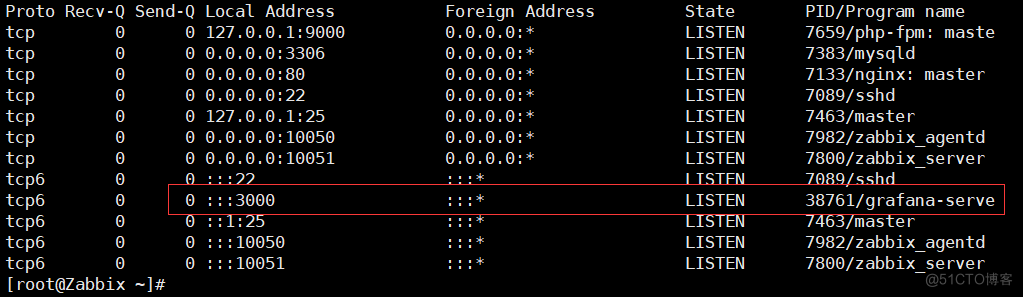
10.4 安装Zabbix插件
[root@Zabbix ~]# grafana-cli plugins install alexanderzobnin-zabbix-app 4.1.2 systemctl restart grafana-server
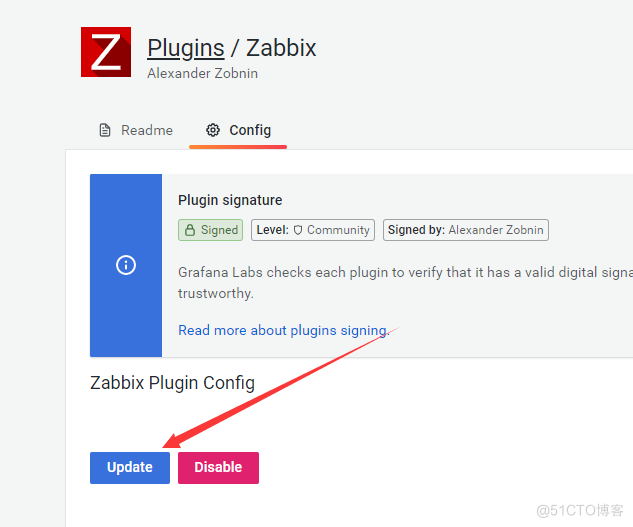
10.5 Grafana启用Zabbix插件
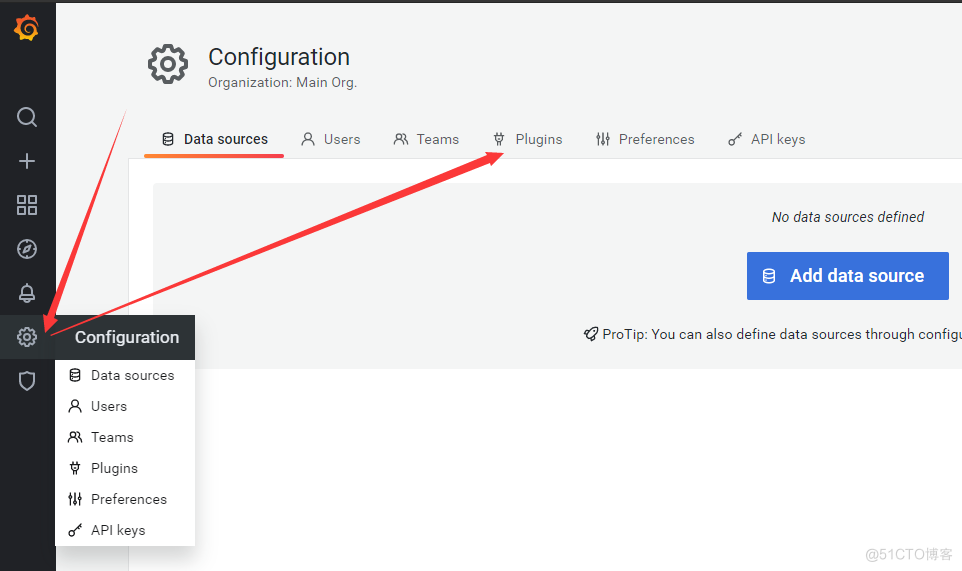

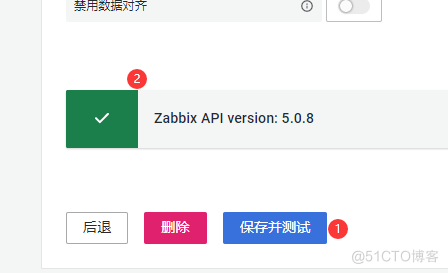
10.6 Grafana新建Zabbix数据源


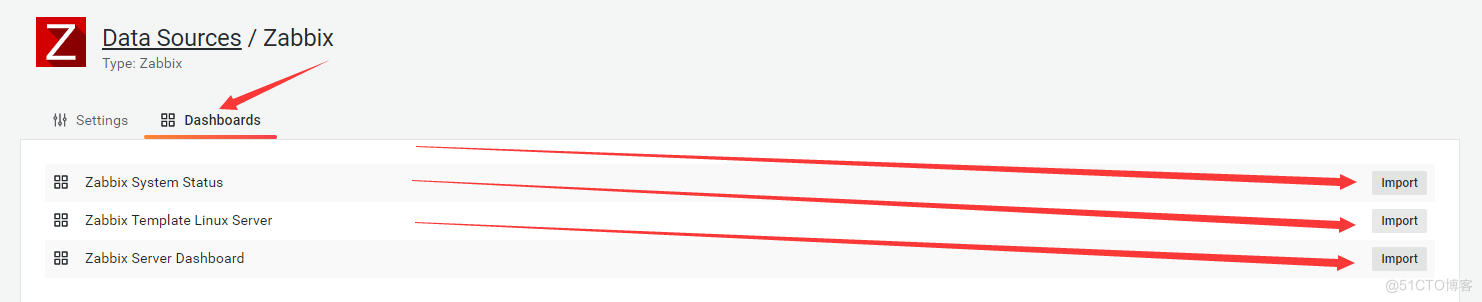
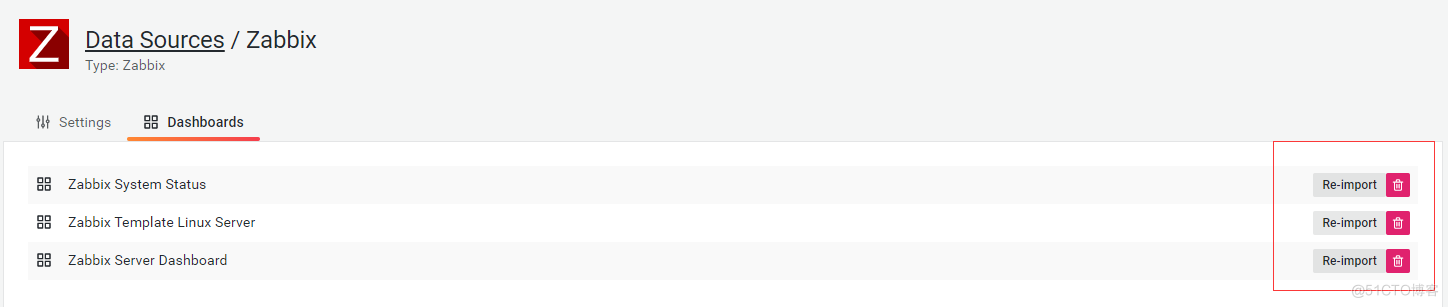
10.7 导入Dashboard模板
#进入官网下载模板 官网:www.grafana.com 模板页面:https://grafana.com/grafana/dashboards #示例用的模板为 9713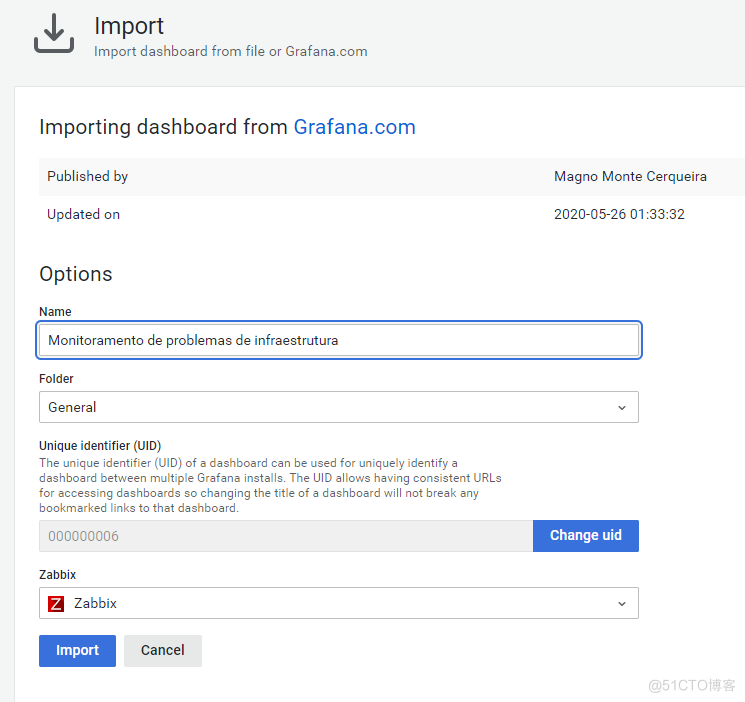
10.8 测试触发报警
#node1[10.0.0.11] systemctl stop nginx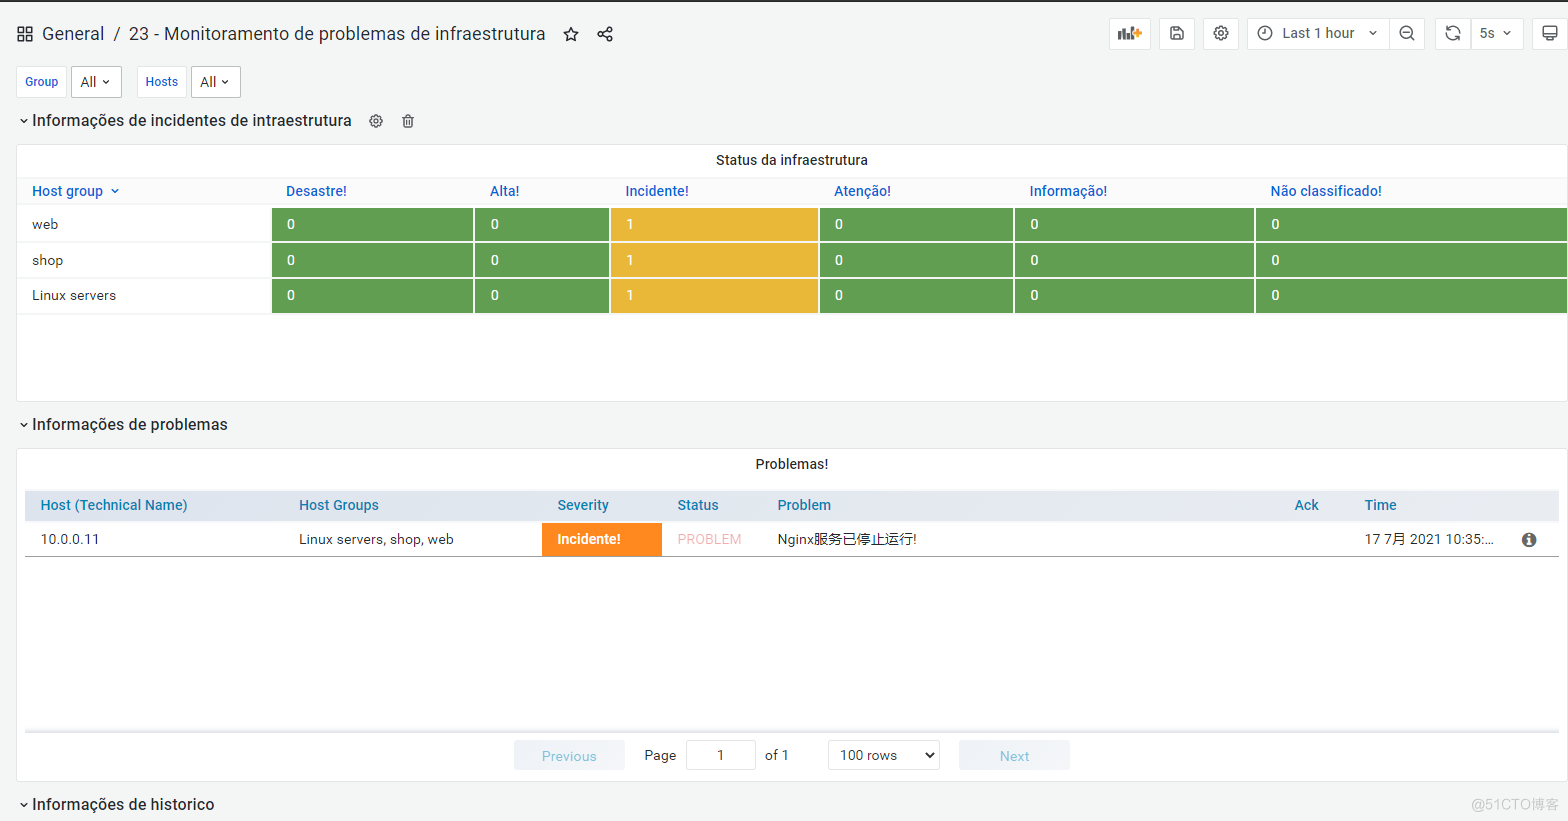
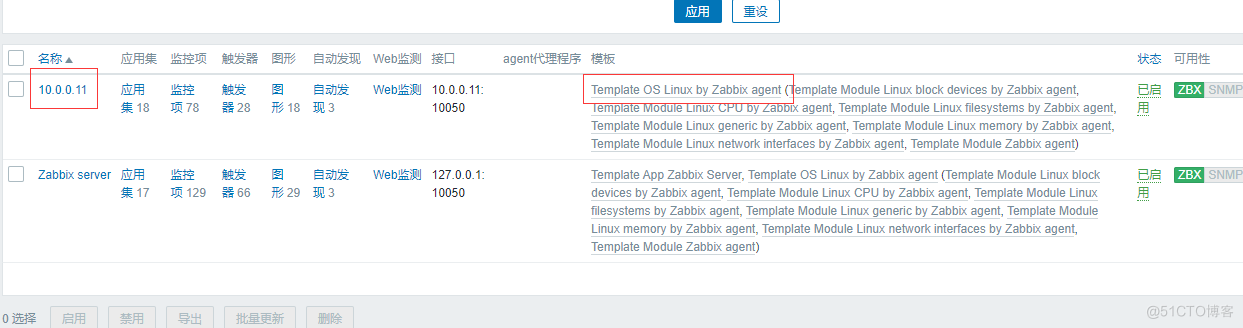
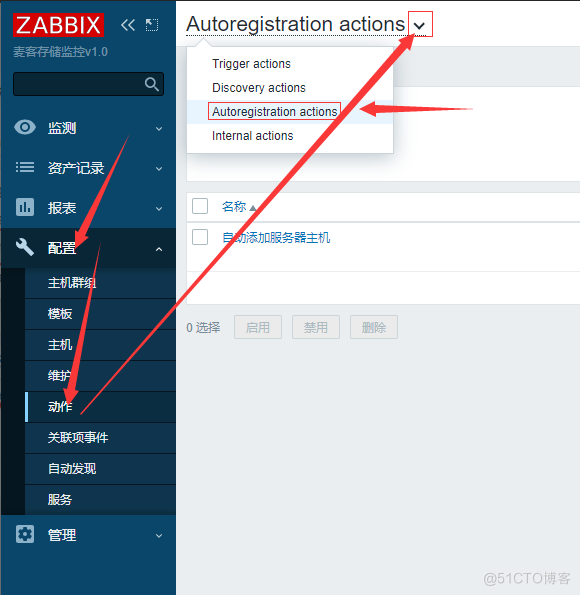
11.Zabbix自动发现和自动注册[主动]
11.1 自动发现
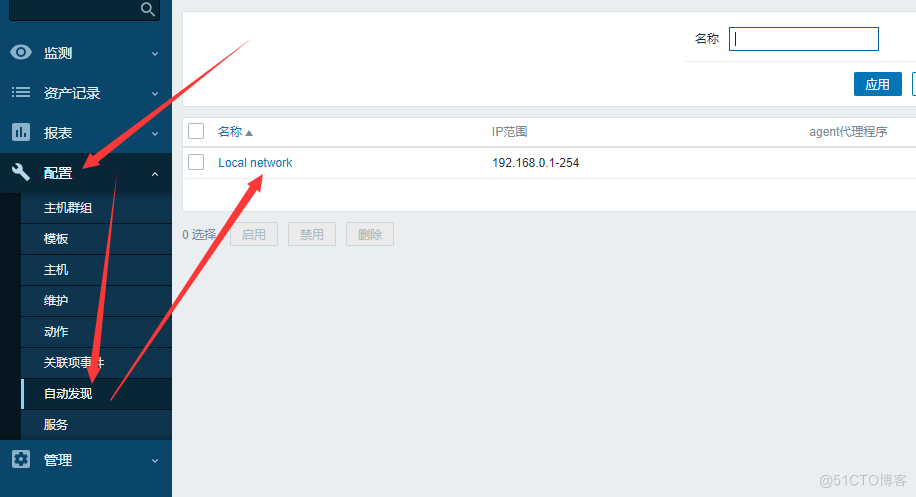
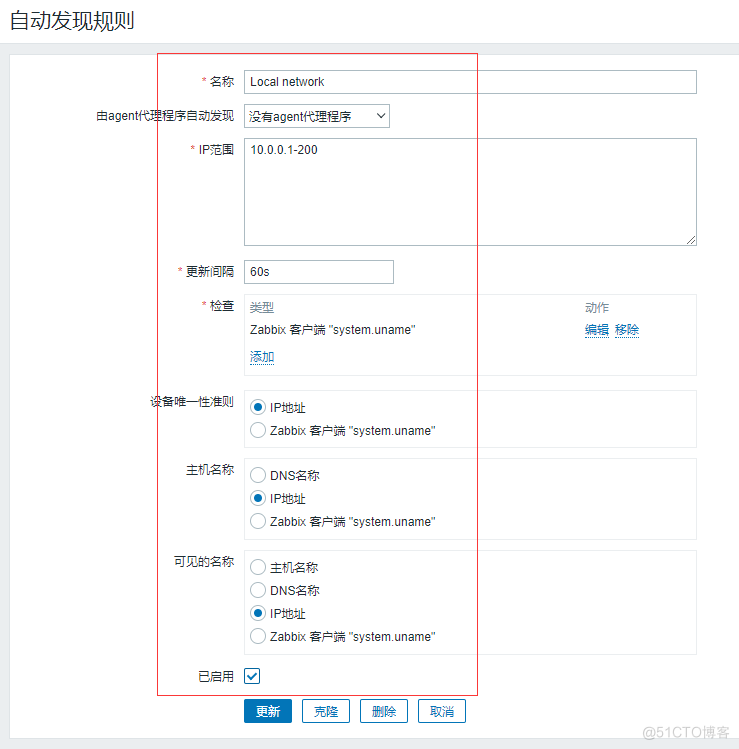
11.2 添加主机的规则
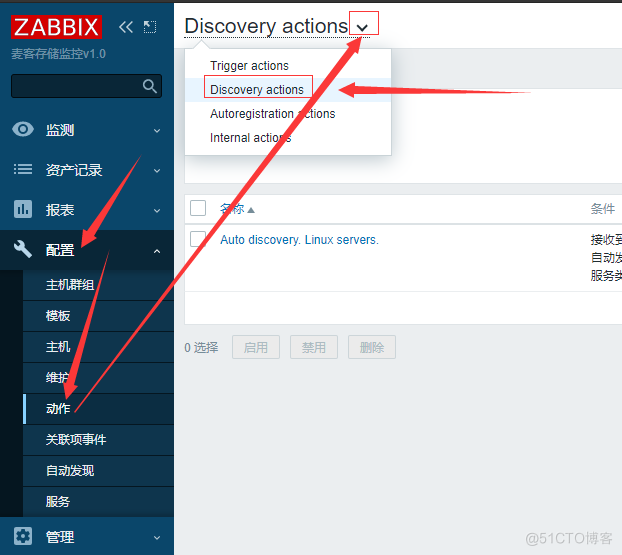
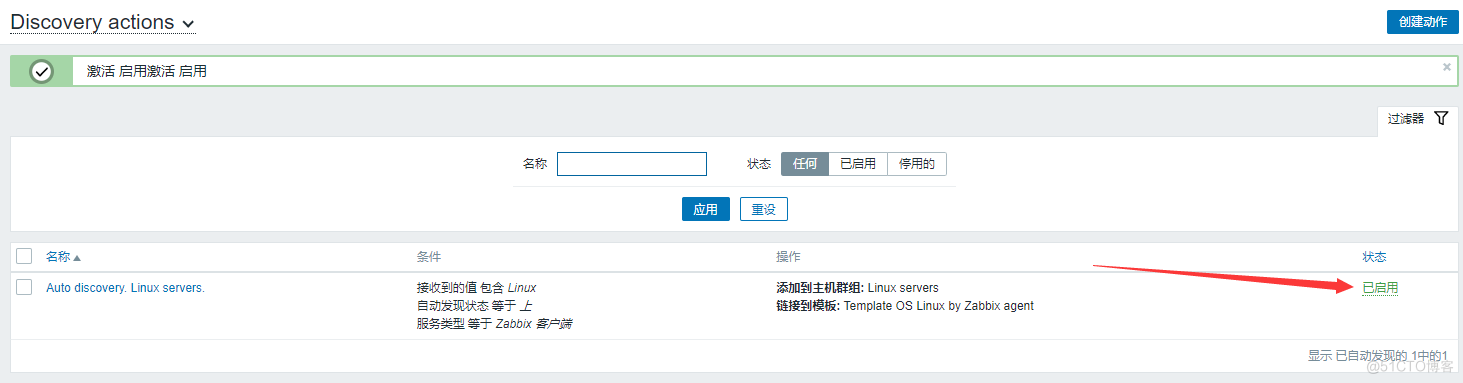
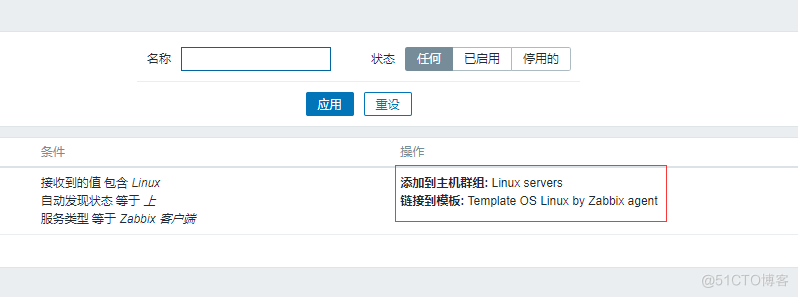
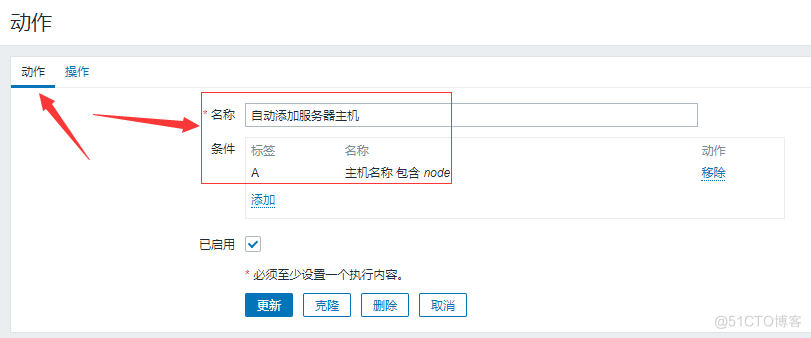
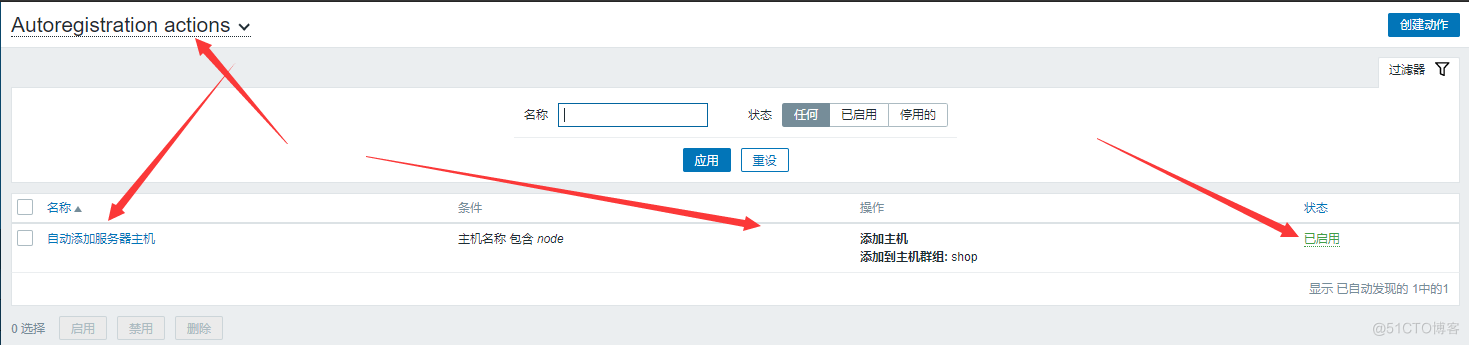
11.3 自动注册


11.4 Zabbix-agent2修改配置文件
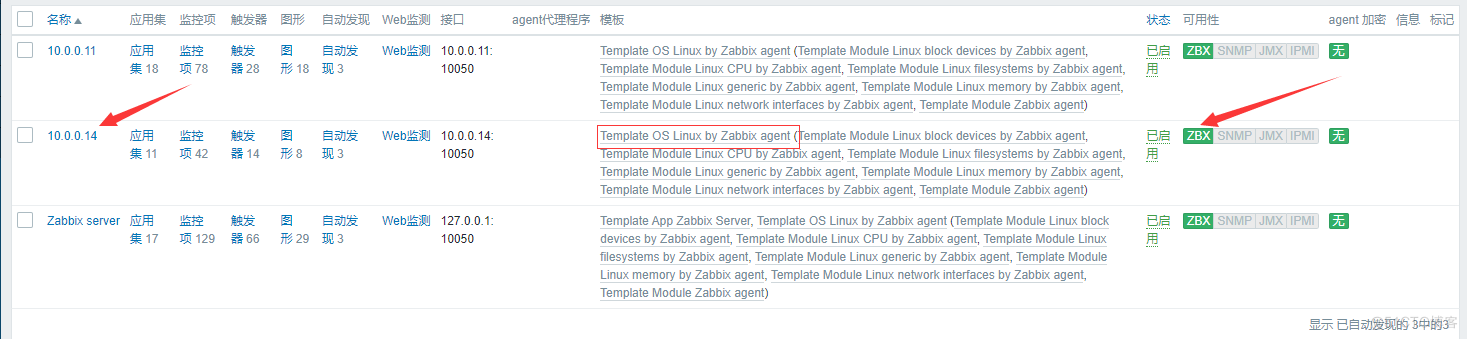
vim /etc/zabbix/zabbix_agent2.conf Server=10.0.0.100 #Zabbix-server主机地址 ServerActive=10.0.0.100 #Zabbix-server主机地址 Hostname=10.0.0.14 #本机地址 HostMetadata=node #关键字 #配置完成后重新启动即可 systemctl restart zabbix-agent2.service11.5 Zabbix自动发现已成功
11.6 Zabbix自动发现前,服务器基本操作
#配置zabbix源 rpm -ivh https://mirrors.tuna.tsinghua.edu.cn/zabbix/zabbix/5.0/rhel/7/x86_64/zabbix-release-5.0-1.el7.noarch.rpm sed -i 's#http://repo.zabbix.com#https://mirrors.tuna.tsinghua.edu.cn/zabbix#g' /etc/yum.repos.d/zabbix.repo #下载安装Zabbix-agent2 yum -y install zabbix-agent2 #启动并且加入开机自启 systemctl start zabbix-agent2.service systemctl enable zabbix-agent2.service
12.低级自动发现
12.1 新增一个监控项原型
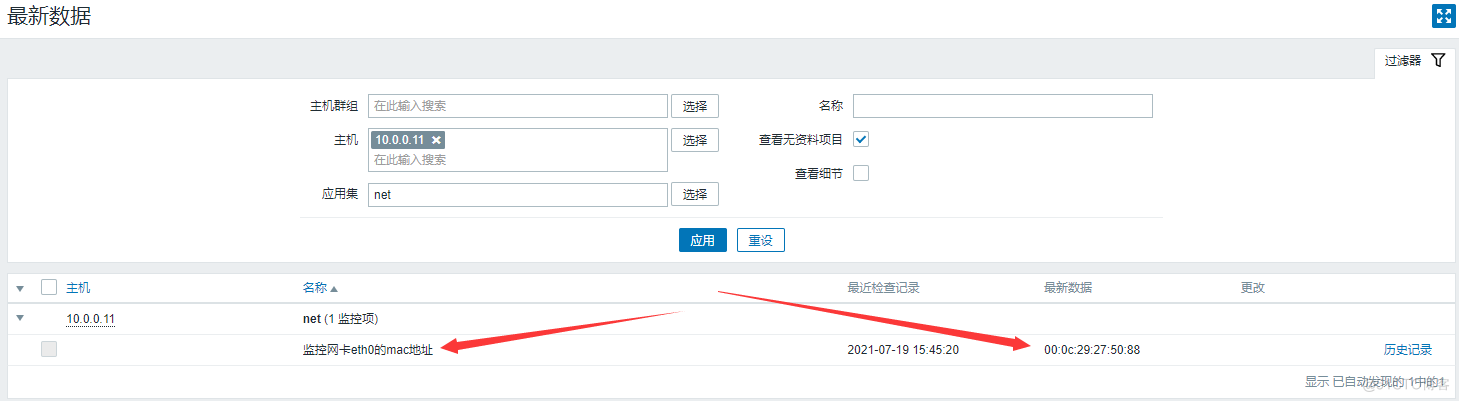
#新增一个监控项原型 增加一个UserParameter=xxxx[*],cmd $1 #监控每块网卡的mac地址 [root@node1 zabbix_agent2.d]# cat zbx_net.conf UserParameter=net_mac[*],ifconfig $1|awk '/ether /{print $$2}' #master节点手动查看是否能触发监控项 [root@zabbix-server ~]# zabbix_get -s 10.0.0.11 -k net_mac[eth1] 00:0c:29:2e:16:18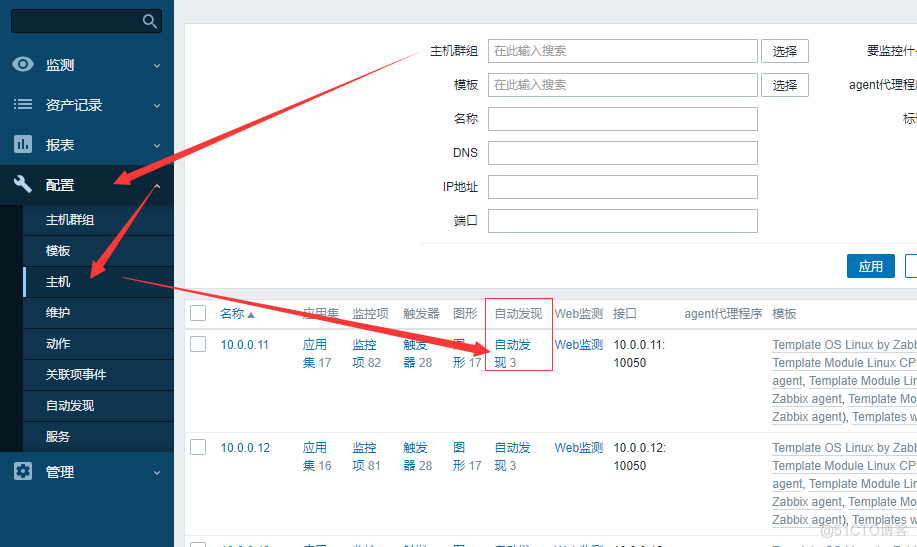

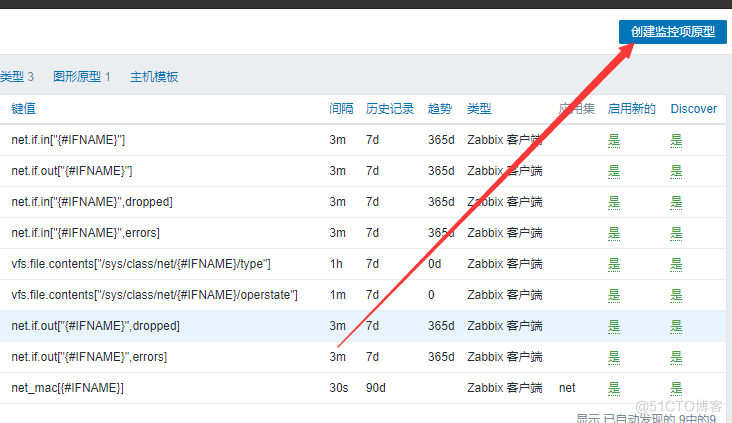
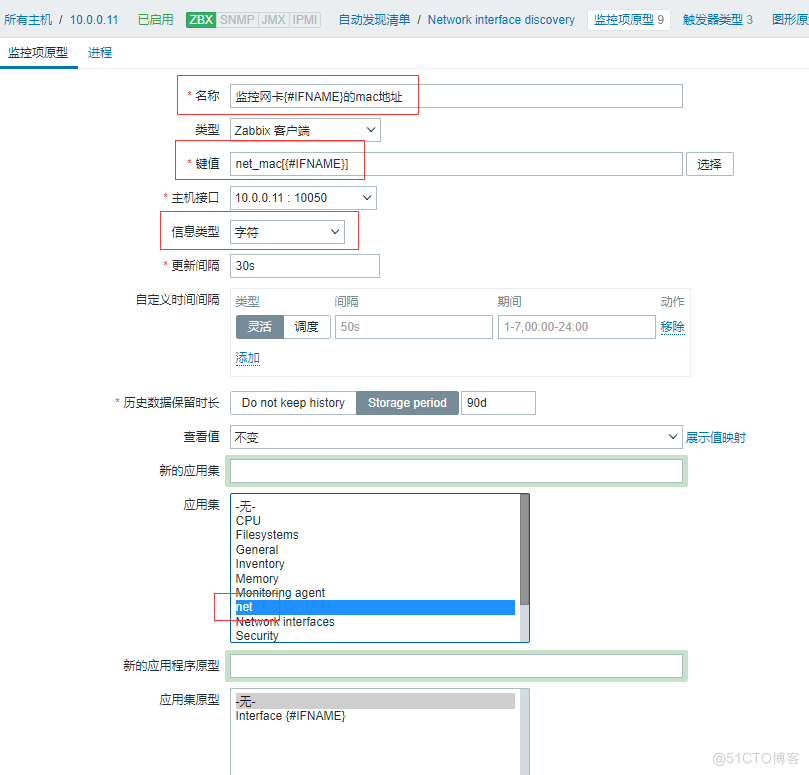
12.2 创建监控项

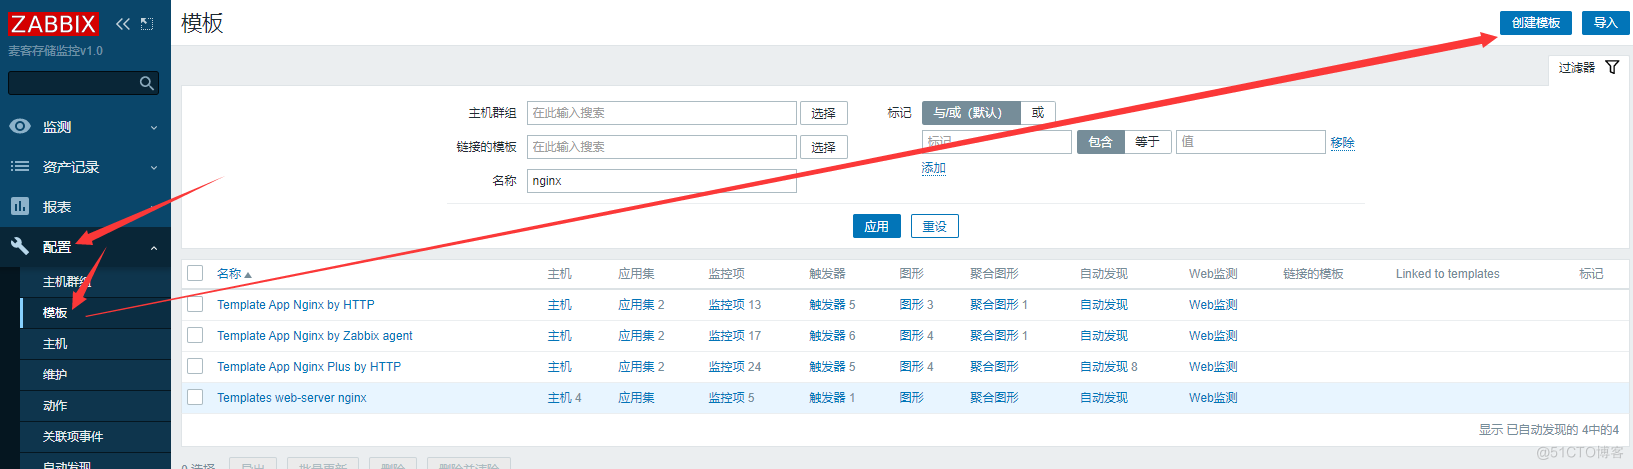
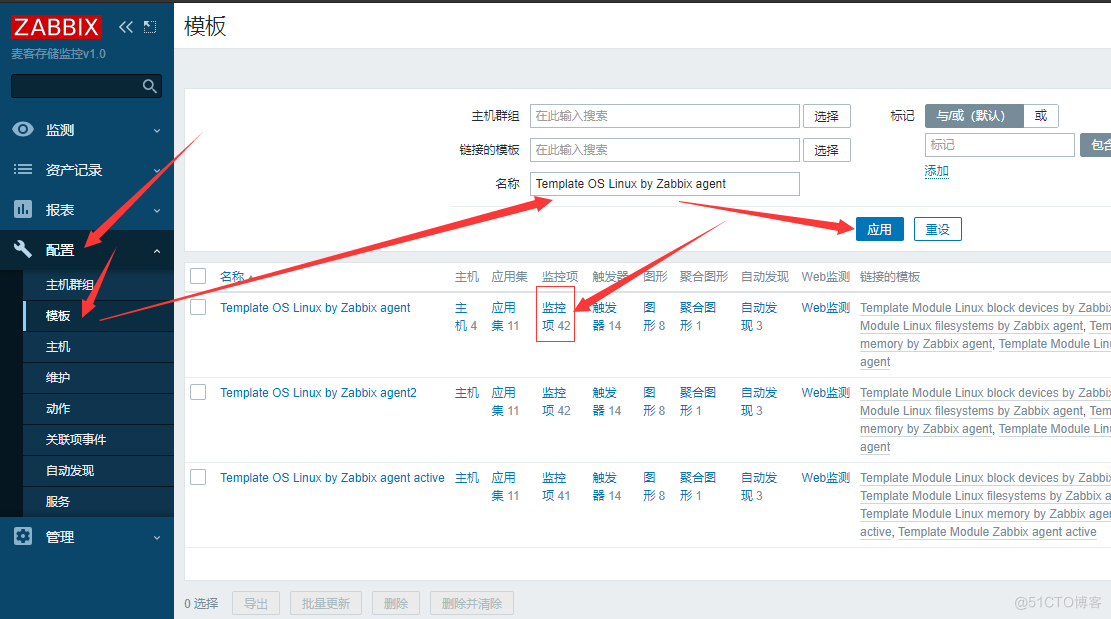
13.自定义监控模板
模板:定义[监控项,应用集,触发器,图形等资源] 模板可以包含子模板 模板可以导入导出,可以分享13.1 自定义模板
#首先修改Nginx配置文件[开启Nginx监控页面] vim /etc/nginx/nginx.conf ...... location = /nginx_status { stub_status; access_log off; } ...... #测试 [root@node1 ~]# curl http://127.0.0.1/nginx_status Active connections: 1 server accepts handled requests 7 7 7 Reading: 0 Writing: 1 Waiting: 0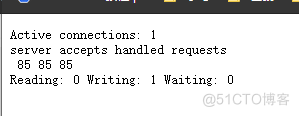

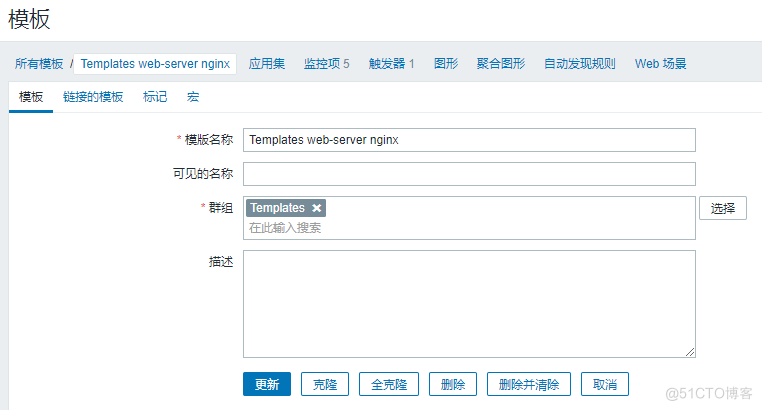
13.2 制作模板
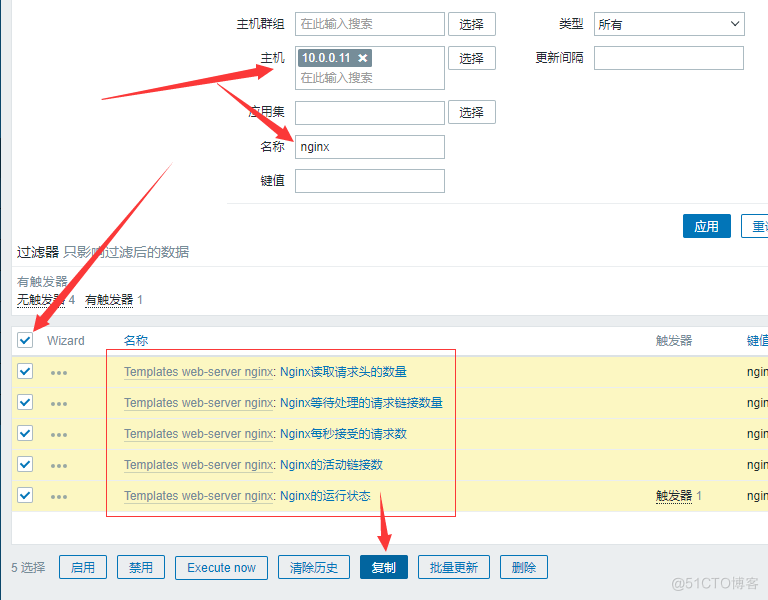
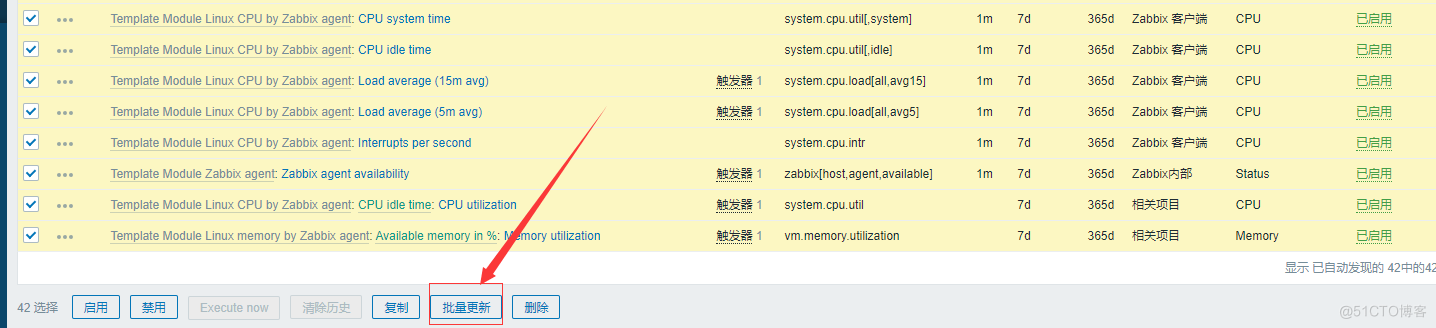
13.3 添加监控项

13.4 使用模板注意事项
#开启监控页面. #导入模板[兼容性]. #把zabbix的取值配置文件,放入到指定目录/etc/zabbix/zabbix_agentd.d/. #如果有取值脚本,需要把取值也放在对应的目录. #zabbix-get调试取值. #在目标主机链接刚导入的模板. #验证,查看最新数据.14.Zabbix-agent主动和被动的区别
#被动 如果有100个监控项,zabbix-server对agent进行100次取值. #主动 如果有100个监控项,agent主动向zabbix-server索要任务清单,根据清单采集所有监控项,一次性发送给zabbix-server. #配置主动 1.Zabbix-server配置主动模板 2.agent需要配置14.1 克隆模板
14.2 修改克隆后的模板为主动模式


14.3 查看最新数据
