1、MYSQL主从复制简述:
随着访问量的不断增加,单台MySQL数据库服务器压力不断增加,需要对MYSQL进行优化和架构改造,MYQSL优化如果不能明显改善压力情况,可以使用高可用、主从复制、读写分离来、拆分库、拆分表来进行优化。MYSQL主从复制集群在中小企业、大型企业中被广泛使用,MYSQL主从复制的目的是实现数据库冗余备份,将Master数据库数据定时同步至Slave库中,一旦Master数据库宕机,可以将WEB应用数据库配置快速切换至Slave数据库,确保WEB应用较高的可用率。
2、什么是MYSQL主从复制
mysql主从复制是用来建立一个和主数据库完全一样的数据库环境,称为从数据库,主数据库一般是准实时的业务数据库。在最常用的mysql数据库中,支持单项、异步赋值。在赋值过程中,一个服务器充当主服务器,而另外一台服务器充当从服务器;此时主服务器会将更新信息写入到一个特定的二进制文件中。并会维护文件的一个索引用来跟踪日志循环。这个日志可以记录并发送到从服务器的更新中去。当一台从服务器连接到主服务器时,从服务器会通知主服务器从服务器的日志文件中读取最后一次成功更新的位置。然后从服务器会接收从哪个时刻起发生的任何更新,然后锁住并等到主服务器通知新的更新。
3、MYSQL主从复制的作用
- 确保数据安全、做数据的热备份,作为后备数据库,主数据库服务器故障后,可切换到从数据库继续工作,避免数据的丢失。
- 提升I/O性能;随着日常生产中业务量越来越大,I/O访问频率越来越高,单机无法满足,此时做多库的存储,有效降低磁盘I/O访问的频率,提高了单个设备的I/O性能。
- 读写分离,使数据库能支持更大的并发;在报表中尤其重要。由于部分报表sql语句非常的慢,导致锁表,影响前台服务。如果前台使用master,报表使用slave,那么报表sql将不会造成前台锁,保证了前台速度。
4、mysql主从复制的原理
Mysql主从复制集群至少需要2台数据库服务器,其中一台为Master库,另外一台为Slave库,MYSQL主从数据同步是一个异步复制的过程,要实现复制首先需要在master上开启bin-log日志功能,bin-log日志用于记录在Master库中执行的增、删、修改、更新操作的sql语句,整个过程需要开启3个线程,分别是Master开启IO线程,Slave开启IO线程和SQL线程,MySQL的主从复制是一个异步的复制过程(虽然一般情况下感觉是实时的),数据将从一个MySQL数据库复制到另一个MySQL数据库,在master与Slave之间实现整个主从复制的过程是有三个线程参与完成的。其中两个线程(SQL线程和IO线程)在slave端,另一个线程(I/O线程)在master端。
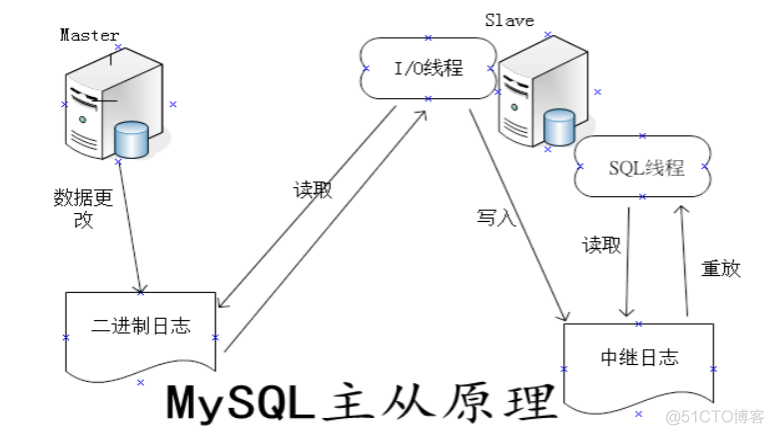
- Slave上执行slave start,Slave IO线程会通过在Master创建的授权用户连接上至Master,并请求master从指定的文件和位置之后发送bin-log日志内容;
- Master接收到来自slave IO线程的请求后,master IO线程根据slave发送的指定bin-log日志position点之后的内容,然后返回给slave的IO线程。
- 返回的信息中除了bin-log日志内容外,还有master最新的binlog文件名以及在binlog中的下一个指定更新position点;
- Slave IO线程接收到信息后,将接收到的日志内容依次添加到Slave端的relay-log文件的最末端,并将读取到的Master端的 bin-log的文件名和position点记录到master.info文件中,以便在下一次读取的时候能告知master从响应的bin-log文件名及最后一个position点开始发起请求;
- Slave Sql线程检测到relay-log中内容有更新,会立刻解析relay-log的内容成在Master真实执行时候的那些可执行的SQL语句,将解析的SQL语句并在Slave里执行,执行成功后,Master库与Slave库保持数据一致。
5、MySQL主从复制前期准备
MYSQL主从复制环境构建至少需2台服务器,可以配置1主多从,多主多从,我做的为1主1从,MYSQL主从复制架构实战步骤:简单说一下yum方式安装mysql5.7,这里是基于mysql5.7.33环境搭建mysql主从服务,源码方式详细安装请移步:https://blog.51cto.com/11353391/2668445
系统环境准备
Master:192.168.2.110 Slave: 192.168.2.112系统版本
cat /etc/redhat-release
6、安装mysql5.7
(Master、Slave端相同操作)CentOS7 及以上版本 默认安装了 MariaDB,卸载系统自带mysql,
yum list installed | grep mariadb yum -y remove mariadb* rpm -qa|grep mariadb rpm -e mariadb-libs --nodeps cd /mnt/ wget https://dev.mysql.com/get/mysql57-community-release-el7-11.noarch.rpm rpm -ivh mysql57-community-release-el7-11.noarch.rpm yum repolist enabled | grep "mysql.*-community.*"查看 MySQL 版本
yum repolist all | grep mysql安装 MySQL
yum install mysql-community-server启动mysql
systemctl start mysqld systemctl status mysqld获取mysql临时密码:
cat /var/log/mysqld.log |grep localhost ****** [Note] A temporary password is generated for root@localhost: 7w9_d,o4<<OU配置mysql安全设置:
[root@localhost ~]# mysql_secure_installation Securing the MySQL server deployment. Enter password for user root: 7w9_d,o4<<OU The existing password for the user account root has expired. Please set a new password. New password: Admin@123. Re-enter new password:Admin@123. The 'validate_password' plugin is installed on the server. The subsequent steps will run with the existing configuration of the plugin. Using existing password for root. Estimated strength of the password: 100 Change the password for root ? ((Press y|Y for Yes, any other key for No) : n ... skipping. By default, a MySQL installation has an anonymous user, allowing anyone to log into MySQL without having to have a user account created for them. This is intended only for testing, and to make the installation go a bit smoother. You should remove them before moving into a production environment. Remove anonymous users? (Press y|Y for Yes, any other key for No) : y Success. Normally, root should only be allowed to connect from 'localhost'. This ensures that someone cannot guess at the root password from the network. Disallow root login remotely? (Press y|Y for Yes, any other key for No) : n ... skipping. By default, MySQL comes with a database named 'test' that anyone can access. This is also intended only for testing, and should be removed before moving into a production environment. Remove test database and access to it? (Press y|Y for Yes, any other key for No) : y - Dropping test database... Success. - Removing privileges on test database... Success. Reloading the privilege tables will ensure that all changes made so far will take effect immediately. Reload privilege tables now? (Press y|Y for Yes, any other key for No) : y Success. All done!设置简单的mysql密码
set global validate_password_policy=0; set global validate_password_length=1; alter user 'root'@'localhost' identified by '123456'; flush privileges; exit mysql -u root -p123456 开启远程访问 use mysql; update user set host = '%' where user = 'root'; flush privileges;7、mysql主从Master端配置
Master端在/etc/my.cnf 配置文件[mysqld]段中加入如下代码,然后重启mysql。
cp my-large.cnf /etc/my.cnf server-id = 1 log-bin = mysql-bin systemctl restart mysqldMaster数据库服务器命令行中 创建tongbu用户及密码并设置权限,查看bin-log文件及position点。
grant replication slave on *.* to 'tongbu'@'%' identified by '123456'; show master status;
8、Slave端安装及配置
Slave端在/etc/my.cnf 配置文件[mysqld]段中加入如下代码,然后重启mysql,MASTER与Slave端server-id不能一样,Slave端也无需开启bin-log功能:
server-id = 2Slave指定Master IP、用户名、密码、bin-log文件名(mysql-bin.000001)及position(1024)
stop slave; change master to master_host='192.168.1.252',master_user='tongbu',master_password='Admin@123',master_log_file='mysql-bin.000001',master_log_pos=1024;
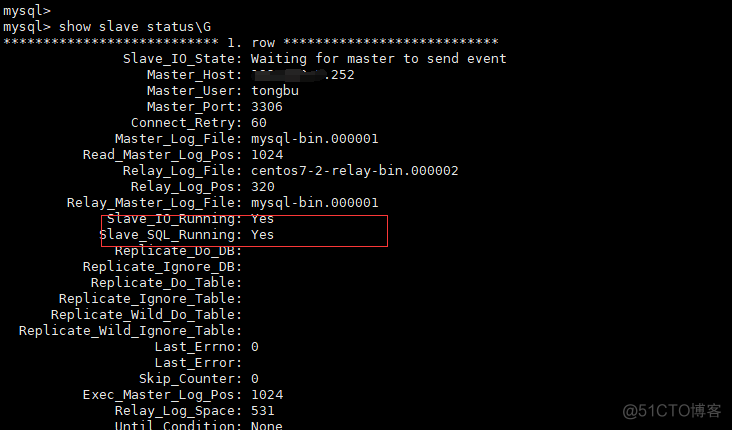
master_log_file是在主数据库中show master status显示的File、master_log_pos是在主数据库中显示的Position。
也可以用show slave status 查看配置信息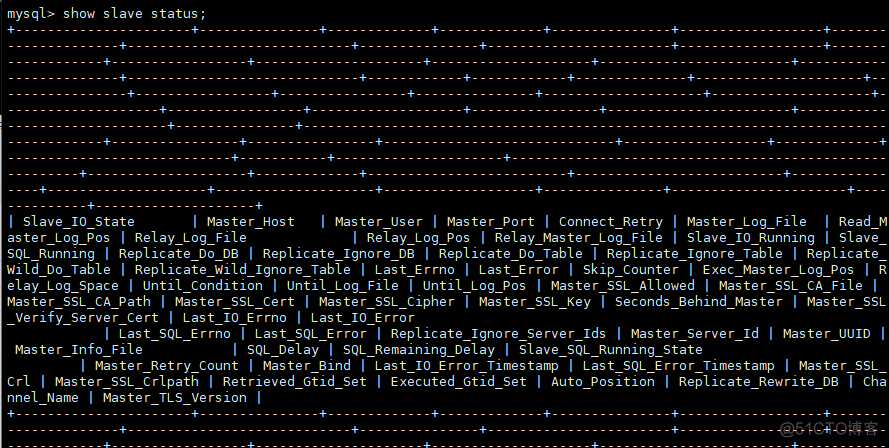
查看Slave端IO线程、SQL线程状态均为YES,代表Slave已正常连接Master实现同步:
Slave_IO_Running: Yes Slave_SQL_Running: Yes执行Show slave status\G,常见参数含义解析:
Slave_IO_State I/O线程连接Master状态; Master_User 用于连接Master的用户; Master_Port Master端监听端口; Connect_Retry 主从连接失败,重试时间间隔; Master_Log_File I/O线程读取的Master二进制日志文件的名称。 Read_Master_Log_Pos I/O线程已读取的Master二进制日志文件的位置; Relay_Log_File SQL线程读取和执行的中继日志文件的名称。 Relay_Log_Pos SQL线程已读取和执行的中继日志文件的位置; Relay_Master_Log_File SQL线程执行的Master二进制日志文件的名称; Slave_IO_Running I/O线程是否被启动并成功地连接到主服务器上; Slave_SQL_Running SQL线程是否被启动; Replicate_Do_DB 指定的同步的数据库列表; Skip_Counter SQL_SLAVE_SKIP_COUNTER设置的值; Seconds_Behind_Master Slave端SQL线程和I/O线程之间的时间差距,单位为秒,常被用于主从延迟检查方法之一。9、主从同步测试
在Master端创建mysql_test1数据库和t1表
create database mysql_test1 charset=utf8; show databases; use mysql_ab_test; create table t1 (id varchar(20),name varchar(20)); show tables;MYSQL master创建数据库和表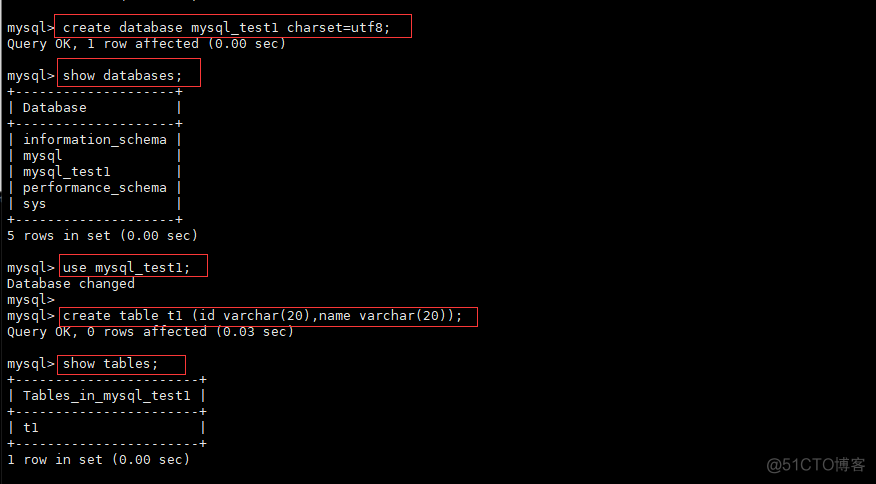
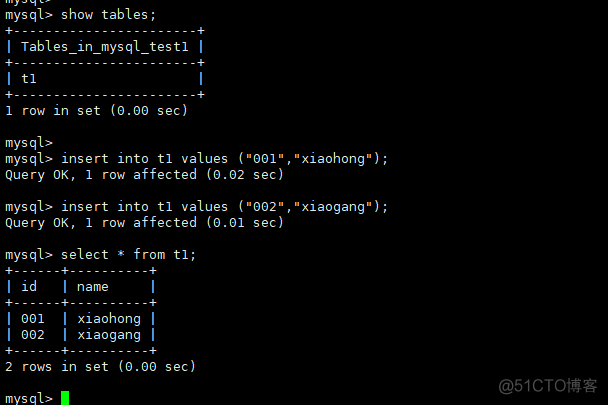
Slave服务器查看是否有mysql_ab_test数据库和t1的表,如果存在则代表Slave从Master复制数据成功,证明MYSQL主从配置至此已经配置成功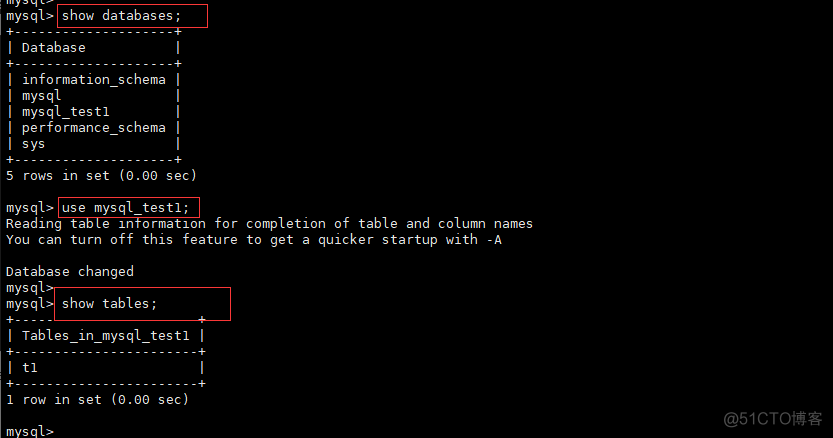 在Master服务器的t0表插入两条数据,在slave查看是否已同步。
Slave端执行查询命令: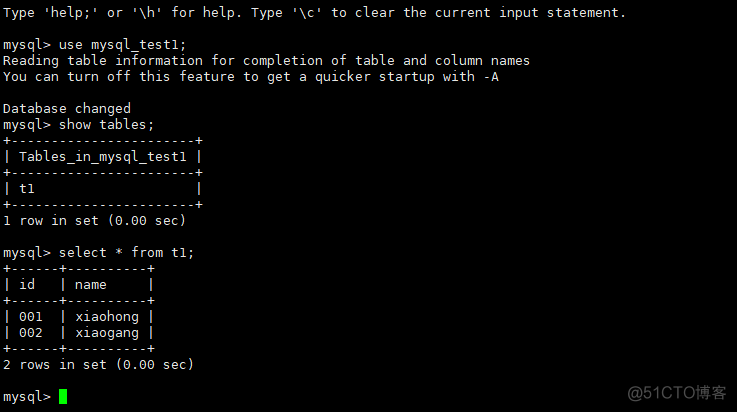
mysql主从同步完成 ....
10、MySQL主从同步排错思路
Mysql主从同步集群在生成环境使用过程中,如果主从服务器之间网络通信条件差或者数据库数据量非常大,容易导致MYSQL主从同步延迟。MYSQL主从产生延迟之后,一旦主库宕机,会导致部分数据没有及时同步至丛库,重新启动主库,会导致丛库与主库同步错误,如何快速恢复主从同步关系?(1)忽略错误后,继续同步:此种方法适用于主从库数据内容相差不大,或者要求数据可以不完全统一的情况,数据要求不严格的情况。Master端执行如下命令,将数据库设置全局读锁,不允许写入新数据:
flush tables with read lock;Slave端停止Slave I/O及sql线程,同时将同步错误的SQL跳过1次,跳过会导致数据不一致,最后启动start slave,同步状态恢复:
stop slave; SET GLOBAL SQL_SLAVE_SKIP_COUNTER=1; START SLAVE; start slave;(2)重新做主从同步,完全同步:此种方法适用于主从库数据内容相差很大,或者要求数据完全统一的情况,数据需完全保持一致。Master端执行如下命令,将数据库设置全局读锁,不允许写入新数据:
flush tables with read lock;Master端基于mysqldump、xtrabackup工具进行数据库将完整的数据库备份,也可以用shell脚本或python脚本实现定时备份,备份成功之后,将完整的数据导入至丛库,重新配置主从关系,当Slave端的IO线程、SQL线程均为YES之后,最后将Master端读锁解开即可,解锁命令:
unlock tables; 【本文来源:武汉seo公司 http://www.5h5q.com复制请保留原URL】