前言
最近公司组织两个星期的新人培训,事情安排的满满的,周末都没有。说好的一个星期一更新的博客中断了,让大家久等了,现在培训结束,终于又可以安安静静的做一个程序员了,好开心。。。
一、NSNotification和Delegate的联系和区别
众所周知,IOS中经常会使用到NSNotification和delegate来进行一些类之间的消息传递。言归正传,这两种有什么区别呢?
NSNotification就是IOS提供的一个消息中心,由一个全局的defaultNotification管理应用中的消息机制。通过公开的API可以看出,这里面使用了是一个观察者,通过注册addObserver和解除注册removeObserver来实现消息传递。苹果文档特别提出,在类析构的时候,要记得把removeObserver,不然就会引发崩溃,所以NSNotifcation的使用是没有retain+1的,NSNotification是一对多的。
至于Delegate,很简单,就是通过增加一个指针,然后把需要调用的函数通过delegate传递到其他类中,来得很直截了当。不需要通过广播的形式去实现,但是,delegate的形式只能是一对一,不能实现一对多。
在什么情况下使用Delegate和NSNotifiation呢?
从效率上看Delegate是一个很轻量级的,相对delegate,NSNotification却是一个很重量级的,效率上delegate明显要比Noticication高。一般情况我们会这样使用。
场景一:
A拥有B,然后B中的一些操作需要回调到A中,这时候就简单的通过delegate回调到A。因为B是A创建的,B可以很直接的把delegate赋值A。
场景二:
A和B是两个不相干的关系,A不知道B,B也不知道A,那么这时候如果通过delegate就没办法做到,会相对复杂。所以可以通过NSNotifcation去做一些消息传递。
所以使用delegate的情况是两者有直接的关系,至于一方知道另一方的存在。而NSNotifcation一般是大家不知道对方的存在,一般是使用跨模块的时候使用。在使用的时候,使用delegate可能需要多写一些delegate去实现,代码量比较多。NSNotication只要定义相关的NotificationName就可以很方便的沟通。两者各有所长。
二、监听系统自带的NSNotification
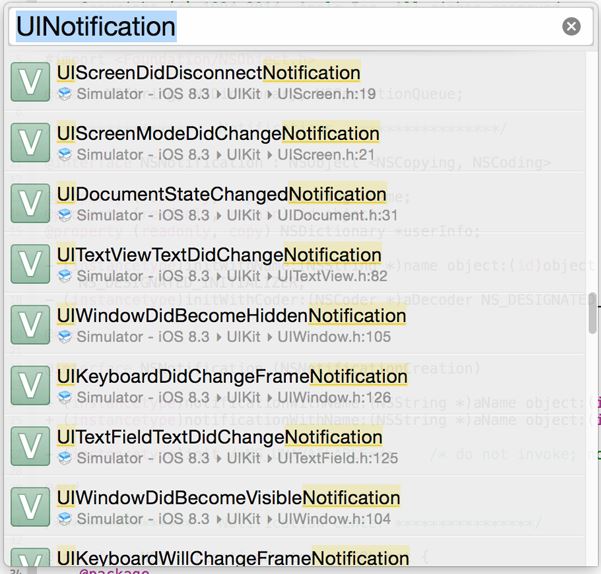
系统里定义了许多的 XxxNotification 名称,其实只要 Cmd+Shift+O 打开 Open Quickly,输入 NSNotification 或者 UINotification 可以看到许多以 Notification 结尾的变量定义,由变量名称也能理解在什么时候会激发什么事件,一般都是向 [NSNotificationCenter defaultCenter] 通知的。

使用步骤
第一步:注册系统监听事件
 //在NSNotificationCenter中注册键盘弹出事件
  [[NSNotificationCenter defaultCenter] addObserver:self selector:@selector(keyboardUpEvent:) name:UIKeyboardDidShowNotification object:nil];
  //在NSNotificationCenter中注册键盘隐藏事件
  [[NSNotificationCenter defaultCenter] addObserver:self selector:@selector(keyboardDownEvent:) name:UIKeyboardDidHideNotification object:nil];
  //在NSNotificationCenter中注册程序从后台唤醒事件
  [[NSNotificationCenter defaultCenter] addObserver:self selector:@selector(becomeActive:) name:UIApplicationDidBecomeActiveNotification object:nil];
第二步:事件触发后的处理
/**
 * 弹出键盘事件触发处理
 *
 * @param notification
 */
-(void)keyboardUpEvent : (NSNotification *)notification{
  //NSLog(@"键盘弹出事件触发==%@",notification);
  NSLog(@"键盘弹出事件触发");
}

/**
 * 键盘隐藏事件触发处理
 *
 * @param notification
 */
-(void)keyboardDownEvent : (NSNotification *)notification{
  //NSLog(@"键盘隐藏事件触发==%@",notification);
  NSLog(@"键盘隐藏事件触发");
}

/**
 * 程序从后台唤醒触发处理
 *
 * @param notification
 */
-(void)becomeActive: (NSNotification *)notification{
  NSLog(@"程序从后台唤醒触发处理");
}
第三步、在dealloc中解除监听
/**
 *NSNotificationCenter 注意点:每一次在接受者对象中需要delleac把它销毁掉。
 */
-(void)dealloc{
  [[NSNotificationCenter defaultCenter] removeObserver:self];
}
三、自定义NSNotification
这里我使用的一个实例为:在ViewController中定义一个按钮,点击该按钮,同时改变两个自定义View中的内容。
使用步骤
第一步、在ViewController中生成一个按钮,两个自定义View
 UIButton *postMsgBtn = [[UIButton alloc] initWithFrame:CGRectMake(50, 200, 100, 40)];
  [postMsgBtn setTitle:@"发送消息" forState:UIControlStateNormal];
  postMsgBtn.backgroundColor = [UIColor grayColor];
  [postMsgBtn addTarget:self action:@selector(postMsg:) forControlEvents:UIControlEventTouchUpInside];
  [self.view addSubview:postMsgBtn];

  MyView *view = [[MyView alloc] initWithFrame:CGRectMake(50, 250, 100, 50)];
  [self.view addSubview:view];

  MyView *view2 = [[MyView alloc] initWithFrame:CGRectMake(50, 320, 100, 50)];
  [self.view addSubview:view2];
第二步、点击按钮,发送Notification
-(void)postMsg: (UIButton *)btn{
  [[NSNotificationCenter defaultCenter] postNotificationName:NOTIFICATION_MESSAGE_NAME object:nil userInfo:@{@"msg":@"jingming1"}];
}
第三步、在自定义View中注册监听事件
复制代码 代码如下:[[NSNotificationCenter defaultCenter] addObserver:self selector:@selector(acceptMsg:) name:NOTIFICATION_MESSAGE_NAME object:nil];
第四步、处理监听事件
-(void)acceptMsg : (NSNotification *)notification{
  NSLog(@"%@",notification);
  NSDictionary *userInfo = notification.userInfo;
  _label.text = [userInfo objectForKey:@"msg"];
}
第五步、在dealloc中解除监听
-(void)dealloc{
  [[NSNotificationCenter defaultCenter] removeObserver:self];
}
以上就是本文的全部内容,希望对大家的学习有所帮助,也希望大家多多支持自由互联。
