在公司里面一直负责整个公司的监控体系的建设,主要包括底层服务器的硬件监控、系统层面的监控、网络设备的监控、中间件和应用层面的监控等等。虽然Zabbix支持日志监控,由于在数据量、搜索和日志展示方面都比较弱化,只能做简单的日志报警。因此日志监控还是需要通过专业的工具来做。我对比过ELK、商业日志工具Splunk和Graylog,后面选择了Graylog。Graylog简单说就是一款开源的日志聚合、分析、审计、展现和预警工具。相比ELK,Graylog更轻量,UI界面更美观,有丰富和完善的API接口。目前收集了网络设备的日志、MySQL错误日志、Linux系统日志等,后期将考虑接入微服务日志。各种日志都按照错误级别做了统计分析,通过查看Dashboards报表就可以确认线上几千台设备是否有问题。对应高级别的日志通过Graylog +Python程序实现微信和邮件的告警的功能。
一、Graylog优点
零开发:从收集->存储->分析->呈现完整流程。部署维护简单:一体化解决方案,不像ELK三个独立系统集成。多日志源接入:syslog、Filebeat、Log4j、Logstash等。多协议接入:UDP、TCP、HTTP、AMQP。自定义面板:提供曲线图、饼状图、世界地图等丰富的图形列表。全文搜索:支持按语法进行过滤搜索全部日志。支持报警:具有报警功能的日志分析平台,目前只支持邮件,可以通过API实现微信告警。权限管理:灵活的权限分配和管理。支持集群:可以根据应用扩展平台性能。
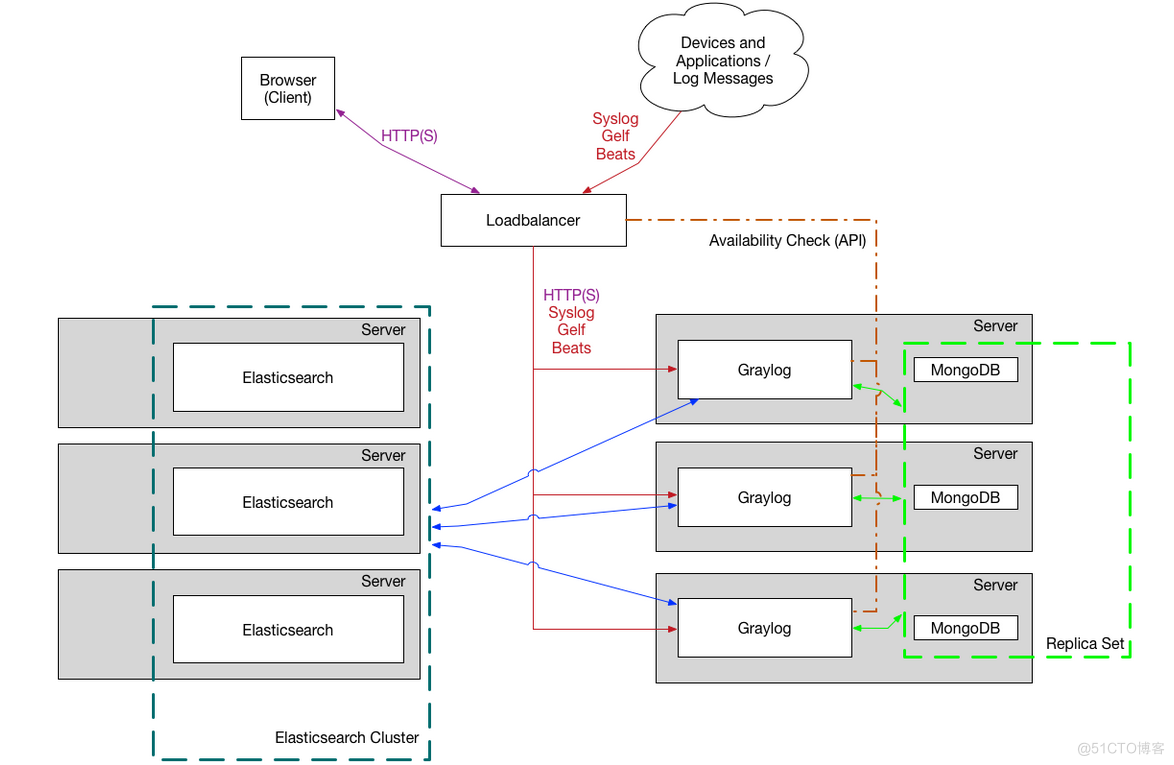
二、Graylog架构设计,支持集群
GrayLog:提供 GrayLog对外接口,属于CPU密集。 Elasticsearch:日志文件的持久化存储和检索,属于IO密集。MongoDB:存储一些 GrayLog 的配置信息。
三、安装配置
3.1 通过Docker安装mongodb数据库。
#获取3.6.5版本的mongo镜像。 docker pull mongo:3.6.5 #运行容器。 docker run -itd --name graylog-mongo01 -p 27017:27017 mongo:3.6.5 --auth #进入mongo数据库,创建admin用户并授超级用户权限。 docker exec -it graylog-mongo01 mongo admin > use admin switched to db admin > db.createUser( ... { ... user:"admin", ... pwd:"xxxxxx", ... roles:[{role:"root",db:"admin"}] ... } ... ); #给graylog新建用户和密码,必须把数据库切换到该数据库下面。 > use graylog switched to db graylog > db.createUser( { user:"grayloguser", pwd:"xxxxxx", roles:[{role:"readWrite",db:"graylog"}] } ); #查看用户是否存在。 > show users; { "_id" : "graylog.grayloguser", "user" : "grayloguser", "db" : "graylog", "roles" : [ { "role" : "readWrite", "db" : "graylog" } ] } #通过用户名密码进入mongo容器里面 docker exec -it graylog-mongo01 mongo admin -u admin -p MongoDB shell version v3.6.5 Enter password: connecting to: mongodb://127.0.0.1:27017/admin MongoDB server version: 3.6.53.2 通过docker compose的方式安装ES。
[root@es01 ~]# cat /etc/docker/conf/docker-compose.yml version: '2.2' services: graylog-es01: image: xx.xx.xx.xx:10000/library/elasticsearch:7.6.0 container_name: graylog-es01 restart: always environment: - cluster.name=graylog-docker-cluster - node.name=graylog-es01 - discovery.type=single-node - network.host=0.0.0.0 - network.publish_host=192.168.xx.xx - transport.tcp.port=9300 - http.cors.enabled=true - http.cors.allow-origin=* - "ES_JAVA_OPTS=-Xms32g -Xmx32g" - bootstrap.memory_lock=true ulimits: memlock: soft: -1 hard: -1 volumes: - /data/elsearch/data:/usr/share/elasticsearch/data - /data/elsearch/logs:/usr/share/elasticsearch/logs ports: - 9200:9200 network_mode: host ulimits: memlock: soft: -1 hard: -1 nofile: soft: 65535 hard: 65535 [root@es01 ~]# nohub docker-compose -f /etc/docker/conf/docker-compose.yml up &3.3 安装Graylog服务。
创建graylog配置文件目录。
[root@graylog-server ~]# mkdir -p /etc/graylog/server/安装graylog服务。
[root@graylog-server software]# tar -zxvf graylog-VERSION.tgz -C /usr/loca/ [root@graylog-server software ]# cd /usr/local/ [root@graylog-server local]# ln -s graylog-VERSION graylog拷贝和编辑graylog配置文件和启动文件。
[root@graylog-server local]# cp graylog/graylog.conf /etc/graylog/server/ [root@graylog-server local]# cp graylog/bin/graylogctl /etc/init.d/ [root@graylog-server ~]# grep '^[a-z]' /etc/graylog/server/server.conf is_master = true node_id_file = /etc/graylog/server/graylog-node-1 password_secret = Z2LoxxeFvWoAPbMF0sIlYWhHH06leW6bfUAeImqhUe86Wzq8p4HDZAyKTQpaedvBuCoKYjaQAGQTj93R33sREiSIVt1sTRg0 root_username = admin root_password_sha2 = xxxxxx root_timezone = Asia/Shanghai bin_dir = bin data_dir = data plugin_dir = plugin http_bind_address = 0.0.0.0:8080 http_publish_uri = http://192.168.xx.xx:8080/ rotation_strategy = count elasticsearch_max_docs_per_index = 20000000 elasticsearch_max_number_of_indices = 20 retention_strategy = delete elasticsearch_shards = 4 elasticsearch_replicas = 0 elasticsearch_index_prefix = graylog allow_leading_wildcard_searches = false allow_highlighting = false elasticsearch_analyzer = standard output_batch_size = 500 output_flush_interval = 1 output_fault_count_threshold = 5 output_fault_penalty_seconds = 30 processbuffer_processors = 5 outputbuffer_processors = 3 processor_wait_strategy = blocking ring_size = 65536 inputbuffer_ring_size = 65536 inputbuffer_processors = 2 inputbuffer_wait_strategy = blocking message_journal_enabled = true message_journal_dir = data/journal lb_recognition_period_seconds = 3 #指定mongodb数据库用户名和密码。 mongodb_uri = mongodb://grayloguser:graylogpasswd@192.168.xx.xx:27017/graylog mongodb_max_connections = 1000 mongodb_threads_allowed_to_block_multiplier = 5 #指定graylog邮件服务,后期告警可以通过这个发邮件。 transport_email_enabled = true transport_email_hostname = 192.168.xx.xx transport_email_port = 25 transport_email_use_auth = false transport_email_subject_prefix = [graylog] transport_email_from_email = X-men@110.zmzblog.com proxied_requests_thread_pool_size = 32启动graylog服务。
[root@graylog-server ~]# /etc/init.d/graylogctl start3.4 验证graylog服务安装配置是否正常。通过http://yourip:9000来访问。

四、总结
1)root_password_sha2 密码可以通过 echo -n yourpassword | sha256sum来生成,这里的yourpassword是用来登录graylog的admin用户的密码。生成的root_password_sha2密码请删除空格和-,否则登录不成功。
[root@graylog-server ~]# echo -n xxxxxx | sha256sum 240be518fabd2724ddb6f04eeb1da5967448d7e831c08c8fa822809f74c720a9 -2)编辑graylog启动文件,指定graylog 配置文件的路径。
[root@graylog-server ~]# vim /etc/init.d/graylogctl GRAYLOG_CONF=${GRAYLOG_CONF:=/etc/graylog/server/server.conf}