Swagger介绍 在一些接口项目中,API的使用很频繁,所以一款API在线文档生成和测试工具非常有必要。而Swagger UI就是这么一款很实用的在线工具本博客介绍如何在公司或者自己的电脑上按
Swagger介绍
在一些接口项目中,API的使用很频繁,所以一款API在线文档生成和测试工具非常有必要。而Swagger UI就是这么一款很实用的在线工具 本博客介绍如何在公司或者自己的电脑上按照Swagger UI,本博客介绍一下怎么集成到SpringBoot项目中,Swagger可以安装在线使用,安装教程可以参考我之前的博客,安装在linux系统的
SpringBoot集成Swagger2
然后介绍一下怎么集成到SpringBoot项目
maven加上配置
<!-- swagger--><dependency>
<groupId>io.springfox</groupId>
<artifactId>springfox-swagger2</artifactId>
<version>2.2.2</version>
</dependency>
<dependency>
<groupId>io.springfox</groupId>
<artifactId>springfox-swagger-ui</artifactId>
<version>2.2.2</version>
</dependency>
SpringBoot Application类:
package org.muses.jeeplatform;import org.muses.jeeplatform.cache.RedisClient;
import org.mybatis.spring.boot.autoconfigure.MybatisAutoConfiguration;
import org.springframework.beans.factory.annotation.Autowired;
import org.springframework.boot.SpringApplication;
import org.springframework.boot.autoconfigure.SpringBootApplication;
import org.springframework.boot.autoconfigure.data.jpa.JpaRepositoriesAutoConfiguration;
import org.springframework.boot.autoconfigure.jdbc.DataSourceAutoConfiguration;
import org.springframework.boot.autoconfigure.jdbc.DataSourceTransactionManagerAutoConfiguration;
import org.springframework.boot.web.servlet.ServletComponentScan;
import org.springframework.scheduling.annotation.EnableAsync;
import org.springframework.scheduling.annotation.EnableScheduling;
import org.springframework.stereotype.Controller;
import org.springframework.transaction.annotation.EnableTransactionManagement;
import org.springframework.web.bind.annotation.RequestMapping;
/**
* @author caiyuyu
*/
@SpringBootApplication(exclude = {DataSourceAutoConfiguration.class,
DataSourceTransactionManagerAutoConfiguration.class, JpaRepositoriesAutoConfiguration.class, MybatisAutoConfiguration.class})
@ServletComponentScan
@EnableScheduling
@EnableTransactionManagement
//@EnableCaching
@EnableAsync
@Controller
public class Application {
@Autowired
RedisClient redisClient;
public static void main(String[] args) {
SpringApplication.run(Application.class, args);
}
@RequestMapping("/set")
public String set(String key, String value) throws Exception{
redisClient.setValue(key, value);
return "success";
}
@RequestMapping("/get")
public String get(String key) throws Exception {
return redisClient.getValue(key);
}
// @Bean
// public static PropertySourcesPlaceholderConfigurer placeholderConfigurer() {
// PropertySourcesPlaceholderConfigurer c = new PropertySourcesPlaceholderConfigurer();
// c.setIgnoreUnresolvablePlaceholders(true);
// return c;
// }
}
新建一个配置类,记得加上主键@EnableSwagger2
package org.muses.jeeplatform.config;import org.springframework.context.annotation.Bean;
import org.springframework.context.annotation.Configuration;
import springfox.documentation.builders.ApiInfoBuilder;
import springfox.documentation.builders.PathSelectors;
import springfox.documentation.builders.RequestHandlerSelectors;
import springfox.documentation.service.ApiInfo;
import springfox.documentation.spi.DocumentationType;
import springfox.documentation.spring.web.plugins.Docket;
import springfox.documentation.swagger2.annotations.EnableSwagger2;
/**
* <pre>
* Swagger2配置类
* </pre>
*
* @author nicky
* <pre>
* 修改记录
* 修改后版本: V1.0.1 修改人: 修改日期: 2019年05月12日 修改内容:
* </pre>
*/
@Configuration
@EnableSwagger2
public class Swagger2Config {
@Bean
public Docket createApi(){
return new Docket(DocumentationType.SWAGGER_2)
.apiInfo(apiInfo())
.select()
.apis(RequestHandlerSelectors.basePackage("org.muses.jeeplatform.web"))
.paths(PathSelectors.any())
.build();
}
private ApiInfo apiInfo(){
return new ApiInfoBuilder()
.title("Swagger2")
.description("SpringBoot集成Swagger2构建RESTful API接口")
.termsOfServiceUrl("https://smilenicky.blog.***.net")
.contact("Nicky.Ma")
.version("1.0.1")
.build();
}
}
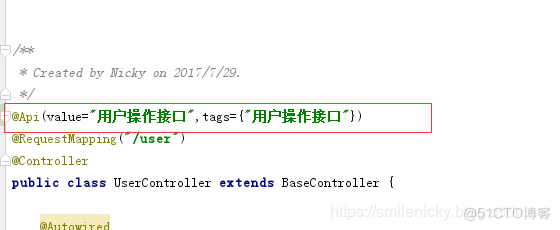
可以对整个Controller进行注释

在这里插入图片描述
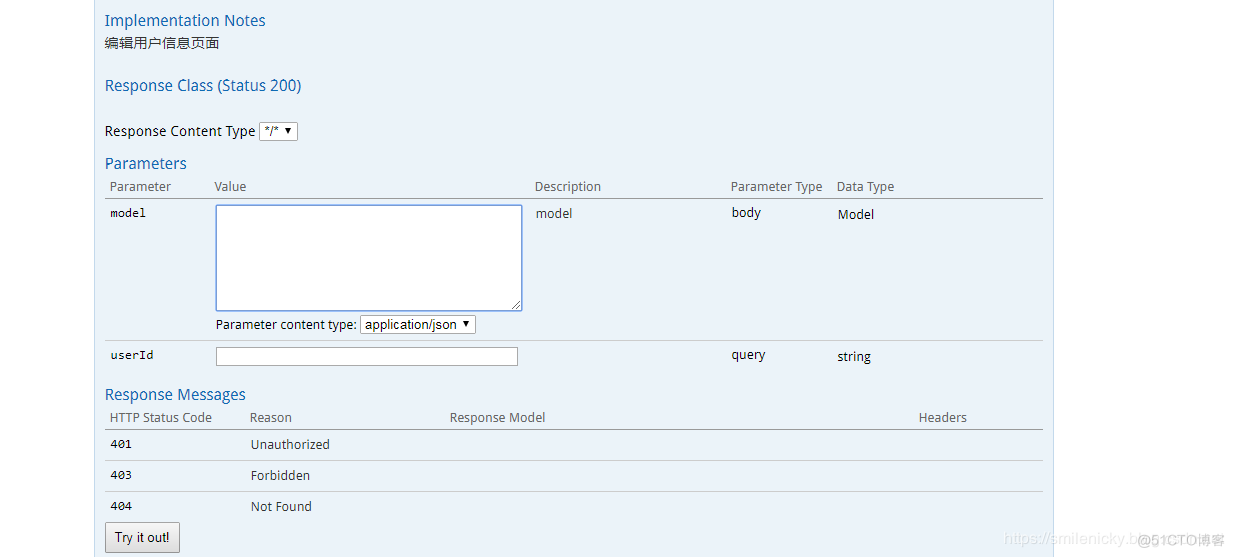
对接口注释,包括具体的传参

在这里插入图片描述
实体类:
import io.swagger.annotations.ApiModelProperty;
import lombok.Data;
/**
* <pre>
* 接口返回类
* </pre>
*
* @author nicky
* <pre>
* 修改记录
* 修改后版本: 修改人: 修改日期: 2019年05月12日 修改内容:
* </pre>
*/
@Data
public class ResultVO<T> {
@ApiModelProperty("状态码")
private Integer status;
@ApiModelProperty("返回信息")
private String message;
@ApiModelProperty("返回数据")
private T data;
public ResultVO(Integer status, String message){
this.status = status;
this.message = message;
}
public ResultVO(Integer status, String message, T data){
this.status = status;
this.message = message;
this.data = data;
}
public static <T> ResultVO error(String message) {
return new ResultVO(0, message, null);
}
public static <T> ResultVO error(String message,T data) {
return new ResultVO(0, message, data);
}
public static <T> ResultVO successful(String message){
return new ResultVO(1,message,null);
}
public static <T> ResultVO successful(String message, T data){
return new ResultVO(1, message, data);
}
}
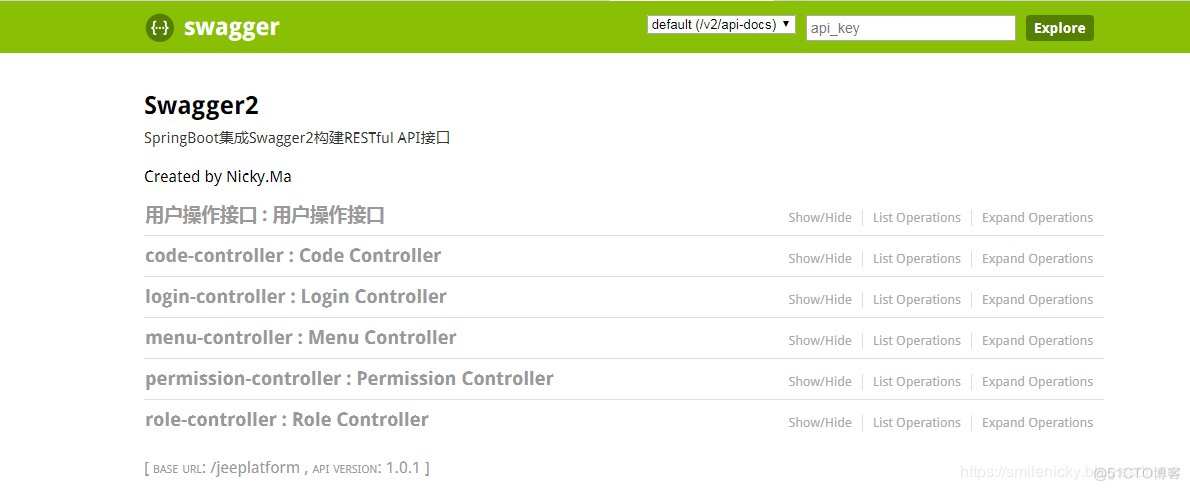
所以工程就部署好了,访问
http://localhost:8080/${项目名称}/swagger-ui.html

在这里插入图片描述
可以看到接口的详情信息,Swagger2相当于一个在线文档

在这里插入图片描述
