从完成一个简单的『手写数字识别任务』开始,快速了解飞桨框架 API 的使用方法。
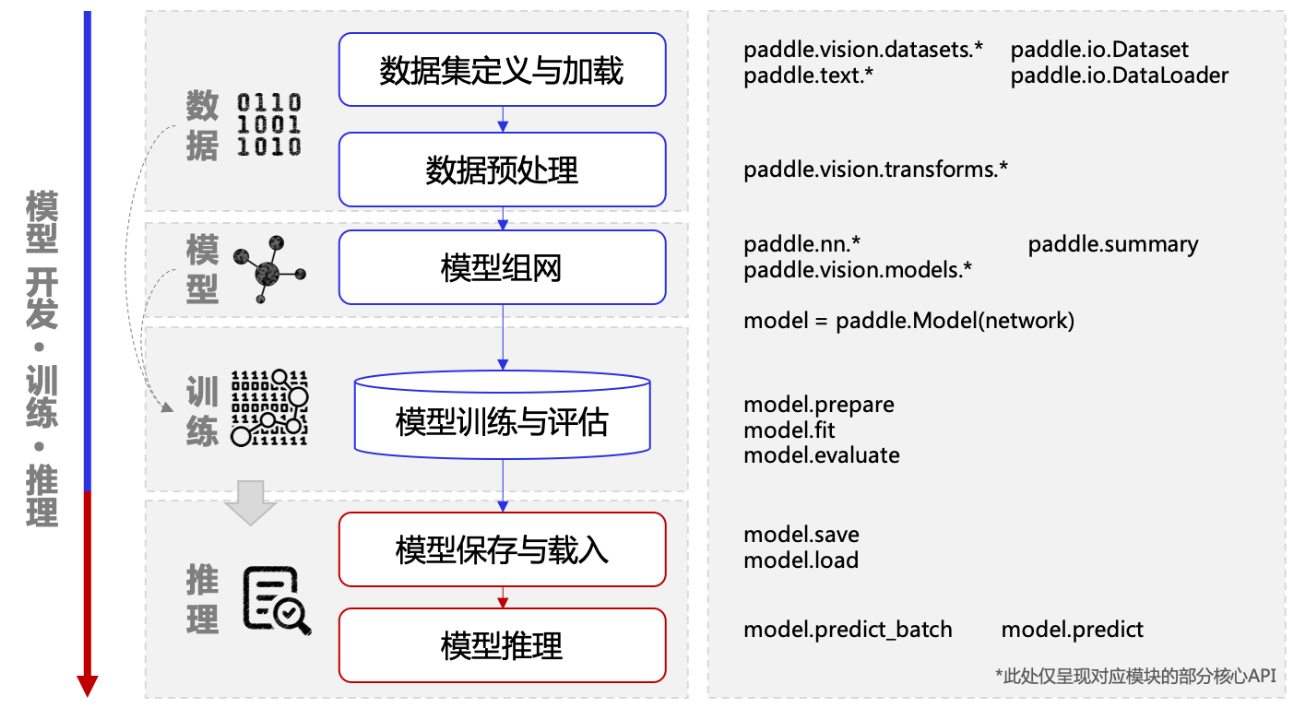
模型开发
『手写数字识别』是深度学习里的 Hello World 任务,用于对 0 ~ 9 的十类数字进行分类,即输入手写数字的图片,可识别出这个图片中的数字。
本任务用到的数据集为 MNIST 手写数字数据集,用于训练和测试模型。该数据集包含 60000 张训练图片、 10000 张测试图片、以及对应的分类标签文件,每张图片上是一个 0 ~ 9 的手写数字,分辨率为 28 * 28。

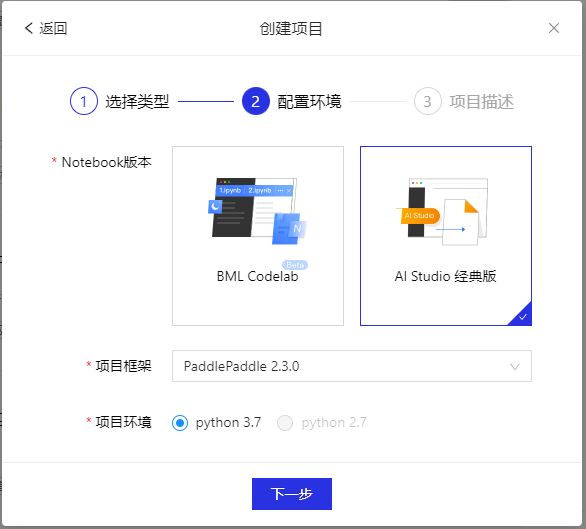
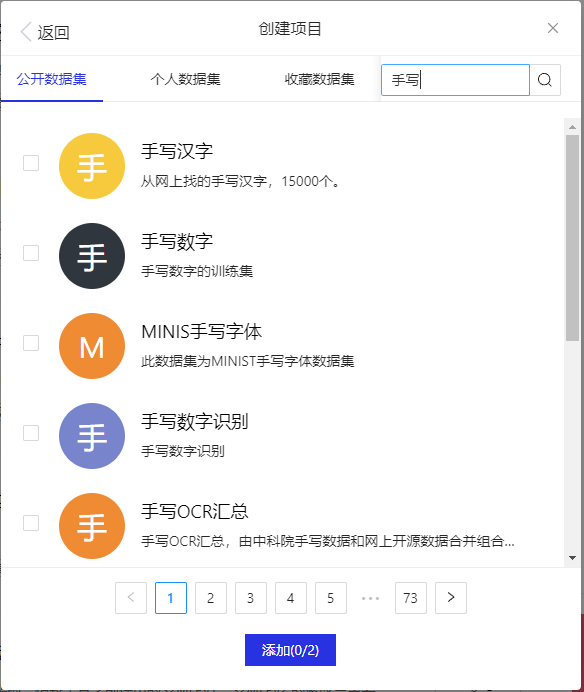
直接去飞桨AI Studio首页创建项目——添加数据集
导入要用到的包
import paddle
import numpy as np
import matplotlib.pyplot as plt
import cv2
import paddle.vision.transforms as T
加载数据集
飞桨在 paddle.vision.datasets 下内置了计算机视觉(Computer Vision,CV)领域常见的数据集,如 MNIST、Cifar10、Cifar100、FashionMNIST 和 VOC2012 等。在本任务中,先后加载了 MNIST 训练集(mode='train')和测试集(mode='test'),训练集用于训练模型,测试集用于评估模型效果。
transform = T.Normalize(mean=[127.5], std=[127.5])
train_dataset = paddle.vision.datasets.MNIST(mode='train', transform=transform)
eval_dataset = paddle.vision.datasets.MNIST(mode='test',transform=transform)

# 打印数据集里图片数量
print('训练集样本量:{}, 验证集样本量{}'.format(len(train_dataset),len(eval_dataset)))
#显示样本
cv2.imwrite("C:/1.PNG", train_dataset[0][0])
plt.figure()
plt.imshow(train_dataset[0][0].reshape([28,28]),cmap=plt.cm.binary)
plt.show()
模型组网
飞桨的模型组网有多种方式,既可以直接使用飞桨内置的模型,也可以自定义组网。『手写数字识别任务』比较简单,普通的神经网络就能达到很高的精度。
可以使用飞桨内置的 LeNet 作为模型。飞桨在 paddle.vision.models 下内置了 CV 领域的一些经典模型,LeNet 就是其中之一,调用很方便,只需一行代码即可完成 LeNet 的网络构建和初始化。num_classes 字段中定义分类的类别数,因为需要对 0 ~ 9 的十类数字进行分类,所以设置为 10。
# 模型组网并初始化网络
lenet = paddle.vision.models.LeNet(num_classes=10)

# 可视化模型组网结构和参数
paddle.summary(lenet,(1, 1, 28, 28))
---------------------------------------------------------------------------
 Layer (type)       Input Shape          Output Shape         Param #
===========================================================================
   Conv2D-1       [[1, 1, 28, 28]]      [1, 6, 28, 28]          60
    ReLU-1        [[1, 6, 28, 28]]      [1, 6, 28, 28]           0
  MaxPool2D-1     [[1, 6, 28, 28]]      [1, 6, 14, 14]           0
   Conv2D-2       [[1, 6, 14, 14]]     [1, 16, 10, 10]         2,416
    ReLU-2       [[1, 16, 10, 10]]     [1, 16, 10, 10]           0
  MaxPool2D-2    [[1, 16, 10, 10]]      [1, 16, 5, 5]            0
   Linear-1          [[1, 400]]            [1, 120]           48,120
   Linear-2          [[1, 120]]            [1, 84]            10,164
   Linear-3          [[1, 84]]             [1, 10]              850
===========================================================================
Total params: 61,610
Trainable params: 61,610
Non-trainable params: 0
---------------------------------------------------------------------------
Input size (MB): 0.00
Forward/backward pass size (MB): 0.11
Params size (MB): 0.24
Estimated Total Size (MB): 0.35
---------------------------------------------------------------------------

{'total_params': 61610, 'trainable_params': 61610}
也可以自己随便搭建一个:
network = paddle.nn.Sequential(
    paddle.nn.Conv2D(1,10,5),
    paddle.nn.MaxPool2D(3,2),
    paddle.nn.Conv2D(10,20,5),
    paddle.nn.MaxPool2D(3,2),
    paddle.nn.Flatten(),
    paddle.nn.Linear(180,64),
    paddle.nn.ReLU(),
    paddle.nn.Linear(64,10)

)
model = paddle.Model(network)
model.summary((1,1,28,28)) # 可以搭建一层就看看网络结构
模型训练
模型训练
模型训练需完成如下步骤:
-
使用 paddle.Model 封装模型。 将网络结构组合成可快速使用 飞桨高层 API 进行训练、评估、推理的实例,方便后续操作。
-
使用 paddle.Model.prepare 完成训练的配置准备工作。 包括损失函数、优化器和评价指标等。飞桨在 paddle.optimizer 下提供了优化器算法相关 API,在 paddle.nn Loss层 提供了损失函数相关 API,在 paddle.metric 下提供了评价指标相关 API。
-
使用 paddle.Model.fit 配置循环参数并启动训练。 配置参数包括指定训练的数据源
train_dataset、训练的批大小batch_size、训练轮数epochs等,执行后将自动完成模型的训练循环。
因为是分类任务,这里损失函数使用常见的 CrossEntropyLoss (交叉熵损失函数),优化器使用 Adam,评价指标使用 Accuracy 来计算模型在训练集上的精度。
# 封装模型,便于进行后续的训练、评估和推理
model = paddle.Model(lenet)

# 模型训练的配置准备,准备损失函数,优化器和评价指标
model.prepare(paddle.optimizer.Adam(parameters=model.parameters()),
              paddle.nn.CrossEntropyLoss(),
              paddle.metric.Accuracy())

# 开始训练
model.fit(train_dataset, epochs=5, batch_size=64, verbose=1)
模型评估、验证
模型训练完成之后,调用 paddle.Model.evaluate ,使用预先定义的测试数据集,来评估训练好的模型效果,评估完成后将输出模型在测试集上的损失函数值 loss 和精度 acc。
result = model.evaluate(eval_dataset,verbose=1)
print(result)


res = model.predict(eval_dataset,verbose=1)
def show_img(img,predict):
    plt.figure()
    plt.title("predict:{}".format(predict))
    plt.imshow(img.reshape([28,28]),cmap=plt.cm.binary)
    plt.show()

indexs = [1,26,56,111]
for idx in indexs:
    show_img(eval_dataset[idx][0], res[0][idx].argmax())
模型保存
模型训练完成后,通常需要将训练好的模型参数和优化器等信息,持久化保存到参数文件中,便于后续执行推理验证。
在飞桨中可通过调用 paddle.Model.save 保存模型。代码示例如下,其中 output 为模型保存的文件夹名称,minst 为保存的模型文件名称。
# 保存模型,文件夹会自动创建
model.save('./output/mnist')
以上代码执行后会在output目录下保存两个文件,mnist.pdopt为优化器的参数,mnist.pdparams为模型的参数。
output
├── mnist.pdopt     # 优化器的参数
└── mnist.pdparams  # 模型的参数
如果是
model.save('snap/mnist',training=False)
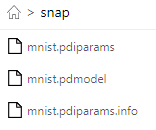
选择前两个进行部署
模型部署 环境配置- 下载安装C++预测库,
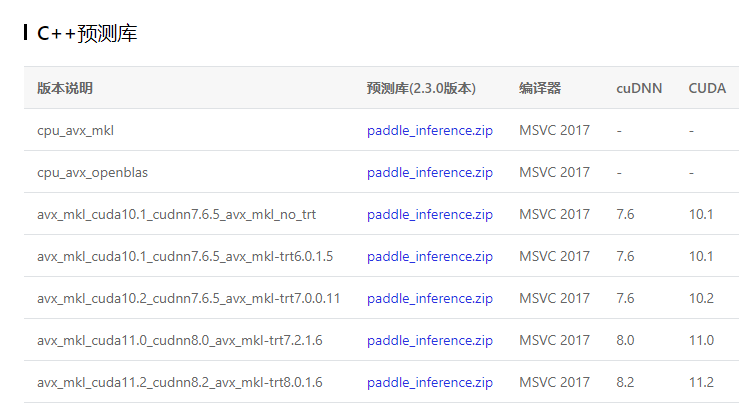
- 下载opencv
- 下载tensorrt的对应版本(可以不用)
- 下载安装cuda以及cudnn(如果和上面给的版本不一样,还要自己编译太麻烦,不如就选10.2)
- 属性页配置
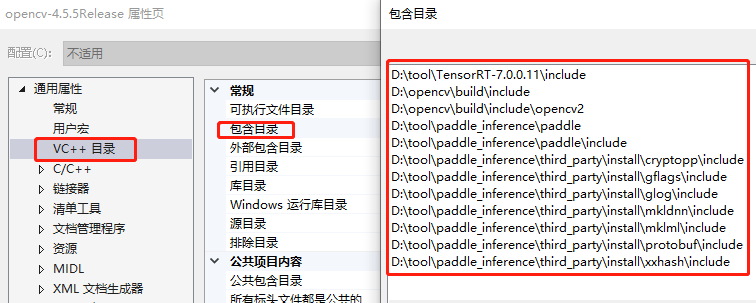
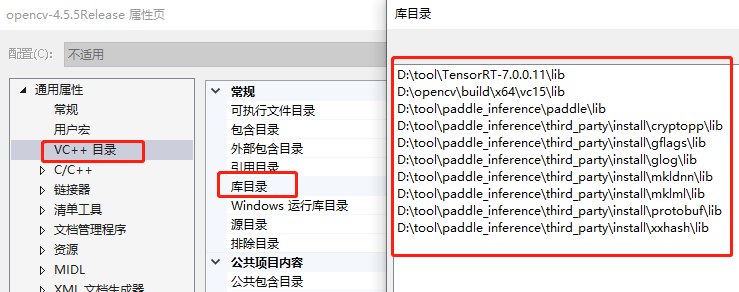
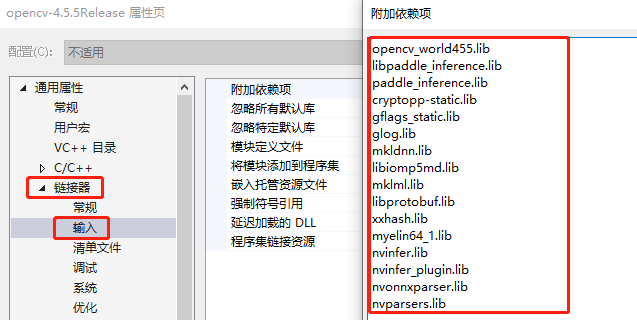
gitee链接包含模型文件
"Paddle.h"
#pragma once
#include <opencv2/opencv.hpp>
#include <paddle_inference_api.h>
#include <numeric>
using namespace cv;
using namespace std;

class Paddle {
private:
    paddle_infer::Config config;

public:

    bool loadModel(string& model_dir, string& model_file, string& params_file, int threads);

    void softmax(const vector<float>& input, vector<float>& result);

    void preprocess(Mat& src, Mat& dst, float meanValue, float stdValue);

    void gpuInference(Mat& srcImage, int srcWidth, int srcHeight, int matType, float meanValue, float stdValue, int& labelIndex, double& probability);

};
"Paddle.cpp"
#include "Paddle.h"

//加载模型
bool Paddle::loadModel(string& model_dir, string& model_file, string& params_file, int threads) {
    // Config默认是使用CPU预测,可以设置开启MKLDNN加速、设置CPU的线程数、开启IR优化、开启内存优化。
    if (model_dir == "") {
        config.SetModel(model_file, params_file); // Load combined model
    }
    else {
        config.SetModel(model_dir); // Load no-combined model
    }
    config.EnableMKLDNN();
    config.EnableUseGpu(1000, 0);
    //config.SetCpuMathLibraryNumThreads(threads);
    config.SwitchIrOptim();
    config.EnableMemoryOptim();
    return true;
}

void Paddle::softmax(const vector<float>& input, vector<float>& result) {
    result.clear();
    float max = *std::max_element(input.begin(), input.end());
    subtract(input, max, result);
    exp(result, result);
    float total = sum(result)[0];
    divide(result, total, result);
}

//预处理
void Paddle::preprocess(Mat& src, Mat& dst, float meanValue, float stdValue) {
    Scalar mean(meanValue);
    Scalar std(stdValue);
    src.convertTo(src, CV_32F, 1.0 / 255.0);
    subtract(src, mean, src);
    divide(src, std, src);
    dst = src.clone();
}

//单张图像前向传播
void Paddle::gpuInference(Mat& srcImage, int srcWidth, int srcHeight, int matType, float meanValue, float stdValue, int& labelIndex, double& probability)
{

    clock_t start, end;
    Mat dstImage(srcWidth, srcHeight,CV_32FC1);

    //预处理
    int buffer_size = srcWidth * srcHeight;
    preprocess(srcImage, dstImage, meanValue, stdValue);
    std::vector<float> input_buffer;
    input_buffer.assign((float*)dstImage.datastart, (float*)dstImage.dataend);
    input_buffer.resize(buffer_size);

    // 创建Predictor
    std::shared_ptr<paddle_infer::Predictor> predictor = paddle_infer::CreatePredictor(config);

    // 设置输入
    auto input_names = predictor->GetInputNames();
    auto input_t = predictor->GetInputHandle(input_names[0]);
    std::vector<int> input_shape = { 1, 1, srcWidth, srcHeight };
    input_t->Reshape(input_shape);
    input_t->CopyFromCpu(input_buffer.data());
    start = clock();
    predictor->Run();
    end = clock();

    // 后处理
    auto output_names = predictor->GetOutputNames();
    auto output_t = predictor->GetOutputHandle(output_names[0]);
    std::vector<int> output_shape = output_t->shape();
int out_num = std::accumulate(output_shape.begin(), output_shape.end(), 1,
        std::multiplies<int>());
    std::vector<float> out_data;
    out_data.resize(out_num);
    output_t->CopyToCpu(out_data.data());

    Point maxLoc;
    double maxValue = 0;
    vector<float> output;
    softmax(out_data, output);
    minMaxLoc(output, 0, &maxValue, 0, &maxLoc);
    labelIndex = maxLoc.x;
    probability = maxValue;
    cout << labelIndex << ":" << probability;
double time = end - start;
    cout << "spend time:" << time << endl;
}
调用
#include "Paddle.h"

int main() {
    Paddle p;
    string model_dir = "";
    string model_file = "F:/C++Projects/paddle/mnist.pdmodel";
    string params_file = "F:/C++Projects/paddle/mnist.pdiparams";

    p.loadModel(model_dir, model_file, params_file, 1);
    Mat src = imread("D:/Backup/桌面/6.png", 0);
    resize(src, src, Size(28, 28));
    bitwise_not(src, src);//变成黑底白字
    int labelIndex = 0;
    double probability = 0.0;
    p.gpuInference(src, 28, 28, CV_8UC1, 0.5, 0.5, labelIndex, probability);
}
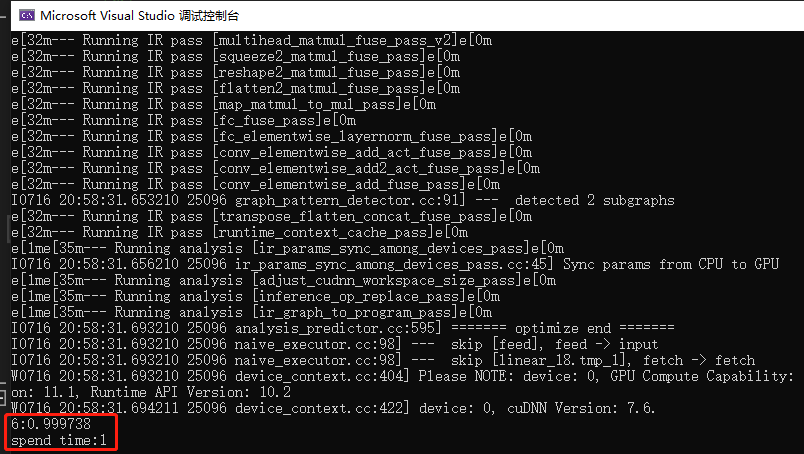
结果:
