1. 布局: GridBagLayout
官方JavaDocsApi: java.awt.GridBagLayout
GridBagLayout,网格袋布局管理器。它不要求组件的大小相同便可以将组件垂直、水平或沿它们的基线对齐。每个 GridBagLayout 对象维持一个动态的矩形单元格(动态计算出单个单元格的大小),每个组件占用一个或多个的单元格,该单元格被称为 显示区域。每个组件显示区域按 从左到右,从上到下,依次排列。
2. 约束: GridBagConstraints
GridBagConstraints,封装了若干对组件的约束属性,每个由 GridBagLayout 管理的 组件都关联一个该约束实例,以指定 组件所在显示区域 的具体放置位置,以及 组件在其显示区域中 的对齐方式。
给组件添加约束: GridBagLayout.setConstraints(Component comp, GridBagConstraints c)
PS: 要理解 组件(所在)显示区域(一个或多个单元格组成) 和 组件在其显示区域中的对齐方式 这两个不同的概念。
3. 属性: GridBagConstraints 的属性
下面属性描述中的相关大写字母常量均定义在GridBagConstraints类中。
3.1 显示区域 约束属性
组件的显示区域相关约束属性,直接作用在组件所在显示区域上。
(1)gridx, gridy
组件显示区域 开始显示的位置(单元格坐标),容器左上角第一个单元格位置为 (0, 0),默认值为RELATIVE,表示放置在 “上一个组件”(所在行列最后添加的一个组件)的 “后面”。
(2)gridwidth, gridheight
组件显示区域 水平/竖直方向 所占单元格的个数,默认值为 1,如要占多行/列,需整体结果有足够的行/列。有如下两个常量特殊值可选:
- REMAINDER: 占完所在行/列余下所有单元格(该值可实现 换行 作用);
- RELATIVE: 占到所在行/列余下的倒数第二个单元格(使用该值,所在行/列的最后一个单元格需要“合理”安排组件,并手动换行)。
设置该值不能导致 “前面” 或 “后面” 单元格有留空白,否则可能无效。
(3)weightx, weighty
如何 分布额外空间(单元格区域外,容器边缘内 的间隔),当指定行/列中的其中 任意一个 组件的权重(大于0),则该行/列将(和其他行/列按权重比例)分配额外的水平/竖直空间。当权重为 0(默认值)时,则 整个单元格区域 居中于容器中心。
PS: 如果调用了java.awt.Window.pack()方法,该值无效,因为 pack 后已无额外的空间。
3.2 组件 约束属性
组件相关约束属性,直接作用在组件上。
(1)fill
当 显示区域 大小大于 组件 所需要的大小时,组件 在其 显示区域内 的填充方式。可能的值如下:
- NONE: (默认)不调整组件大小;
- HORIZONTAL: 加宽组件,使它在水平方向上填满其显示区域,但是不改变高度;
- VERTICAL: 加高组件,使它在垂直方向上填满其显示区域,但是不改变宽度;
- BOTH: 使组件完全填满其显示区域。
(2)anchor
组件 在 显示区域内 的位置(对齐方式),可能有如下三种值:
绝对值
相对于方向的值
相对于基线的值
(3)ipadx, ipady
组件的内部填充(可看做是 组件的内边距),即对组件最小大小的添加量。组件的宽度至少为其最小宽度/高度加上 ipadx/ipady 像素。
(4)insets
组件的外部填充(可看做是 组件的外边距,也可看做是 显示区域 的内边距),即 组件 与其 显示区域边缘 之间间距的最小量。
PS: 上面各属性值之间,以及其他因素,有可能存在冲突或不兼容,不一定设置了即有效,建议多做实验,多写测试Demo去尝试。
4. 案例: GridBagLayout使用实例
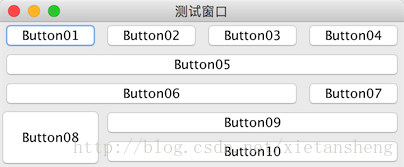
先展示效果,如下图所示:

各按钮约束参数:
- Button01, Button02, Button03:默认
- Button04:gridwidth = REMAINDER、fill = BOTH
- Button05:gridwidth = REMAINDER、fill = BOTH
- Button06:gridwidth = RELATIVE、fill = BOTH
- Button07:gridwidth = REMAINDER
- Button08:gridheight = 2、fill = BOTH
- Button09:gridwidth = REMAINDER、fill = BOTH
- Button10:gridwidth = REMAINDER、fill = BOTH
代码实现:
package com.xiets.swing;

import javax.swing.*;
import java.awt.*;

public class Main {

 public static void main(String[] args) {
  JFrame jf = new JFrame("测试窗口");
  jf.setDefaultCloseOperation(WindowConstants.EXIT_ON_CLOSE);

  GridBagLayout gridBag = new GridBagLayout(); // 布局管理器
  GridBagConstraints c = null;     // 约束

  JPanel panel = new JPanel(gridBag);

  JButton btn01 = new JButton("Button01");
  JButton btn02 = new JButton("Button02");
  JButton btn03 = new JButton("Button03");
  JButton btn04 = new JButton("Button04");
  JButton btn05 = new JButton("Button05");
  JButton btn06 = new JButton("Button06");
  JButton btn07 = new JButton("Button07");
  JButton btn08 = new JButton("Button08");
  JButton btn09 = new JButton("Button09");
  JButton btn10 = new JButton("Button10");

  /* 添加 组件 和 约束 到 布局管理器 */
  // Button01
  c = new GridBagConstraints();
  gridBag.addLayoutComponent(btn01, c); // 内部使用的仅是 c 的副本

  // Button02
  c = new GridBagConstraints();
  gridBag.addLayoutComponent(btn02, c);

  // Button03
  c = new GridBagConstraints();
  gridBag.addLayoutComponent(btn03, c);

  // Button04 显示区域占满当前行剩余空间(换行),组件填充显示区域
  c = new GridBagConstraints();
  c.gridwidth = GridBagConstraints.REMAINDER;
  c.fill = GridBagConstraints.BOTH;
  gridBag.addLayoutComponent(btn04, c);

  // Button05 显示区域独占一行(换行),组件填充显示区域
  c = new GridBagConstraints();
  c.gridwidth = GridBagConstraints.REMAINDER;
  c.fill = GridBagConstraints.BOTH;
  gridBag.addLayoutComponent(btn05, c);

  // Button06 显示区域占到当前尾倒车第二个单元格(下一个组件后需要手动换行),组件填充显示区域
  c = new GridBagConstraints();
  c.gridwidth = GridBagConstraints.RELATIVE;
  c.fill = GridBagConstraints.BOTH;
  gridBag.addLayoutComponent(btn06, c);

  // Button07 放置在当前行最后一个单元格(换行)
  c = new GridBagConstraints();
  c.gridwidth = GridBagConstraints.REMAINDER;
  gridBag.addLayoutComponent(btn07, c);

  // Button08 显示区域占两列,组件填充显示区域
  c = new GridBagConstraints();
  c.gridheight = 2;
  c.fill = GridBagConstraints.BOTH;
  gridBag.addLayoutComponent(btn08, c);

  // Button09 显示区域占满当前行剩余空间(换行),组件填充显示区域
  c = new GridBagConstraints();
  c.gridwidth = GridBagConstraints.REMAINDER;
  c.fill = GridBagConstraints.BOTH;
  gridBag.addLayoutComponent(btn09, c);

  // Button10 显示区域占满当前行剩余空间(换行),组件填充显示区域
  c = new GridBagConstraints();
  c.gridwidth = GridBagConstraints.REMAINDER;
  c.fill = GridBagConstraints.BOTH;
  gridBag.addLayoutComponent(btn10, c);

  /* 添加 组件 到 内容面板 */
  panel.add(btn01);
  panel.add(btn02);
  panel.add(btn03);
  panel.add(btn04);
  panel.add(btn05);
  panel.add(btn06);
  panel.add(btn07);
  panel.add(btn08);
  panel.add(btn09);
  panel.add(btn10);

  jf.setContentPane(panel);
  jf.pack();
  jf.setLocationRelativeTo(null);
  jf.setVisible(true);
 }

}
以上就是本文的全部内容,希望对大家的学习有所帮助,也希望大家多多支持易盾网络。
