前言
iOS 11 已经发布了一段时间了,随手记团队也早早的完成了适配。在这里,我们做了点总结,与大家一起分享一下关于 iOS 11 一些新特性的适配。
UIView & UIViewController
Layout Margins
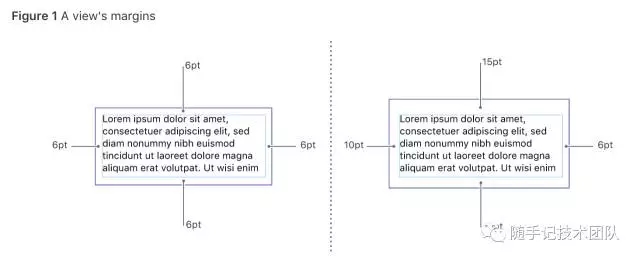
iOS 11 中,官方提供了一种新的布局方法——通过 layout margins 进行布局。官方文档 Positioning Content Within Layout Margins 称,使用这种布局可以保证各个 content 之间不会相互覆盖。
总的来说,layout margins 可以视作视图的内容和内容之间的空隙。它由每个边的 insetValues 组成,分别是 top, bottom, leading and trailing. 对应的是上、下、左、右。

Auto Layout with Layout Margins
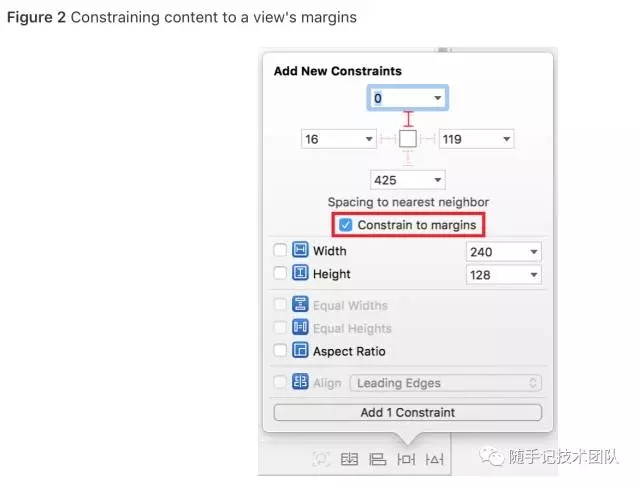
如果使用 Auto Layout 进行布局,并希望约束遵循 layout margins,那么必须要在 Xcode 中打开 Constrain to margins 选项。这样,如果父视图的 layout margins 改变,那么所有绑定于父视图 margins 的子视图都会更新布局。

注意
如果没有开启这个选项,那么所有建立的约束都会依赖于父视图的 bounds.
Manually Layout with Layout Margins
如果没有使用 Auto Layout, 而是通过设置 frame 布局的话,要遵循 layout margins 也并不困难,只需要在布局计算时使用 directionalLayoutMargins 这个属性。
var directionalLayoutMargins: NSDirectionalEdgeInsets { get set }
官方文档中阐述道,对于 view controller 的根视图,它的 directionalLayoutMargins 默认值是由 systemMinimumLayoutMargins和SafeAreaInsets 决定的。在 iPhone X 下打印根视图的这三个属性可以看到它们的关系。
override func viewDidAppear(_ animated: Bool) {
 super.viewDidAppear(animated)
 print("SafeAreaInsets :" + "\(self.view.safeAreaInsets)")
 print("systemMinimumLayoutMargins :" + "\(self.systemMinimumLayoutMargins)")
 print("directionalLayoutMargins: " + "\(self.view.directionalLayoutMargins)")

 // SafeAreaInsets :UIEdgeInsets(top: 88.0, left: 0.0, bottom: 34.0, right: 0.0)
 // systemMinimumLayoutMargins :NSDirectionalEdgeInsets(top: 0.0, leading: 16.0, bottom: 0.0, trailing: 16.0)
 // directionalLayoutMargins: NSDirectionalEdgeInsets(top: 88.0, leading: 16.0, bottom: 34.0, trailing: 16.0)
}
结果显而易见,directionalLayoutMargins 的默认值由 systemMinimumLayoutMargins 和 safeAreaInsets 组成。
注意
systemMinimumLayoutMargins 属性是否可用由 view controller 的布尔值属性viewRespectsSystemMinimumLayoutMargins决定,默认为true.
如果手动对 directionalLayoutMargins 赋值,那么在 viewRespectsSystemMinimumLayoutMargins 开启的情况下,系统会比较赋值后的 directionalLayoutMargins 和 systemMinimumLayoutMargins ,并取其较大值作为最终的 margins。
print("systemMinimumLayoutMargins :" + "\(self.systemMinimumLayoutMargins)")
print("origin directionalLayoutMargins: " + "\(self.view.directionalLayoutMargins)")

// 这里把 leading 和 trailing 分别赋值为相对于 systemMinimumLayoutMargins 的较大值20和较小值10
self.view.directionalLayoutMargins = NSDirectionalEdgeInsets(top: 0, leading: 20, bottom: 0, trailing: 10)
print("assigned directionalLayoutMargins: " + "\(self.view.directionalLayoutMargins)")

// 打印日志可见只有 leading 的值改变为手动赋的值,trailing 依然遵循于 systemMinimumLayoutMargins
systemMinimumLayoutMargins :NSDirectionalEdgeInsets(top: 0.0, leading: 16.0, bottom: 0.0, trailing: 16.0)
origin directionalLayoutMargins: NSDirectionalEdgeInsets(top: 88.0, leading: 16.0, bottom: 34.0, trailing: 16.0)
assigned directionalLayoutMargins: NSDirectionalEdgeInsets(top: 88.0, leading: 20.0, bottom: 34.0, trailing: 16.0)
注意
如果不希望受到systemMinimumLayoutMargins的影响,那么把 view controller 的viewRespectsSystemMinimumLayoutMargins设为false即可.
Navigation bar
进入了 iOS 11,苹果为提供了更为漂亮和醒目的大标题的样式,如果想开启这样的功能,其实很简单。
只需要将 navigation bar 中的 prefersLargeTitles 置为 true 即可,这样便自动有了来自 iOS 11 中的大标题的样式。
self.navigationController.navigationBar.prefersLargeTitles = true
这里可以注意到,prefersLargeTitles 是配置在的 navigation controller 中的 navigation bar 中的。也就是说该 navigation controller 容器中的所有的 view controller 在此配置之后,都会受到影响。所以如果你要在当前的 navigation controller 中推入一个新的 view controller 的话,那么该 view controller 也会是大标题。因此为了避免这个问题,UIKit 为 UINavigationItem 提供了 largeTitleDisplayMode 属性。
该属性默认为 UINavigationItem.LargeTitleDisplayMode.automatic, 即保持与前面已经显示过的 navigation item 一致的样式。 如果想在后来的一个 view controller 避免大标题样式那么可以这么配置:
self.navigationItem.largeTitleDisplayMode = .never
除了大标题以外,在 iOS 11 中,UIKit 还为 navigation item 提供了便于管理搜索的接口。
具体参考如下:
self.navigationItem.searchController = self.searchController
self.navigationItem.hidesSearchBarWhenScrolling = true
在配置好你的 search controller 之后便可以直接提供给 navigation item 的 searchController属性上,这样的便能够在导航栏看到一个漂亮的搜索框了。
此外还可以给 navigation item 中的属性 hidesSearchBarWhenScrolling 设置为 true, 他可以使你 view controller 中管理的 scroll view 在滑动的时候自动隐藏 search bar.
Scroll view
如果使用过 view controller 管理过 scroll view 的话,想必对 automaticallyAdjustsScrollViewInsets 这个属性一定不陌生。在 iOS 11 之前,该属性可以让 view controller 自动管理 scroll view 中的 content inset. 但是,在实际在开发的过程中,这样的自动管理的方式会带来麻烦,尤其是一些在 content inset 需要动态调整的情况。
为此,在 iOS 11, UIKit 废弃了 automaticallyAdjustsScrollViewInsets 属性,并将该的职责转移到 scroll view 本身。因此,在 iOS 11 中,为了解决这个问题,有两个 scroll view 的新属性。一个是用于管理调整 content inset 行为的属性 contentInsetAdjustmentBehavior, 另一个是获取调整后的填充的属性 adjustedContentInset. 同时,UIScrollViewDelegate 也提供了新的代理方法,以方便开发者获取 inset 变化的时机:
optional func scrollViewDidChangeAdjustedContentInset(_ scrollView: UIScrollView)
至此,对于这个「自动为开发者设置 inset」 的特性,苹果算是提供了相当完备的接口了。
不过作为开发者的我们要注意的是,如果对原本自动设置 contentInset 属性的行为有依赖,在新的 iOS 11 的适配中,可能得做出调整。
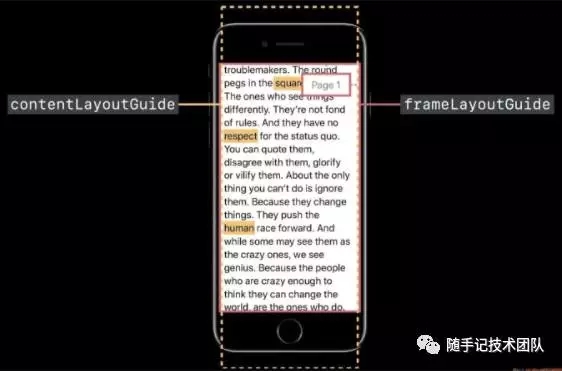
此外,为了便于开发者在 scroll view 中使用 Auto Layout. UIKit 还提供了两个新的属性。一个是 contentLayoutGuide, 它用来获取当前在 scroll view 内的内容的 layout guides. 而另一个是 frameLayoutGuide, 他用来获取实际内容的 layout guides. 这样说有点繁琐,还是看 WWDC 的原图吧:

Table view
实际上对于 table view 而言,其最大的更新就在于新的特性 Drag and Drop 了吧。但是这个特性在适配中暂时不需要考虑,本文就不介绍了,让我们一起来看看其他有意思的变化。
首先是在 iOS 11 中,table view 默认开启了 self-sizing, 可以注意到 estimatedRowHeight, estimatedSectionHeaderHeight 以及 estimatedSectionFooterHeight 都被默认设置为 UITableViewAutomaticDimension. 但是我们知道,如果原本已经实现 tableView:heightForRowAtIndexPath: 之类的方法并返回了高度,那么在布局方面是不会有影响的,这对 iOS 11 适配而言是个好消息。
在 iOS 11 中,有了新的 layout margins 的概念,因此 UIKit 也为 separator inset 做了额外的补充。现在 separator inset 可以有两个来源,一个是从 cell 的边缘开始 (UITableViewSeparatorInsetReference.fromCellEdges) ,另一个是从 table view 默认的填充开始 (UITableViewSeparatorInsetReference.fromAutomaticInsets)。其中,默认的填充由 table view 的 layout margins 进行控制。
此外,iOS 11 还为 table view 添加了更多的滑动操作的控制能力。分别可以通过以下两个 UITableViewDelegate 的方法
实现:
func tableView(_ tableView: UITableView, leadingSwipeActionsConfigurationForRowAt indexPath: IndexPath) -> UISwipeActionsConfiguration?
func tableView(_ tableView: UITableView, trailingSwipeActionsConfigurationForRowAt indexPath: IndexPath) -> UISwipeActionsConfiguration?
我们可以注意到两个方法均要求返回一个 UISwipeActionsConfiguration 实例。为构造这个实例,我们还需要构造一个由 UIContextualAction 实例组成的数组。UIContextualAction 与原本的 UITableViewRowAction 大致类似,但是要注意在 contextual action 的参数 handler 中,我们需要调用 handler 参数中的 completionHandler 才能完成操作。从这一点我们可以看到,似乎在新的 action 中,我们可以做一些异步操作相关的事情。
下面是一个删除操作的示例:
override func tableView(_ tableView: UITableView, trailingSwipeActionsConfigurationForRowAt indexPath: IndexPath) -> UISwipeActionsConfiguration? {
 let contextualAction = UIContextualAction.init(style: .destructive, title: "Delete") { (style, title, completionHandler) in
  // 删除指定的数据
  completionHandler(true)
 }

 let actionsConfiguration = UISwipeActionsConfiguration.init(actions: [contextualAction])
 return actionsConfiguration
}
在 swipe actions configuration 中,我们还需要注意一点,那就是新的 performsFirstActionWithFullSwipe 属性。通过开启这个属性的配置(默认开启),我们可以为第一个动作提供 full swipe 操作 (一种通过过度滑动从而触发动作的交互) 。
如果仅仅实现了以往的编辑的代理方法,在 iOS 11 中,对于第一个动作将会默认支持 full swipe, 且不能关闭。
Face ID
如果已经做过了 Touch ID 那么实际上适配 Face ID 便并不难了。即便是不做任何的改动,估计 Face ID 也是可以直接使用的(写作时, iPhone X 还未上市),当然相关的体验肯定会打点折扣,毕竟文案以及相关的提示操作还是在仅有 Touch ID 的前提下实现的。
与以往一样,可以通过 LAContext 类实现生物识别认证。不过需要注意的是,因为支持了新的 Face ID 认证,苹果便为 LAContext 类添加了新的接口 biometryType 用于区分 Touch ID 以及 Face ID。同时,以往仅涵盖 Touch ID 的错误类型,也在 iOS 11 中废弃了,相应的,苹果提供了新的更通用的错误类型予以替代。
IOS 11 下适配UITableView
UIScrollView及其子类在IOS 11之前的版本UI显示完全正常,但是在IOS 11上面会显示奇葩的界面。
(1)先看一下UITablevIew。
原本在VC里面的automaticallyAdjustsScrollViewInsets竟然过期了,在IOS 11下 APPLE推荐使用UIScrollView的contentInsetAdjustmentBehavior属性进行设置自动计算滚动视图的内容边距。
@property(nonatomic,assign) BOOL automaticallyAdjustsScrollViewInsets
在IOS11的SDK下,UIScrollView的这个属性
@property(nonatomic) UIScrollViewContentInsetAdjustmentBehavior contentInsetAdjustmentBehavior //这个属性是一个枚举类型的

{

UIScrollViewContentInsetAdjustmentAutomatic,//scrollView会自动计算和适应顶部和底部的内边距并且在scrollView 不可滚动时,也会设置内边距.

UIScrollViewContentInsetAdjustmentScrollableAxes, //自动适应边距

UIScrollViewContentInsetAdjustmentNever, //和 automaticallyAdjustsScrollViewInsets=NO有着同样的效果,不计算内边距

UIScrollViewContentInsetAdjustmentAlways//根据safeAreaInsets (安全区域)计算内边距

 }
所以,在IOS 11 下,需要设置ScrollView:
self.tableView.contentInsetAdjustmentBehavior = UIScrollViewContentInsetAdjustmentNever;
如果需要全局设置的话,需要这么设置:
if (@available(iOS 11.0, *)) {


 [[UIScrollView appearance] setContentInsetAdjustmentBehavior:UIScrollViewContentInsetAdjustmentNever];

}
这样设置后使用UITableview 、UICollectionView、UIScrollview的时候就不需要再单独设置该属性了,因为UIView以及他的子类都是遵循UIAppearance协议的。
总结
以上就是这篇文章的全部内容了,希望本文的内容对大家的学习或者工作具有一定的参考学习价值,如果有疑问大家可以留言交流,谢谢大家对自由互联的支持。
Reference
- Positioning Content Within Layout Margins
- directionalLayoutMargins
- systemMinimumLayoutMargins
- SafeAreaInsets
