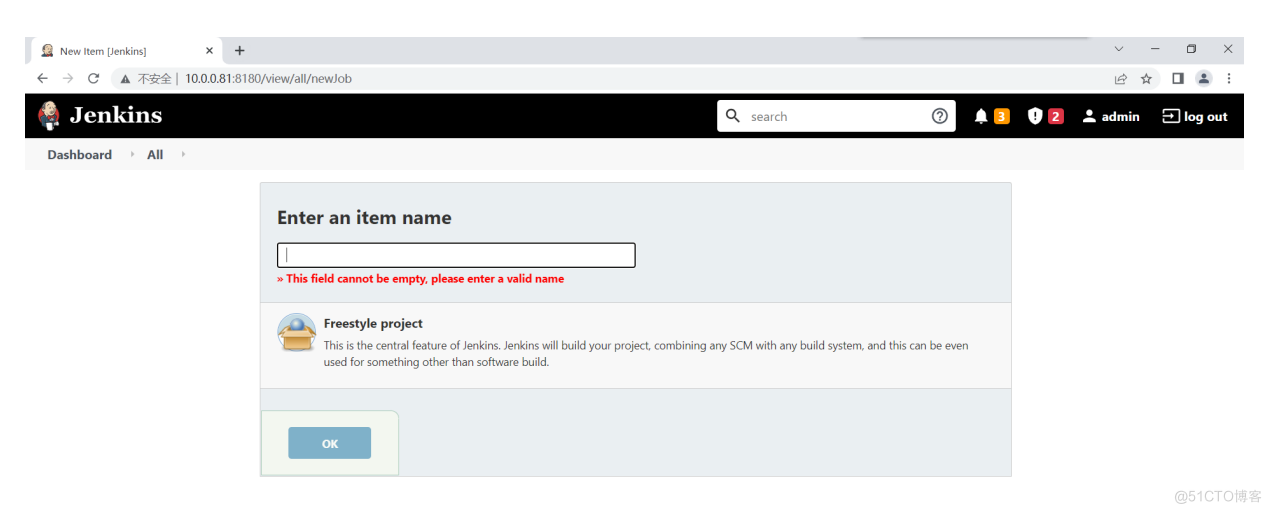
Jenkins-freestyle Jenkins的插件安装 没有打插件之前 修改admin密码 安装插件的方式 使用Jenkins页面安装 ## jenkins插件目录[root@auto01 ~]# ll /var/lib/jenkins/plugins/total 5472drwxr-xr-x 4 root root 56 Aug 31 0
Jenkins-freestyle
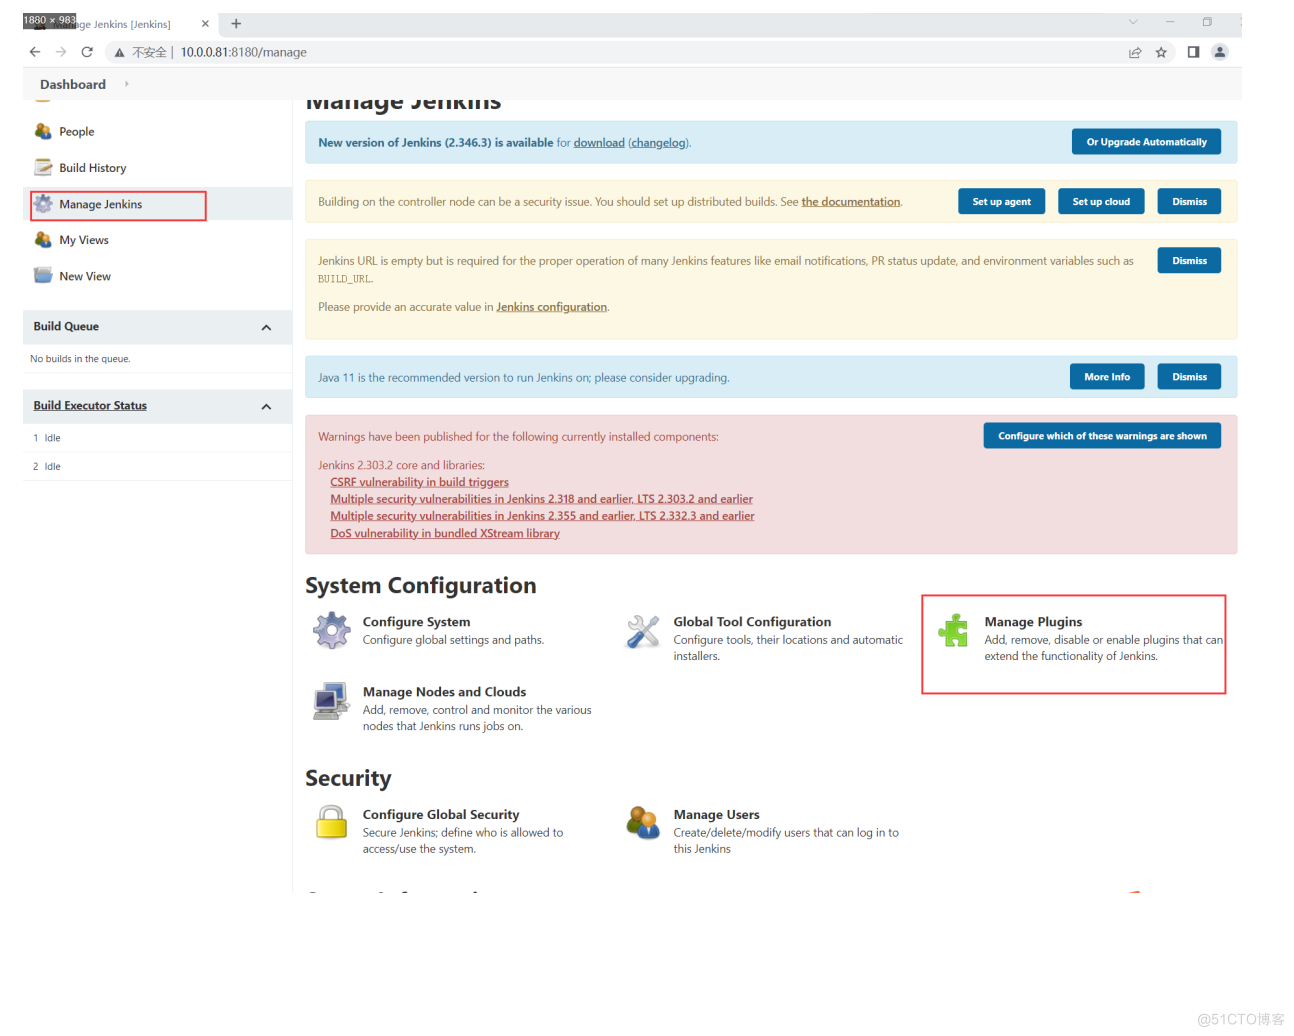
Jenkins的插件安装
没有打插件之前
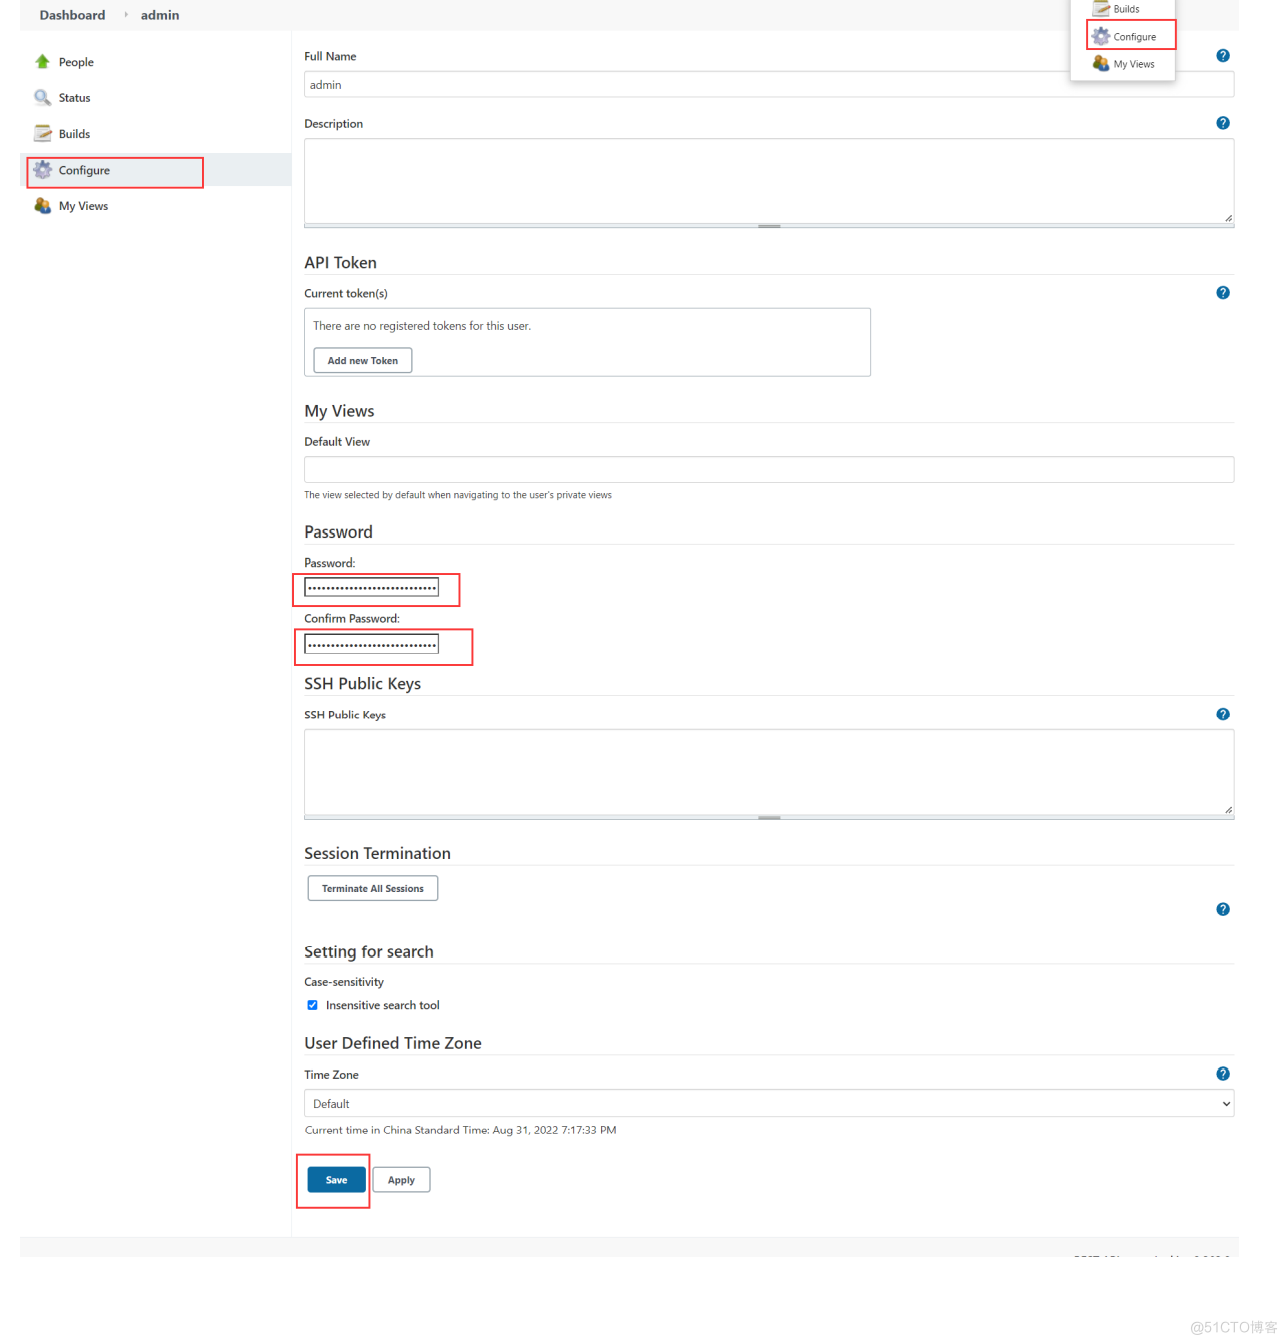
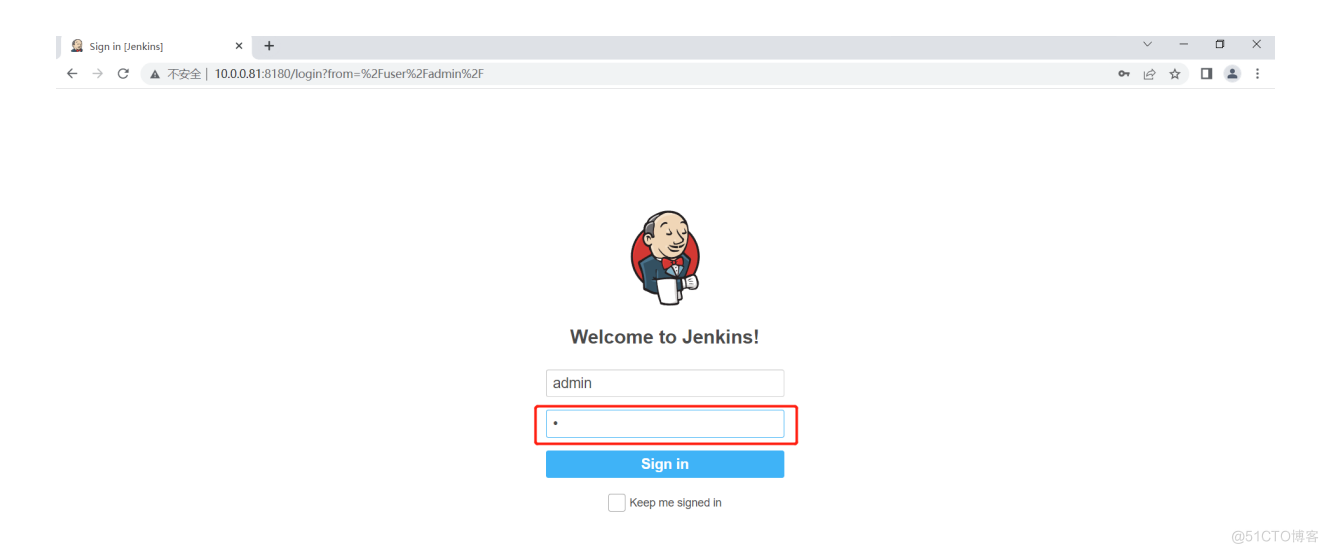
修改admin密码
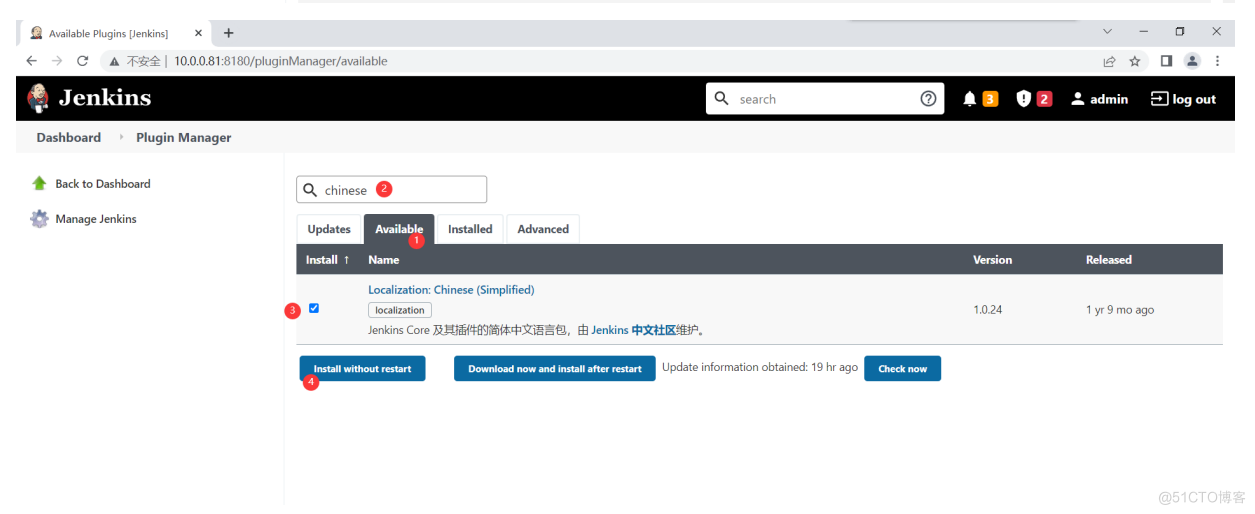
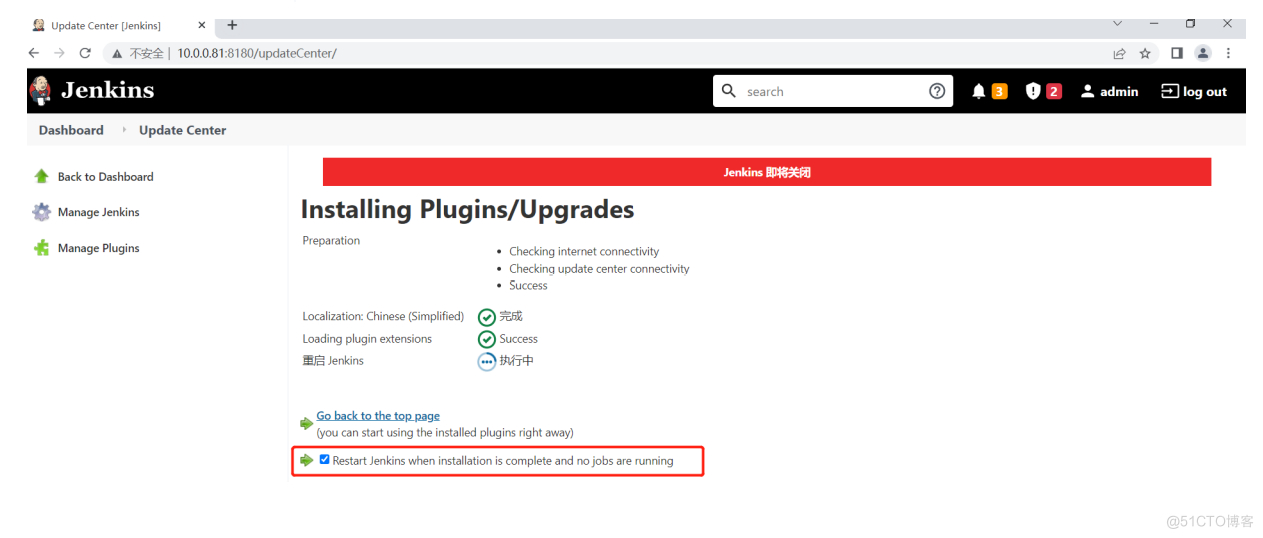
安装插件的方式
- 使用Jenkins页面安装
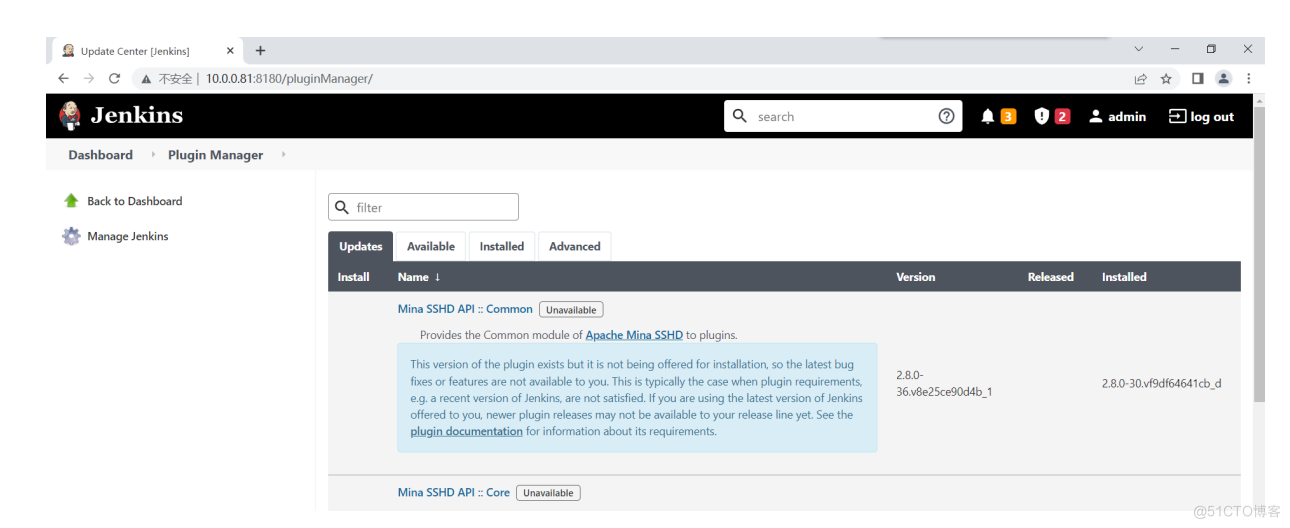
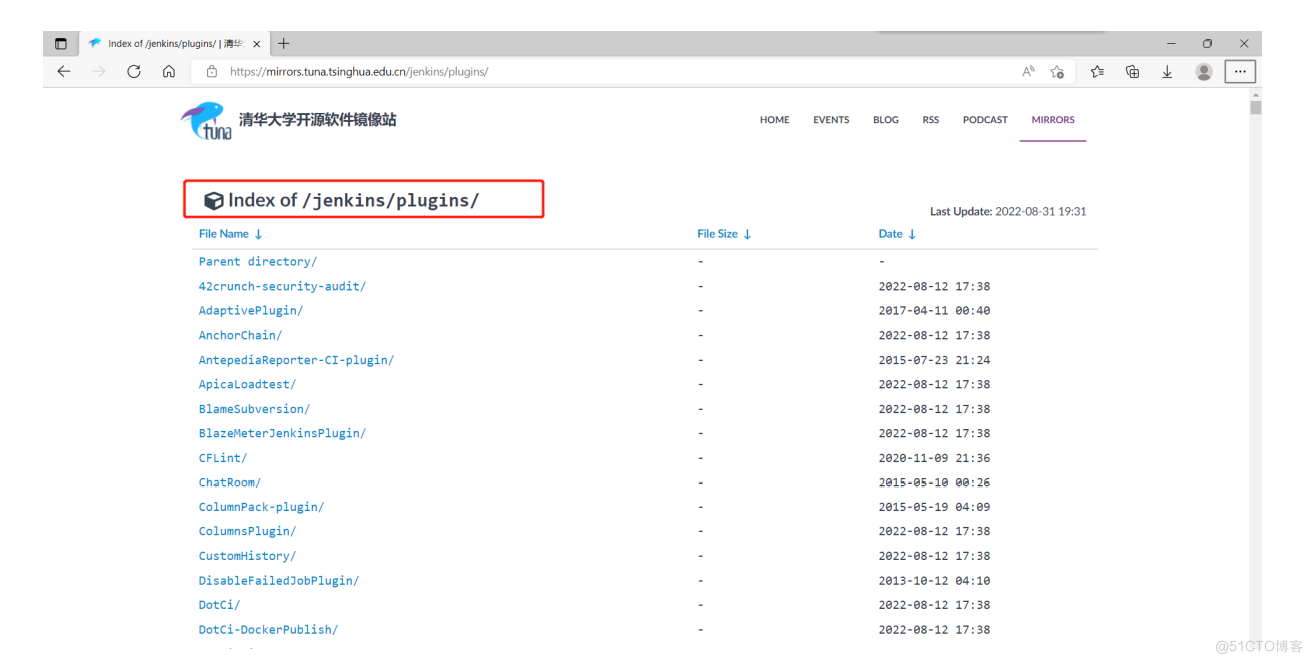
- 使用各大源安装
清华源Jenkins插件地址:https://mirrors.tuna.tsinghua.edu.cn/jenkins/plugins/
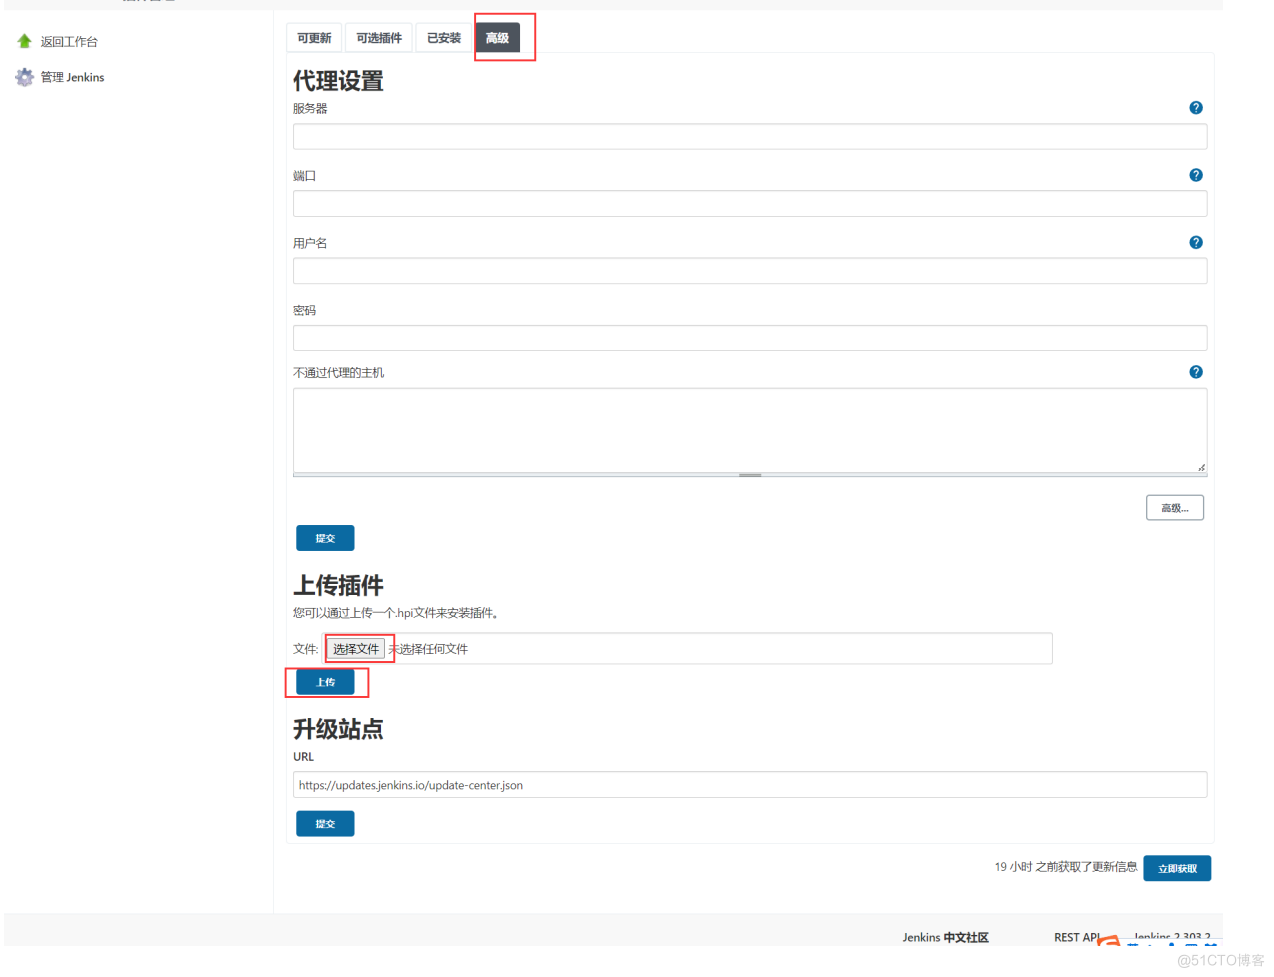
- 手动安装

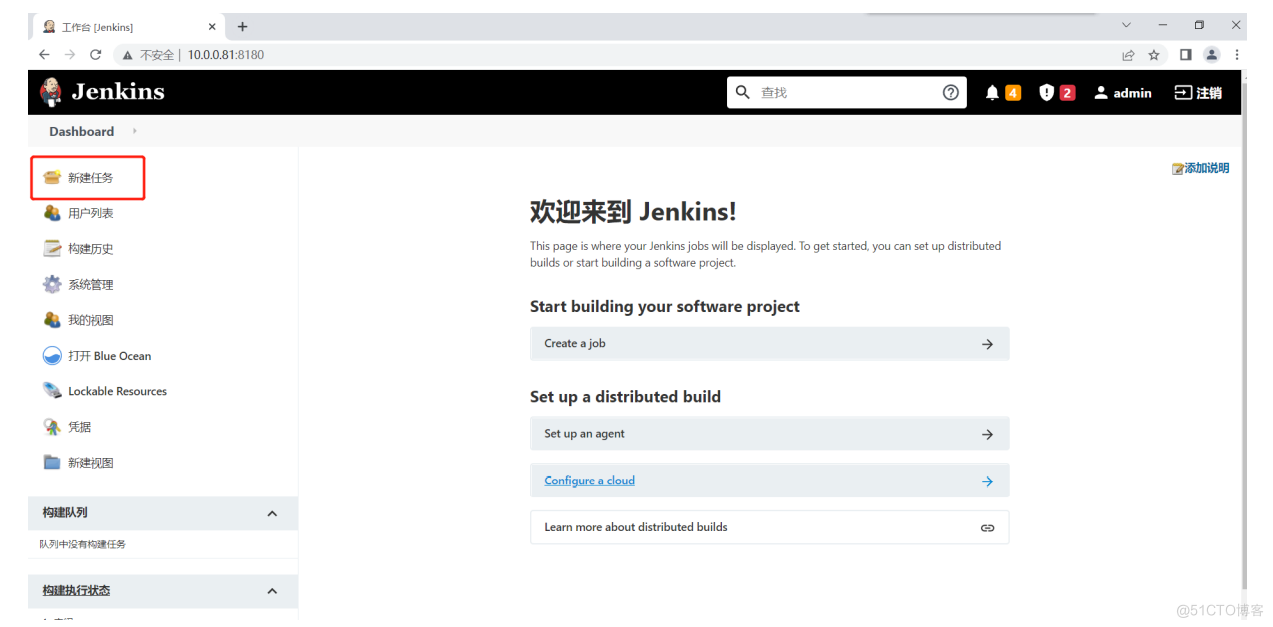
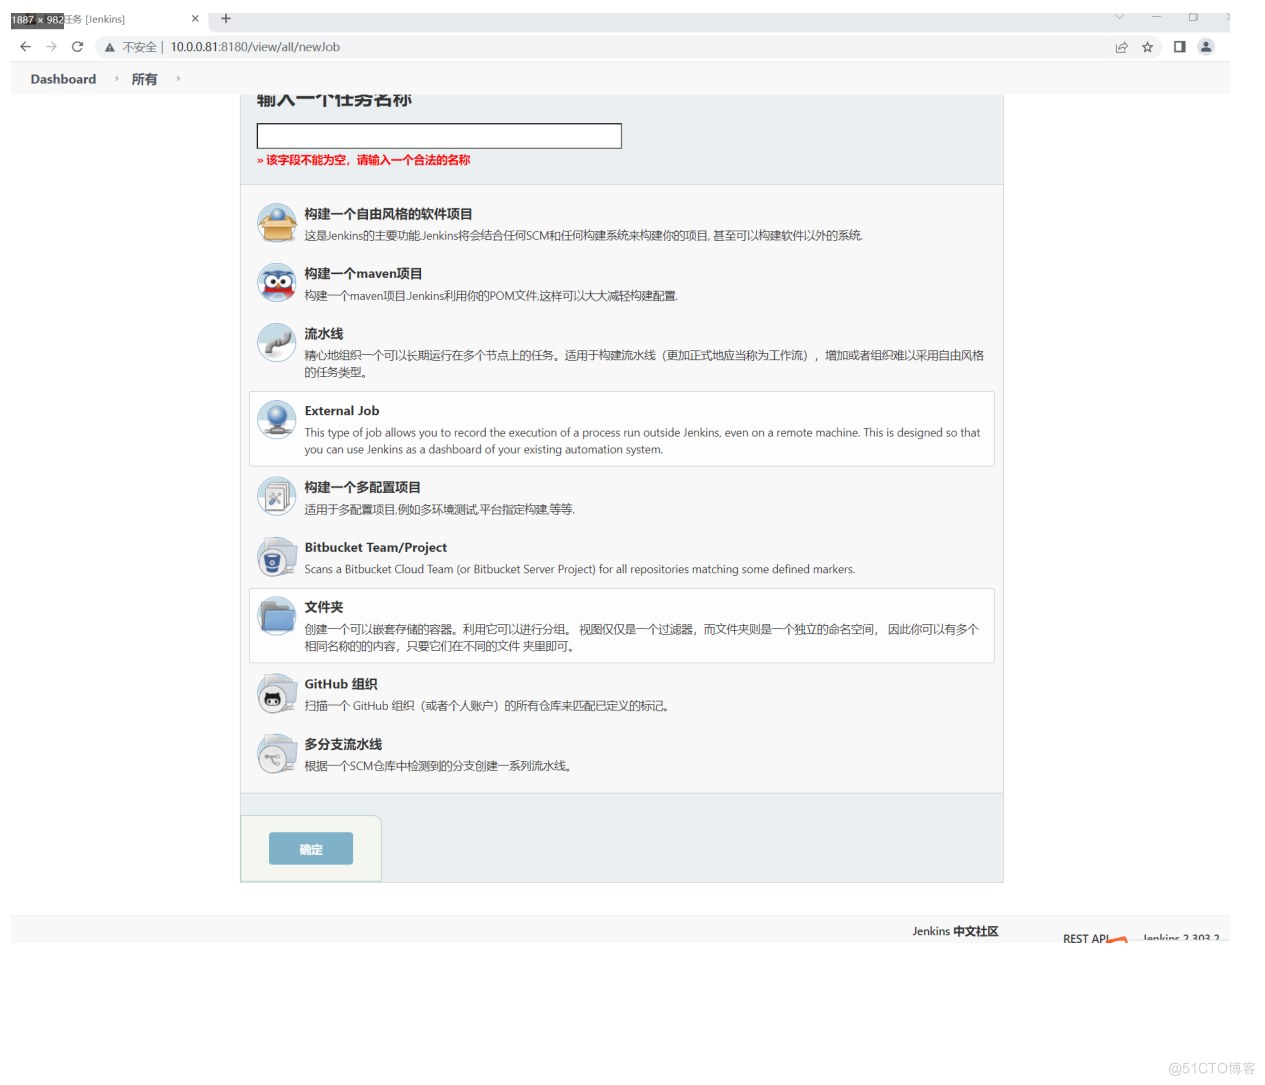
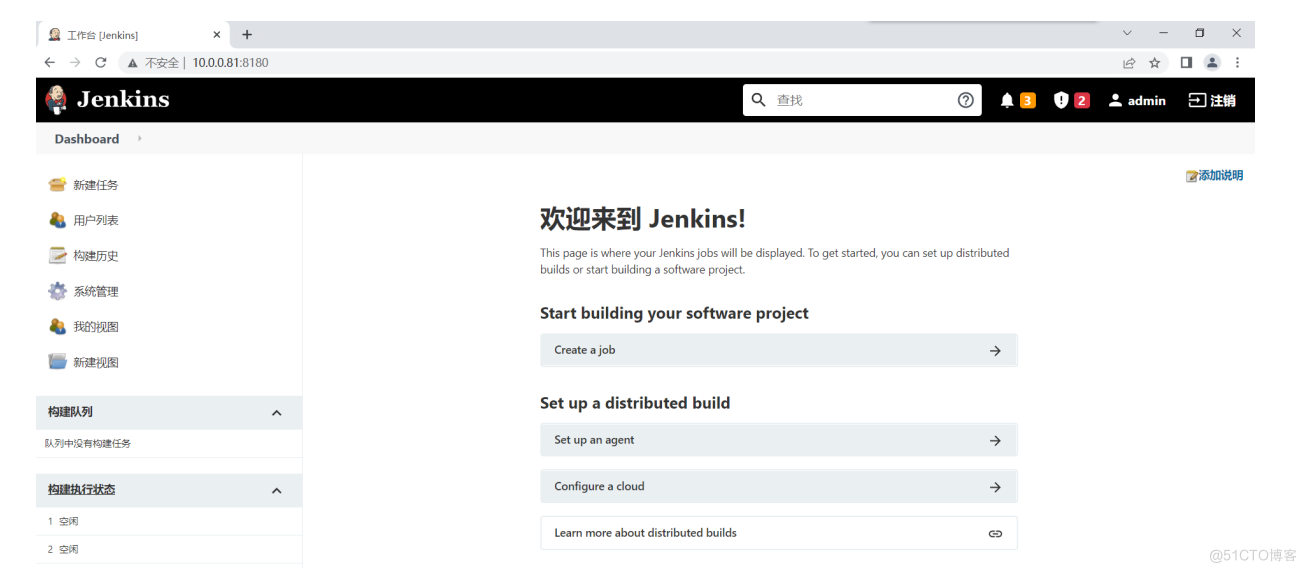
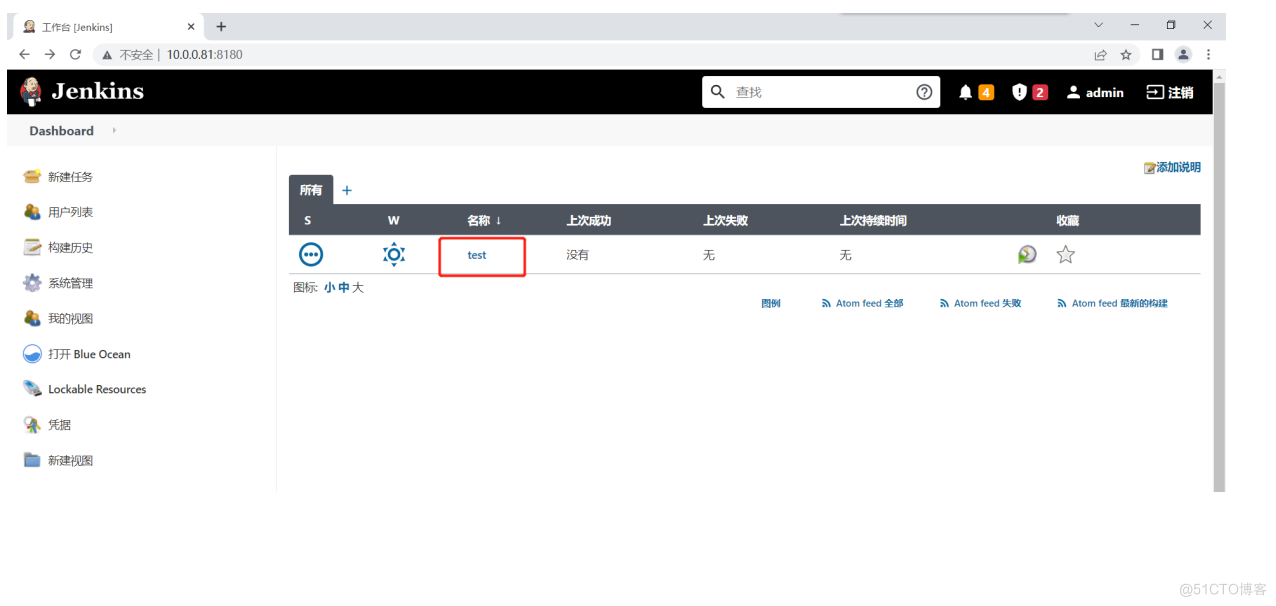
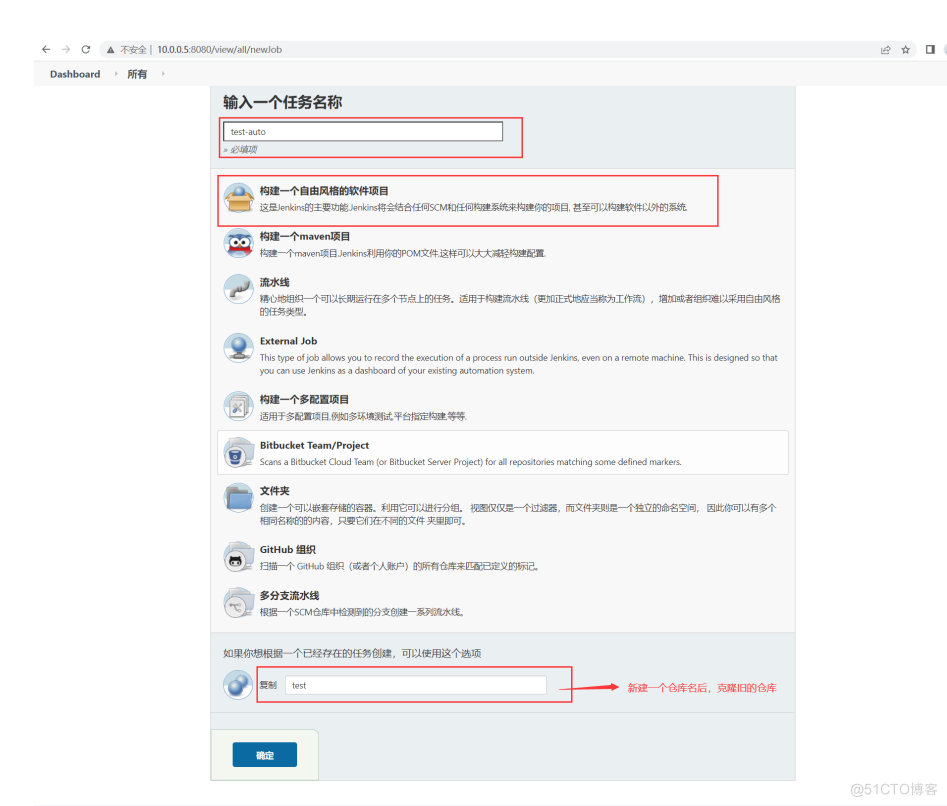
Jenkins 创建自由风格构建
安装插件之后的freestyle

手动代码上线
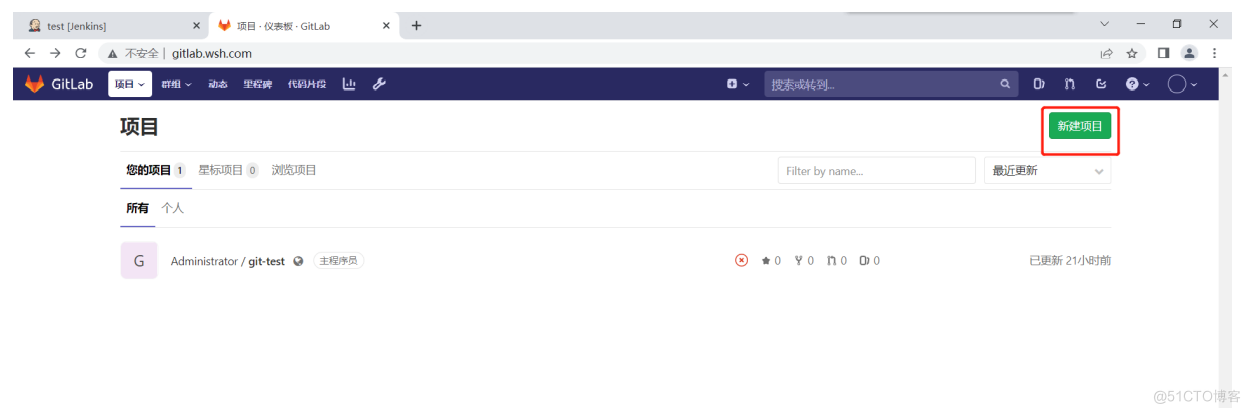
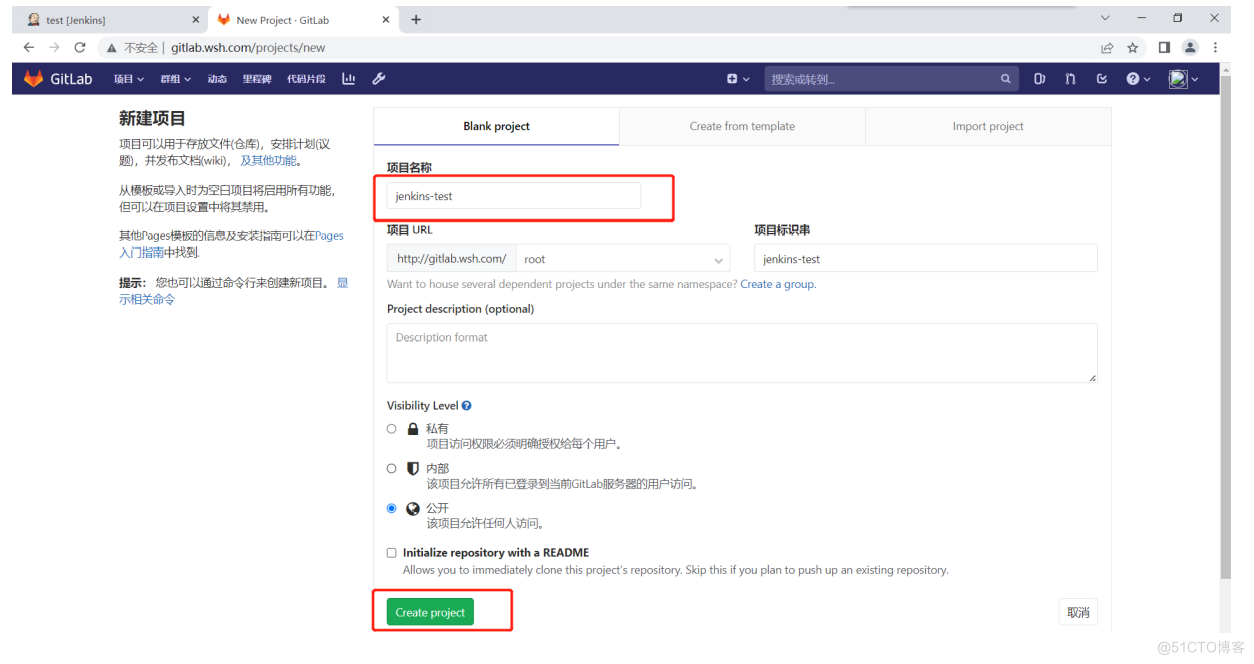
创建gitlab项目
模拟开发数据
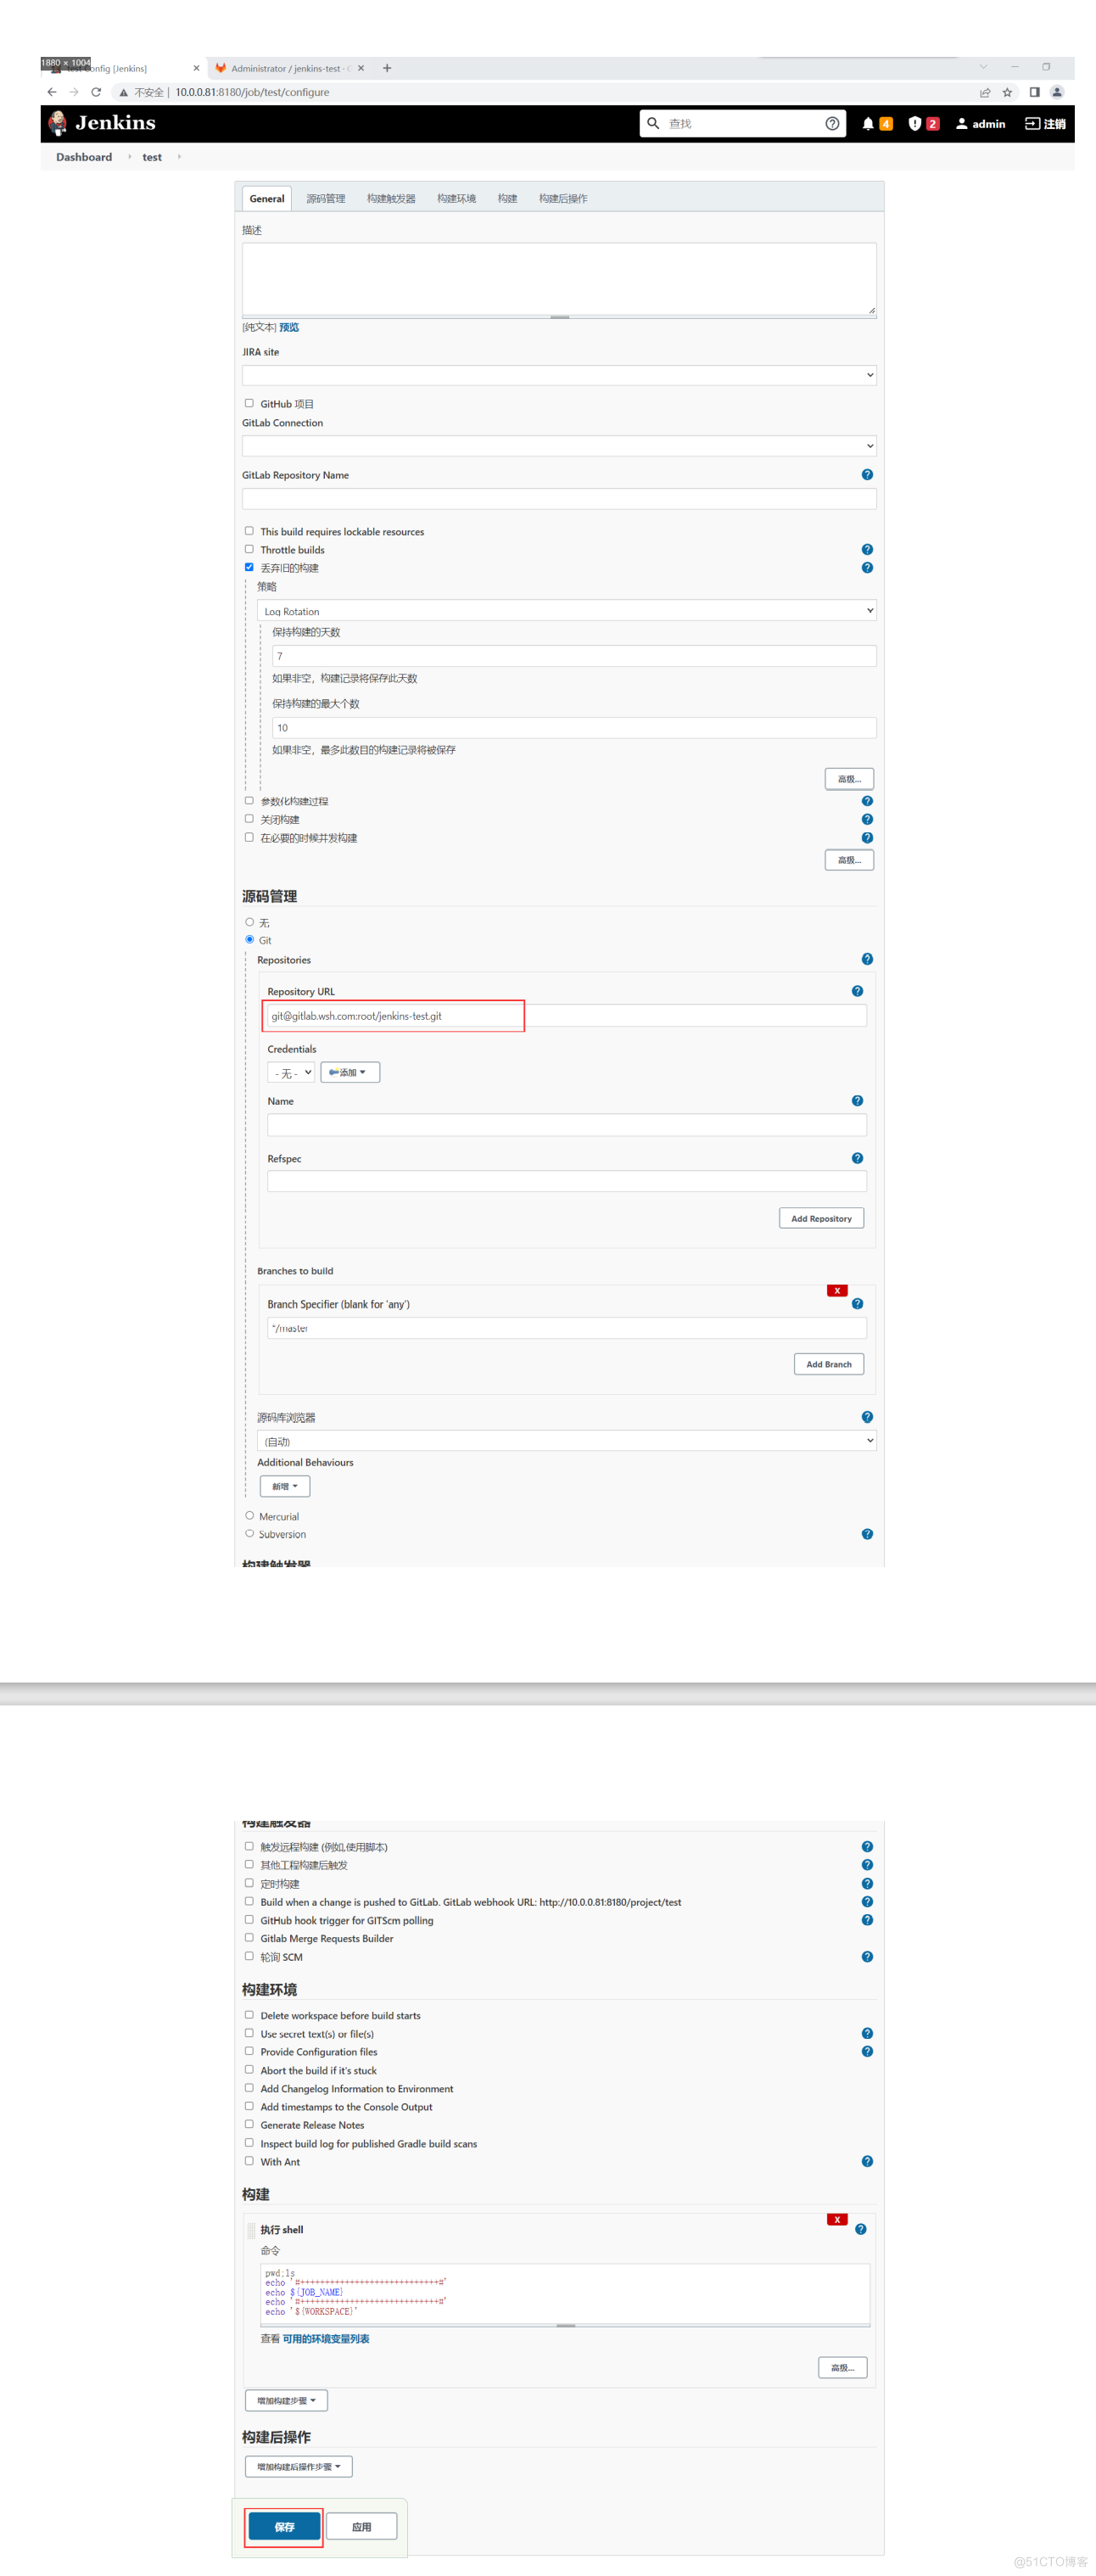
[root@auto01 ~]# mkdir /jenkins-test [root@auto01 ~]# cd /jenkins-test/ [root@auto01 jenkins-test]# vim index.html <!DOCTYPE html> <html lang="zh"> <head> <meta charset="UTF-8"> <meta name="viewport" content="width=device-width, initial-scale=1.0"> <title>代码迭代过程-wsh</title> </head> <body> <div id="demo"></div> <script src="src.js"></script> </body> </html> [root@auto01 jenkins-test]# vim src.js const string = '老板好,我是程序猿:wsh,您让我写的官网页面,它会动' let n = 1 demo.innerHTML = string.substring(0,n) setInterval(()=>{ n+=1 demo.innerHTML = string.substring(0,n) },200) ## 做git仓库 [root@auto01 jenkins-test]# git init ## 添加当前目录的所有文件到暂存区 [root@auto01 jenkins-test]# git add ./ ## 提交暂存区到仓库区 [root@auto01 jenkins-test]# git commit -m 'v1.1' [master (root-commit) 43f1b57] v1.1 1 file changed, 20 insertions(+) create mode 100644 index.html ## 提交到远程仓库 [root@auto01 jenkins-test]# git remote add origin git@gitlab.wsh.com:root/jenkins-test.git ## 上传本地指定分支到远程仓库 [root@auto01 jenkins-test]# git push -u origin master修改代码
[root@auto01 jenkins-test]# vim index.html <!DOCTYPE html> <html lang="zh"> <head> <meta charset="UTF-8"> <!DOCTYPE html> <html lang="zh"> <head> <meta charset="UTF-8"> <meta name="viewport" content="width=device-width, initial-scale=1.0"> <title>代码迭代过程-wsh</title> <style> #demo{ border: solid 1px red; width: 410px; height: 25px; background-color: lightpink; } </style> </head> <body> <div id="demo"></div> <script src="src.js"></script> </body> </html> [root@auto01 jenkins-test]# git add ./ [root@auto01 jenkins-test]# git commit -m 'v1.2' [master 79adc12] v1.2 1 file changed, 9 insertions(+), 1 deletion(-) [root@auto01 jenkins-test]# vim index.html <!DOCTYPE html> <html lang="zh"> <head> <meta charset="UTF-8"> <meta name="viewport" content="width=device-width, initial-scale=1.0"> <title>代码迭代过程-wsh</title> <link rel="stylesheet" href="style.css"> </head> <body> <div id="demo">假面骑士龙骑</div> <div id="demo2"></div> <script src="main.js"></script> </body> </html> [root@auto01 jenkins-test]# vim style.css #demo2{ margin-top: 50px; } [root@auto01 jenkins-test]# vim main.js const string = '官网内容:假面骑士龙骑是日本特摄剧《假面骑士龙骑》中登场的主角假面骑士。以东方龙与西方铠甲为主题,与镜怪物“龙深红者”契约,为阻止骑士间的战斗>而成为假面骑士' let n = 1 demo2.innerHTML = string.substring(0,n) setInterval(()=>{ n+=1 demo2.innerHTML = string.substring(0,n) },200) [root@auto01 jenkins-test]# git add ./ [root@auto01 jenkins-test]# git commit -m 'v1.3' [root@auto01 jenkins-test]# vim style.css body{ background-color: yellow; } #demo2{ margin-top: 50px; } [root@auto01 jenkins-test]# git add ./ [root@auto01 jenkins-test]# git commit -m 'v1.4' [master 65251a7] v1.4 1 file changed, 3 insertions(+) ## 创建ceo分支并进入分支 [root@auto01 jenkins-test]# git branch ceo_branch [root@auto01 jenkins-test]# git checkout ceo_branch Switched to branch 'ceo_branch' ## 修改文件 [root@auto01 jenkins-test]# vim style.css body{ background-color: #fff; } #demo2{ margin-top: 50px; } [root@auto01 jenkins-test]# git add ./ [root@auto01 jenkins-test]# git commit -m 'ceo_branch v1.5' [ceo_branch b781e4a] ceo_branch v1.5 1 file changed, 1 insertion(+), 1 deletion(-) ## 创建mishu分支并进入 [root@auto01 jenkins-test]# git branch mishu_branch [root@auto01 jenkins-test]# git checkout mishu_branch Switched to branch 'mishu_branch' ## 修改文件 [root@auto01 jenkins-test]# vim style.css #demo2{ margin-top: 50px; } #demo,#demo2 { display: block; /*渐变背景*/ background-image: -webkit-linear-gradient(left, #3498db, #f47920 10%, #d71345 20%, #f7acbc 30%, #ffd400 40%, #3498db 50%, #f47920 60%, #d71345 70%, #f7acbc 80%, #ffd400 90%, #3498db); color: transparent; /*文字填充色为透明*/ -webkit-text-fill-color: transparent; -webkit-background-clip: text; /*背景剪裁为文字,只将文字显示为背景*/ background-size: 200% 100%; /*背景图片向水平方向扩大一倍,这样background-position才有移动与变化的空间*/ /* 动画 */ animation: masked-animation 4s infinite linear; } @keyframes masked-animation { 0% { background-position: 0 0; /*background-position 属性设置背景图像的起始位置。*/ } 100% { background-position: -100% 0; } } [root@auto01 jenkins-test]# git add . [root@auto01 jenkins-test]# git commit -m 'mishu_branch v1.6' [mishu_branch d9206a3] mishu_branch v1.6 1 file changed, 20 insertions(+), 3 deletions(-) ## 切换到主分支 [root@auto01 jenkins-test]# git checkout master ## 合并分支 [root@auto01 jenkins-test]# git merge ceo_branch [root@auto01 jenkins-test]# git merge mishu_branch [root@auto01 jenkins-test]# git add . [root@auto01 jenkins-test]# git commit -m 'mishu需求和ceo需求 v1.1' [root@auto01 jenkins-test]# git push --all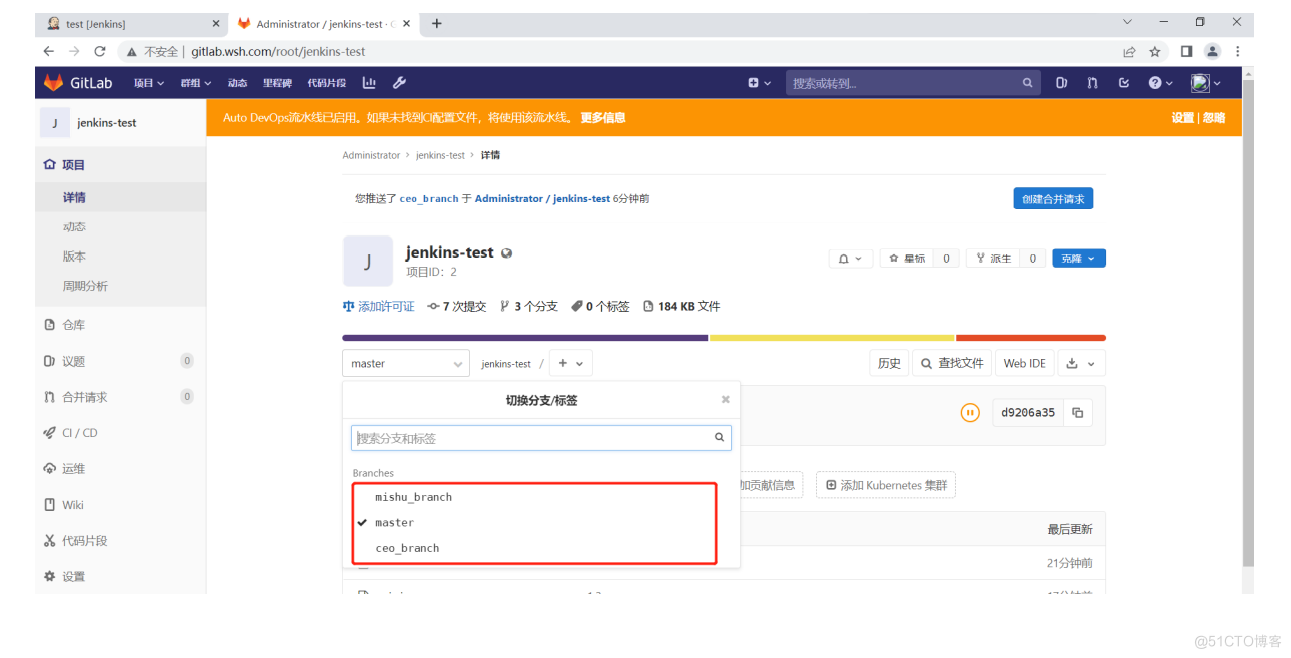
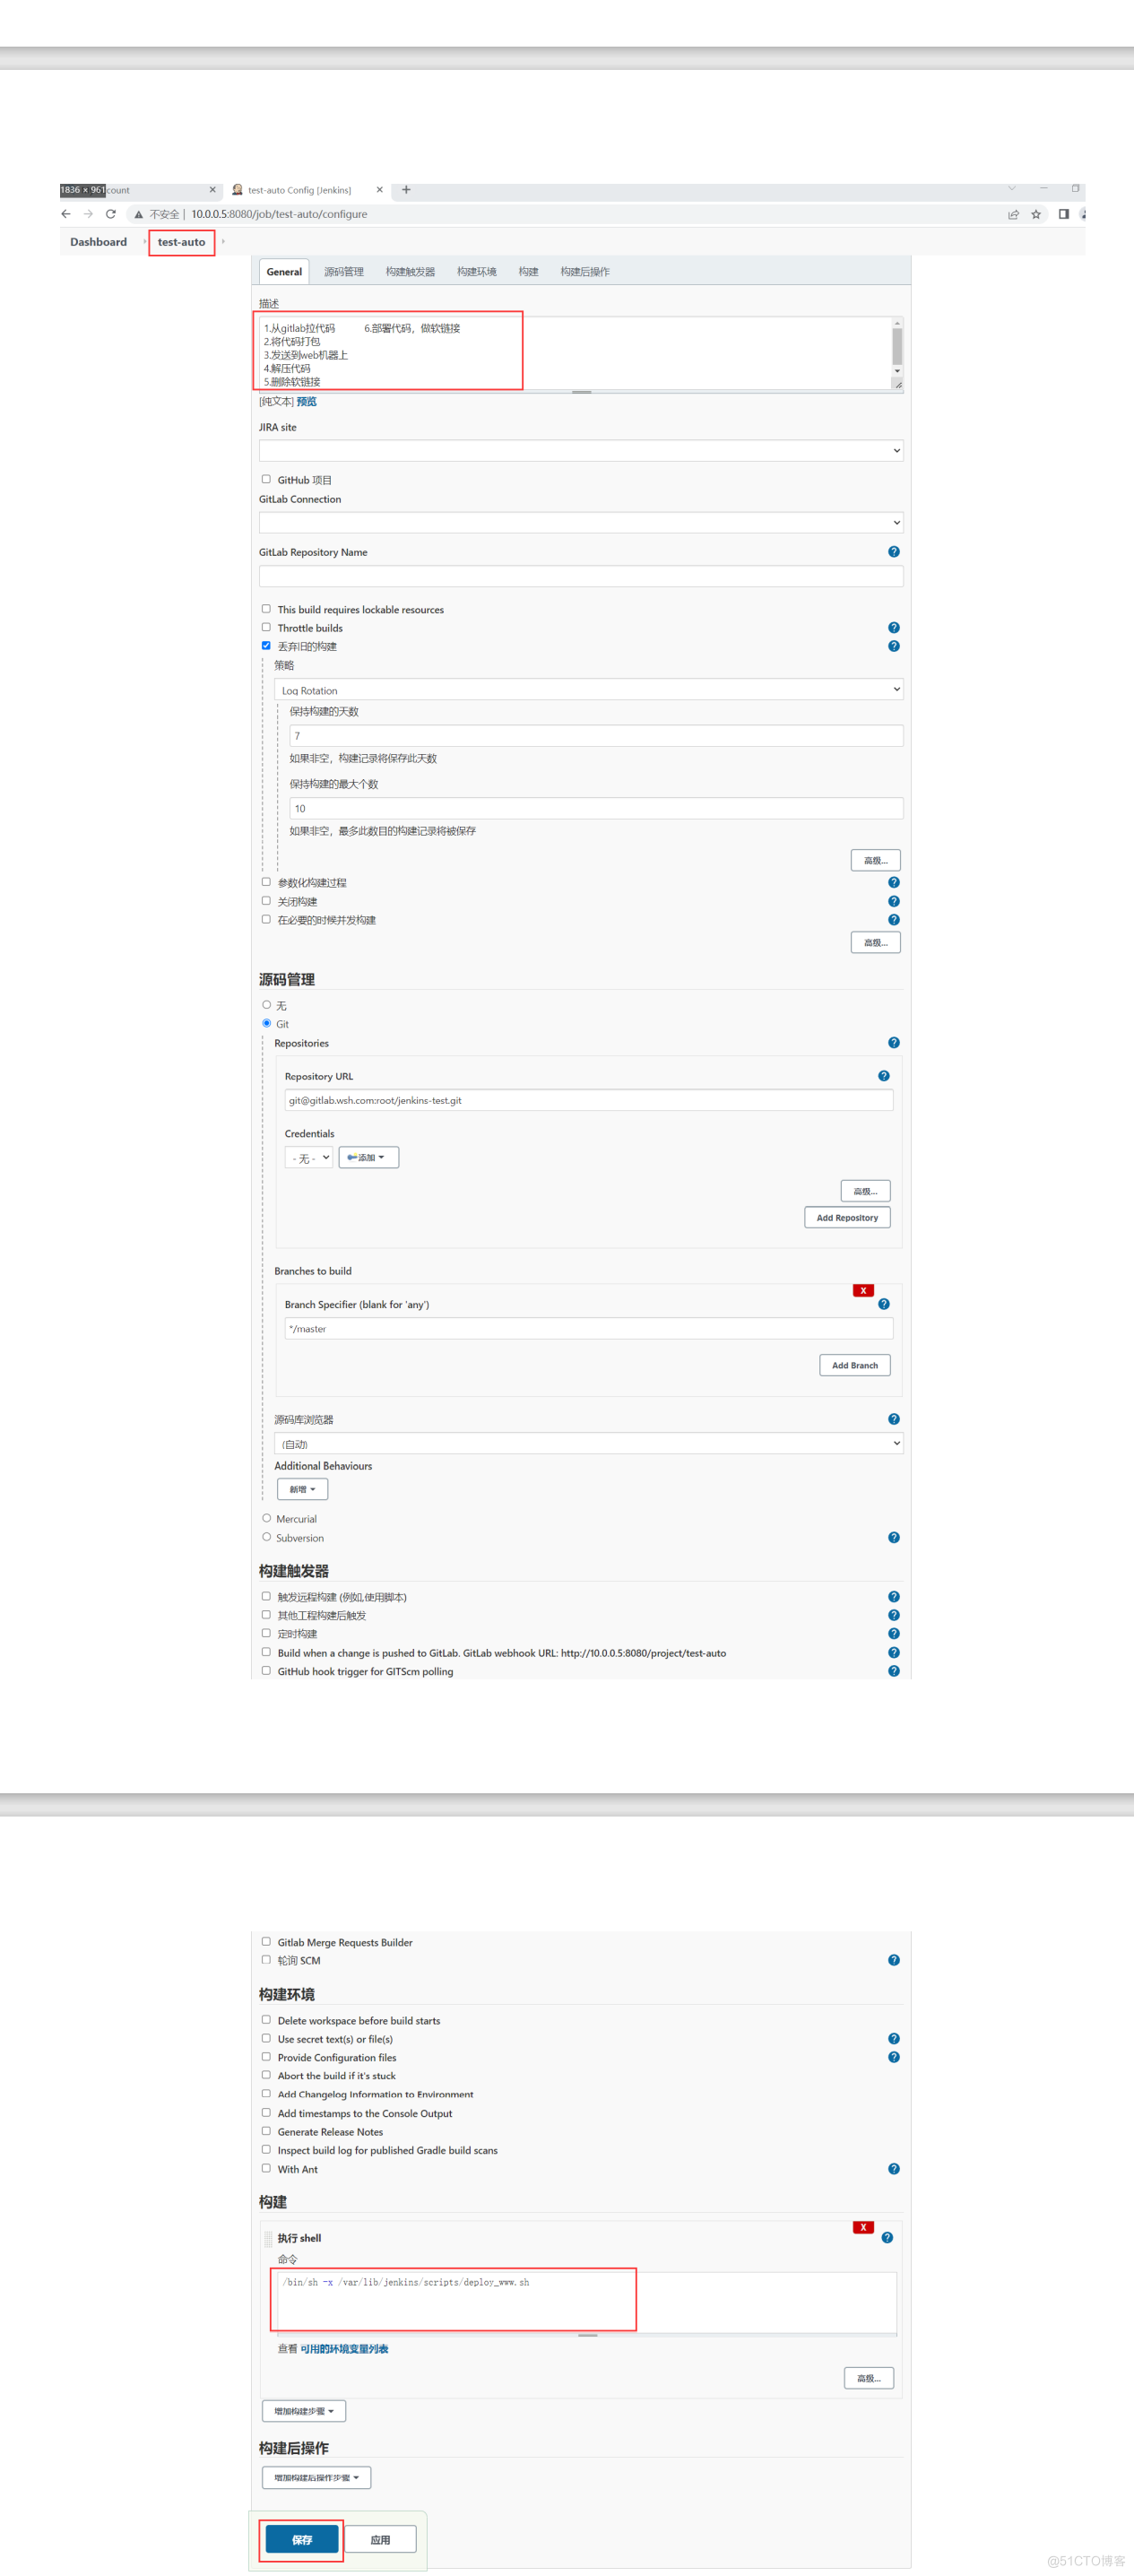
手动发布步骤
主机名 外网IP 内网IP 角色 应用 auto01 10.0.0.81 172.16.1.81 代码仓库 gitlab lb01 10.0.0.5 172.16.1.5 代码发布 jenkins、jdk web01 10.0.0.7 172.16.1.7 官网 nginx web02 10.0.0.8 172.16.1.8 官网 nginx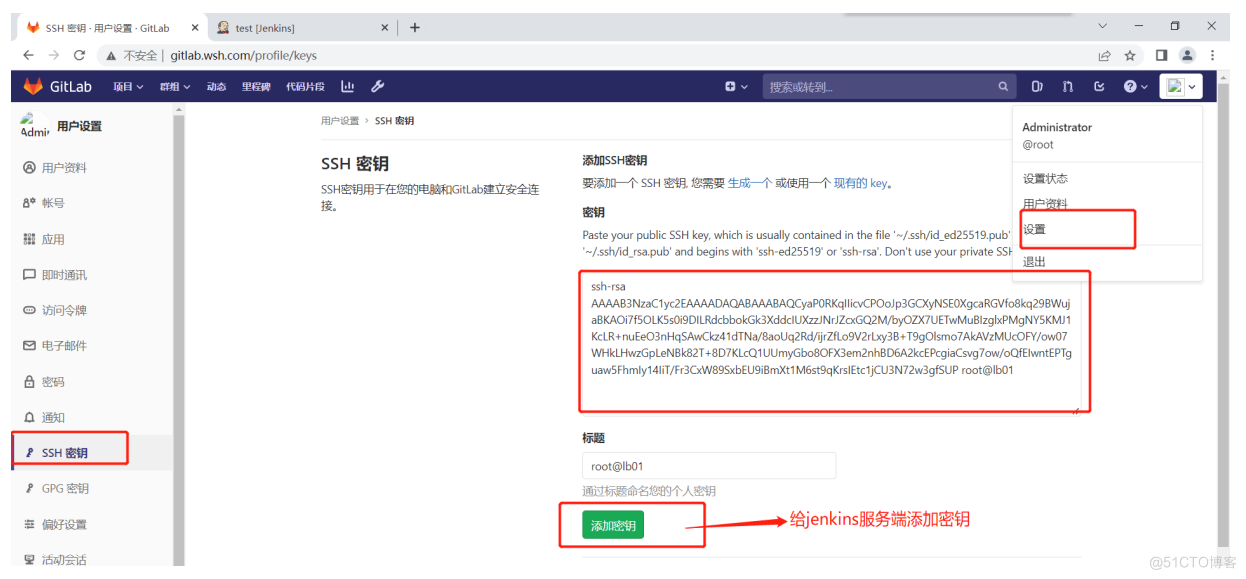
自动化代码上线
使用git commit号
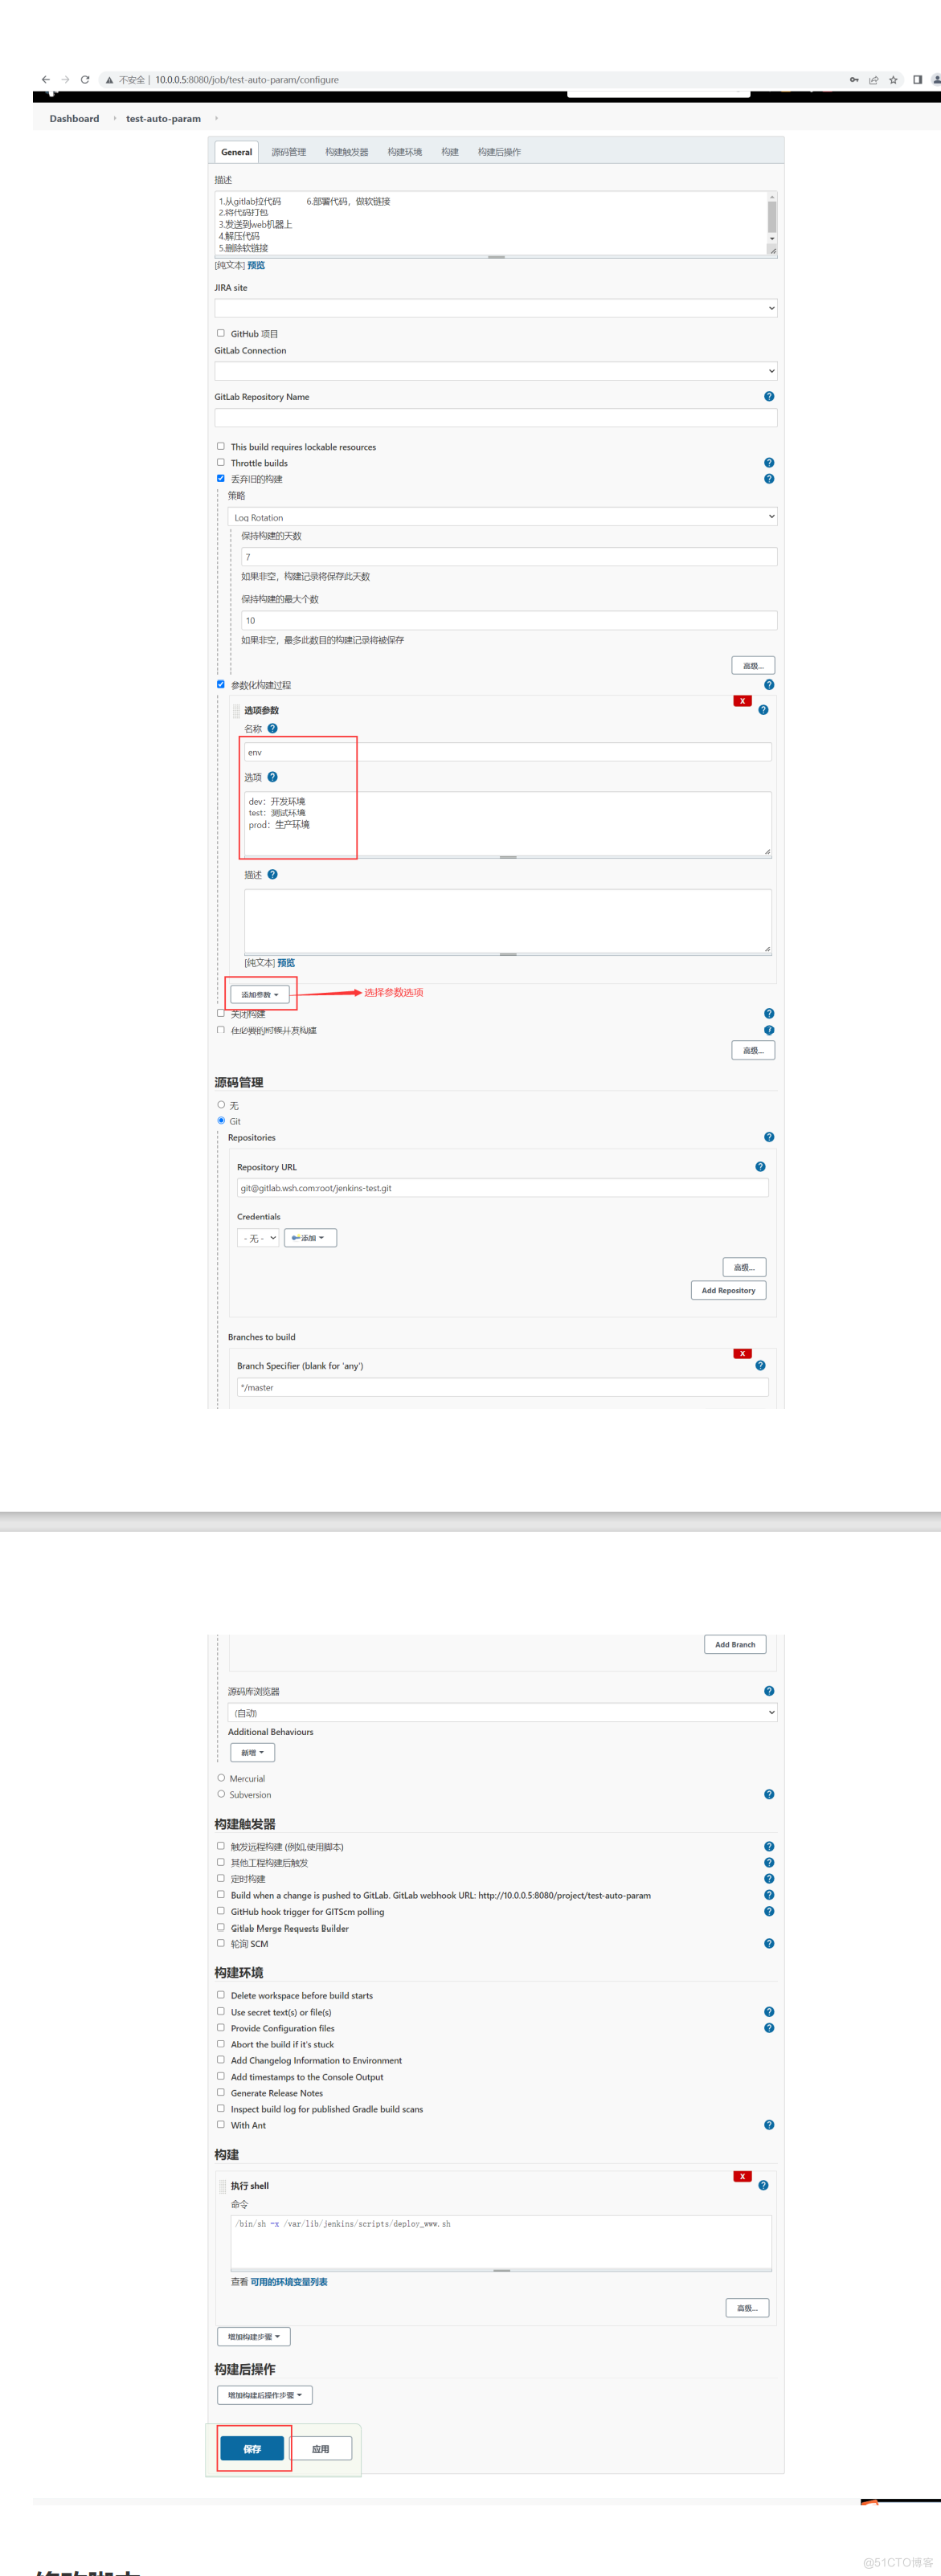
## 修改gitlab服务器文件 [root@auto01 ~]# vim /jenkins-test/index.html <!DOCTYPE html> <html lang="zh"> <head> <meta charset="UTF-8"> <meta name="viewport" content="width=device-width, initial-scale=1.0"> <title>代码迭代过程-wsh-git_commit</title> <link rel="stylesheet" href="style.css"> </head> <body> <div id="demo">假面骑士龙骑</div> <div id="demo2"></div> <script src="main.js"></script> </body> </html> [root@auto01 jenkins-test]# git add ./ [root@auto01 jenkins-test]# git commit -m '添加 git_commit号 v2.1' [root@auto01 jenkins-test]# git push ## 修改jenkins服务器脚本 [root@lb01 ~]# vim /var/lib/jenkins/scripts/deploy_www.sh #!/bin/bash ### 变量定义 DATE=$(date +%F) package_name="www_${DATE}_${GIT_COMMIT}.zip" code_dir='/data/www_code' soft_link='/blog/jenkins-test' web_server='172.16.1.7 172.16.1.8' ### # 1.将代码打包 cd ${WORKSPACE} &&\ rm -f ./*.zip &&\ zip -r ${package_name} ./* # 2.发送到web机器上 && 3.解压代码 && 4.删除软链接 && 5.部署代码(做软链接) for ip in ${web_server};do ssh ${ip} "mkdir -p ${code_dir}" scp ${package_name} ${ip}:${code_dir} ssh ${ip} "rm -fr ${code_dir}/${package_name%%.*}" ssh ${ip} "cd ${code_dir} && unzip ${package_name} -d ${package_name%%.*}" ssh ${ip} "rm -f ${soft_link}" ssh ${ip} "ln -s ${code_dir}/${package_name%%.*} ${soft_link}" doneJenkins freestyle参数化构建
修改脚本
[root@lb01 ~]# cat /var/lib/jenkins/scripts/deploy_www.sh #!/bin/bash ### 变量定义 DATE=$(date +%F) package_name="www_${DATE}_${GIT_COMMIT}.zip" code_dir='/data/www_code' soft_link='/blog/jenkins-test' dev_server='172.16.1.9' test_server='172.16.1.7' prod_server='172.16.1.8' ### # 1.将代码打包 cd ${WORKSPACE} &&\ rm -f ./*.zip &&\ zip -r ${package_name} ./* # 2.发送到web机器上 && 3.解压代码 && 4.删除软链接 && 5.部署代码(做软链接) deploy(){ for ip in $1;do ssh ${ip} "mkdir -p ${code_dir}" scp ${package_name} ${ip}:${code_dir} ssh ${ip} "cd ${code_dir} && unzip ${package_name} -d ${package_name%%.*}" ssh ${ip} "rm -f ${soft_link}" ssh ${ip} "ln -s ${code_dir}/${package_name%%.*} ${soft_link}" done } case $env in dev) deploy $dev_server ;; test) deploy $test_server ;; prod) deploy $prod_server ;; esac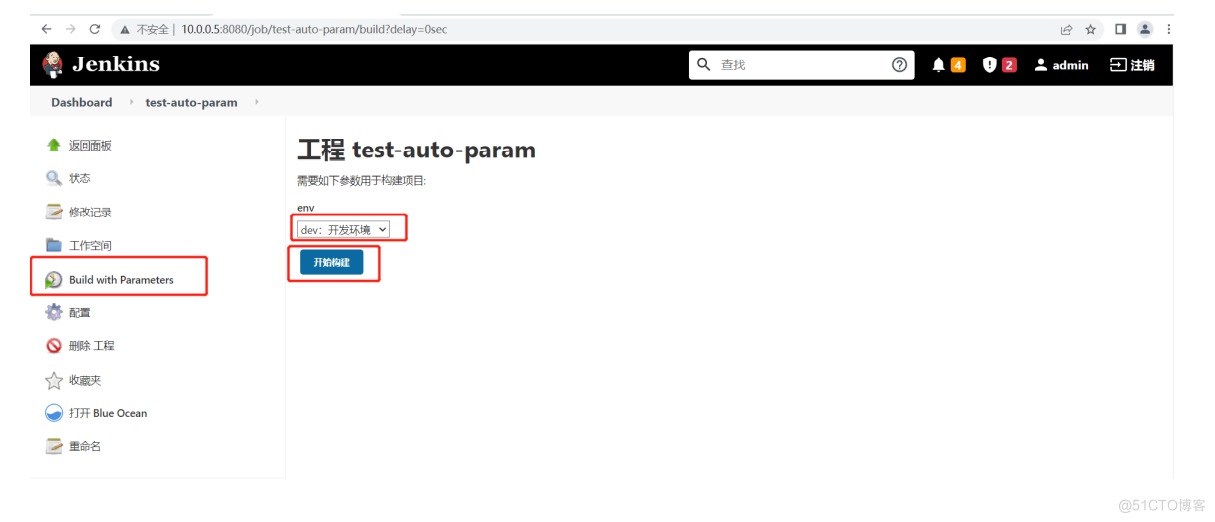
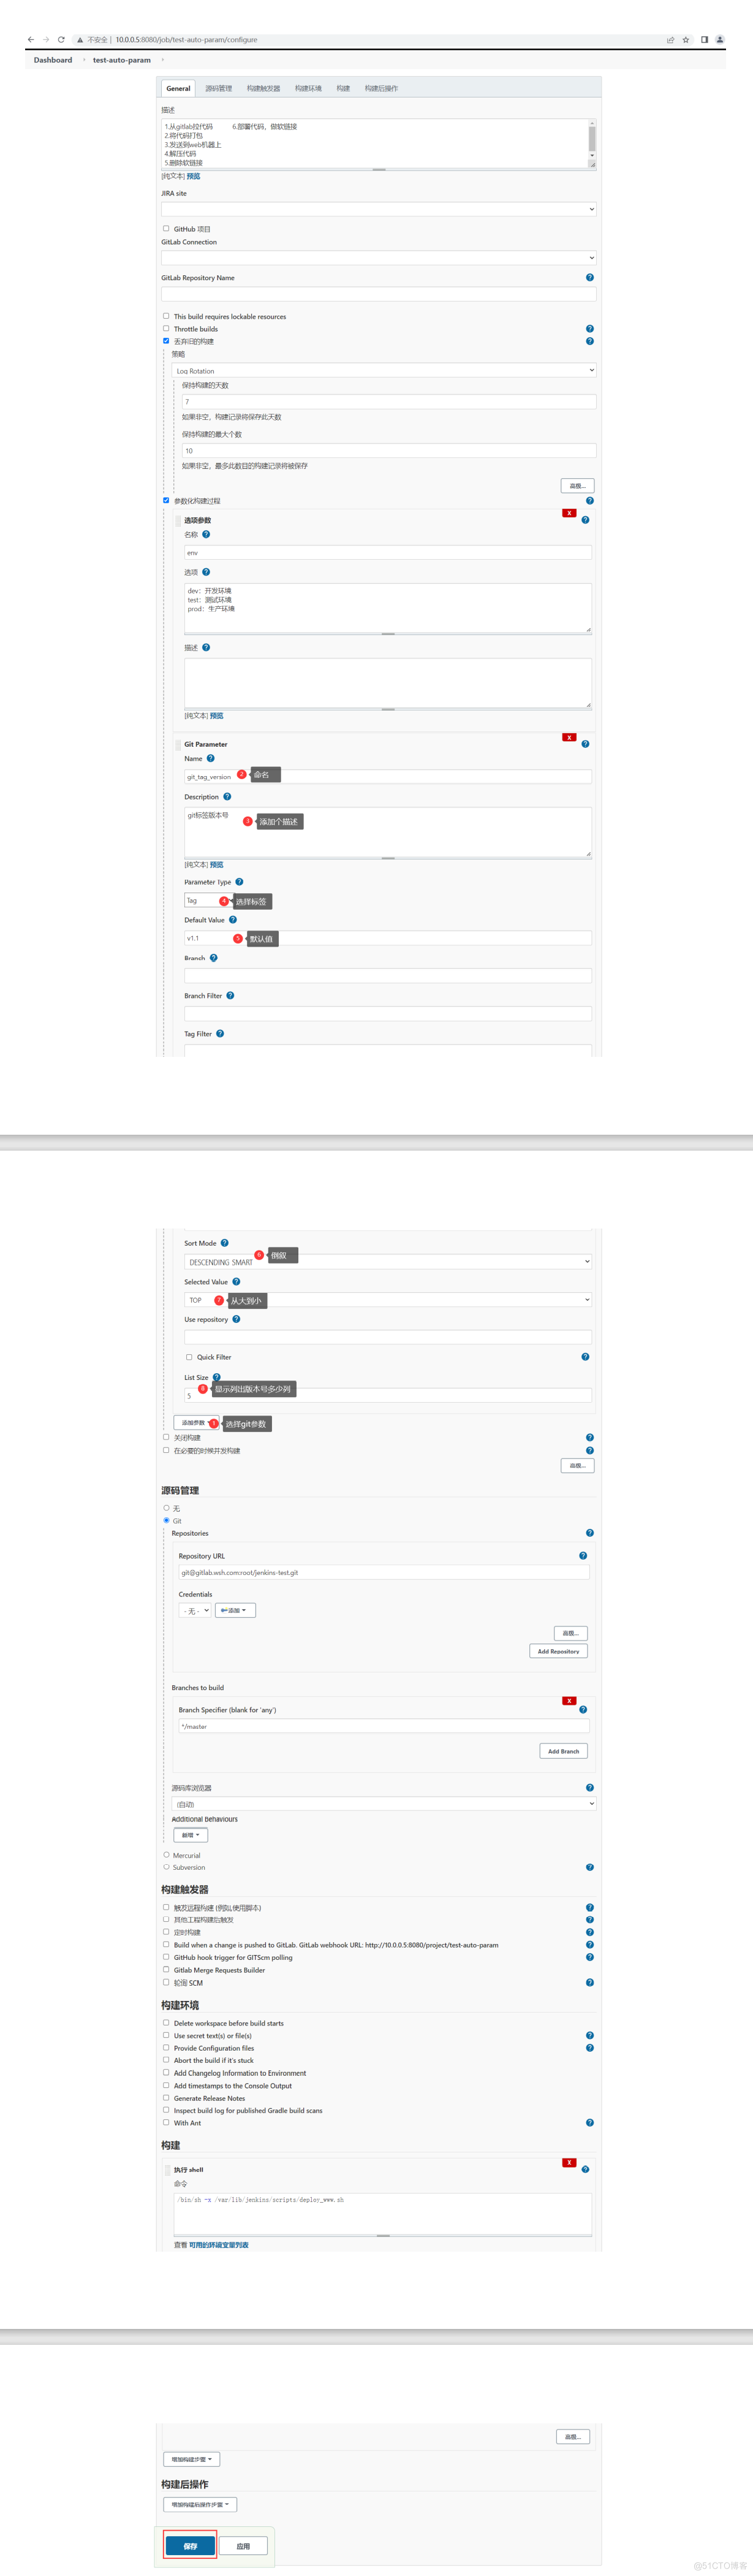
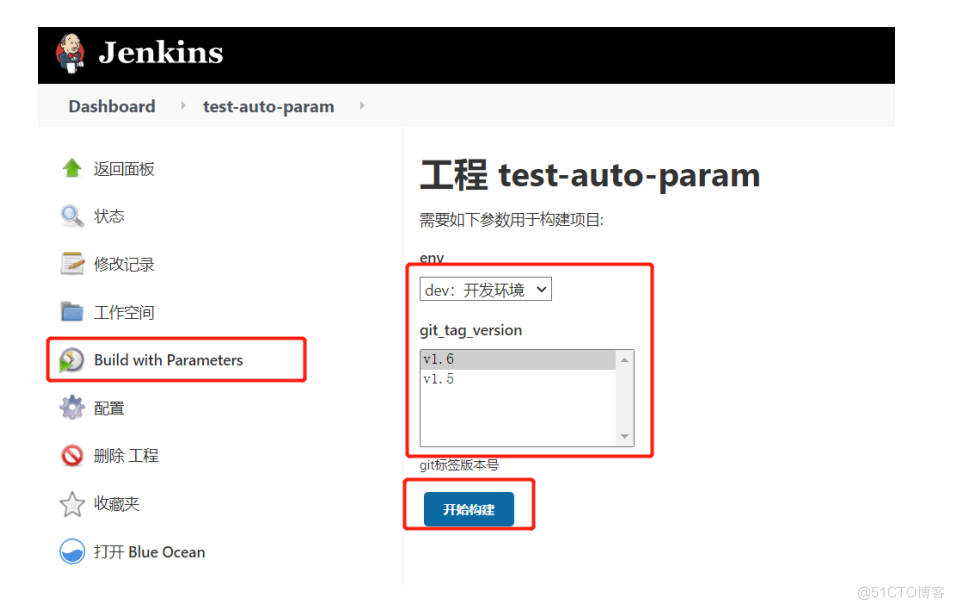
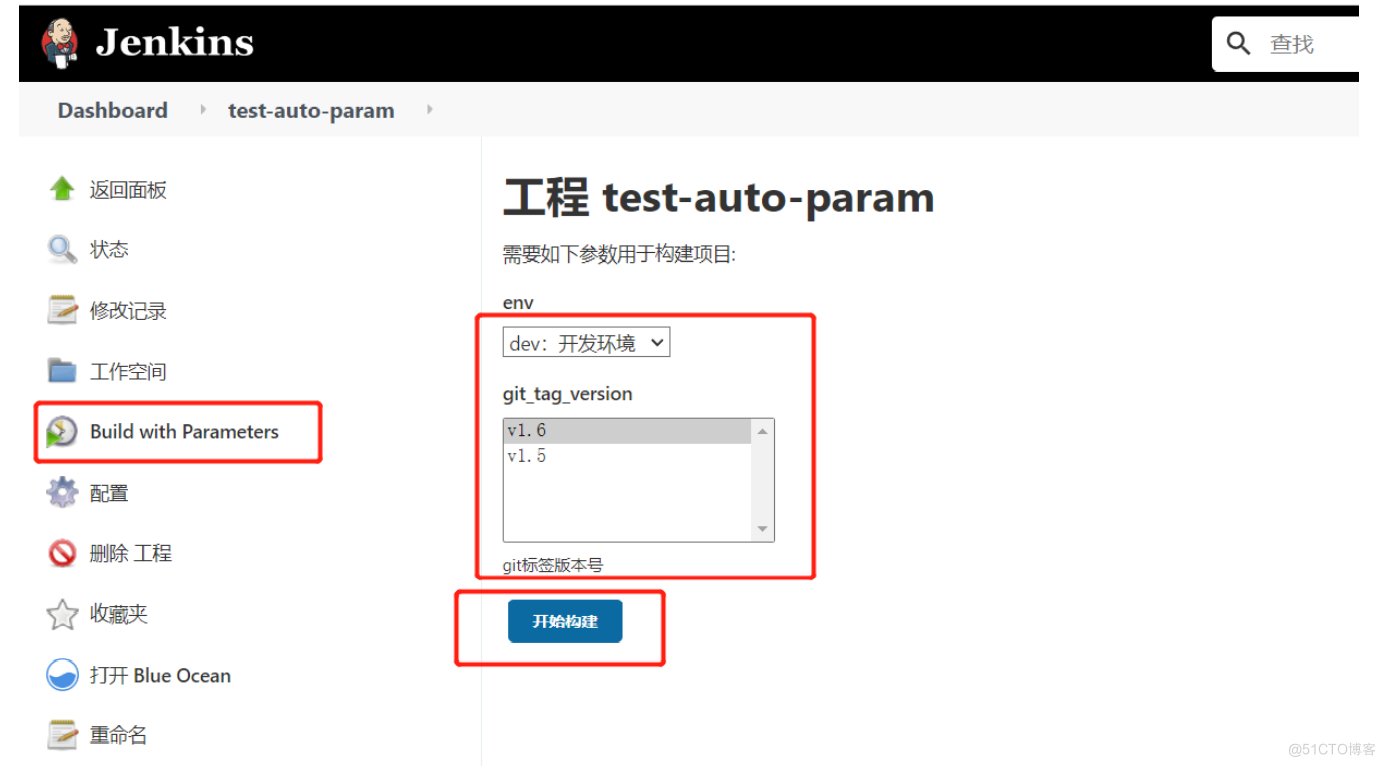
使用git标签部署
## 给版本号打标签 [root@auto01 jenkins-test]# git tag -a 'v1.6' -m 'v1.6' 3000070 [root@auto01 jenkins-test]# git tag -a 'v1.5' -m 'v1.5' 8f64288 ## 推送标签到远程仓库 [root@auto01 jenkins-test]# git push --tag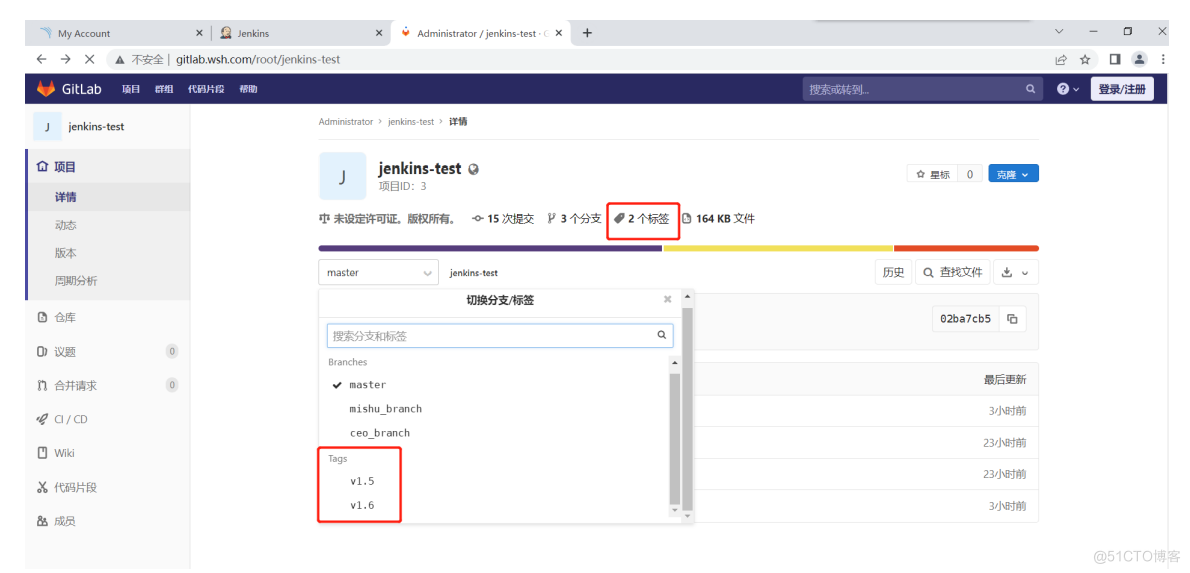
配置使用标签
修改脚本
[root@lb01 ~]# vim /var/lib/jenkins/scripts/deploy_www.sh #!/bin/bash ### 变量定义 DATE=$(date +%F) package_name="www_${DATE}_${git_tag_version}.zip" code_dir='/data/www_code' soft_link='/blog/jenkins-test' dev_server='172.16.1.9' test_server='172.16.1.7' prod_server='172.16.1.8' ### # 1.将代码打包 cd ${WORKSPACE} &&\ rm -f ./*.zip &&\ zip -r ${package_name} ./* # 2.发送到web机器上 && 3.解压代码 && 4.删除软链接 && 5.部署代码(做软链接) deploy(){ for ip in $1;do ssh ${ip} "mkdir -p ${code_dir}" scp ${package_name} ${ip}:${code_dir} ssh ${ip} "cd ${code_dir} && unzip ${package_name} -d ${package_name%.*}" ssh ${ip} "rm -f ${soft_link}" ssh ${ip} "ln -s ${code_dir}/${package_name%.*} ${soft_link}" done } case $env in dev) deploy $dev_server ;; test) deploy $test_server ;; prod) deploy $prod_server ;; esac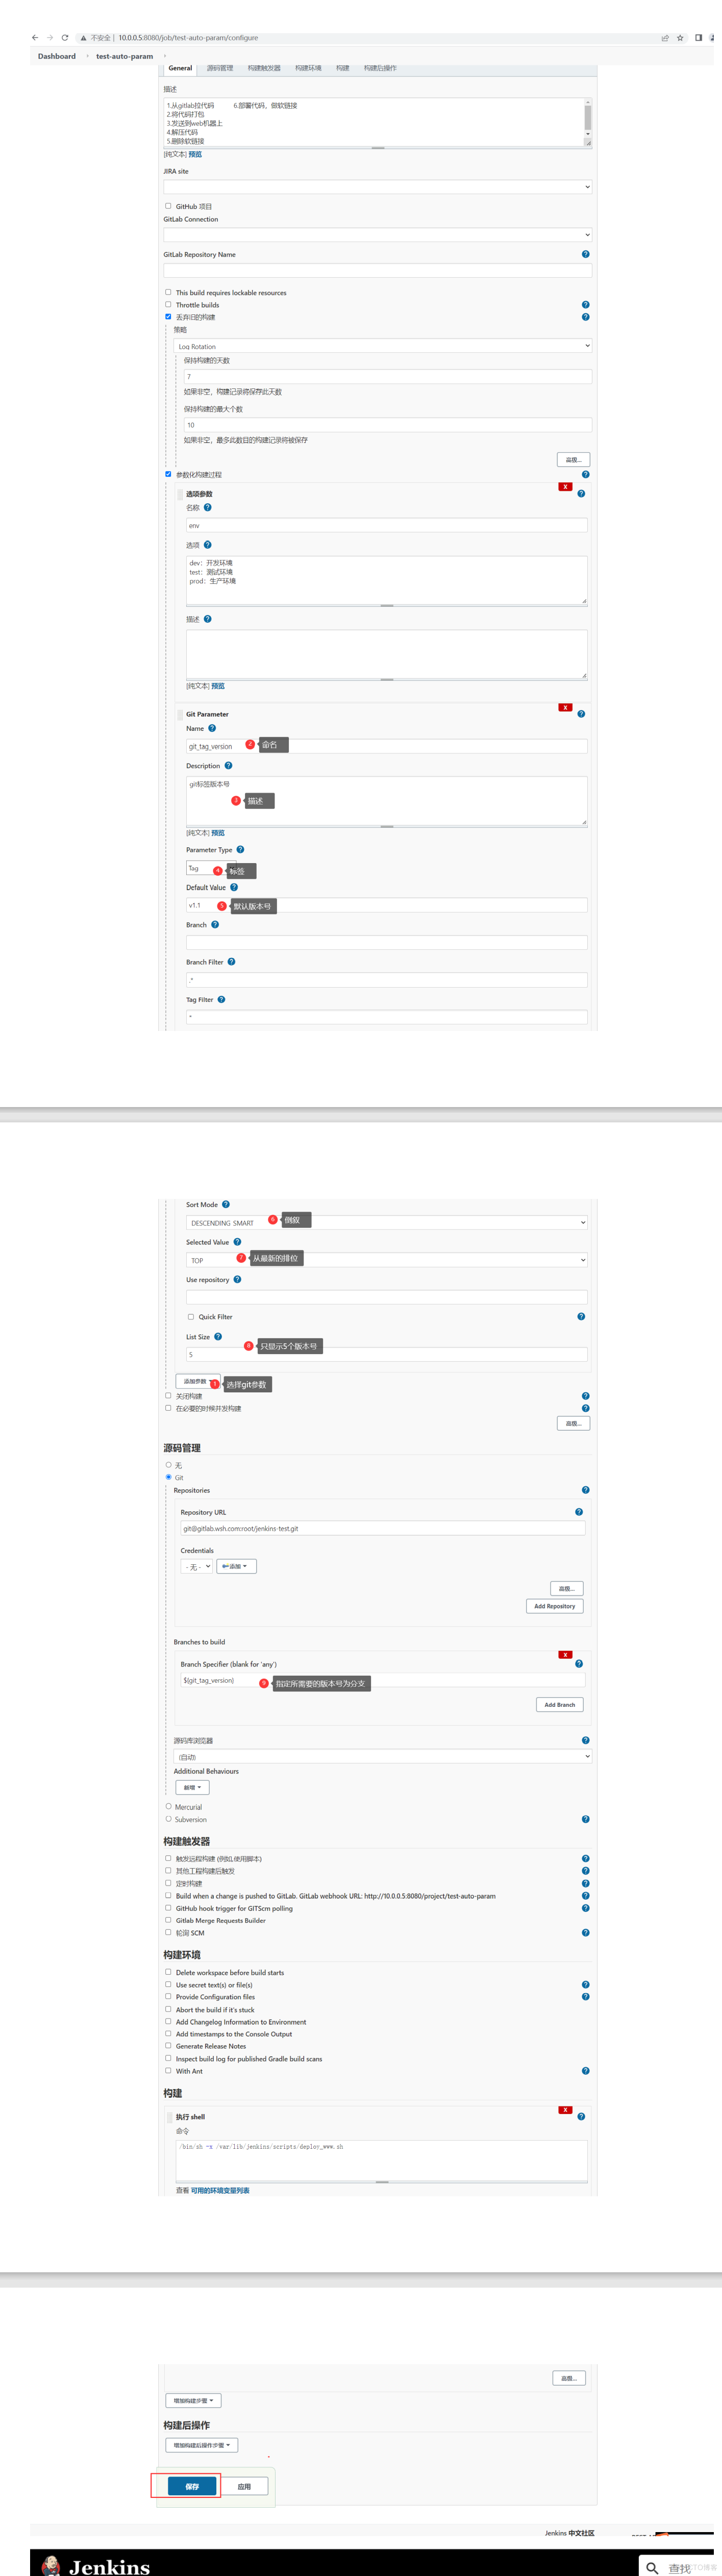
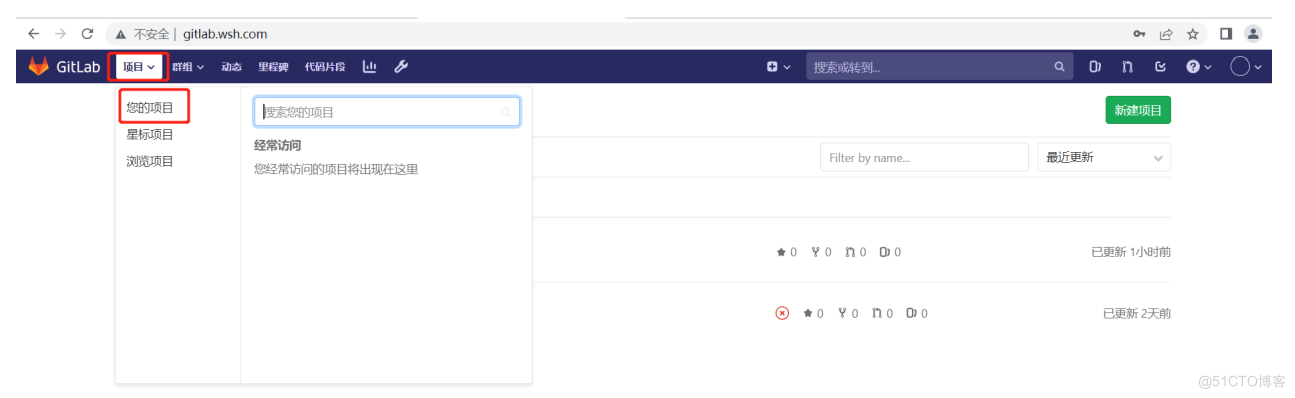
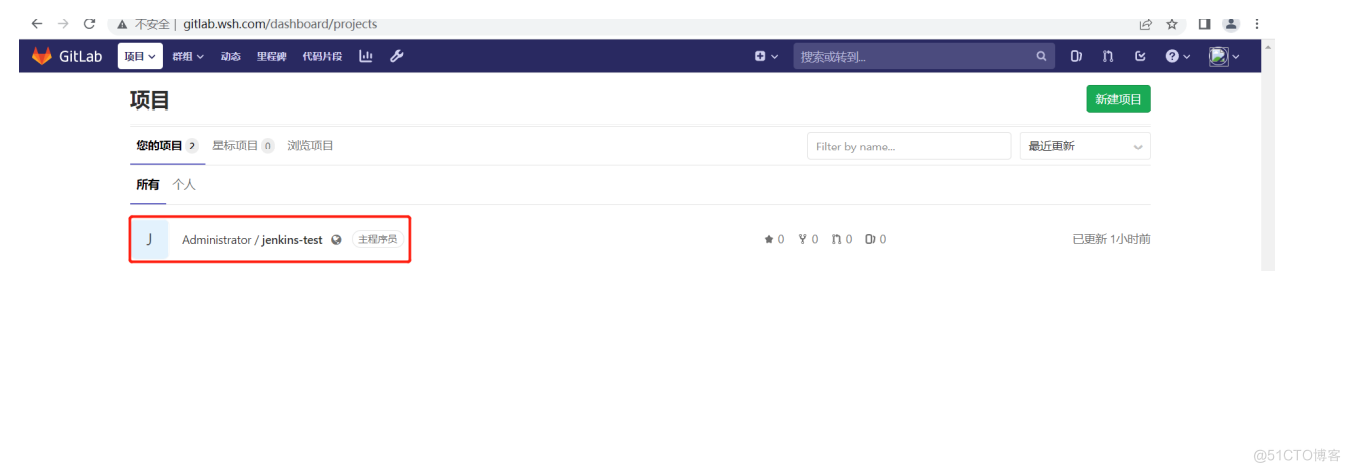
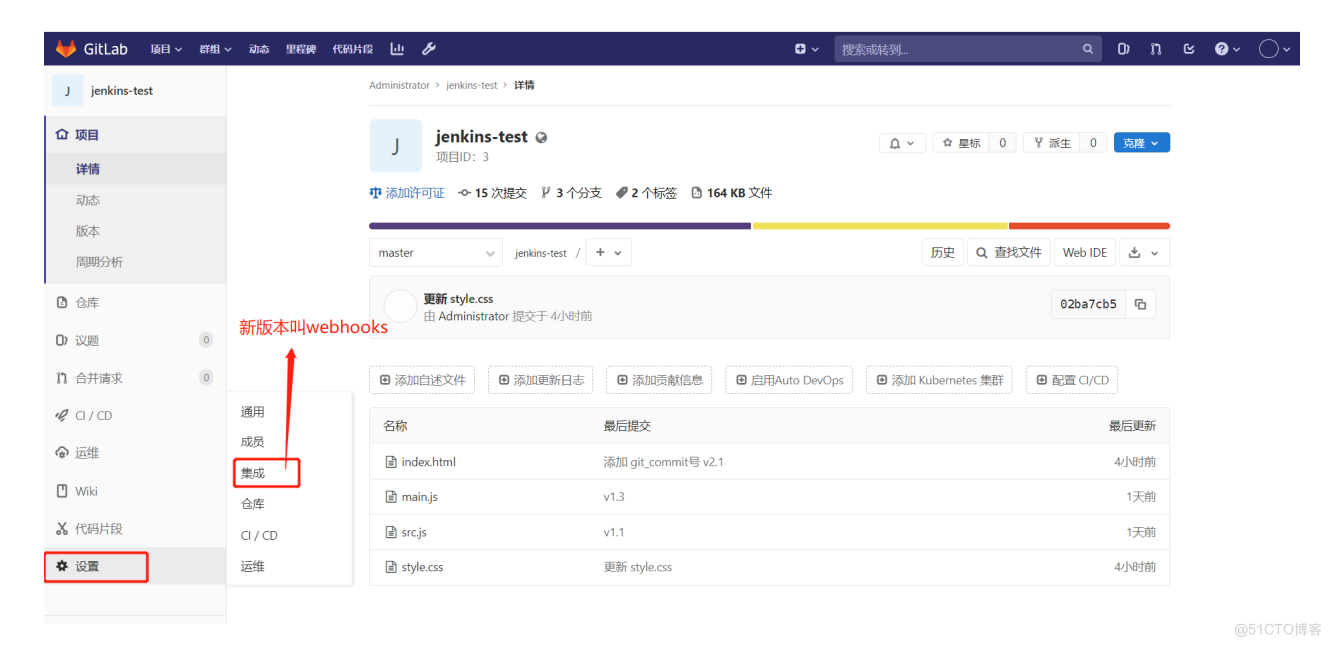
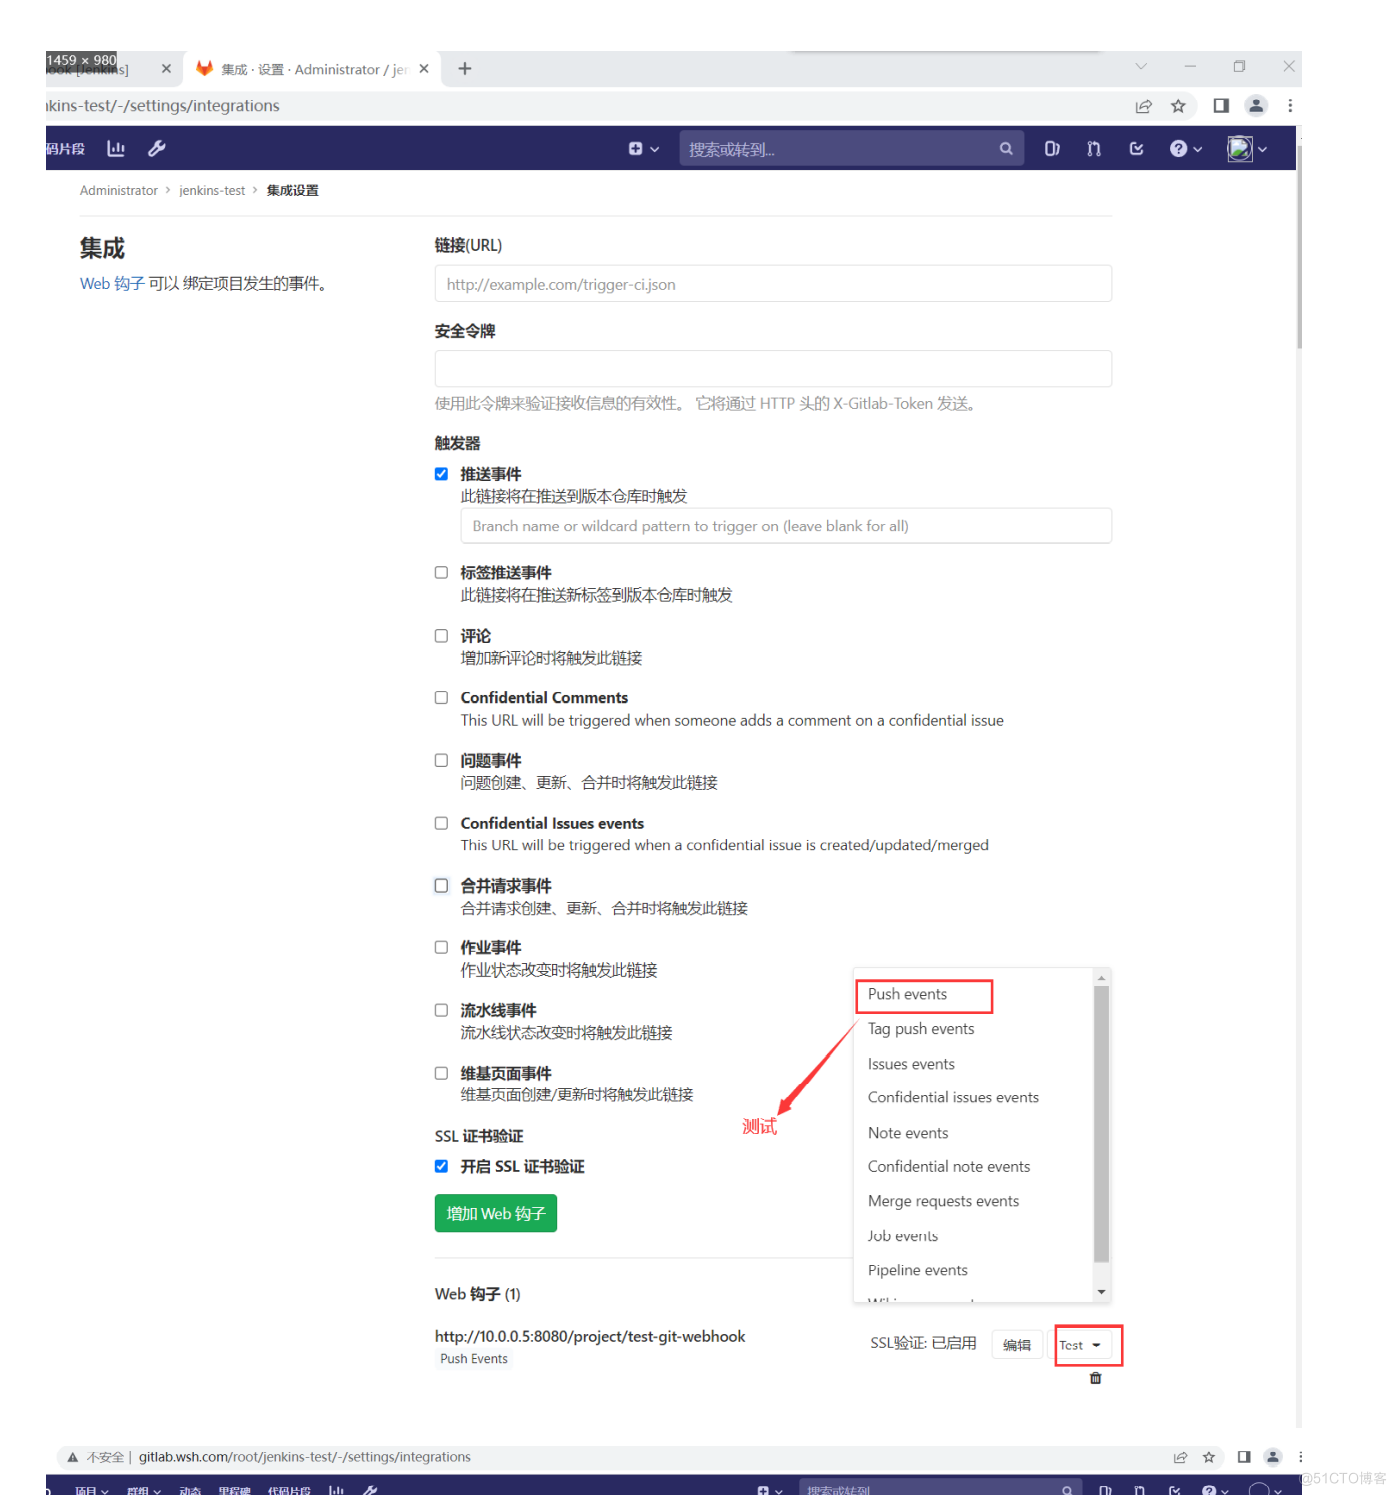
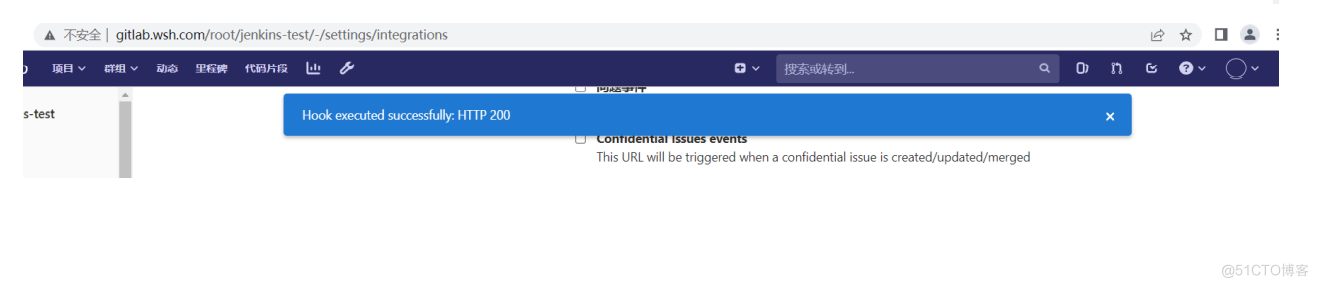
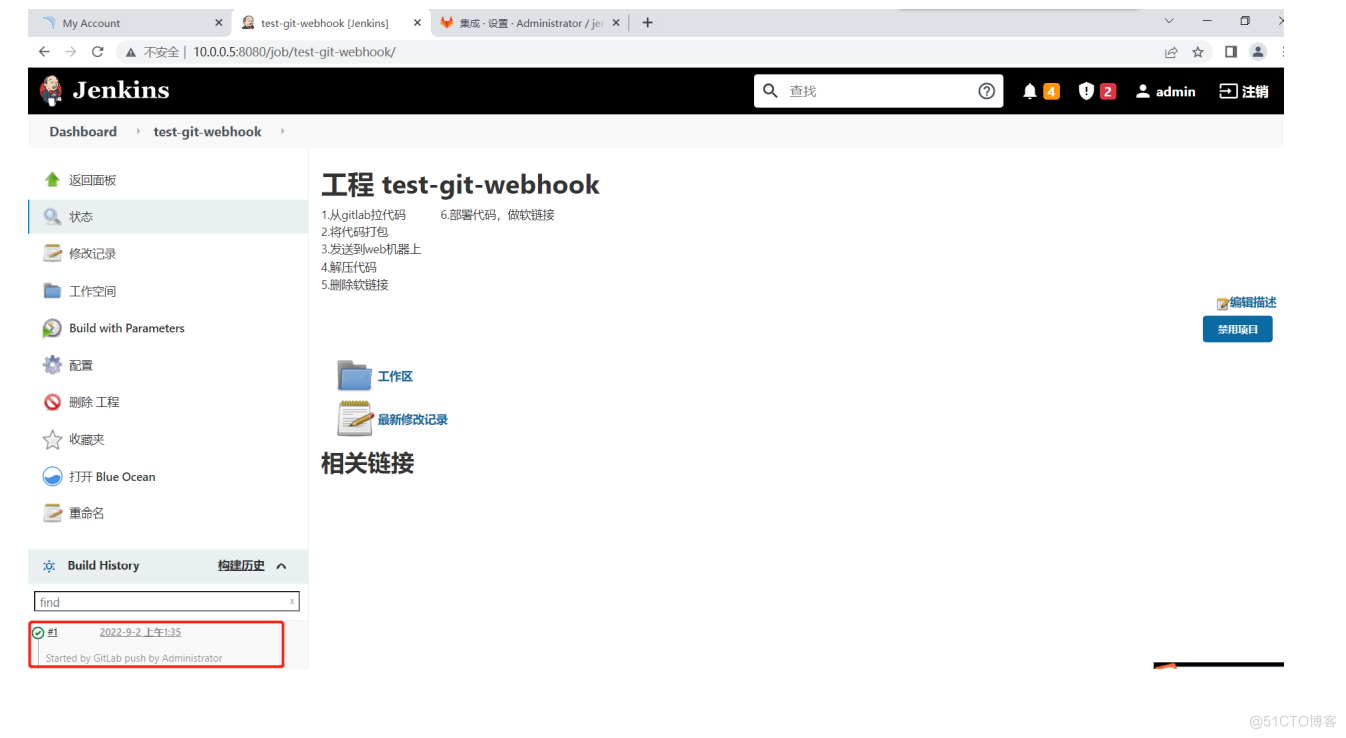
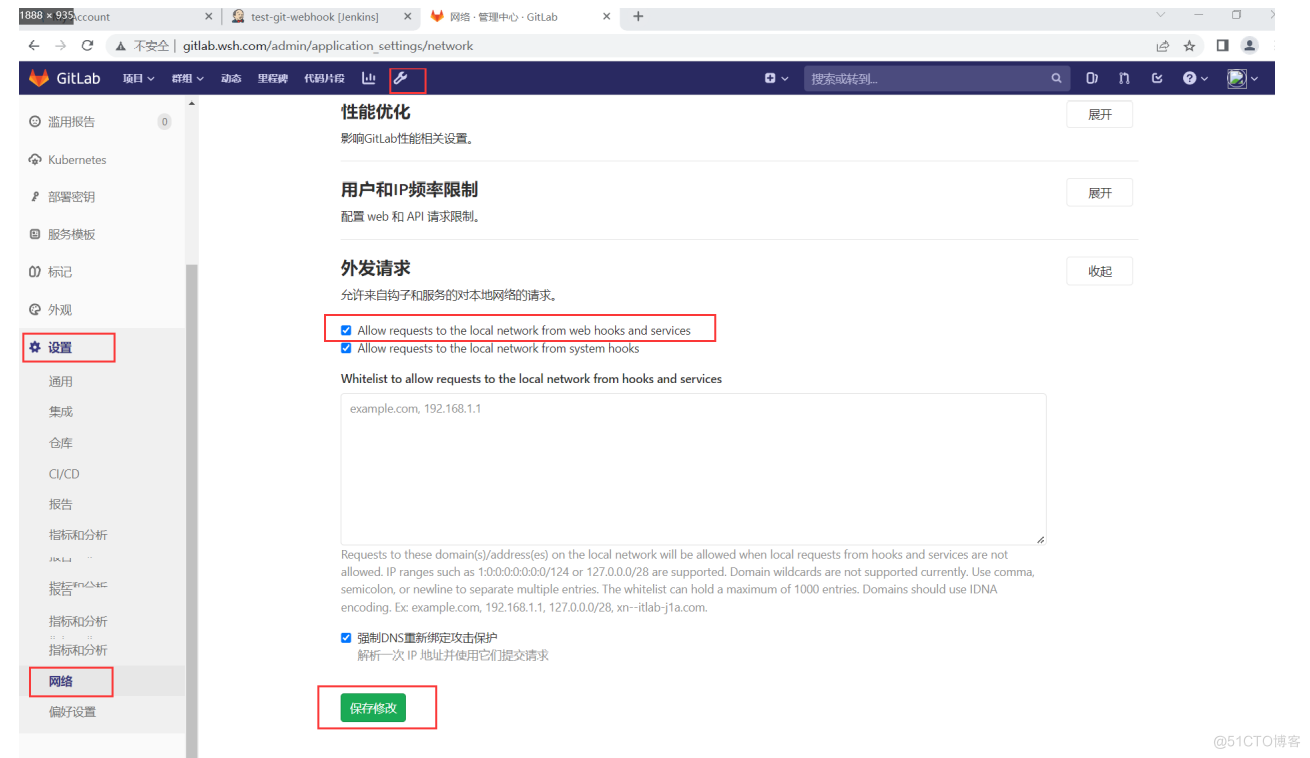
gitlab钩子自动化构建
## 全自动,开发提交了代码之后,自动将代码部署到测试环境 webhook #1.Jenkins触发器功能:Jenkins通知地址 http://10.0.0.5:8080/project/test-git-webhook #2.Jenkins获取令牌:Jenkins生成tocken令牌 2ec7f7c6c9db7143cce658c18f8c972b #3.gitlab开启功能 管理中心-设置-网络设置-外发请求-允许钩子和服务访问本地网络 #4.gitlab配置url地址和令牌 找到对应项目-设置-集成(新版本webhooks) - 链接:Jenkins通知地址 - 令牌:Jenkins对应令牌 #5.开发上传代码,web检查结果 ### 注意:新版本10.6版本以上的gitlab要开启本地网络webhook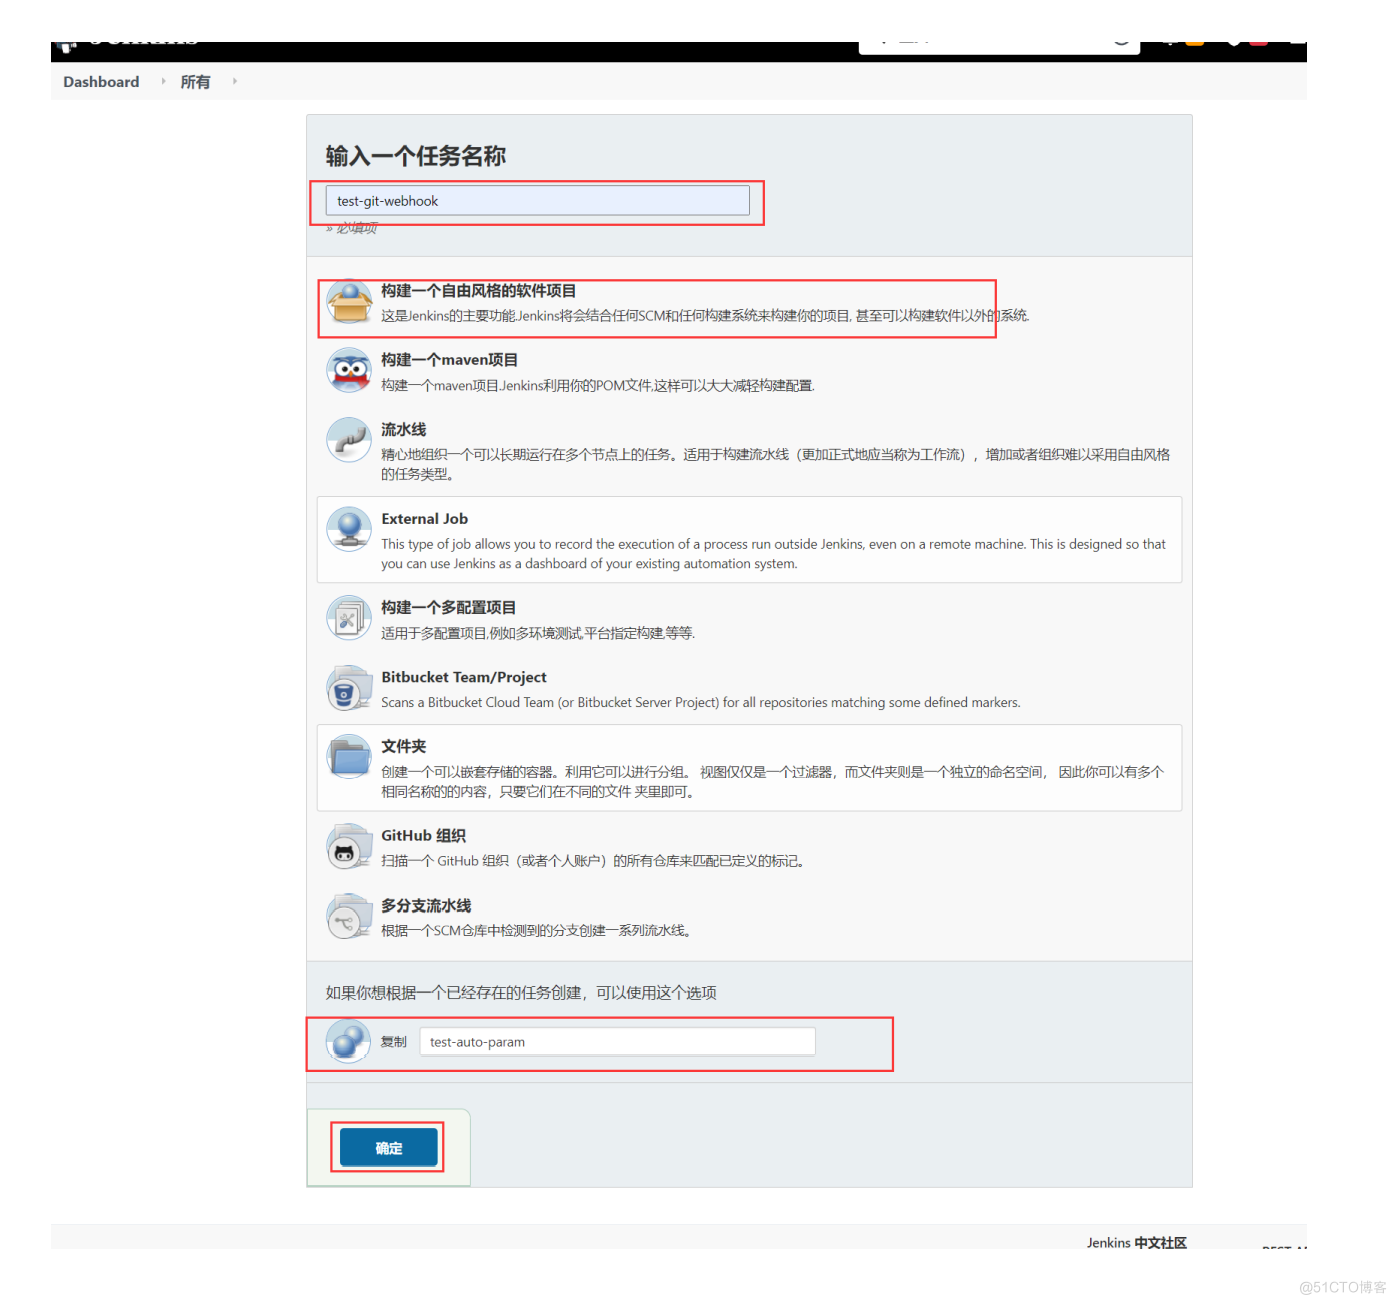
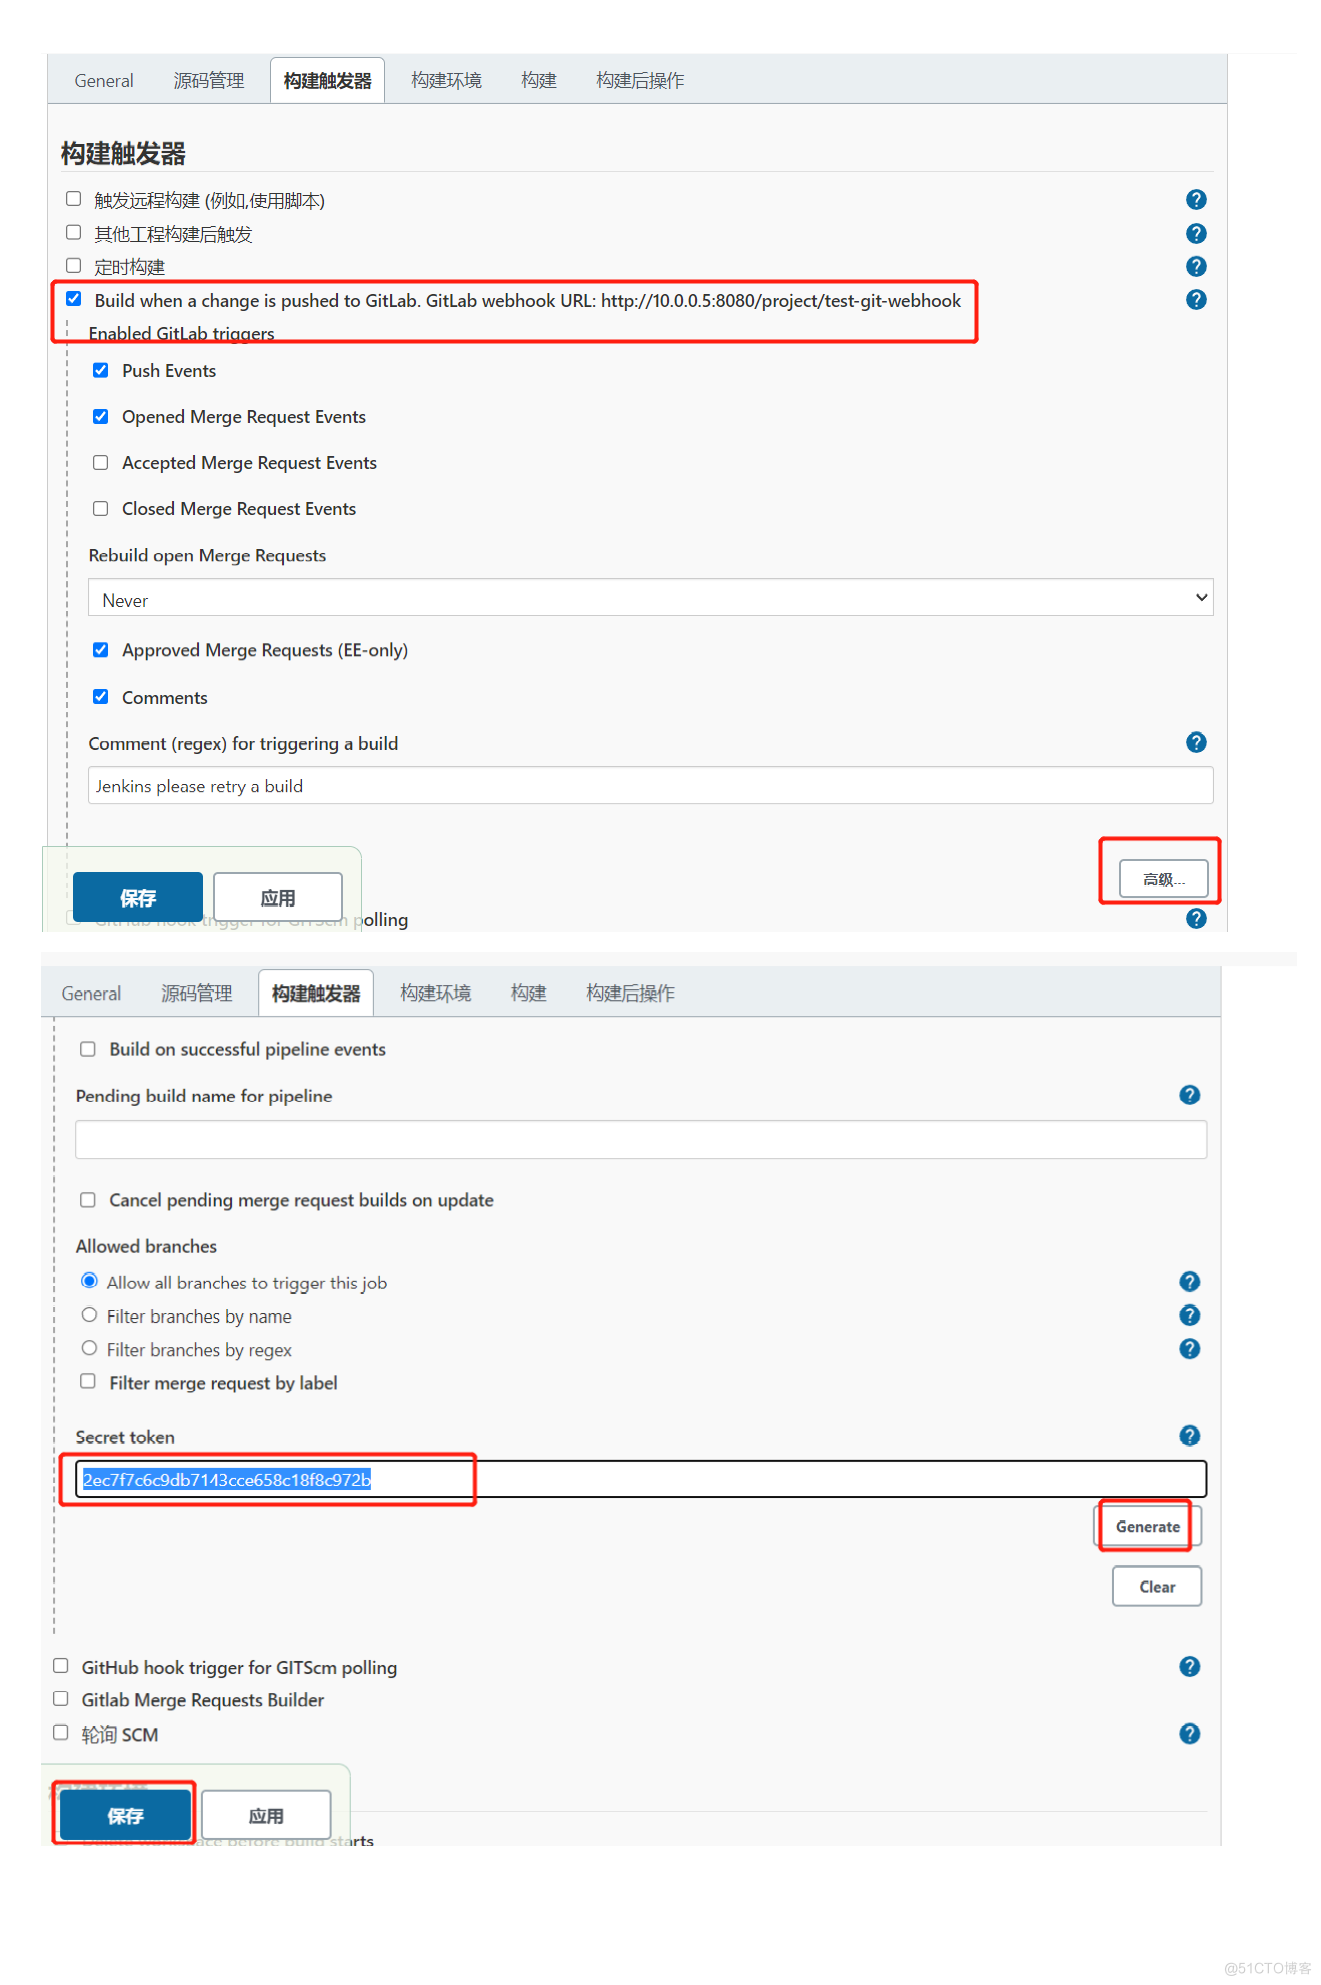
开启本地网络webhook
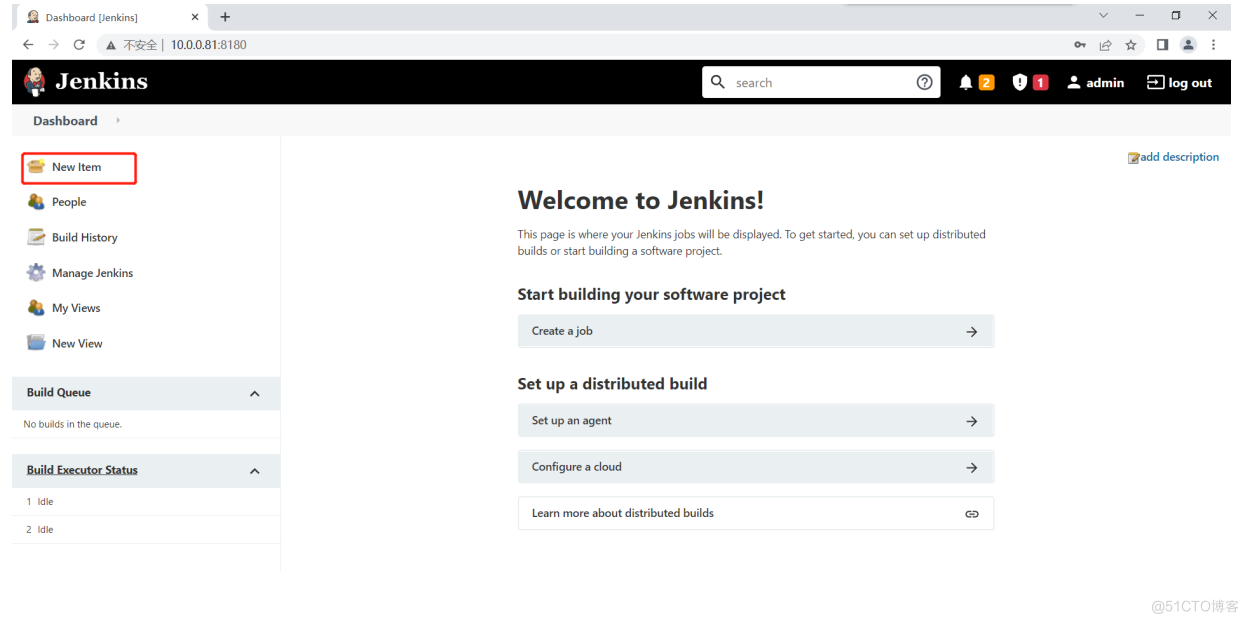
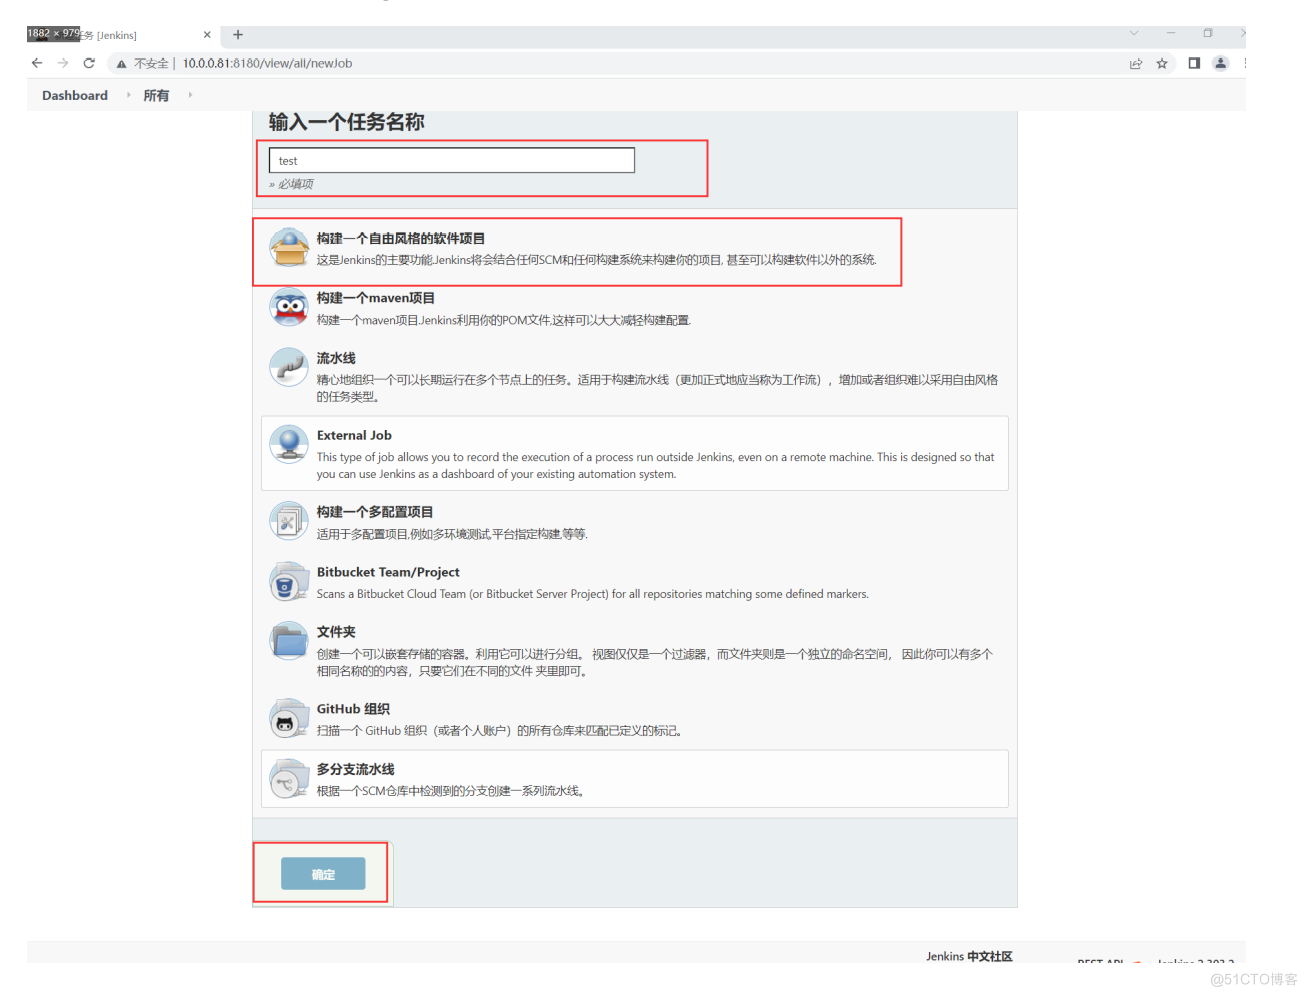
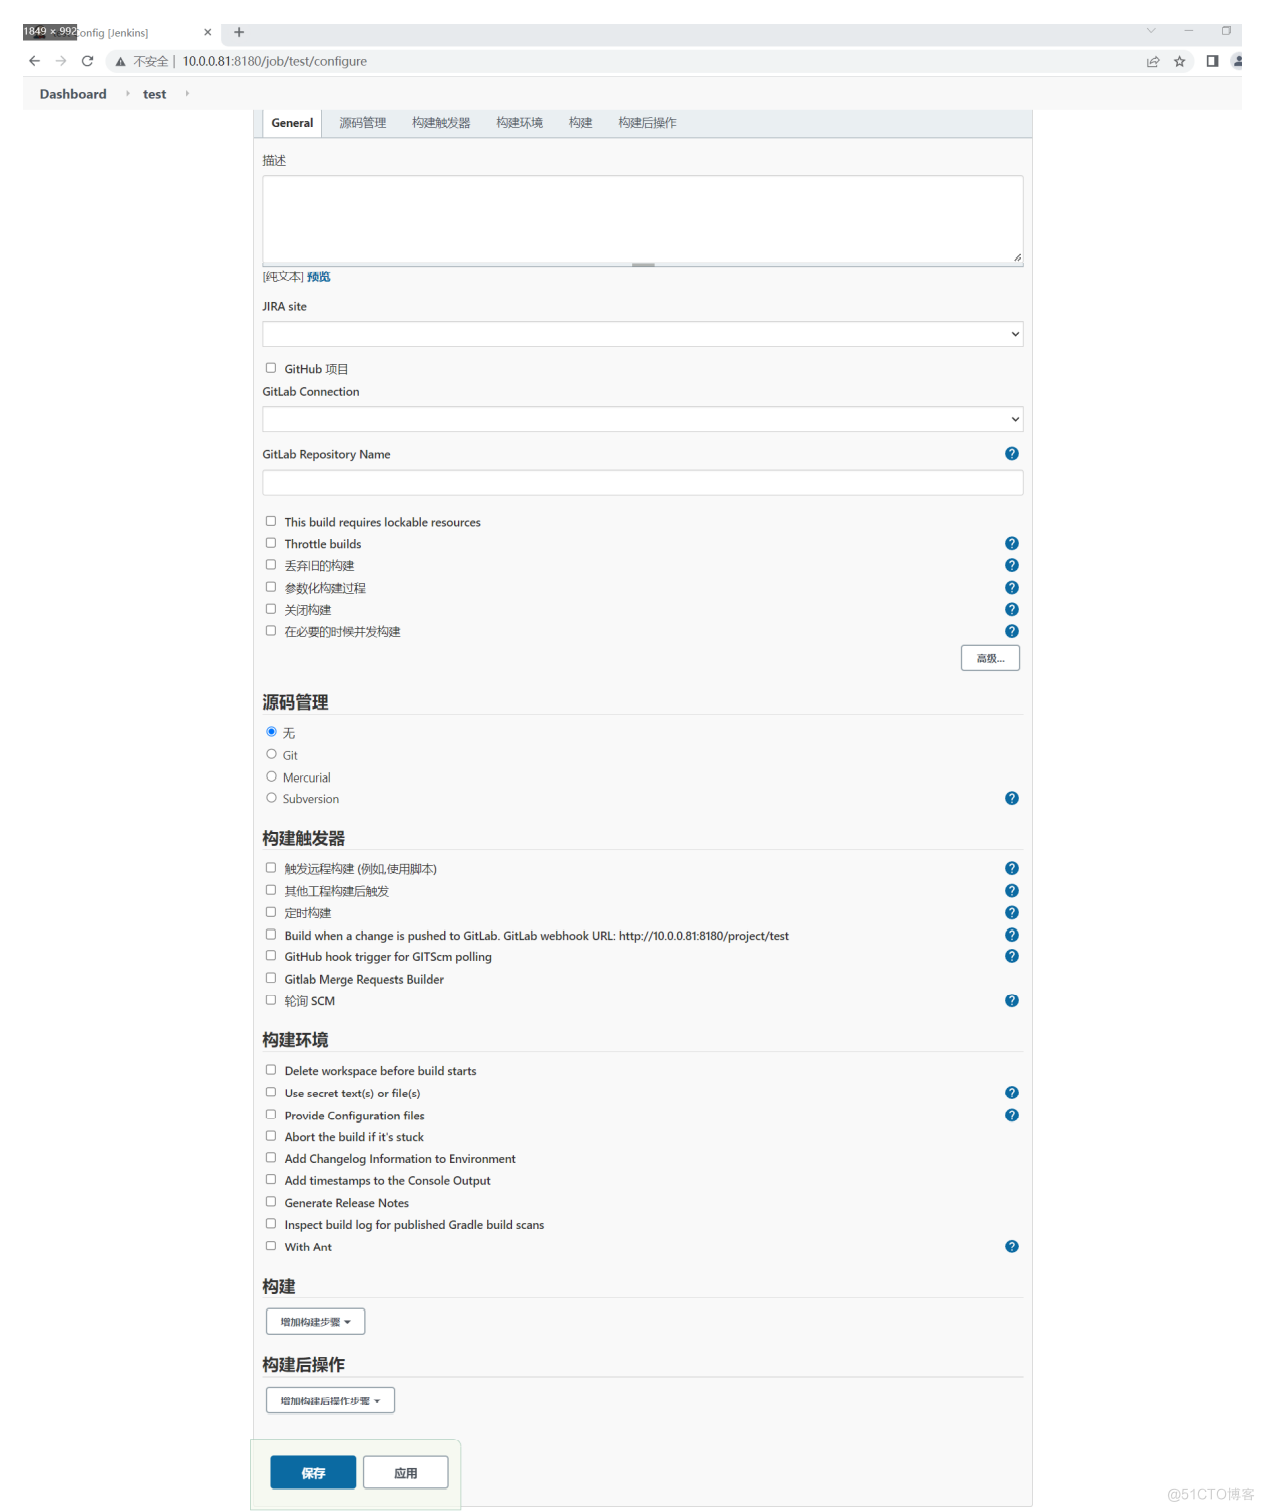
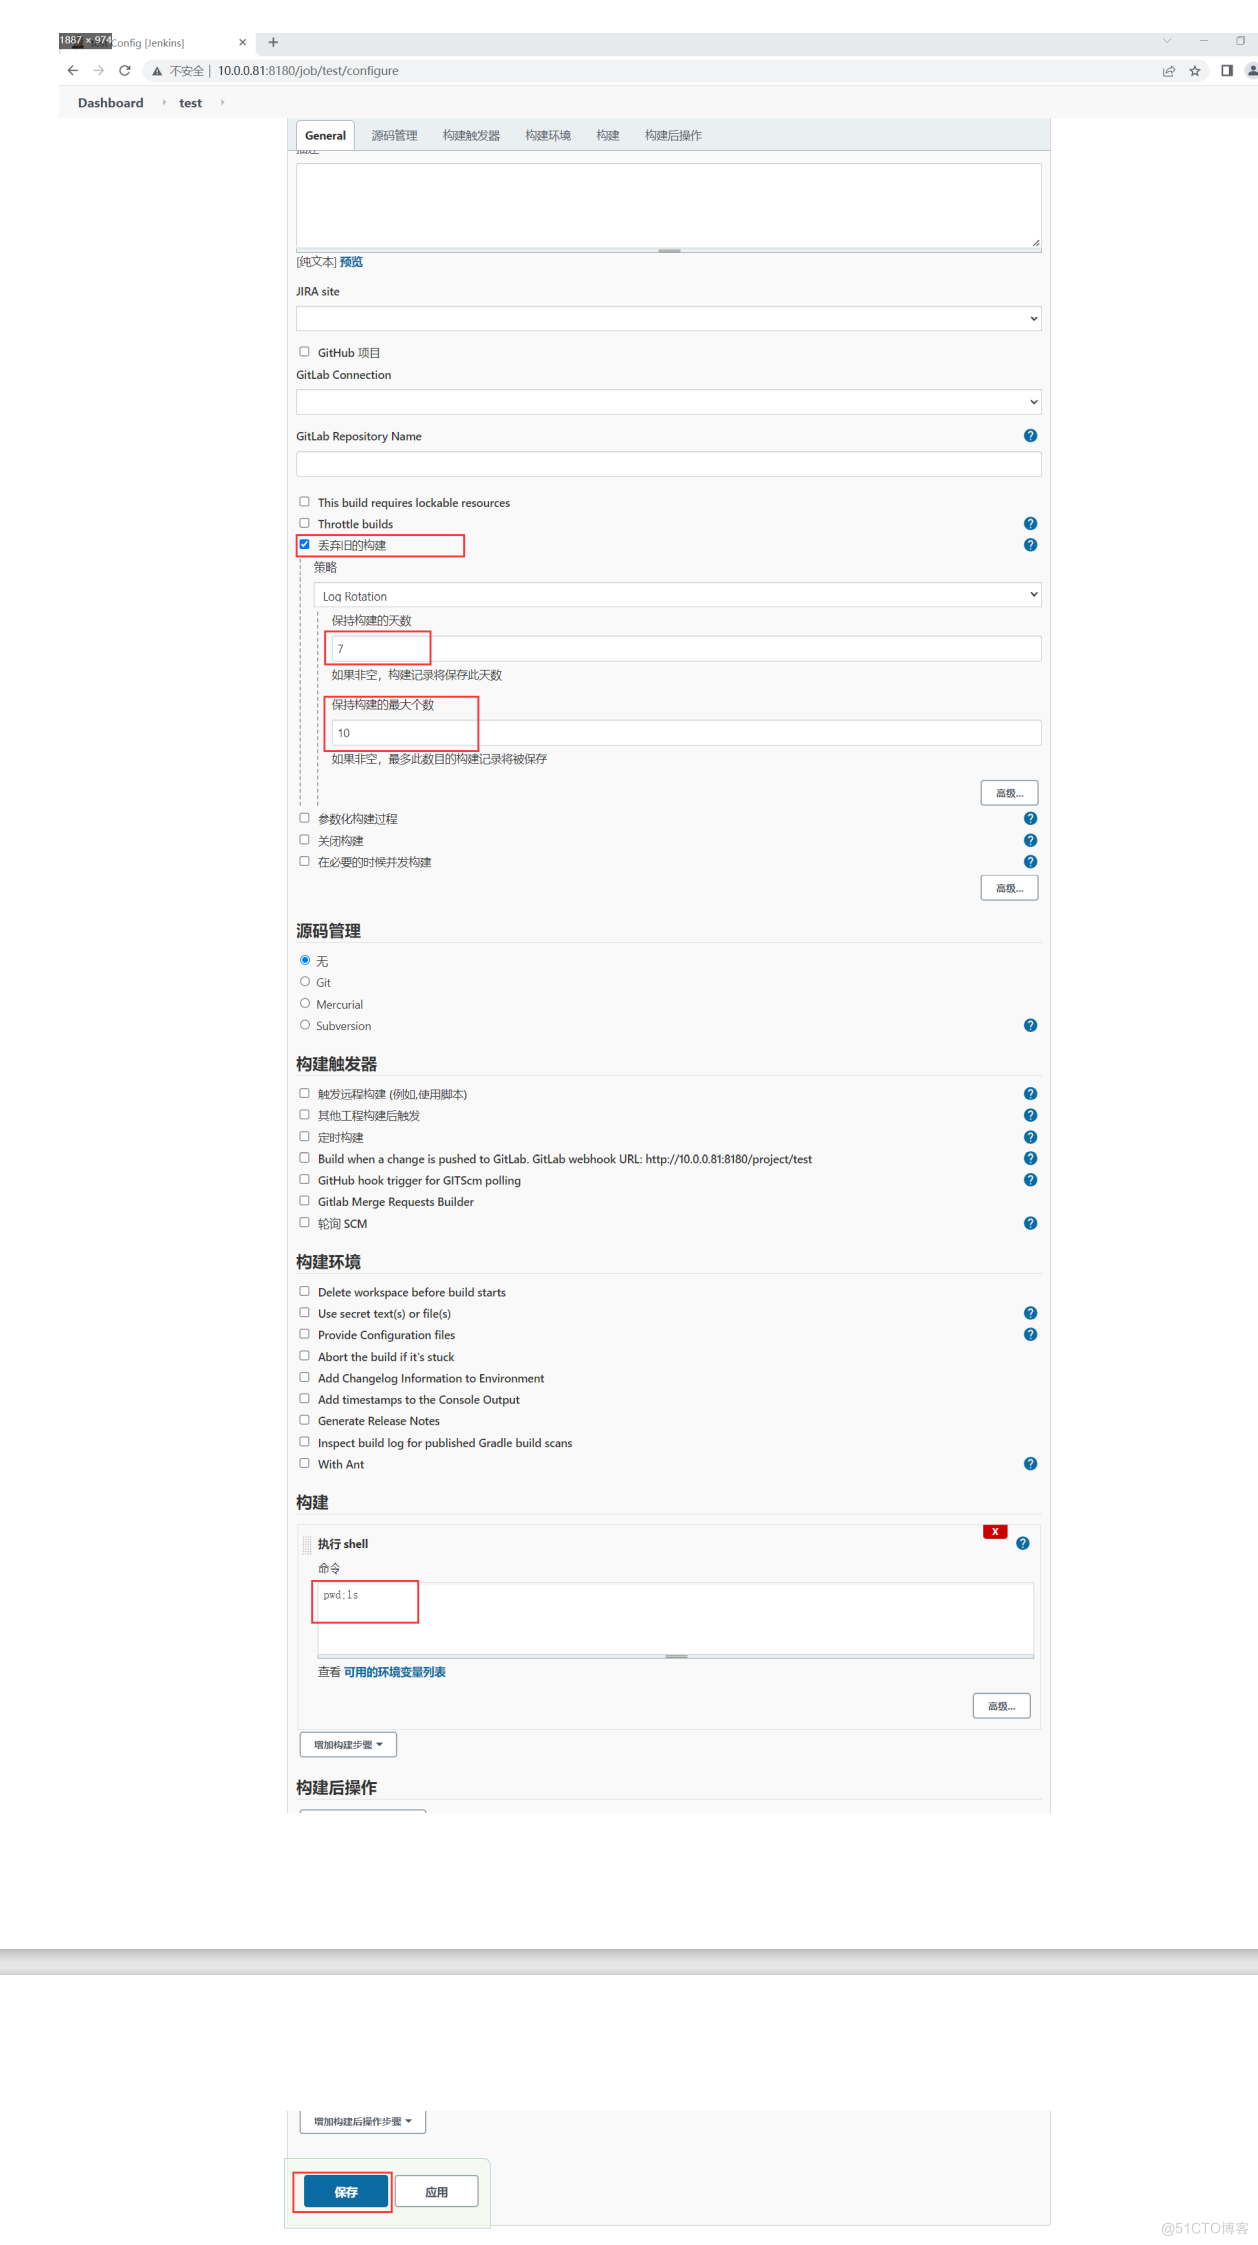
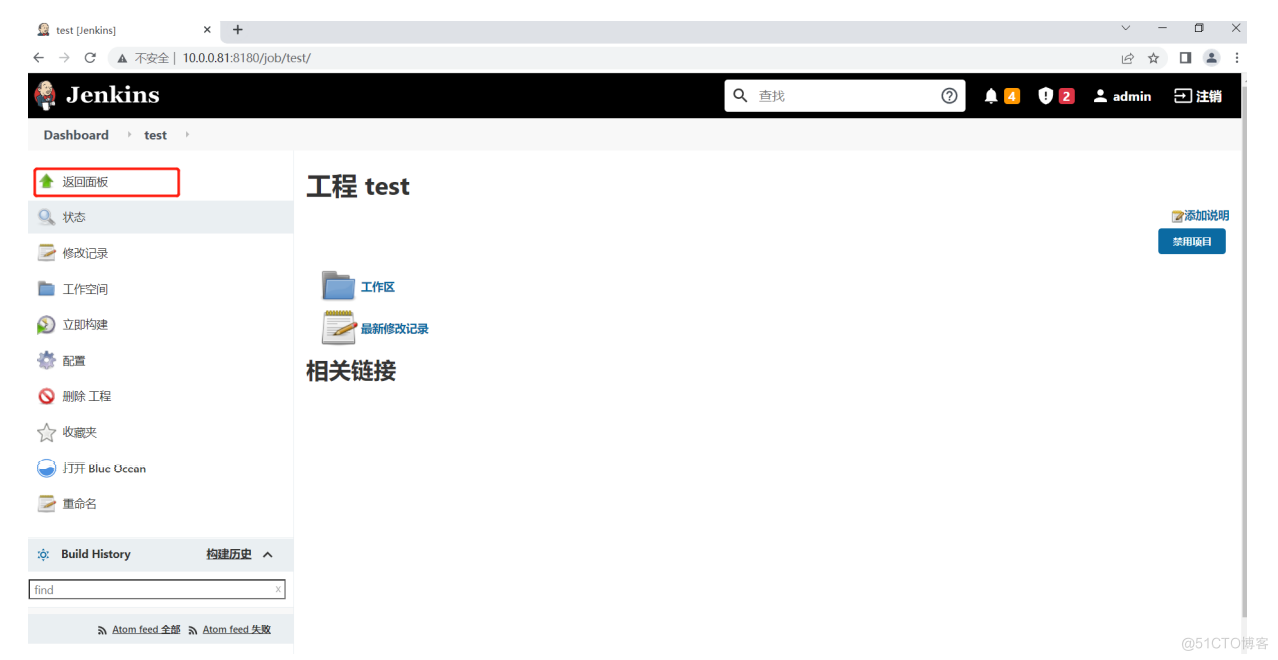
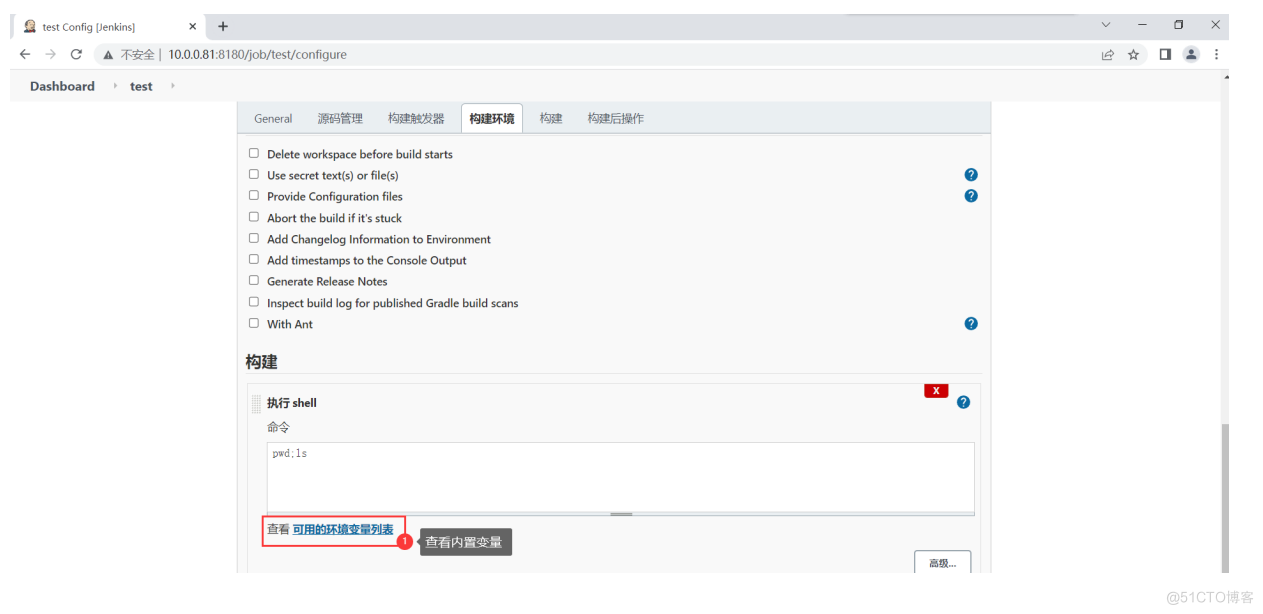
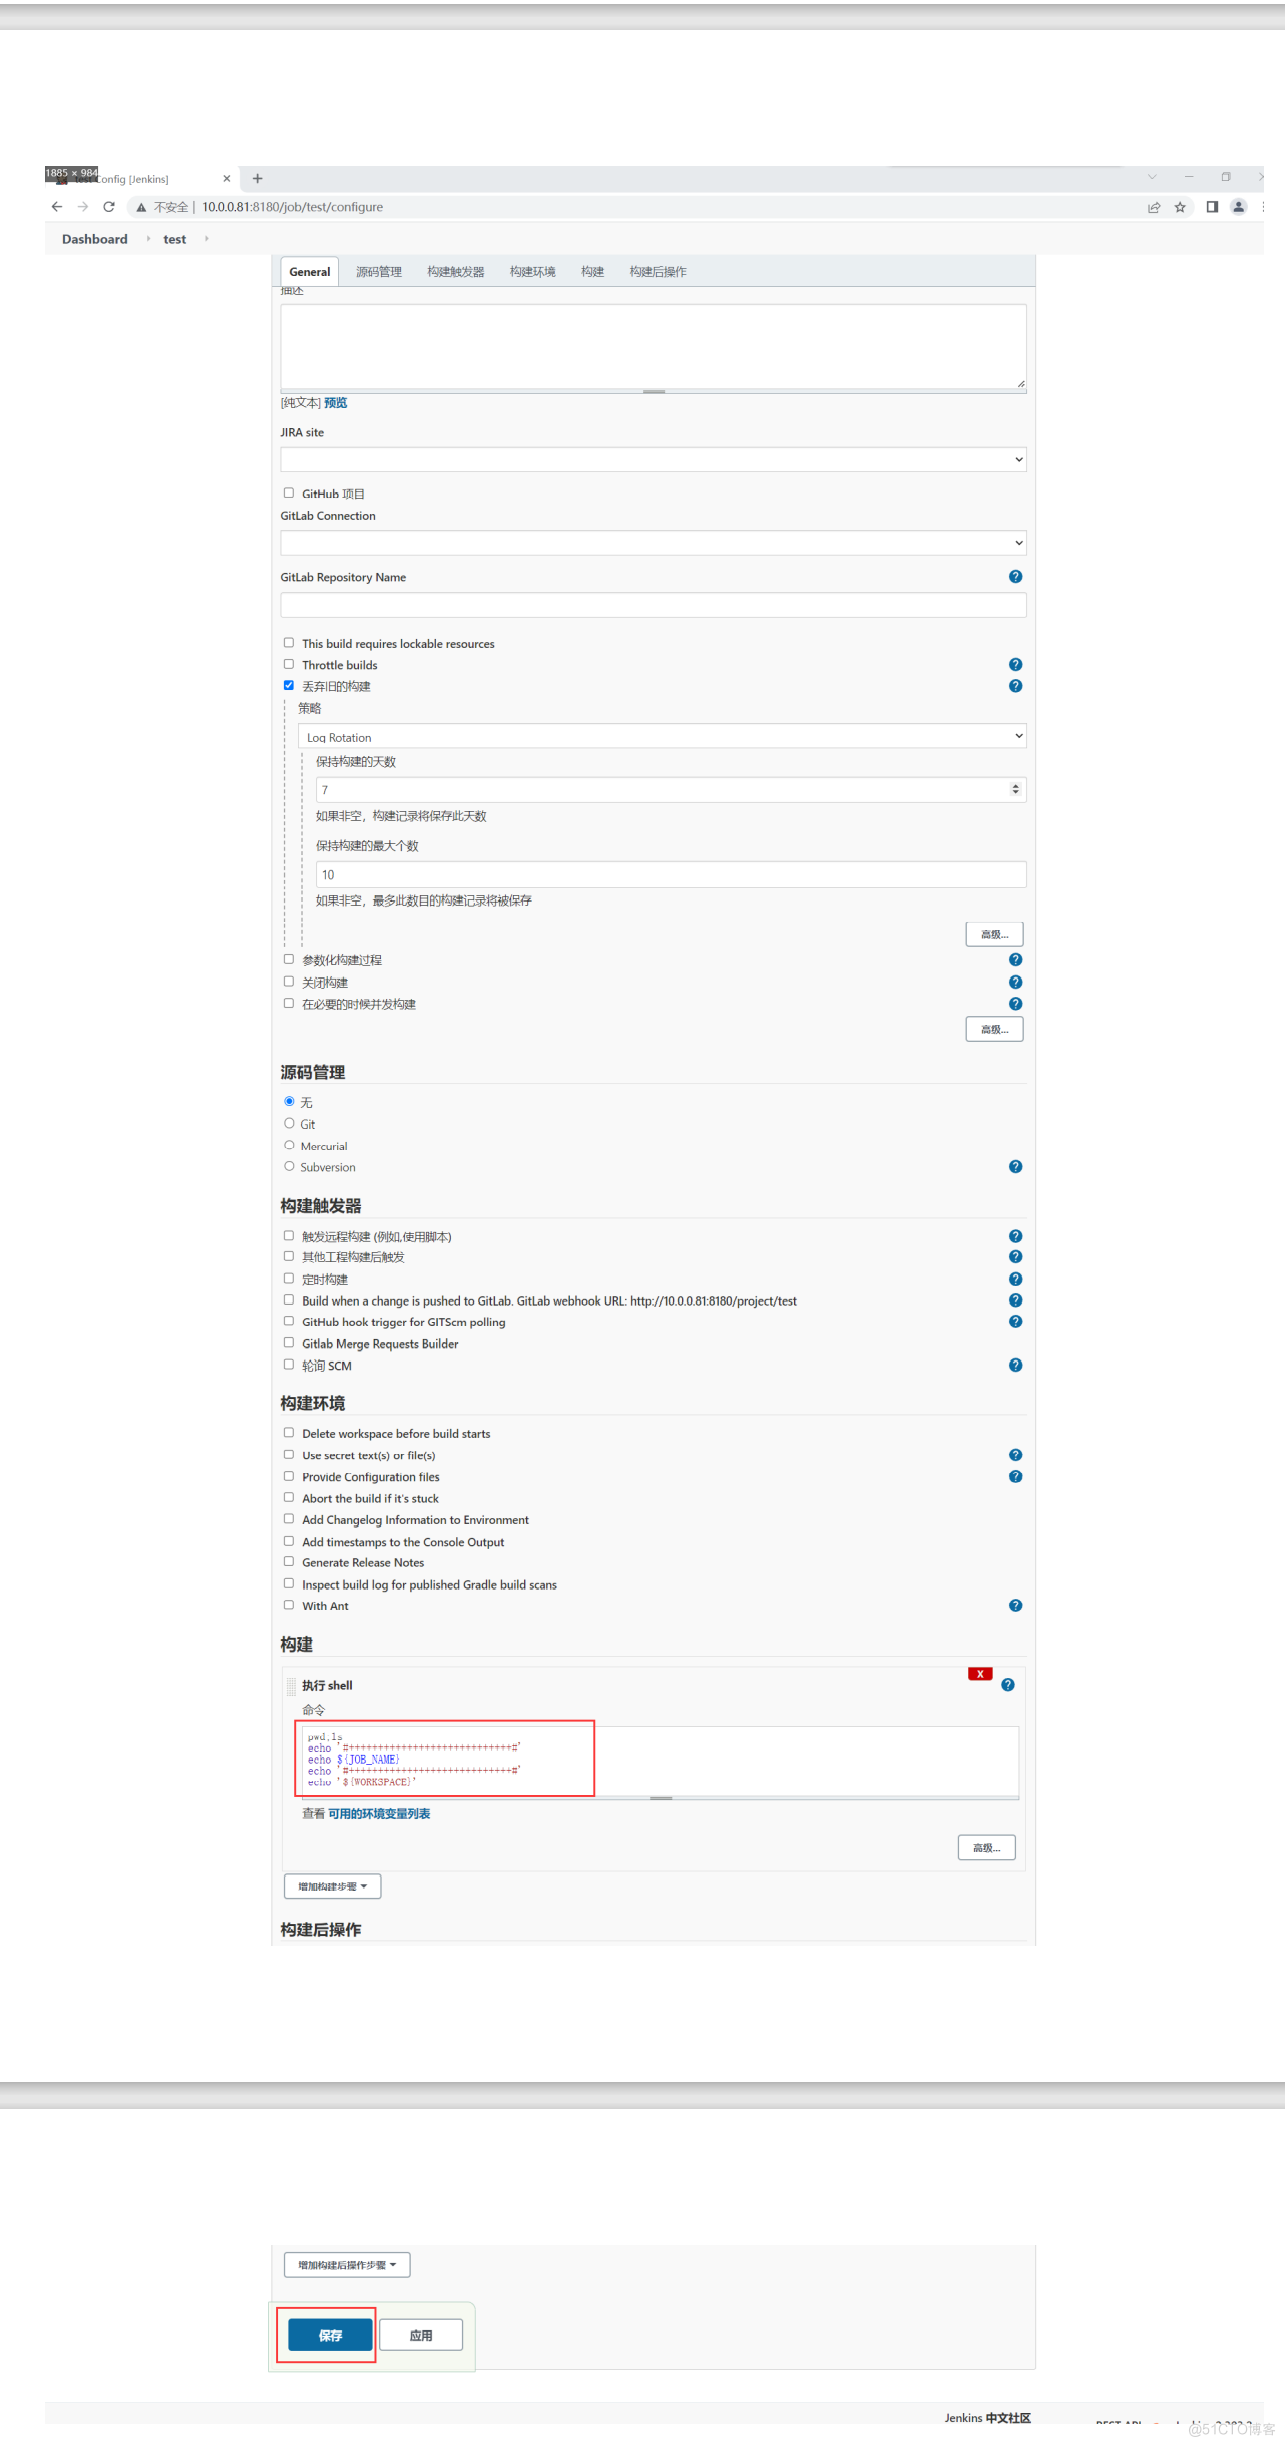
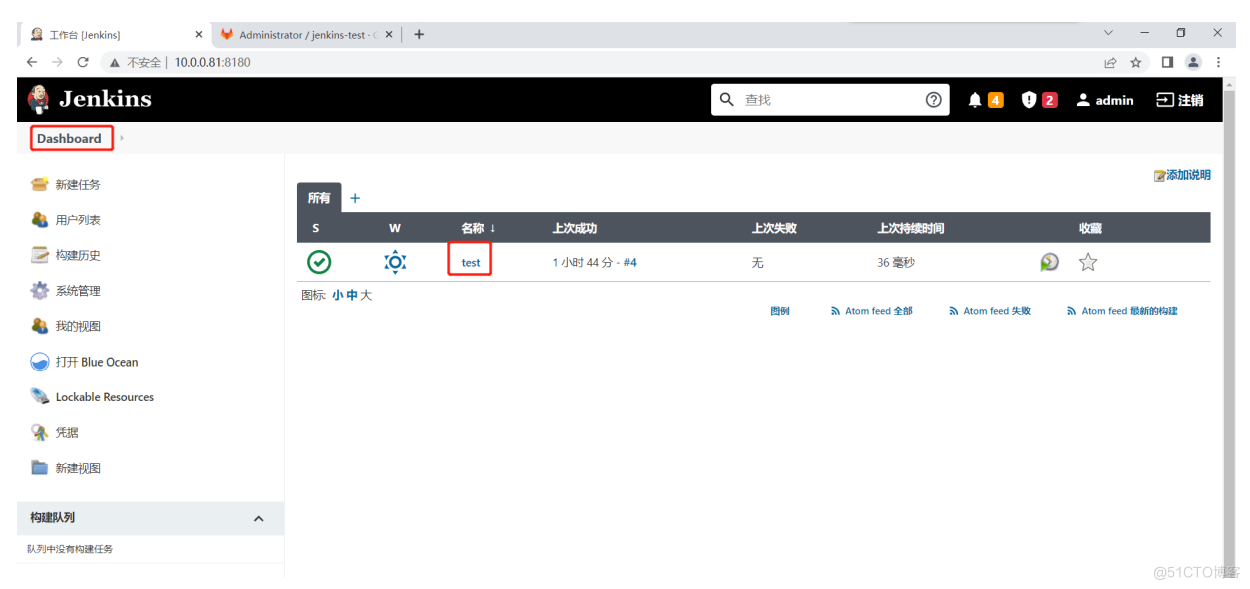
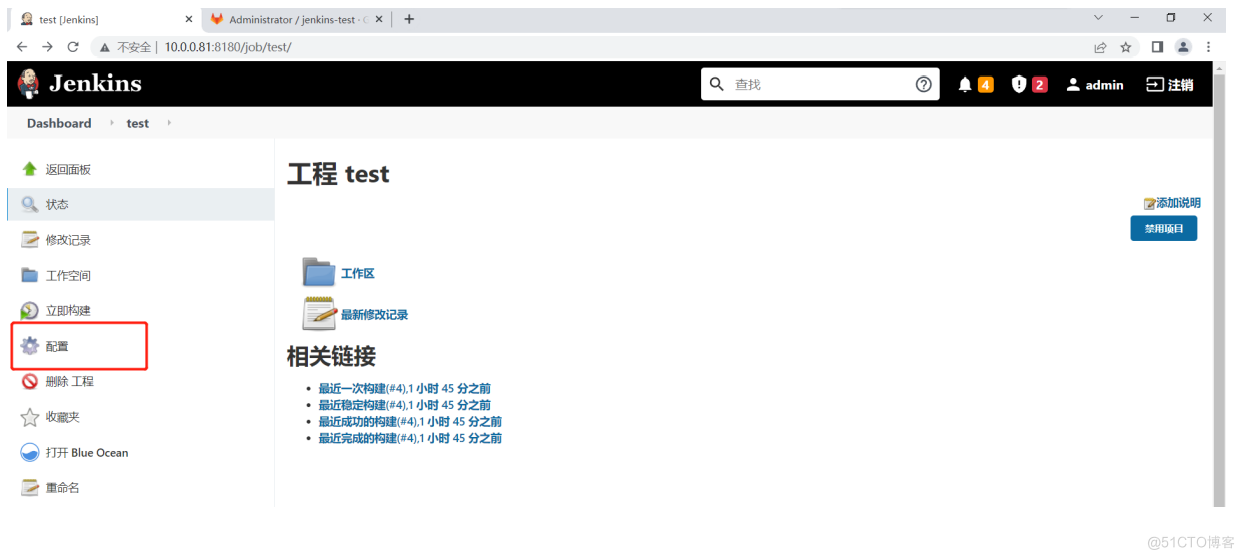
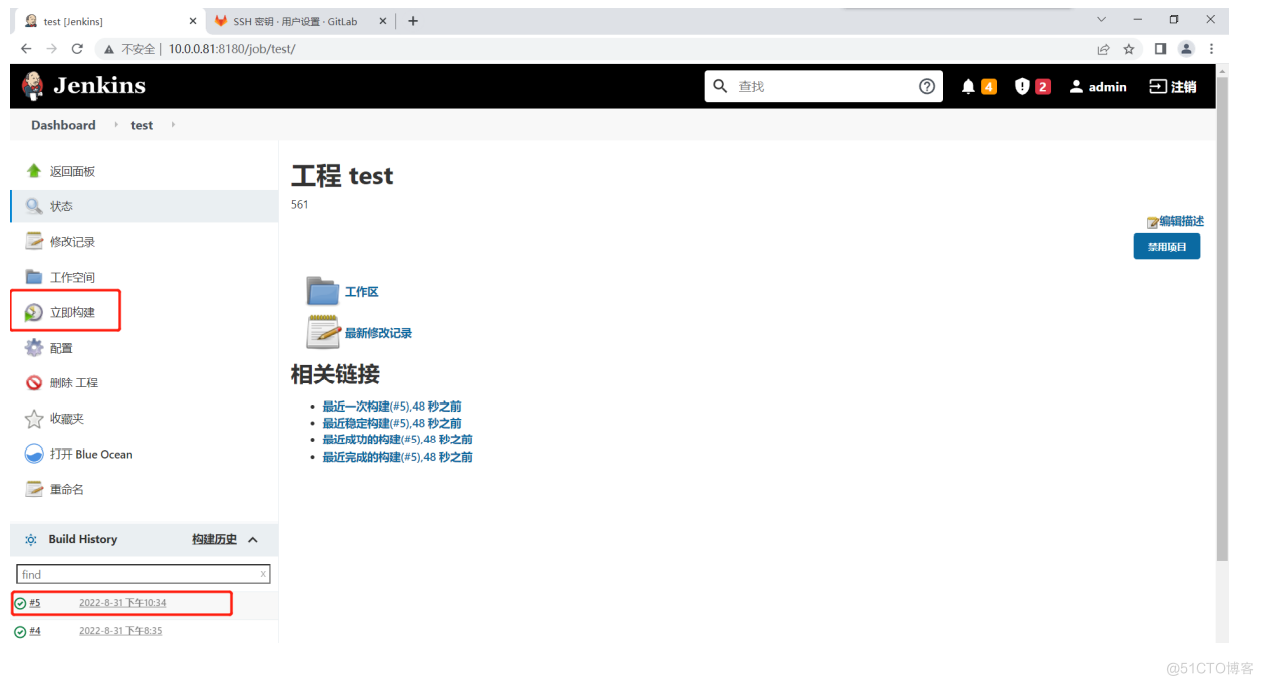
进入Jenkins的项目