
正在配置Step
如域章节所述,a 是 域对象,用于封装批处理作业的独立顺序阶段,以及 包含定义和控制实际批次所需的所有信息 加工。这是一个必然模糊的描述,因为任何给定的内容都由编写 .A 可以很简单 或开发人员想要的复杂。一个简单的可能会将数据从文件加载到 数据库,需要很少或不需要代码(取决于所使用的实现)。一个更多的 复杂可能具有作为 处理,如下图所示:StepStepJobStepStepStep
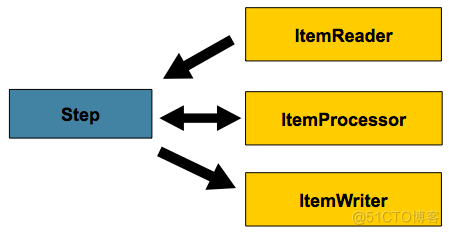
图1.步
面向块的处理
Spring Batch 在最常见的情况下使用“面向块”的处理方式 实现。面向块的处理是指一次读取一个数据, 创建在事务边界内写出的“块”。一次的数量 读取的项目等于提交间隔,整个块由 写出,然后提交事务。下图显示了 过程:ItemWriter
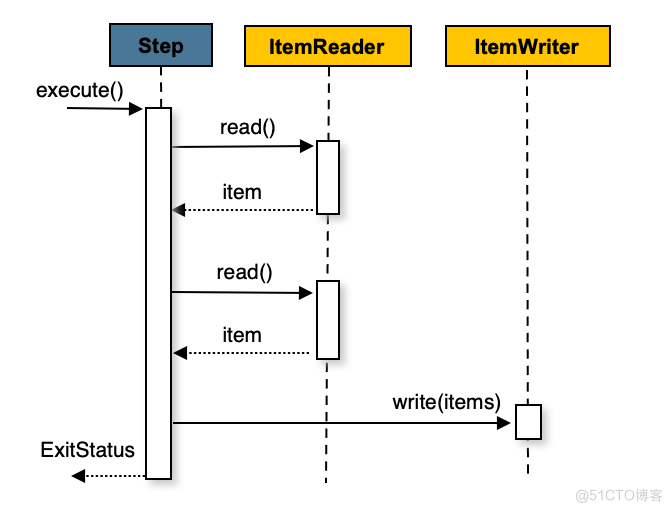
图2.面向块的处理
以下伪代码以简化的形式显示了相同的概念:
List items = new Arraylist();for(int i = 0; i < commitInterval; i++){ Object item = itemReader.read(); if (item != null) { items.add(item); }}itemWriter.write(items);您还可以配置一个面向块的步骤,其中包含一个可选的步骤,以便在将项目传递给 .下图 显示了在步骤中注册 an 时的过程:ItemProcessorItemWriterItemProcessor
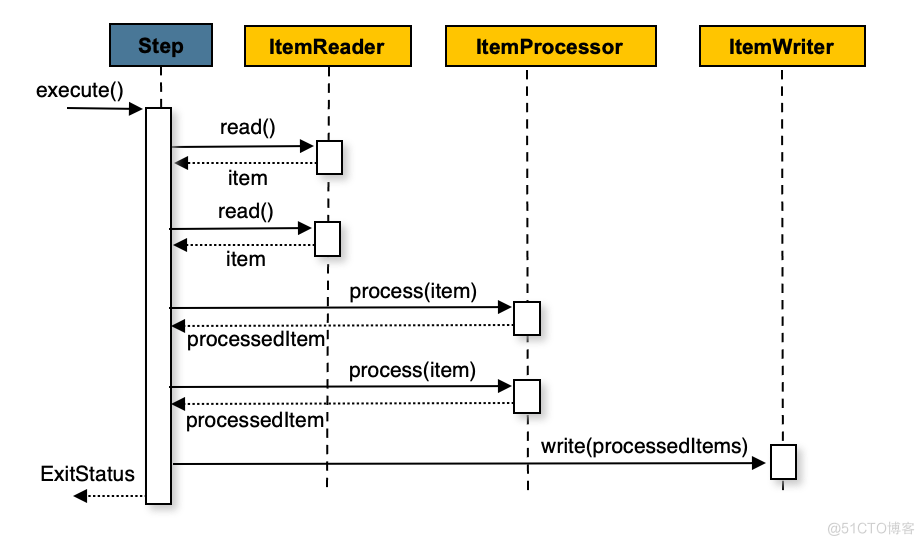
图3.使用项目处理器进行面向块的处理
以下伪代码显示了如何以简化的形式实现这一点:
List items = new Arraylist();for(int i = 0; i < commitInterval; i++){ Object item = itemReader.read(); if (item != null) { items.add(item); }}List processedItems = new Arraylist();for(Object item: items){ Object processedItem = itemProcessor.process(item); if (processedItem != null) { processedItems.add(processedItem); }}itemWriter.write(processedItems);有关项目处理器及其用例的更多详细信息,请参阅项目处理部分。
配置步骤
尽管 所需的依赖项列表相对较短,但它是一个 极其复杂的类,可能包含许多协作者。Step
为了简化配置,您可以使用Spring Batch XML命名空间,如 以下示例显示:
例 1.XML 配置
<job id="sampleJob" job-repository="jobRepository"> <step id="step1"> <tasklet transaction-manager="transactionManager"> <chunk reader="itemReader" writer="itemWriter" commit-interval="10"/> </tasklet> </step></job>使用 Java 配置时,您可以使用 Spring Batch 构建器,作为 以下示例显示:
例 2.爪哇配置
/** * Note the JobRepository is typically autowired in and not needed to be explicitly * configured */@Beanpublic Job sampleJob(JobRepository jobRepository, Step sampleStep) { return new JobBuilder("sampleJob", jobRepository) .start(sampleStep) .build();}/** * Note the TransactionManager is typically autowired in and not needed to be explicitly * configured */@Beanpublic Step sampleStep(JobRepository jobRepository, PlatformTransactionManager transactionManager) { return new StepBuilder("sampleStep", jobRepository) .<String, String>chunk(10, transactionManager) .reader(itemReader()) .writer(itemWriter()) .build();}从父级继承Step
如果一组共享类似的配置,那么定义一个 混凝土可能从中继承属性的“父项”。类似于类 继承 在 Java 中,“子”将其元素和属性与 父母的。孩子还会覆盖任何父母的 .StepsStepStepsStepSteps
在下面的示例中,, 继承自 。是的 使用 、、 和 实例化。此外,是 ,因为它是 被 覆盖,如以下示例所示:StepconcreteStep1parentStepitemReaderitemProcessoritemWriterstartLimit=5allowStartIfComplete=truecommitInterval5concreteStep1Step
<step id="parentStep"> <tasklet allow-start-if-complete="true"> <chunk reader="itemReader" writer="itemWriter" commit-interval="10"/> </tasklet></step><step id="concreteStep1" parent="parentStep"> <tasklet start-limit="5"> <chunk processor="itemProcessor" commit-interval="5"/> </tasklet></step>作业元素中的步骤仍需要该属性。这是两个人的 原因:id
- 在保留 .如果相同 在作业的多个步骤中引用独立步骤时,会发生错误。idStepExecution
- 创建作业流时,如本章后面所述,属性 应引用流中的步骤,而不是独立步骤。next
抽象Step
有时,可能需要定义一个不是完整配置的父级。例如,如果 、 和 属性是 离开配置,则初始化失败。如果父母必须是 在没有一个或多个这些属性的情况下定义,则应使用该属性。an 只是扩展,从不实例化。StepStepreaderwritertaskletStepabstractabstractStep
在下面的示例中,如果 () 没有被宣布为抽象的。、() 具有 、 和 。StepabstractParentStepStepconcreteStep2itemReaderitemWritercommit-interval=10
<step id="abstractParentStep" abstract="true"> <tasklet> <chunk commit-interval="10"/> </tasklet></step><step id="concreteStep2" parent="abstractParentStep"> <tasklet> <chunk reader="itemReader" writer="itemWriter"/> </tasklet></step>合并列表
上的一些可配置元素是列表,例如元素。 如果父元素和子元素都声明一个元素,则 子项列表将覆盖父项的列表。允许孩子添加其他 侦听器 对于父级定义的列表,每个列表元素都有一个属性。 如果元素指定 ,则子列表与 父级的,而不是覆盖它。Steps<listeners/>Steps<listeners/>mergemerge="true"
在下面的示例中,“concreteStep3”是使用两个侦听器创建的:和 :SteplistenerOnelistenerTwo
<step id="listenersParentStep" abstract="true"> <listeners> <listener ref="listenerOne"/> <listeners></step><step id="concreteStep3" parent="listenersParentStep"> <tasklet> <chunk reader="itemReader" writer="itemWriter" commit-interval="5"/> </tasklet> <listeners merge="true"> <listener ref="listenerTwo"/> <listeners></step>提交间隔
如前所述,步骤读入和写出项目,定期提交 通过使用提供的 .如果为 1,则为 在写入每个单独的项目后提交。在许多情况下,这不太理想, 因为开始和提交交易是昂贵的。理想情况下,最好是 在每笔交易中处理尽可能多的项目,这完全取决于 正在处理的数据类型以及步骤与之交互的资源。 因此,您可以配置在提交中处理的项目数。PlatformTransactionManagercommit-interval
下面的示例显示 其值为 10,因为它将在 XML 中定义:steptaskletcommit-interval
XML 配置
<job id="sampleJob"> <step id="step1"> <tasklet> <chunk reader="itemReader" writer="itemWriter" commit-interval="10"/> </tasklet> </step></job>以下示例显示了 a 其值为 10,因为它将在 Java 中定义:steptaskletcommit-interval
爪哇配置
@Beanpublic Job sampleJob(JobRepository jobRepository) { return new JobBuilder("sampleJob", jobRepository) .start(step1()) .build();}@Beanpublic Step step1(JobRepository jobRepository, PlatformTransactionManager transactionManager) { return tnew StepBuilder("step1", jobRepository) .<String, String>chunk(10, transactionManager) .reader(itemReader()) .writer(itemWriter()) .build();}在前面的示例中,每个事务中处理 10 个项目。在 开始处理,交易开始。此外,每次在 上调用 时,计数器都会递增。当它达到 10 时,聚合项目列表 传递给 ,并提交事务。readItemReaderItemWriter
为重新启动配置Step
在 “配置和运行作业” 一节中,讨论了重新启动 的问题。重新启动会对步骤产生许多影响,因此可能会 需要一些特定的配置。Job
设置启动限制
在许多情况下,您可能希望控制一次可以的次数 开始。例如,您可能需要配置特定的可能,以便 仅运行一次,因为它使某些必须手动修复的资源失效,然后才能运行 再次运行。这是可以在步骤级别配置的,因为不同的步骤可能有 不同的要求。只能执行一次的 A 可以作为 与可以无限运行的 a 相同。StepStepStepJobStep
以下代码片段显示了 XML 中的启动限制配置示例:
XML 配置
<step id="step1"> <tasklet start-limit="1"> <chunk reader="itemReader" writer="itemWriter" commit-interval="10"/> </tasklet></step>以下代码片段显示了 Java 中的启动限制配置示例:
爪哇配置
@Beanpublic Step step1(JobRepository jobRepository, PlatformTransactionManager transactionManager) { return tnew StepBuilder("step1", jobRepository) .<String, String>chunk(10, transactionManager) .reader(itemReader()) .writer(itemWriter()) .startLimit(1) .build();}前面示例中所示的步骤只能运行一次。尝试再次运行它 导致 被抛出。请注意,默认值为 启动限制为 。StartLimitExceededExceptionInteger.MAX_VALUE
重新启动已完成的Step
对于可重新启动的作业,可能始终存在一个或多个步骤 运行,无论他们第一次是否成功。一个例子可能是 是验证步骤或在处理之前清理资源。在 重新启动作业的正常处理,状态为 (表示它) 的任何步骤 已成功完成),将被跳过。设置为 将覆盖此设置,以便步骤始终运行。StepCOMPLETEDallow-start-if-completetrue
以下代码片段演示如何在 XML 中定义可重新启动的作业:
XML 配置
<step id="step1"> <tasklet allow-start-if-complete="true"> <chunk reader="itemReader" writer="itemWriter" commit-interval="10"/> </tasklet></step>以下代码片段演示如何在 Java 中定义可重新启动的作业:
爪哇配置
@Beanpublic Step step1(JobRepository jobRepository, PlatformTransactionManager transactionManager) { return tnew StepBuilder("step1", jobRepository) .<String, String>chunk(10, transactionManager) .reader(itemReader()) .writer(itemWriter()) .allowStartIfComplete(true) .build();}Step重新启动配置示例
下面的 XML 示例演示如何将作业配置为具有可以 重新 启动:
XML 配置
<job id="footballJob" restartable="true"> <step id="playerload" next="gameLoad"> <tasklet> <chunk reader="playerFileItemReader" writer="playerWriter" commit-interval="10" /> </tasklet> </step> <step id="gameLoad" next="playerSummarization"> <tasklet allow-start-if-complete="true"> <chunk reader="gameFileItemReader" writer="gameWriter" commit-interval="10"/> </tasklet> </step> <step id="playerSummarization"> <tasklet start-limit="2"> <chunk reader="playerSummarizationSource" writer="summaryWriter" commit-interval="10"/> </tasklet> </step></job>The following Java example shows how to configure a job to have steps that can be restarted:
Java Configuration
@Beanpublic Job footballJob(JobRepository jobRepository) { return new JobBuilder("footballJob", jobRepository) .start(playerLoad()) .next(gameLoad()) .next(playerSummarization()) .build();}@Beanpublic Step playerLoad(JobRepository jobRepository, PlatformTransactionManager transactionManager) { return new StepBuilder("playerLoad", jobRepository) .<String, String>chunk(10, transactionManager) .reader(playerFileItemReader()) .writer(playerWriter()) .build();}@Beanpublic Step gameLoad(JobRepository jobRepository, PlatformTransactionManager transactionManager) { return new StepBuilder("gameLoad", jobRepository) .allowStartIfComplete(true) .<String, String>chunk(10, transactionManager) .reader(gameFileItemReader()) .writer(gameWriter()) .build();}@Beanpublic Step playerSummarization(JobRepository jobRepository, PlatformTransactionManager transactionManager) { return new StepBuilder("playerSummarization", jobRepository) .startLimit(2) .<String, String>chunk(10, transactionManager) .reader(playerSummarizationSource()) .writer(summaryWriter()) .build();}前面的示例配置适用于加载有关足球信息的作业 游戏并总结它们。它包含三个步骤:、 和 。该步骤从平面文件加载玩家信息, 而该步骤对游戏执行相同的操作。最后一步是 ,然后根据 提供游戏。假定加载者必须仅加载文件 一次,但可以加载在特定目录中找到的任何游戏, 在成功加载到数据库中后删除它们。结果, 此步骤不包含其他配置。它可以启动任何数字 如果完成,则跳过时间。但是,需要运行该步骤 每次以防自上次运行以来添加了额外的文件。它已设置为始终启动。(假设 加载游戏的数据库表上有一个进程指示器,以确保 新游戏可以通过摘要步骤正确找到)。总结步骤, 这是作业中最重要的,配置为具有 2 的启动限制。这 很有用,因为如果该步骤持续失败,则会向 控制作业执行的运算符,直到手动才能重新启动 干预已经发生。playerLoadgameLoadplayerSummarizationplayerLoadgameLoadplayerSummarizationplayerLoadgameLoadplayerLoadgameLoadallow-start-if-completetrue
此作业提供了本文档的示例,与示例项目中的示例不同。footballJob
本节的其余部分介绍示例的三次运行中每次运行发生的情况。footballJob
运行 1:
运行 2:
运行 3:
配置跳过逻辑
在许多情况下,处理时遇到的错误不应导致失败,而应跳过。这通常是一个必须的决定 由了解数据本身及其含义的人制作。财务数据, 例如,可能无法跳过,因为它会导致资金被转移,这 需要完全准确。另一方面,加载供应商列表可能会 允许跳过。如果供应商因格式不正确或 缺少必要的信息,可能没有问题。通常,这些不好 记录也会被记录,稍后在讨论侦听器时将对此进行介绍。Step
以下 XML 示例显示了使用跳过限制的示例:
XML 配置
<step id="step1"> <tasklet> <chunk reader="flatFileItemReader" writer="itemWriter" commit-interval="10" skip-limit="10"> <skippable-exception-classes> <include class="org.springframework.batch.item.file.FlatFileParseException"/> </skippable-exception-classes> </chunk> </tasklet></step>以下 Java 示例显示了使用跳过限制的示例:
爪哇配置
@Beanpublic Step step1(JobRepository jobRepository, PlatformTransactionManager transactionManager) { return tnew StepBuilder("step1", jobRepository) .<String, String>chunk(10, transactionManager) .reader(flatFileItemReader()) .writer(itemWriter()) .faultTolerant() .skipLimit(10) .skip(FlatFileParseException.class) .build();}在前面的示例中,使用了 a。如果在任何时候抛出 a,则跳过该项目并计入总数 跳过限制为 10。声明的异常(及其子类)可能会引发 在块处理的任何阶段(读取、处理或写入)。单独的计数 由内部读取、处理和写入的跳过组成 步骤执行,但限制适用于所有跳过。一旦跳过限制为 已达到,则找到下一个异常会导致步骤失败。换句话说,第十一 跳过会触发异常,而不是第十个。FlatFileItemReaderFlatFileParseException
前面的示例的一个问题是,除 a 之外的任何其他异常都会导致失败。在某些情况下,这可能是 正确的行为。但是,在其他情况下,可能更容易识别哪个 异常应导致失败并跳过其他所有内容。FlatFileParseExceptionJob
以下 XML 示例显示排除特定异常的示例:
XML 配置
<step id="step1"> <tasklet> <chunk reader="flatFileItemReader" writer="itemWriter" commit-interval="10" skip-limit="10"> <skippable-exception-classes> <include class="java.lang.Exception"/> <exclude class="java.io.FileNotFoundException"/> </skippable-exception-classes> </chunk> </tasklet></step>以下 Java 示例显示了一个排除特定异常的示例:
爪哇配置
@Beanpublic Step step1(JobRepository jobRepository, PlatformTransactionManager transactionManager) { return tnew StepBuilder("step1", jobRepository) .<String, String>chunk(10, transactionManager) .reader(flatFileItemReader()) .writer(itemWriter()) .faultTolerant() .skipLimit(10) .skip(Exception.class) .noSkip(FileNotFoundException.class) .build();}通过标识为可跳过的异常类,配置 表示所有内容都是可跳过的。但是,通过“排除”,配置会细化可跳过的列表 异常类为除 之外的所有类。任何排除 如果遇到异常类,则为致命类(即,不会跳过它们)。java.lang.ExceptionExceptionsjava.io.FileNotFoundExceptionExceptionsFileNotFoundException
对于遇到的任何异常,可跳过性由最近的超类确定 在类层次结构中。任何未分类的异常都被视为“致命”。
配置重试逻辑
在大多数情况下,您希望异常导致跳过或失败。然而 并非所有异常都是确定性的。如果遇到 阅读,它总是被抛出那个记录。重置无济于事。 但是,对于其他例外情况(例如 , 指示当前进程已尝试更新另一个进程的记录 保持锁定),等待并重试可能会导致成功。StepFlatFileParseExceptionItemReaderDeadlockLoserDataAccessException
在 XML 中,重试应按如下方式配置:
<step id="step1"> <tasklet> <chunk reader="itemReader" writer="itemWriter" commit-interval="2" retry-limit="3"> <retryable-exception-classes> <include class="org.springframework.dao.DeadlockLoserDataAccessException"/> </retryable-exception-classes> </chunk> </tasklet></step>在 Java 中,重试应配置如下:
@Beanpublic Step step1(JobRepository jobRepository, PlatformTransactionManager transactionManager) { return tnew StepBuilder("step1", jobRepository) .<String, String>chunk(2, transactionManager) .reader(itemReader()) .writer(itemWriter()) .faultTolerant() .retryLimit(3) .retry(DeadlockLoserDataAccessException.class) .build();}允许对单个项目可以重试的次数限制,并且 “可重试”的异常列表。您可以在重试中找到有关重试工作原理的更多详细信息。Step
控制回滚
默认情况下,无论重试还是跳过,引发的任何异常都会导致事务由 回滚控制。如果跳过配置为 如前所述,从 引发的异常不会导致回滚。 但是,在许多情况下,从应该 不会导致回滚,因为尚未执行任何操作以使事务无效。 因此,您可以使用不应的例外列表配置 导致回滚。ItemWriterStepItemReaderItemWriterStep
在 XML 中,可以按如下方式控制回滚:
XML 配置
<step id="step1"> <tasklet> <chunk reader="itemReader" writer="itemWriter" commit-interval="2"/> <no-rollback-exception-classes> <include class="org.springframework.batch.item.validator.ValidationException"/> </no-rollback-exception-classes> </tasklet></step>在 Java 中,您可以按如下方式控制回滚:
爪哇配置
@Beanpublic Step step1(JobRepository jobRepository, PlatformTransactionManager transactionManager) { return tnew StepBuilder("step1", jobRepository) .<String, String>chunk(2, transactionManager) .reader(itemReader()) .writer(itemWriter()) .faultTolerant() .noRollback(ValidationException.class) .build();}事务性读取器
的基本合同是它仅是远期的。步进缓冲器 读取器输入,以便在回滚时不需要重新读取项目 来自读者。但是,在某些情况下,读者是建立在 事务资源(如 JMS 队列)的顶部。在这种情况下,由于队列是 绑定到回滚的事务,已从 队列重新打开。因此,您可以将步骤配置为不缓冲 项目。ItemReader
下面的示例演示如何创建不缓冲 XML 中的项的读取器:
XML 配置
<step id="step1"> <tasklet> <chunk reader="itemReader" writer="itemWriter" commit-interval="2" is-reader-transactional-queue="true"/> </tasklet></step>以下示例演示如何创建不在 Java 中缓冲项的读取器:
爪哇配置
@Beanpublic Step step1(JobRepository jobRepository, PlatformTransactionManager transactionManager) { return tnew StepBuilder("step1", jobRepository) .<String, String>chunk(2, transactionManager) .reader(itemReader()) .writer(itemWriter()) .readerIsTransactionalQueue() .build();}交易属性
您可以使用事务属性来控制 、 和 设置。您可以在 中找到有关设置交易属性的更多信息 春天 核心文档。isolationpropagationtimeout
以下示例设置 、 和 事务 XML 中的属性:isolationpropagationtimeout
XML 配置
<step id="step1"> <tasklet> <chunk reader="itemReader" writer="itemWriter" commit-interval="2"/> <transaction-attributes isolation="DEFAULT" propagation="REQUIRED" timeout="30"/> </tasklet></step>以下示例设置 、 和 事务 Java 中的属性:isolationpropagationtimeout
爪哇配置
@Beanpublic Step step1(JobRepository jobRepository, PlatformTransactionManager transactionManager) { DefaultTransactionAttribute attribute = new DefaultTransactionAttribute(); attribute.setPropagationBehavior(Propagation.REQUIRED.value()); attribute.setIsolationLevel(Isolation.DEFAULT.value()); attribute.setTimeout(30); return new StepBuilder("step1", jobRepository) .<String, String>chunk(2, transactionManager) .reader(itemReader()) .writer(itemWriter()) .transactionAttribute(attribute) .build();}注册时ItemStreamStep
该步骤必须在其必要的点处理回调 生命周期。(有关接口的详细信息,请参阅项流)。如果一个步骤失败并且可能 需要重新启动,因为接口是步骤获取的位置 它需要的有关执行之间的持久状态的信息。ItemStreamItemStreamItemStream
如果 、 或 本身实现了接口,则会自动注册这些接口。任何其他流都需要 单独注册。这通常是间接依赖关系的情况,例如 委托被注入到读取器和编写器中。您可以在 通过元素上注册流。ItemReaderItemProcessorItemWriterItemStreamstepstream
下面的示例演示如何在 XML 中注册 :streamstep
XML 配置
<step id="step1"> <tasklet> <chunk reader="itemReader" writer="compositeWriter" commit-interval="2"> <streams> <stream ref="fileItemWriter1"/> <stream ref="fileItemWriter2"/> </streams> </chunk> </tasklet></step><beans:bean id="compositeWriter" class="org.springframework.batch.item.support.CompositeItemWriter"> <beans:property name="delegates"> <beans:list> <beans:ref bean="fileItemWriter1" /> <beans:ref bean="fileItemWriter2" /> </beans:list> </beans:property></beans:bean>以下示例显示了如何在 Java 中注册 a:streamstep
爪哇配置
@Beanpublic Step step1(JobRepository jobRepository, PlatformTransactionManager transactionManager) { return tnew StepBuilder("step1", jobRepository) .<String, String>chunk(2, transactionManager) .reader(itemReader()) .writer(compositeItemWriter()) .stream(fileItemWriter1()) .stream(fileItemWriter2()) .build();}/** * In Spring Batch 4, the CompositeItemWriter implements ItemStream so this isn't * necessary, but used for an example. */@Beanpublic CompositeItemWriter compositeItemWriter() { List<ItemWriter> writers = new ArrayList<>(2); writers.add(fileItemWriter1()); writers.add(fileItemWriter2()); CompositeItemWriter itemWriter = new CompositeItemWriter(); itemWriter.setDelegates(writers); return itemWriter;}在前面的示例中,不是 ,而是其 代表是。因此,两个委托编写器都必须显式注册为流 以便框架正确处理它们。不需要 显式注册为流,因为它是 的直接属性。步骤 现在可以重新启动,并且读取器和写入器的状态正确保留在 故障事件。CompositeItemWriterItemStreamItemReaderStep
拦截执行Step
与 一样,在执行 a 的过程中有许多事件,其中 用户可能需要执行某些功能。例如,写出到平面 需要页脚的文件,需要通知何时 已完成,以便可以写入页脚。这可以通过许多作用域侦听器之一来实现。JobStepItemWriterStepStep
您可以应用实现 (但不是该接口)之一的扩展的任何类 本身,因为它是空的)来逐步完成元素。 该元素在步骤、任务集或块声明中有效。我们 建议您在其函数应用的级别声明侦听器 或者,如果它是多功能的(例如和), 在适用的最精细级别声明它。StepListenerlistenerslistenersStepExecutionListenerItemReadListener
以下示例显示了在 XML 中在块级别应用的侦听器:
XML 配置
<step id="step1"> <tasklet> <chunk reader="reader" writer="writer" commit-interval="10"/> <listeners> <listener ref="chunkListener"/> </listeners> </tasklet></step>以下示例显示了在 Java 中在块级别应用的侦听器:
爪哇配置
@Beanpublic Step step1(JobRepository jobRepository, PlatformTransactionManager transactionManager) { return tnew StepBuilder("step1", jobRepository) .<String, String>chunk(10, transactionManager) .reader(reader()) .writer(writer()) .listener(chunkListener()) .build();}本身实现其中一个接口的、 或 会自动注册到 if 使用 命名空间元素或工厂之一。这仅 适用于直接注入 .如果侦听器嵌套在 另一个组件,您需要显式注册它(如前面使用步骤注册 ItemStream 中所述)。ItemReaderItemWriterItemProcessorStepListenerStep<step>*StepFactoryBeanStep
除了接口之外,还提供了注释以解决 同样的担忧。普通的旧 Java 对象可以具有具有这些注释的方法,这些注释是 然后转换为相应的类型。注释也很常见 区块组件的自定义实现,例如 OR 或 .注释由元素的 XML 解析器进行分析 以及使用构建器中的方法注册,所以你需要做的一切 是使用 XML 命名空间或生成器向步骤注册侦听器。StepListenerStepListenerItemReaderItemWriterTasklet<listener/>listener
StepExecutionListener
StepExecutionListener表示用于执行的最通用侦听器。它 允许在 开始之前和结束之后发出通知,无论它是否结束 正常或失败,如以下示例所示:StepStep
public interface StepExecutionListener extends StepListener { void beforeStep(StepExecution stepExecution); ExitStatus afterStep(StepExecution stepExecution);}ExitStatus具有返回类型 ,以便让侦听器有机会 修改完成 时返回的退出代码。afterStepStep
与此接口对应的注释是:
- @BeforeStep
- @AfterStep
ChunkListener
“块”定义为在事务范围内处理的项目。提交一个 事务在每个提交间隔提交一个块。您可以使用 在区块开始处理之前或区块完成后执行逻辑 成功,如以下接口定义所示:ChunkListener
public interface ChunkListener extends StepListener { void beforeChunk(ChunkContext context); void afterChunk(ChunkContext context); void afterChunkError(ChunkContext context);}beforeChunk 方法在事务启动后但在读取开始之前调用 在 .相反,在块被调用后调用 已提交(如果有回滚,则根本不提交)。ItemReaderafterChunk
与此接口对应的注释是:
- @BeforeChunk
- @AfterChunk
- @AfterChunkError
您可以在没有块声明时应用 。这是 负责调用 ,因此它适用于非面向项的任务 以及(它在任务之前和之后被调用)。ChunkListenerTaskletStepChunkListener
ItemReadListener
在之前讨论跳过逻辑时,有人提到日志可能是有益的 跳过的记录,以便以后可以处理它们。在读取错误的情况下, 这可以通过 完成,如以下接口 定义显示:ItemReaderListener
public interface ItemReadListener<T> extends StepListener { void beforeRead(); void afterRead(T item); void onReadError(Exception ex);}在每次调用之前调用该方法以读取 .该方法在每次成功调用读取后调用,并传递项目 那被读了。如果读取时出错,则调用该方法。 提供了遇到的异常,以便可以记录它。beforeReadItemReaderafterReadonReadError
与此接口对应的注释是:
- @BeforeRead
- @AfterRead
- @OnReadError
ItemProcessListener
与 一样,可以“侦听”项目的处理,如 以下接口定义显示:ItemReadListener
public interface ItemProcessListener<T, S> extends StepListener { void beforeProcess(T item); void afterProcess(T item, S result); void onProcessError(T item, Exception e);}该方法在 和 之前调用 递上要处理的项目。该方法在 项目已成功处理。如果在处理时出错,则调用该方法。遇到的异常和 提供尝试处理,以便可以记录它们。beforeProcessprocessItemProcessorafterProcessonProcessError
与此接口对应的注释是:
- @BeforeProcess
- @AfterProcess
- @OnProcessError
ItemWriteListener
您可以使用 “侦听”项目的写入,作为 以下接口定义显示:ItemWriteListener
public interface ItemWriteListener<S> extends StepListener { void beforeWrite(List<? extends S> items); void afterWrite(List<? extends S> items); void onWriteError(Exception exception, List<? extends S> items);}该方法在之前被调用,并被交给 写入的项目列表。该方法在项目被调用后调用 写得成功。如果在写入时出现错误,则方法是 叫。遇到的异常和尝试写入的项目是 提供,以便可以记录它们。beforeWritewriteItemWriterafterWriteonWriteError
与此接口对应的注释是:
- @BeforeWrite
- @AfterWrite
- @OnWriteError
SkipListener
ItemReadListener、 和 都提供机制 收到错误通知,但没有通知您记录实际上已被 跳。,例如,即使重试项目,也会调用,并且 成功的。因此,有一个单独的界面用于跟踪跳过的项目,如 以下接口定义显示:ItemProcessListenerItemWriteListeneronWriteError
public interface SkipListener<T,S> extends StepListener { void onSkipInRead(Throwable t); void onSkipInProcess(T item, Throwable t); void onSkipInWrite(S item, Throwable t);}onSkipInRead每当在读取时跳过项目时都会调用。应该注意的是 该回滚可能会导致同一项目注册为多次跳过。 在写入时跳过项目时调用。因为该项目具有 已成功读取(而不是跳过),它还作为项目本身提供 论点。onSkipInWrite
与此接口对应的注释是:
- @OnSkipInRead
- @OnSkipInWrite
- @OnSkipInProcess
跳过侦听器和事务
最常见的用例之一是注销跳过的项目,因此 另一个批处理过程甚至人工过程可用于评估和修复 导致跳过的问题。因为有很多情况下原始交易 可以回滚,Spring Batch做出两个保证:SkipListener
- 仅调用一次相应的 skip 方法(取决于错误发生的时间) 每件。
- 总是在提交事务之前调用。这是 确保侦听器的任何事务资源调用都不会被 中的故障。SkipListenerItemWriter
TaskletStep
面向块的处理并不是在 中处理的唯一方法。如果必须包含存储过程调用,该怎么办?你可以 将调用实现为 AN 并在过程完成后返回 null。 但是,这样做有点不自然,因为需要 无操作 . Spring Batch 为这种情况提供了。StepStepItemReaderItemWriterTaskletStep
接口有一个方法,称为 反复通过,直到它返回或抛出 指示失败的异常。对 的每次调用都包装在一个事务中。 实现者可以调用存储过程、脚本或 SQL 更新 陈述。TaskletexecuteTaskletStepRepeatStatus.FINISHEDTaskletTasklet
如果它实现了接口,则会自动将 tasklet 注册为 .StepListenerTaskletStepStepListener
TaskletAdapter
与 和接口的其他适配器一样,该接口包含一个实现,允许将自身适应任何预先存在的 .class:。这可能有用的一个例子是现有的 DAO 用于更新一组记录上的标志。您可以使用 来调用此 类,而无需为接口编写适配器。ItemReaderItemWriterTaskletTaskletAdapterTaskletAdapterTasklet
下面的示例演示如何在 XML 中定义 :TaskletAdapter
XML 配置
<bean id="myTasklet" class="o.s.b.core.step.tasklet.MethodInvokingTaskletAdapter"> <property name="targetObject"> <bean class="org.mycompany.FooDao"/> </property> <property name="targetMethod" value="updateFoo" /></bean>以下示例显示了如何在 Java 中定义 a:TaskletAdapter
爪哇配置
@Beanpublic MethodInvokingTaskletAdapter myTasklet() { MethodInvokingTaskletAdapter adapter = new MethodInvokingTaskletAdapter(); adapter.setTargetObject(fooDao()); adapter.setTargetMethod("updateFoo"); return adapter;}实现示例Tasklet
许多批处理作业包含在主处理开始之前必须完成的步骤, 设置各种资源或在处理完成后清理这些资源 资源。对于大量处理文件的作业,通常需要 将某些文件成功上传到另一个文件后,在本地删除这些文件 位置。以下示例(取自 Spring 批处理示例项目)就是具有以下责任的实现:Tasklet
public class FileDeletingTasklet implements Tasklet, InitializingBean { private Resource directory; public RepeatStatus execute(StepContribution contribution, ChunkContext chunkContext) throws Exception { File dir = directory.getFile(); Assert.state(dir.isDirectory()); File[] files = dir.listFiles(); for (int i = 0; i < files.length; i++) { boolean deleted = files[i].delete(); if (!deleted) { throw new UnexpectedJobExecutionException("Could not delete file " + files[i].getPath()); } } return RepeatStatus.FINISHED; } public void setDirectoryResource(Resource directory) { this.directory = directory; } public void afterPropertiesSet() throws Exception { Assert.state(directory != null, "directory must be set"); }}前面的实现删除给定目录中的所有文件。它 应该注意的是,该方法只调用一次。剩下的就是 从 引用 。taskletexecutetaskletstep
下面的示例演示如何从 XML 中引用 :taskletstep
XML 配置
<job id="taskletJob"> <step id="deleteFilesInDir"> <tasklet ref="fileDeletingTasklet"/> </step></job><beans:bean id="fileDeletingTasklet" class="org.springframework.batch.sample.tasklet.FileDeletingTasklet"> <beans:property name="directoryResource"> <beans:bean id="directory" class="org.springframework.core.io.FileSystemResource"> <beans:constructor-arg value="target/test-outputs/test-dir" /> </beans:bean> </beans:property></beans:bean>以下示例显示了如何从 Java 中引用 :taskletstep
爪哇配置
@Beanpublic Job taskletJob(JobRepository jobRepository) { return new JobBuilder("taskletJob", jobRepository) .start(deleteFilesInDir()) .build();}@Beanpublic Step deleteFilesInDir(JobRepository jobRepository, PlatformTransactionManager transactionManager) { return new StepBuilder("deleteFilesInDir", jobRepository) .tasklet(fileDeletingTasklet(), transactionManager) .build();}@Beanpublic FileDeletingTasklet fileDeletingTasklet() { FileDeletingTasklet tasklet = new FileDeletingTasklet(); tasklet.setDirectoryResource(new FileSystemResource("target/test-outputs/test-dir")); return tasklet;}控制步进流
由于能够在拥有作业中将步骤组合在一起,因此需要能够 控制作业如何从一个步骤“流动”到另一个步骤。的失败不 必然意味着应该失败。此外,可能有多种类型 的“成功”,决定接下来应该执行哪个。取决于如何 组已配置,某些步骤甚至可能根本不被处理。StepJobStepSteps
顺序流
最简单的流方案是所有步骤按顺序执行的作业,如 下图显示:
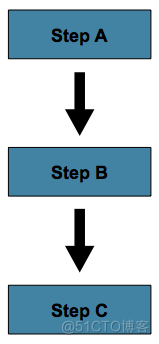
图4.顺序流
这可以通过在 中使用 来实现。nextstep
下面的示例演示如何在 XML 中使用该属性:next
XML 配置
<job id="job"> <step id="stepA" parent="s1" next="stepB" /> <step id="stepB" parent="s2" next="stepC"/> <step id="stepC" parent="s3" /></job>以下示例演示如何在 Java 中使用该方法:next()
爪哇配置
@Beanpublic Job job(JobRepository jobRepository) { return new JobBuilder("job", jobRepository) .start(stepA()) .next(stepB()) .next(stepC()) .build();}在上面的场景中,首先运行,因为它是第一个列出的。如果正常完成,则运行,依此类推。但是,如果失败, 整个失败且不执行。stepAStepstepAstepBstep AJobstepB
对于 Spring Batch XML 命名空间,配置中列出的第一步始终是 .其他步骤元素的顺序不 很重要,但第一步必须始终首先出现在 XML 中。Job
条件流
在前面的示例中,只有两种可能性:
在许多情况下,这可能就足够了。但是,在这种情况下呢 一个失败应该触发一个不同的,而不是导致失败?这 下图显示了这样的流程:stepstep
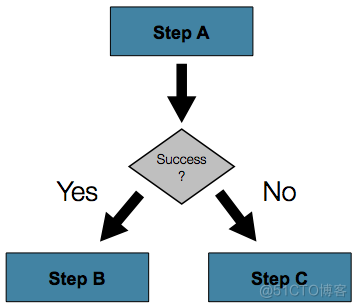
图5.条件流
为了处理更复杂的场景,Spring Batch XML 命名空间允许您定义转换 步骤元素中的元素。一个这样的过渡是元素。与属性一样,元素告诉哪个 接下来执行。但是,与属性不同的是,允许任意数量的元素 给定的,并且在失败的情况下没有默认行为。这意味着,如果 使用过渡元素,过渡的所有行为都必须 显式定义。另请注意,单个步骤不能同时具有属性和 一个元素。nextnextnextJobStepnextStepStepnexttransition
该元素指定要匹配的模式以及接下来要执行的步骤,如 以下示例显示:next
XML 配置
<job id="job"> <step id="stepA" parent="s1"> <next on="*" to="stepB" /> <next on="FAILED" to="stepC" /> </step> <step id="stepB" parent="s2" next="stepC" /> <step id="stepC" parent="s3" /></job>Java API 提供了一组流畅的方法,允许您指定流程和操作 当步骤失败时。下面的示例演示如何指定一个步骤 (),然后 继续执行两个不同步骤( 或 ),具体取决于是否成功:stepAstepBstepCstepA
爪哇配置
@Beanpublic Job job(JobRepository jobRepository) { return new JobBuilder("job", jobRepository) .start(stepA()) .on("*").to(stepB()) .from(stepA()).on("FAILED").to(stepC()) .end() .build();}使用 XML 配置时,转换元素的属性使用简单的 模式匹配方案,以匹配执行 .onExitStatusStep
使用 java 配置时,该方法使用简单的模式匹配方案来 匹配执行 时产生的结果。on()ExitStatusStep
模式中只允许两个特殊字符:
- *匹配零个或多个字符
- ?只匹配一个字符
例如,匹配和 ,而匹配但不匹配 。c*tcatcountc?tcatcount
虽然 上的转换元素数量没有限制,但如果执行导致元素未涵盖的 ,则 框架引发异常和失败。框架自动订购 从最具体到最不具体的过渡。这意味着,即使订购 在前面的示例中被交换,一个 of 仍然会去 自。StepStepExitStatusJobstepAExitStatusFAILEDstepC
批处理状态与退出状态
为条件流配置 时,了解 和 之间的区别。 是一个枚举 是两者的属性,并且被框架用于 记录 或 的状态。它可以是以下值之一:、 或 。它们中的大多数是不言自明的:是步骤时设置的状态 或作业已成功完成,在失败时设置,依此类推。JobBatchStatusExitStatusBatchStatusJobExecutionStepExecutionJobStepCOMPLETEDSTARTINGSTARTEDSTOPPINGSTOPPEDFAILEDABANDONEDUNKNOWNCOMPLETEDFAILED
以下示例包含使用 XML 配置时的元素:next
<next on="FAILED" to="stepB" />以下示例包含使用 Java 配置时的元素:on
....from(stepA()).on("FAILED").to(stepB())...乍一看,似乎引用了 它所属的。但是,它实际上引用了 .作为 名称表示,表示 A 完成执行后的状态。onBatchStatusStepExitStatusStepExitStatusStep
更具体地说,使用 XML 配置时,元素显示在 前面的 XML 配置示例引用了 的退出代码。nextExitStatus
使用 Java 配置时,前面所示的方法 Java 配置示例引用 的退出代码。on()ExitStatus
在英语中,它说:“如果退出代码失败,则转到步骤B”。默认情况下,退出 代码始终与 for 相同,这就是为什么前面的条目 工程。但是,如果退出代码需要不同怎么办?一个很好的例子来自 示例项目中的跳过示例作业:BatchStatusStep
下面的示例演示如何在 XML 中使用不同的退出代码:
XML 配置
<step id="step1" parent="s1"> <end on="FAILED" /> <next on="COMPLETED WITH SKIPS" to="errorPrint1" /> <next on="*" to="step2" /></step>以下示例演示如何在 Java 中使用不同的退出代码:
爪哇配置
@Beanpublic Job job(JobRepository jobRepository) { return new JobBuilder("job", jobRepository) .start(step1()).on("FAILED").end() .from(step1()).on("COMPLETED WITH SKIPS").to(errorPrint1()) .from(step1()).on("*").to(step2()) .end() .build();}step1有三种可能性:
- 失败,在这种情况下,作业应失败。Step
- 成功完成。Step
- 已成功完成,但退出代码为 。在 在这种情况下,应运行不同的步骤来处理错误。StepCOMPLETED WITH SKIPS
上述配置有效。但是,需要根据以下内容更改退出代码 执行跳过记录的条件,如以下示例所示:
public class SkipCheckingListener extends StepExecutionListenerSupport { public ExitStatus afterStep(StepExecution stepExecution) { String exitCode = stepExecution.getExitStatus().getExitCode(); if (!exitCode.equals(ExitStatus.FAILED.getExitCode()) && stepExecution.getSkipCount() > 0) { return new ExitStatus("COMPLETED WITH SKIPS"); } else { return null; } }}前面的代码是首先检查以确保 成功,然后检查 上的跳过计数是否高于 0. 如果同时满足这两个条件,则返回退出代码为 的新。StepExecutionListenerStepStepExecutionExitStatusCOMPLETED WITH SKIPS
配置停止
在讨论了批处理状态和退出状态之后, 有人可能想知道 和 是如何确定 的 . 虽然这些状态是由执行的代码确定的,但 的状态是根据配置确定的。BatchStatusExitStatusJobStepJob
到目前为止,所有讨论的作业配置都至少有一次决赛 无过渡。Step
在下面的 XML 示例中,执行后结束:stepJob
<step id="stepC" parent="s3"/>在下面的 Java 示例中,执行后,结束:stepJob
@Beanpublic Job job(JobRepository jobRepository) { return new JobBuilder("job", jobRepository) .start(step1()) .build();}如果没有为 定义转换,则 的状态定义为 遵循:StepJob
- 如果以 的结尾,则 和 的 两者都是.StepExitStatusFAILEDBatchStatusExitStatusJobFAILED
- 否则,和 的 都是 。BatchStatusExitStatusJobCOMPLETED
虽然这种终止批处理作业的方法足以满足某些批处理作业,例如 可能需要简单的顺序步骤作业,自定义的作业停止方案。为 为此,Spring Batch 提供了三个过渡元素来阻止 (在 添加到我们之前讨论的下一个元素)。 这些停止元素中的每一个都停止一个特定的 .是的 请务必注意,停止过渡元素对 中的任何 或 都没有影响。这些元素仅影响 的最终状态。例如,作业中的每个步骤都可能具有 状态为 ,但作业的状态为 。JobJobBatchStatusBatchStatusExitStatusStepsJobJobFAILEDCOMPLETED
一步结束
配置步骤结束指示 停止,并返回 的 。已完成且状态为 无法重新启动的 A (框架抛出 a ).JobBatchStatusCOMPLETEDJobCOMPLETEDJobInstanceAlreadyCompleteException
使用 XML 配置时,可以将该元素用于此任务。元素 还允许使用可选属性来自定义 .如果未给出属性,则缺省情况下为 与 .endendexit-codeExitStatusJobexit-codeExitStatusCOMPLETEDBatchStatus
使用 Java 配置时,该方法用于此任务。方法 还允许使用可选参数来自定义 .如果未提供任何值,则缺省情况下为 与 .endendexitStatusExitStatusJobexitStatusExitStatusCOMPLETEDBatchStatus
请考虑以下方案:如果失败,则 停止并显示 of 和 of ,并且不会运行。 否则,执行将移至 。请注意,如果失败,则 不是 可重新启动(因为状态为 )。step2JobBatchStatusCOMPLETEDExitStatusCOMPLETEDstep3step3step2JobCOMPLETED
以下示例显示了 XML 中的方案:
<step id="step1" parent="s1" next="step2"><step id="step2" parent="s2"> <end on="FAILED"/> <next on="*" to="step3"/></step><step id="step3" parent="s3">以下示例显示了 Java 中的场景:
@Beanpublic Job job(JobRepository jobRepository) { return new JobBuilder("job", jobRepository) .start(step1()) .next(step2()) .on("FAILED").end() .from(step2()).on("*").to(step3()) .end() .build();}步骤失败
将步骤配置为在给定点失败会指示 停止,并显示 的 。与 end 不同,a 的失败不会阻止重新启动。JobBatchStatusFAILEDJobJob
使用 XML 配置时,该元素还允许一个可选属性,该属性可用于自定义 .如果未给出属性,则缺省情况下为 与 .failexit-codeExitStatusJobexit-codeExitStatusFAILEDBatchStatus
请考虑以下方案:如果失败,则停止时以 of 和 of 和 not 执行。否则,执行将移至 。此外,如果失败并重新启动,则在 上将再次开始执行。step2JobBatchStatusFAILEDExitStatusEARLY TERMINATIONstep3step3step2Jobstep2
以下示例显示了 XML 中的方案:
XML 配置
<step id="step1" parent="s1" next="step2"><step id="step2" parent="s2"> <fail on="FAILED" exit-code="EARLY TERMINATION"/> <next on="*" to="step3"/></step><step id="step3" parent="s3">以下示例显示了 Java 中的场景:
爪哇配置
@Beanpublic Job job(JobRepository jobRepository) { return new JobBuilder("job", jobRepository) .start(step1()) .next(step2()).on("FAILED").fail() .from(step2()).on("*").to(step3()) .end() .build();}在给定步骤停止作业
将作业配置为在特定步骤处停止会指示 停止,并显示 的 。停止 a 可能会暂时中断处理, 以便操作员可以在重新启动 .JobBatchStatusSTOPPEDJobJob
使用 XML 配置时,元素需要一个指定 重新启动时应继续执行的步骤。stoprestartJob
使用 Java 配置时,该方法需要一个属性 指定在重新启动作业时应继续执行的步骤。stopAndRestartrestart
请考虑以下方案:如果以 完成,则作业 停止。重新启动后,执行将在 开始。step1COMPLETEstep2
下面的清单显示了 XML 中的方案:
<step id="step1" parent="s1"> <stop on="COMPLETED" restart="step2"/></step><step id="step2" parent="s2"/>以下示例显示了 Java 中的场景:
@Beanpublic Job job(JobRepository jobRepository) { return new JobBuilder("job", jobRepository) .start(step1()).on("COMPLETED").stopAndRestart(step2()) .end() .build();}程序化流程决策
在某些情况下,比决定所需的更多信息 下一步要执行的步骤。在这种情况下,可以使用 来协助 在决策中,如以下示例所示:ExitStatusJobExecutionDecider
public class MyDecider implements JobExecutionDecider { public FlowExecutionStatus decide(JobExecution jobExecution, StepExecution stepExecution) { String status; if (someCondition()) { status = "FAILED"; } else { status = "COMPLETED"; } return new FlowExecutionStatus(status); }}在以下示例作业配置中,a 指定要用作的决策程序 以及所有过渡:decision
XML 配置
<job id="job"> <step id="step1" parent="s1" next="decision" /> <decision id="decision" decider="decider"> <next on="FAILED" to="step2" /> <next on="COMPLETED" to="step3" /> </decision> <step id="step2" parent="s2" next="step3"/> <step id="step3" parent="s3" /></job><beans:bean id="decider" class="com.MyDecider"/>在下面的示例中,传递了实现 使用 Java 配置时直接调用:JobExecutionDecidernext
爪哇配置
@Beanpublic Job job(JobRepository jobRepository) { return new JobBuilder("job", jobRepository) .start(step1()) .next(decider()).on("FAILED").to(step2()) .from(decider()).on("COMPLETED").to(step3()) .end() .build();}拆分流
到目前为止,描述的每个场景都涉及一个执行其步骤一个 线性方式的时间。除了这种典型的风格,Spring Batch 还允许 用于使用并行流配置作业。Job
XML 命名空间允许您使用该元素。如以下示例所示, 该元素包含一个或多个元素,其中整个单独的流可以 被定义。元素还可以包含前面讨论的任何转换 元素,例如属性或 、 或元素。splitsplitflowsplitnextnextendfail
<split id="split1" next="step4"> <flow> <step id="step1" parent="s1" next="step2"/> <step id="step2" parent="s2"/> </flow> <flow> <step id="step3" parent="s3"/> </flow></split><step id="step4" parent="s4"/>基于 Java 的配置允许您通过提供的构建器配置拆分。作为 以下示例显示,该元素包含一个或多个元素,其中 可以定义整个单独的流。元素还可以包含任何 前面讨论的过渡元素,例如属性或 、 或元素。splitflowsplitnextnextendfail
@Beanpublic Flow flow1() { return new FlowBuilder<SimpleFlow>("flow1") .start(step1()) .next(step2()) .build();}@Beanpublic Flow flow2() { return new FlowBuilder<SimpleFlow>("flow2") .start(step3()) .build();}@Beanpublic Job job(Flow flow1, Flow flow2) { return this.jobBuilderFactory.get("job") .start(flow1) .split(new SimpleAsyncTaskExecutor()) .add(flow2) .next(step4()) .end() .build();}外部化流定义和作业之间的依赖关系
作业中的部分流可以外部化为单独的 Bean 定义,然后 重复使用。有两种方法可以做到这一点。第一种是将流声明为 引用在其他地方定义的一个。
下面的 XML 示例演示如何将流声明为对定义的流的引用 别处:
XML 配置
<job id="job"> <flow id="job1.flow1" parent="flow1" next="step3"/> <step id="step3" parent="s3"/></job><flow id="flow1"> <step id="step1" parent="s1" next="step2"/> <step id="step2" parent="s2"/></flow>以下 Java 示例演示如何将流声明为对定义的流的引用 别处:
Java Confguration
@Beanpublic Job job(JobRepository jobRepository) { return new JobBuilder("job", jobRepository) .start(flow1()) .next(step3()) .end() .build();}@Beanpublic Flow flow1() { return new FlowBuilder<SimpleFlow>("flow1") .start(step1()) .next(step2()) .build();}The effect of defining an external flow, as shown in the preceding example, is to insert the steps from the external flow into the job as if they had been declared inline. In this way, many jobs can refer to the same template flow and compose such templates into different logical flows. This is also a good way to separate the integration testing of the individual flows.
The other form of an externalized flow is to use a . A is similar to a but actually creates and launches a separate job execution for the steps in the flow specified.JobStepJobStepFlowStep
The following example hows an example of a in XML:JobStep
XML Configuration
<job id="jobStepJob" restartable="true"> <step id="jobStepJob.step1"> <job ref="job" job-launcher="jobLauncher" job-parameters-extractor="jobParametersExtractor"/> </step></job><job id="job" restartable="true">...</job><bean id="jobParametersExtractor" class="org.spr...DefaultJobParametersExtractor"> <property name="keys" value="input.file"/></bean>The following example shows an example of a in Java:JobStep
Java Configuration
@Beanpublic Job jobStepJob(JobRepository jobRepository) { return new JobBuilder("jobStepJob", jobRepository) .start(jobStepJobStep1(null)) .build();}@Beanpublic Step jobStepJobStep1(JobLauncher jobLauncher, JobRepository jobRepository) { return new StepBuilder("jobStepJobStep1", jobRepository) .job(job()) .launcher(jobLauncher) .parametersExtractor(jobParametersExtractor()) .build();}@Beanpublic Job job(JobRepository jobRepository) { return new JobBuilder("job", jobRepository) .start(step1()) .build();}@Beanpublic DefaultJobParametersExtractor jobParametersExtractor() { DefaultJobParametersExtractor extractor = new DefaultJobParametersExtractor(); extractor.setKeys(new String[]{"input.file"}); return extractor;}作业参数提取器是一种策略,用于确定如何 转换为 用于运行。这是 当您希望有一些更精细的选项来监视和报告 作业和步骤。使用通常也是对以下问题的良好回答:“我如何 在作业之间创建依赖关系?这是将大型系统分解为的好方法 更小的模块并控制作业流。ExecutionContextStepJobParametersJobJobStepJobStep
和属性的后期绑定JobStep
前面显示的 XML 和平面文件示例都使用 Spring 抽象 以获取文件。这是有效的,因为有一个返回 .您可以使用标准 Spring 配置 XML 和平面文件资源 构建:ResourceResourcegetFilejava.io.File
下面的示例演示 XML 中的后期绑定:
XML 配置
<bean id="flatFileItemReader" class="org.springframework.batch.item.file.FlatFileItemReader"> <property name="resource" value="file://outputs/file.txt" /></bean>以下示例显示了 Java 中的后期绑定:
爪哇配置
@Beanpublic FlatFileItemReader flatFileItemReader() { FlatFileItemReader<Foo> reader = new FlatFileItemReaderBuilder<Foo>() .name("flatFileItemReader") .resource(new FileSystemResource("file://outputs/file.txt")) ...}前面从指定的文件系统位置加载文件。注意 该绝对位置必须以双斜杠 () 开头。在大多数春天 应用程序,这个解决方案已经足够好了,因为这些资源的名称是 编译时已知。但是,在批处理方案中,文件名可能需要 在运行时确定为作业的参数。这可以使用参数来解决 以读取系统属性。Resource//-D
下面的示例演示如何从 XML 中的属性中读取文件名:
XML 配置
<bean id="flatFileItemReader" class="org.springframework.batch.item.file.FlatFileItemReader"> <property name="resource" value="${input.file.name}" /></bean>下面显示了如何从 Java 中的属性读取文件名:
爪哇配置
@Beanpublic FlatFileItemReader flatFileItemReader(@Value("${input.file.name}") String name) { return new FlatFileItemReaderBuilder<Foo>() .name("flatFileItemReader") .resource(new FileSystemResource(name)) ...}此解决方案工作所需的只是一个系统参数(例如 )。-Dinput.file.name="file://outputs/file.txt"
虽然你可以在这里使用,但它不是 如果始终设置系统属性,则为必需,因为在 Spring 中 已经过滤并在系统属性上替换占位符。PropertyPlaceholderConfigurerResourceEditor
通常,在批处理设置中,最好在作业中参数化文件名(而不是通过系统属性)并访问它们 道路。为了实现这一点,Spring Batch 允许各种属性的后期绑定。JobParametersJobStep
下面的示例演示如何在 XML 中参数化文件名:
XML 配置
<bean id="flatFileItemReader" scope="step" class="org.springframework.batch.item.file.FlatFileItemReader"> <property name="resource" value="#{jobParameters['input.file.name']}" /></bean>以下示例演示如何在 Java 中参数化文件名:
爪哇配置
@StepScope@Beanpublic FlatFileItemReader flatFileItemReader(@Value("#{jobParameters['input.file.name']}") String name) { return new FlatFileItemReaderBuilder<Foo>() .name("flatFileItemReader") .resource(new FileSystemResource(name)) ...}您可以访问 和 级别 同样的方式。JobExecutionStepExecutionExecutionContext
下面的示例演示如何访问 XML 中的:ExecutionContext
XML 配置
<bean id="flatFileItemReader" scope="step" class="org.springframework.batch.item.file.FlatFileItemReader"> <property name="resource" value="#{jobExecutionContext['input.file.name']}" /></bean>XML 配置
<bean id="flatFileItemReader" scope="step" class="org.springframework.batch.item.file.FlatFileItemReader"> <property name="resource" value="#{stepExecutionContext['input.file.name']}" /></bean>以下示例显示了如何在 Java 中访问 :ExecutionContext
爪哇配置
@StepScope@Beanpublic FlatFileItemReader flatFileItemReader(@Value("#{jobExecutionContext['input.file.name']}") String name) { return new FlatFileItemReaderBuilder<Foo>() .name("flatFileItemReader") .resource(new FileSystemResource(name)) ...}爪哇配置
@StepScope@Beanpublic FlatFileItemReader flatFileItemReader(@Value("#{stepExecutionContext['input.file.name']}") String name) { return new FlatFileItemReaderBuilder<Foo>() .name("flatFileItemReader") .resource(new FileSystemResource(name)) ...}任何使用后期绑定的 Bean 都必须使用 声明。有关详细信息,请参阅步骤范围。 Bean 不应是步进范围的。如果步骤中需要后期绑定 定义,该步骤的组件(tasklet、item reader 或 writer 等) 是应该限定范围的那些。scope="step"Step
如果您使用 Spring 3.0(或更高版本),则步作用域 Bean 中的表达式位于 Spring 表达式语言,一种功能强大的通用语言,具有许多有趣的功能 特征。为了提供向后兼容性,如果 Spring Batch 检测到存在 旧版本的 Spring,它使用一种不太强大的原生表达式语言和 解析规则略有不同。主要区别在于地图键 上面的例子不需要在 Spring 2.5 中引用,但引用是强制性的 在春季 3.0 中。
Step Scope
All of the late binding examples shown earlier have a scope of declared on the bean definition.step
The following example shows an example of binding to step scope in XML:
XML Configuration
<bean id="flatFileItemReader" scope="step" class="org.springframework.batch.item.file.FlatFileItemReader"> <property name="resource" value="#{jobParameters[input.file.name]}" /></bean>The following example shows an example of binding to step scope in Java:
Java Configuration
@StepScope@Beanpublic FlatFileItemReader flatFileItemReader(@Value("#{jobParameters[input.file.name]}") String name) { return new FlatFileItemReaderBuilder<Foo>() .name("flatFileItemReader") .resource(new FileSystemResource(name)) ...}Using a scope of is required to use late binding, because the bean cannot actually be instantiated until the starts, to let the attributes be found. Because it is not part of the Spring container by default, the scope must be added explicitly, by using the namespace, by including a bean definition explicitly for the , or by using the annotation. Use only one of those methods. The following example uses the namespace:StepStepbatchStepScope@EnableBatchProcessingbatch
<beans xmlns="http://www.springframework.org/schema/beans" xmlns:batch="http://www.springframework.org/schema/batch" xmlns:xsi="http://www.w3.org/2001/XMLSchema-instance" xsi:schemaLocation="..."><batch:job .../>...</beans>以下示例显式包含 Bean 定义:
<bean class="org.springframework.batch.core.scope.StepScope" />工作范围
JobSpring Batch 3.0 中引入的作用域类似于配置中的作用域 但是是上下文的范围,因此这样的 Bean 只有一个实例 每个正在运行的作业。此外,还提供了对引用的后期绑定的支持 使用占位符从 访问。使用此功能,您可以拉豆 作业或作业执行上下文中的属性以及作业参数。StepJobJobContext#{..}
下面的示例演示在 XML 中绑定到作业范围的示例:
XML 配置
<bean id="..." class="..." scope="job"> <property name="name" value="#{jobParameters[input]}" /></bean>XML 配置
<bean id="..." class="..." scope="job"> <property name="name" value="#{jobExecutionContext['input.name']}.txt" /></bean>以下示例显示了在 Java 中绑定到作业范围的示例:
爪哇配置
@JobScope@Beanpublic FlatFileItemReader flatFileItemReader(@Value("#{jobParameters[input]}") String name) { return new FlatFileItemReaderBuilder<Foo>() .name("flatFileItemReader") .resource(new FileSystemResource(name)) ...}爪哇配置
@JobScope@Beanpublic FlatFileItemReader flatFileItemReader(@Value("#{jobExecutionContext['input.name']}") String name) { return new FlatFileItemReaderBuilder<Foo>() .name("flatFileItemReader") .resource(new FileSystemResource(name)) ...}由于默认情况下它不是 Spring 容器的一部分,因此必须添加范围 显式地,通过使用命名空间,通过显式包含 Bean 定义 作业范围,或使用批注(仅选择一种方法)。 以下示例使用命名空间:batch@EnableBatchProcessingbatch
<beans xmlns="http://www.springframework.org/schema/beans" xmlns:batch="http://www.springframework.org/schema/batch" xmlns:xsi="http://www.w3.org/2001/XMLSchema-instance" xsi:schemaLocation="..."><batch:job .../>...</beans>以下示例包含一个显式定义 的 Bean:JobScope
<bean class="org.springframework.batch.core.scope.JobScope" />在多线程中使用作业范围的 Bean 存在一些实际限制 或分区步骤。Spring 批处理不控制在这些线程中生成的线程 用例,因此无法正确设置它们以使用此类 bean。因此 我们不建议在多线程或分区步骤中使用作业范围的 Bean。
范围界定组件ItemStream
使用 Java 配置样式定义作业或步骤作用域 Bean 时, Bean 定义方法的返回类型应至少为 。这是必需的 以便 Spring Batch 正确创建实现此接口的代理,因此 按预期通过调用 和方法来履行协定。ItemStreamItemStreamopenupdateclose
建议让这类豆子的 bean 定义方法返回最具体的 已知实现,如以下示例所示:
定义具有最具体返回类型的步骤范围的 Bean
@Bean@StepScopepublic FlatFileItemReader flatFileItemReader(@Value("#{jobParameters['input.file.name']}") String name) { return new FlatFileItemReaderBuilder<Foo>() .resource(new FileSystemResource(name)) // set other properties of the item reader .build();}