这篇文章主要介绍了SpringBoot2整合activiti6环境搭建过程解析,文中通过示例代码介绍的非常详细,对大家的学习或者工作具有一定的参考学习价值,需要的朋友可以参考下 依赖 dependencies
这篇文章主要介绍了SpringBoot2整合activiti6环境搭建过程解析,文中通过示例代码介绍的非常详细,对大家的学习或者工作具有一定的参考学习价值,需要的朋友可以参考下
依赖
<dependencies>
    <dependency>
      <groupId>org.springframework.boot</groupId>
      <artifactId>spring-boot-starter-web</artifactId>
    </dependency>
    <dependency>
      <groupId>org.activiti</groupId>
      <artifactId>activiti-spring-boot-starter-basic</artifactId>
      <version>${activiti.version}</version>
    </dependency>
    <dependency>
      <groupId>org.springframework.boot</groupId>
      <artifactId>spring-boot-starter-jdbc</artifactId>
    </dependency>
    <!-- mysql驱动 -->
    <dependency>
      <groupId>mysql</groupId>
      <artifactId>mysql-connector-java</artifactId>
    </dependency>
  </dependencies>
这里使用的springboot2.0.6的版本,activiti为6.0.0的版本
添加processes目录
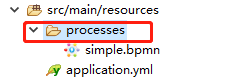
SpringBoot集成activiti默认会从classpath下的processes目录下读取流程定义文件,所以需要在src/main/resources目录下添加processes目录,并在目录中创建流程文件
application.yml
spring:
 activiti:
  check-process-definitions: true #自动检查、部署流程定义文件
  database-schema-update: true #自动更新数据库结构
  #流程定义文件存放目录
  process-definition-location-prefix: classpath:/processes/
  #process-definition-location-suffixes: #流程文件格式
 datasource:
  driver-class-name: com.mysql.jdbc.Driver
  url: jdbc:mysql://127.0.0.1:3306/taosir_process?useUnicode=true&useSSL=false&characterEncoding=utf8
  username : root
  password : root
  initsize : 10
  maxActive : 20
  minIdle : 10
  maxWait : 120000
  poolPreparedStatements : false
  maxOpenPreparedStatements : -1
  validationQuery : select 1
  testOnborrow : true
  testOnReturn : true
  testWhileIdle : true
  timeBetweenEvictionRunsMillis : 120000
server:
 port: 8764
bpmn文件
<?xml version="1.0" encoding="UTF-8" standalone="yes"?>
<definitions xmlns="http://www.omg.org/spec/BPMN/20100524/MODEL" xmlns:activiti="http://activiti.org/bpmn" xmlns:bpmndi="http://www.omg.org/spec/BPMN/20100524/DI" xmlns:dc="http://www.omg.org/spec/DD/20100524/DC" xmlns:di="http://www.omg.org/spec/DD/20100524/DI" xmlns:tns="Examples" xmlns:xsd="http://www.w3.org/2001/XMLSchema" xmlns:xsi="http://www.w3.org/2001/XMLSchema-instance" expressionLanguage="http://www.w3.org/1999/XPath" id="m1539757531057" name="" targetNamespace="Examples" typeLanguage="http://www.w3.org/2001/XMLSchema">
 <process id="oneTaskProcess" isClosed="false" name="The One Task Process" processType="None">
  <startEvent id="theStart"/>
  <sequenceFlow id="flow1" sourceRef="theStart" targetRef="theTask"/>
  <userTask activiti:assignee="${user}" activiti:exclusive="true" id="theTask" name="my task"/>
  <sequenceFlow id="flow2" sourceRef="theTask" targetRef="theEnd"/>
  <endEvent id="theEnd"/>
 </process>
</definitions>
启动类,注意@SpringBootApplication注解需要设置exclude属性
package cn.zytao.taosir.process;
import org.activiti.spring.boot.SecurityAutoConfiguration;
import org.springframework.boot.SpringApplication;
import org.springframework.boot.autoconfigure.SpringBootApplication;

@SpringBootApplication(exclude = SecurityAutoConfiguration.class)
public class ProcessApplication {
  public static void main(String[] args) {
    SpringApplication.run(ProcessApplication.class, args);
  }
}
以上就是本文的全部内容,希望对大家的学习有所帮助,也希望大家多多支持自由互联。