本文测试使用的spring cloud版本为:
Dalston.SR1
很多朋友只知道spring cloud config可以刷新远程git的配置到内存中,
却不知道spring cloud config的客户端可以脱离服务端使用,
更不知道spring cloud config客户端结合actuator还可以刷新本地的配置文件到内存中。
具体做法如下:
1、pom:
<?xml version="1.0" encoding="UTF-8"?>
<project xmlns="http://maven.apache.org/POM/4.0.0"
     xmlns:xsi="http://www.w3.org/2001/XMLSchema-instance"
     xsi:schemaLocation="http://maven.apache.org/POM/4.0.0 http://maven.apache.org/xsd/maven-4.0.0.xsd">
  <modelVersion>4.0.0</modelVersion>

  <groupId>com.liuyx</groupId>
  <artifactId>test-config-refresh</artifactId>
  <version>1.0-SNAPSHOT</version>

  <parent>
    <groupId>org.springframework.boot</groupId>
    <artifactId>spring-boot-starter-parent</artifactId>
    <version>1.5.4.RELEASE</version>
    <relativePath/> <!-- lookup parent from repository -->
  </parent>

  <dependencies>
    <dependency>
      <groupId>org.springframework.boot</groupId>
      <artifactId>spring-boot-starter-web</artifactId>
    </dependency>
    <dependency>
      <groupId>org.springframework.cloud</groupId>
      <artifactId>spring-cloud-starter-config</artifactId>
    </dependency>

    <!--监控+refresh配置-->
    <dependency>
      <groupId>org.springframework.boot</groupId>
      <artifactId>spring-boot-starter-actuator</artifactId>
    </dependency>
  </dependencies>

  <dependencyManagement>
    <dependencies>
      <dependency>
        <groupId>org.springframework.cloud</groupId>
        <artifactId>spring-cloud-dependencies</artifactId>
        <version>Dalston.SR1</version>
        <type>pom</type>
        <scope>import</scope>
      </dependency>
    </dependencies>
  </dependencyManagement>

</project>
单独引入 spring-boot-starter-actuator或者spring-cloud-starter-config(spring cloud config的客户端) 是不会暴露/refresh端点的,两者同时引入之后才能暴露/refresh端点。
2、一般使用spring-cloud-starter-config的文章都会让你在bootstrap里加上配置中心服务端的地址,这里我们要脱离配置中心服务端使用,所以这些配置完全不需要。
3、对需要刷新的属性使用@Value注解,同时将类使用@RefreshScope注解进行标记,示例如下:
package com.liuyx.test;

import org.springframework.beans.factory.annotation.Value;
import org.springframework.boot.SpringApplication;
import org.springframework.boot.autoconfigure.SpringBootApplication;
import org.springframework.cloud.context.config.annotation.RefreshScope;
import org.springframework.web.bind.annotation.RequestMapping;
import org.springframework.web.bind.annotation.RestController;

@SpringBootApplication
@RestController
@RefreshScope
public class Main {
  public static void main(String[] args) {
    SpringApplication.run(Main.class);
  }

  private static int port;

  @Value("${server.port}")
  public void setPort(int port){
    this.port=port;
  }

  @RequestMapping("/port")
  public int port(){
    return port;
  }
}
这里我的变量是一个static变量,所以只能在非static的set方法上加@Value注解,而不是变量定义行的上方。如果不是静态变量则可以直接写作:
  @Value("${server.port}")
  private int port;
4、application.properties配置
server.port=80
local.test=hello1
management.security.enabled=false
5、测试
1、启动项目,访问 http://localhost/port 显示 80
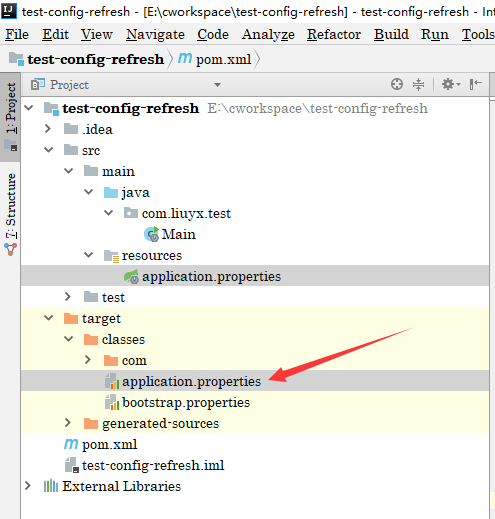
2、修改classpath(注意是classpath,即你编译后的class文件所处的目录)下的application.properties将server.port改为801

3、发送空post(注意是post)请求到 http://localhost:80/refresh

4、再次访问 http://localhost/port 显示 801 测试成功
最后的补充:
即使结合配置中心服务端使用,该方法也是有效的,所有有效位置的有效配置文件(如git上的,jar内的,jar外的)都会被扫描,并根据一定的顺序进行覆盖
以上就是本文的全部内容,希望对大家的学习有所帮助,也希望大家多多支持自由互联。
