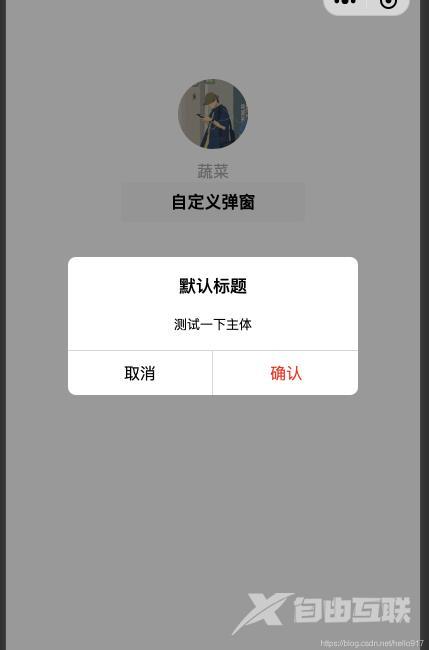
本文实例为大家分享了小程序自定义弹出框效果的具体代码,供大家参考,具体内容如下 my-pop----api: title ------字符串---------自定义弹窗标题 context ------字符串---------自定义弹窗内容
本文实例为大家分享了小程序自定义弹出框效果的具体代码,供大家参考,具体内容如下


my-pop----api:
title ------字符串---------自定义弹窗标题
context ------字符串---------自定义弹窗内容
cancelTxt ------字符串---------取消按钮文本
cancelCor ------字符串---------取消按钮颜色
inp ------布尔值---------true文本弹出框---------fasle默认弹出框
okTxt ------字符串---------确定按钮文字
okCor ------字符串---------确定按钮颜色
@cancel ------事件---------点击取消按钮事件可携带value参数
@ok ------事件---------点击确定按钮事件可携带value参数
//使用方法
//在目标文件json文件里引入该组件
"usingComponents": {
    "mypop":"/components/my-pop"
 }

<mypop id="mypop" context="测试一下主体" inp="{{true}}" bindok="ok"/>
//给组件一个id
this.selectComponent("#mypop").openPop();   //打开弹窗
ok(e)  //点击确定触发 如果是inp类型弹窗 e 就是input的value , 反之e为空串
cancel(e) //点击取消触发  如果是inp类型弹窗 e 就是input的value  , 反之e为空串
弹窗js文件:
Component({
  /**
   * 组件的属性列表
   */
  properties: {
    title: {
      type: String,
      value: '默认标题',
    },
    context: {
      type: String,
      value: '默认内容',
    },
    inp:{
      type: Boolean,
      value: true
    },
    cancelTxt: {
      type: String,
      value: '取消',
    },
    cancelCor:{
      type:String,
      value:'black'
    },
    okTxt: {
      type: String,
      value: '确认',
    },
    okCor:{
      type:String,
      value:'red'
    },
  },

  /**
   * 组件的初始数据
   */
  data: {
    show:false,
    animation:'',
    animationPop:'',
    inpVal:''
  },


  methods: {
    bindinput(e){
      let {value} = e.detail
      this.setData({inpVal:value})
    },
    ok(){
      this.triggerEvent("ok",this.data.inpVal);
      this.hidePop()
      this.setData({inpVal:''})
    },
    cancel(){
      this.triggerEvent("cancel",this.data.inpVal);
      this.hidePop()
      this.setData({inpVal:''})
    },
    openPop(){
      var animation = wx.createAnimation({
          duration: 200,
          timingFunction: "linear",
          delay: 0
      })
      this.animation = animation
      animation.opacity(0).step()
      this.setData({
        animationData: animation.export(),
        show:true
      })
      setTimeout(function () {
          animation.opacity(1).step()
          this.setData({
              animationData: animation.export()
          })
      }.bind(this), 200)
    },
    hidePop(){
      var animation = wx.createAnimation({
          duration: 200,
          timingFunction: "linear",
          delay: 0
      })
      this.animation = animation
      animation.opacity(0).step()
      this.setData({
        animationData: animation.export()
      })
      setTimeout(function () {
          this.setData({
              show:false
          })
      }.bind(this), 200)
    }
  }
})
弹窗wxml文件:
<!--components/my-pop.wxml-->
<view>
  <view class="mask" animation="{{animationData}}" bindtap="hidePop" wx:if="{{show}}">
    <view class="content" animation="{{animationPop}}" catchtap >
      <view class="title">{{title}}</view>
      <view class="txt" wx:if="{{!inp}}">{{context}}</view>
      <view class="inp" wx:if="{{inp}}">
        <input type="text" value='{{inpVal}}' bindinput="bindinput" name="" id="" />
      </view>
      <view class="btnView">
        <view class="cancel" hover-class="op5" bindtap="cancel" style="color:{{cancelCor}}">{{cancelTxt}}</view>
        <view class="partition"></view>
        <view class="ok" hover-class="op5" bindtap="ok" style="color:{{okCor}}">{{okTxt}}</view>
      </view>
    </view>
  </view>
</view>
弹窗wxss文件:
.mask{
  width: 100%;
  height: 100vh;
  position: fixed;
  top: 0; left: 0;
  z-index: 100;
  background: rgba(0, 0, 0, 0.4);
  display: flex;
  align-items: center;
  justify-content: center;
}
.content{
  background: #FFFFFF;
  border-radius: 16rpx;
  width: 70%;
}
.title{
  padding: 32rpx 0rpx;
  text-align: center;
  font-weight: 500;
    font-size: 32rpx;
    color: black;
}
.txt{
  color: #000000;
  font-size: 24rpx;
  text-align: center;
  margin-bottom: 32rpx;
}
.btnView{
  border-top: 1rpx solid #D4D6D8;
  display: flex;
  align-items: center;
  justify-content: space-around;
}
.cancel{
  width: 49%;
  display: flex;
  align-items: center;
  justify-content: center;
  height: 80rpx; line-height: 80rpx;
}
.ok{
  width: 49%;
  display: flex;
  align-items: center;
  justify-content: center;
  height: 80rpx; line-height: 80rpx;
}
.inp{
    text-align: center;
    padding: 5px 0px;
        font-size: 24rpx;
        margin: auto;
        color: #868686;
        width: 90%;
        border: 1.2px solid #DEDEDE;
    border-radius: 5px;
    margin-bottom: 32rpx;
}
.op5{
  opacity: .5;
  background: rgba(0,0,0,0.05);
}
.partition{
  width: 2rpx;
  height: 80rpx;
  background: #D4D6D8;
}
弹窗json文件:
{
  "component": true,
  "usingComponents": {}
}
以上就是本文的全部内容,希望对大家的学习有所帮助,也希望大家多多支持自由互联。
