1.什么是AutoMapper?
AutoMapper是一个对象-对象映射器。对象-对象映射通过将一种类型的输入对象转换为另一种类型的输出对象来工作。使AutoMapper变得有趣的是,它提供了一些有趣的约定,免去用户不需要了解如何将类型A映射为类型B。只要类型B遵循AutoMapper既定的约定,就需要几乎零配置来映射两个类型。映射代码虽然比较无聊,但是AutoMapper为我们提供简单的类型配置以及简单的映射测试,而映射可以在应用程序中的许多地方发生,但主要发生在层之间的边界中,比如,UI /域层之间或服务/域层之间。一层的关注点通常与另一层的关注点冲突,因此对象-对象映射导致分离的模型,其中每一层的关注点仅会影响该层中的类型。
2.如何在Core上面使用AutoMapper组件?
先在Startup.ConfigureServices注入AutoMapper组件服务,然后在Startup.Configure上获取AutoMapper服务配置扩展类创建对象-对象映射关系,为了好统一管理代码,可以新建一个AutoMapperExtension静态类,把以下代码封装一下:
public static class AutoMapperExtension
{
    /// <summary>
    /// 新增自动映射服务
    /// </summary>
    /// <param name="service"></param>
    /// <returns></returns>
    public static IServiceCollection AddAutoMapper(this IServiceCollection services)
    {
        #region 方案一
        //注册AutoMapper配置扩展类服务
        services.TryAddSingleton<MapperConfigurationExpression>();
        //注册AutoMapper配置扩展类到AutoMapper配置服务去
        services.TryAddSingleton(serviceProvider =>
        {
            var mapperConfigurationExpression = serviceProvider.GetRequiredService<MapperConfigurationExpression>();
            var mapperConfiguration = new MapperConfiguration(mapperConfigurationExpression);
            mapperConfiguration.AssertConfigurationIsValid();
            return mapperConfiguration;
        });
        //注入IMapper接口DI服务
        services.TryAddSingleton(serviceProvider =>
        {
            var mapperConfiguration = serviceProvider.GetRequiredService<MapperConfiguration>();
            return mapperConfiguration.CreateMapper();
        });
        return services;
        #endregion
    }

    /// <summary>
    /// 使用自动映射配置扩展类
    /// </summary>
    /// <param name="applicationBuilder"></param>
    /// <returns></returns>
    public static IMapperConfigurationExpression UseAutoMapper(this IApplicationBuilder applicationBuilder)
    {
        //获取已注册服务AutoMapper配置扩展类
        return applicationBuilder.ApplicationServices.GetRequiredService<MapperConfigurationExpression>();
    }
}
// This method gets called by the runtime. Use this method to add services to the container.
public void ConfigureServices(IServiceCollection services)
{
    ......
    //添加自动映射组件DI服务
    services.AddAutoMapper();
}
// This method gets called by the runtime. Use this method to configure the HTTP request pipeline.
public void Configure(IApplicationBuilder app, IHostingEnvironment env)
{
    ......
    //注册组件之后,创建映射对象
  var expression = app.UseAutoMapper();
    expression.CreateMap<Customer, CustomerDto>();
    expression.CreateMap<Address, AddressDto>();
}
因为IMapper接口已经在ConfigureServices方法注入DI服务了,所以无需再重新注入,只需要直接使用IMapper调用其方法就可以:
public class BlogsController : Controller
{
private IMapper _iMapper { get; }
public BlogsController(IMapper iMapper)
{
_iMapper = iMapper;
}
// GET: Blogs
public async Task<IActionResult> Index()
{
//对象-对象数据传输
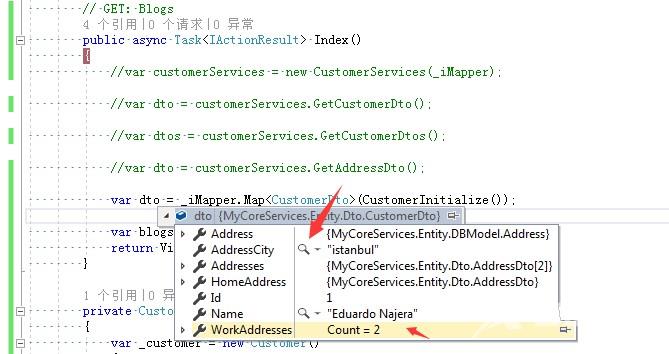
var dto = _iMapper.Map<CustomerDto>(CustomerInitialize());
......
}
//手动赋值客户对象数据
private Customer CustomerInitialize()
{
var _customer = new Customer()
{
Id = 1,
Name = "Eduardo Najera",
Credit = 234.7m,
Address = new Address() { City = "istanbul", Country = "turkey", Id = 1, Street = "istiklal cad." },
HomeAddress = new Address() { City = "istanbul", Country = "turkey", Id = 2, Street = "istiklal cad." },
WorkAddresses = new List<Address>()
{
new Address() {City = "istanbul", Country = "turkey", Id = 5, Street = "istiklal cad."},
new Address() {City = "izmir", Country = "turkey", Id = 6, Street = "konak"}
},
Addresses = new List<Address>()
{
new Address() {City = "istanbul", Country = "turkey", Id = 3, Street = "istiklal cad."},
new Address() {City = "izmir", Country = "turkey", Id = 4, Street = "konak"}
}.ToArray()
};
return _customer;
}
}
运行效果:
3.如果更加灵活使用AutoMapper组件?
相信在第二章节时候,相信大家都会发现一个问题,如果生产场景业务越来越庞大,需创建对应业务对象也会越来越多,如果面对这样的业务场景难道要在Configure方法里面创建越来越多的映射关系吗?例:
var expression = app.UseAutoMapper();
expression.CreateMap<A, ADto>();
expression.CreateMap<B, BDto>();
expression.CreateMap<C, CDto>();
expression.CreateMap<D, DDto>();
......
很显然这样子是不可行的,这样会导致后续代码越来越多,难以维护。那么现在让我们来解决这个问题。首先新建一个自动注入属性的AutoInjectAttribute密封类,具体代码如下:
public sealed class AutoInjectAttribute : Attribute
{
    public Type SourceType { get; }
    public Type TargetType { get; }
    public AutoInjectAttribute(Type sourceType, Type targetType)
    {
        SourceType = sourceType;
        TargetType = targetType;
    }
}
新增这个AutoInjectAttribute密封类,目的是声明每个DTO对象(数据传输对象)与对应数据源对象是传输关系,方便在Configure里面自动注册创建映射关系,例:
//声明源对象,目标对象
[AutoInject(sourceType: typeof(Customer),targetType:typeof(CustomerDto))]
public class CustomerDto
{
    public int Id { get; set; }
    public string Name { get; set; }
    public Address Address { get; set; }
    public AddressDto HomeAddress { get; set; }
    public AddressDto[] Addresses { get; set; }
    public List<AddressDto> WorkAddresses { get; set; }
    public string AddressCity { get; set; }
}
然后创建一个自动注入AutoInjectFactory工厂类,检测运行中的程序集是否有AutoInjectAttribute属性声明,如果有则插入一个类型数据集中返回,目的是把所有声明需要映射DTO对象跟数据源对象自动创建映射关系:
public class AutoInjectFactory
{
    public List<(Type, Type)> AddAssemblys
    {
        get
        {
            var assemblys =new List<Assembly>() { Assembly.GetExecutingAssembly() };
            List<(Type, Type)> ConvertList = new List<(Type, Type)>();
            foreach (var assembly in assemblys)
            {
                var atributes = assembly.GetTypes()
                    .Where(_type => _type.GetCustomAttribute<AutoInjectAttribute>() != null)
                    .Select(_type => _type.GetCustomAttribute<AutoInjectAttribute>());
                foreach (var atribute in atributes)
                {
                    ConvertList.Add((atribute.SourceType, atribute.TargetType));
                }
            }
            return ConvertList;
        }
    }
}
在第2小节AutoMapperExtension静态类的AddAutoMapper方法内修改如下代码:
#region 方案二
//注入AutoMapper配置扩展类服务
services.TryAddSingleton<MapperConfigurationExpression>();
//注入自动注入工厂类服务
services.TryAddSingleton<AutoInjectFactory>();
//注入AutoMapper配置扩展类到AutoMapper配置服务去
services.TryAddSingleton(serviceProvider =>
{
    var mapperConfigurationExpression = serviceProvider.GetRequiredService<MapperConfigurationExpression>();
    //通过自动注入工厂类获取声明数据源对象与DTO对象自动创建映射关系
    var factory = serviceProvider.GetRequiredService<AutoInjectFactory>();
    foreach (var (sourceType, targetType) in factory.AddAssemblys)
    {
        mapperConfigurationExpression.CreateMap(sourceType, targetType);
    }
    var mapperConfiguration = new MapperConfiguration(mapperConfigurationExpression);
    mapperConfiguration.AssertConfigurationIsValid();
    return mapperConfiguration;
});
//注入IMapper接口DI服务
services.TryAddSingleton(serviceProvider =>
{
    var mapperConfiguration = serviceProvider.GetRequiredService<MapperConfiguration>();
    return mapperConfiguration.CreateMapper();
});
return services;
#endregion
再新增一个使用自动注入工厂类服务静态方法:
/// <summary>
/// 使用自动注入工厂类
/// </summary>
/// <param name="applicationBuilder"></param>
public static void UseAutoInject(this IApplicationBuilder applicationBuilder)
{
   applicationBuilder.ApplicationServices.GetRequiredService<AutoInjectFactory>();
}
然后在Startup.ConfigureServices注入AutoMapper组件服务,然后在Startup.Configure上调用UseAutoInject静态方法,具体代码如下:
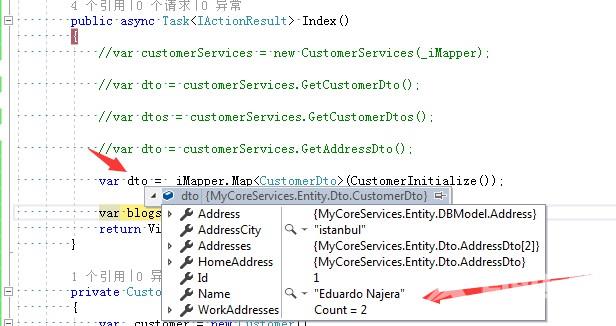
app.UseAutoInject();
运行效果:
到此这篇关于ASP.NET Core使用AutoMapper组件的文章就介绍到这了。希望对大家的学习有所帮助,也希望大家多多支持自由互联。