目录
- 前言
- 全局组件
- Vue.extend
- 组件渲染流程
- 总结
前言
Vue中组件分为全局组件和局部组件:
- 全局组件:通过
Vue.component(id,definition)方法进行注册,并且可以在任何组件中被访问 - 局部组件:在组件内的
components属性中定义,只能在组件内访问
下面是一个例子:
<div id="app">
  {{ name }}
  <my-button></my-button>
  <aa></aa>
</div>
Vue.components('my-button', {
  template: `<button>my button</button>`
});
Vue.components('aa', {
  template: `<button>global aa</button>`
});
const vm = new Vue({
  el: '#app',
  components: {
    aa: {
      template: `<button>scoped aa</button>`
    },
    bb: {
      template: `<button>bb</button>`
    }
  },
  data () {
    return {
      name: 'ss'
    };
  }
});
页面中会渲染全局定义的my-button组件和局部定义的aa组件:
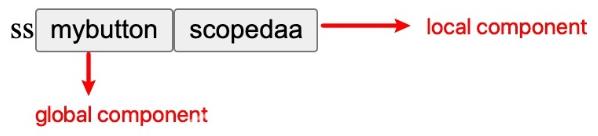
接下来笔者会详细讲解全局组件和局部组件到底是如何渲染到页面上的,并实现相关代码。
全局组件
Vue.component是定义在Vue构造函数上的一个函数,它接收id和definition作为参数:
id: 组件的唯一标识definition: 组件的配置项
在src/global-api/index.js中定义Vue.component方法:
export function initGlobalApi (Vue) {
  Vue.options = {};
  // 最终会合并到实例上,可以通过vm.$options._base直接使用
  Vue.options._base = Vue;
  // 定义全局组件
  Vue.options.components = {};
  initExtend(Vue);
  Vue.mixin = function (mixin) {
    this.options = mergeOptions(this.options, mixin);
  };
  // 通过Vue.components来注册全局组件
  Vue.components = function (id, definition) {
    const name = definition.name = definition.name || id;
    // 通过Vue.extend来创建Vue的子类
    definition = this.options._base.extend(definition);
    // 将Vue子类添加到Vue.options.components对象中,key为name
    this.options.components[name] = definition;
  };
}
Vue.component帮我们做了俩件事:
- 通过
Vue.extend利用传入的definition生成Vue子类 - 将
Vue子类放到全局Vue.options.components中
那么Vue.extend是如何创建出Vue的子类呢?下面我们来实现Vue.extend函数
Vue.extend
Vue.extend利用JavaScript原型链实现继承,我们会将Vue.prototype指向Sub.prototype.__proto__,这样就可以在Sub的实例上调用Vue原型上定义的方法了:
Vue.extend = function (extendOptions) {
  const Super = this;
  const Sub = function VueComponent () {
    // 会根据原型链进行查找,找到Super.prototype.init方法
    this._init();
  };
  Sub.cid = cid++;
  // Object.create将Sub.prototype的原型指向了Super.prototype
  Sub.prototype = Object.create(Super.prototype);
  // 此时prototype为一个对象,会失去原来的值
  Sub.prototype.constructor = Sub;
  Sub.options = mergeOptions(Super.options, extendOptions);
  Sub.component = Super.component;
  return Sub;
};
如果有小伙伴对JavaScript原型链不太了解的话,可以看笔者的这篇文章: 一文彻底理解JavaScript原型与原型链
核心的继承代码如下:
const Super = Vue
const Sub = function VueComponent () {
  // some code ...
};
// Object.create将Sub.prototype的原型指向了Super.prototype
Sub.prototype = Object.create(Super.prototype);
// 此时prototype为一个对象,会失去原来的值
Sub.prototype.constructor = Sub;
Object.create会创建一个新对象,使用一个已经存在的对象作为新对象的原型。这里将创建的新对象赋值给了Sub.prototype,相当于做了如下俩件事:
Sub.prototype = {}Sub.prototype.__proto__ = Super.prototype
为Sub.prototype赋值后,其之前拥有的constructor属性便会被覆盖,这里需要再手动指定一下Sub.prototype.constructor = Sub
最终Vue.extend会将生成的子类返回,当用户实例化这个子类时,便会通过this._init执行子类的初始化方法创建组件
组件渲染流程
在用户执行new Vue创建组件的时候,会执行this._init方法。在该方法中,会将用户传入的配置项和Vue.options中定义的配置项进行合并,最终放到vm.$options中:
function initMixin (Vue) {
  Vue.prototype._init = function (options = {}) {
    const vm = this;
    // 组件选项和Vue.options或者 Sub.options进行合并
    vm.$options = mergeOptions(vm.constructor.options, options);
    // ...
  };
  // ...
}
执行到这里时,mergeOptoins会将用户传入options中的components和Vue.options.components中通过Vue.component定义的组件进行合并。
在merge-options.js中,我们为strategies添加合并components的策略:
strategies.components = function (parentVal, childVal) {
  const result = Object.create(parentVal); // 合并后的原型链为parentVal
  for (const key in childVal) { // childVal中的值都设置为自身私有属性,会优先获取
    if (childVal.hasOwnProperty(key)) {
      result[key] = childVal[key];
    }
  }
  return result;
};
components的合并利用了JavaScript的原型链,将Vue.options.components中的全局组件放到了合并后对象的原型上,而将options中components 属性定义的局部组件放到了自身的属性上。这样当取值时,首先会从自身属性上查找,然后再到原型链上查找,也就是优先渲染局部组件,如果没有局部组件就会去渲染全局组件。
合并完components之后,接下来要创建组件对应的虚拟节点:
function createVComponent (vm, tag, props, key, children) {
  const baseCtor = vm.$options._base;
  // 在生成父虚拟节点的过程中,遇到了子组件的自定义标签。它的定义放到了父组件的components中,所有通过父组件的$options来进行获取
  // 这里包括全局组件和自定义组件,内部通过原型链进行了合并
  let Ctor = vm.$options.components[tag];
  // 全局组件:Vue子类构造函数,局部组件:对象,合并后的components中既有对象又有构造函数,这里要利用Vue.extend统一处理为构造函数
  if (typeof Ctor === 'object') {
    Ctor = baseCtor.extend(Ctor);
  }
  props.hook = { // 在渲染真实节点时会调用init钩子函数
    init (vNode) {
      const child = vNode.componentInstance = new Ctor();
      child.$mount();
    }
  };
  return vNode(`vue-component-${Ctor.id}-${tag}`, props, key, undefined, undefined, { Ctor, children });
}

function createVElement (tag, props = {}, ...children) {
  const vm = this;
  const { key } = props;
  delete props.key;
  if (isReservedTag(tag)) { // 是否为html的原生标签
    return vNode(tag, props, key, children);
  } else {
    // 创建组件虚拟节点
    return createVComponent(vm, tag, props, key, children);
  }
}
在创建虚拟节点时,如果tag不是html中定义的标签,便需要创建组件对应的虚拟节点。
组件虚拟节点中做了下面几件事:
- 通过
vm.$options拿到合并后的components - 用
Vue.extend将components中的对象转换为Vue子类构造函数 - 在虚拟节点上的
props上添加钩子函数,方便在之后调用 - 执行
vNode函数创建组件虚拟节点,组件虚拟节点会新增componentOptions属性来存放组件的一些选项
在生成虚拟节点之后,便会通过虚拟节点来创建真实节点,如果是组件虚拟节点要单独处理:
// 处理组件虚拟节点
function createComponent (vNode) {
  let init = vNode.props?.hook?.init;
  init?.(vNode);
  if (vNode.componentInstance) {
    return true;
  }
}

// 将虚拟节点处理为真实节点
function createElement (vNode) {
  if (typeof vNode.tag === 'string') {
    if (createComponent(vNode)) {
      return vNode.componentInstance.$el;
    }
    vNode.el = document.createElement(vNode.tag);
    updateProperties(vNode);
    for (let i = 0; i < vNode.children.length; i++) {
      const child = vNode.children[i];
      vNode.el.appendChild(createElement(child));
    }
  } else {
    vNode.el = document.createTextNode(vNode.text);
  }
  return vNode.el;
}
在处理虚拟节点时,我们会获取到在创建组件虚拟节点时为props添加的init钩子函数,将vNode传入执行init函数:
props.hook = { // 在渲染真实节点时会调用init钩子函数
  init (vNode) {
    const child = vNode.componentInstance = new Ctor();
    child.$mount();
  }
};
此时便会通过new Ctor()来进行子组件的一系列初始化工作:
this._initinitState- ...
Ctor是通过Vue.extend来生成的,而在执行Vue.extend的时候,我们已经将组件对应的配置项传入。但是由于配置项中缺少el选项,所以要手动执行$mount方法来挂载组件。
在执行$mount之后,会将组件template创建为真实DOM并设置到vm.$el选项上。执行props.hook.init方法时,将组件实例放到了vNode的componentInstance 属性上,最终在createComponent中会判断如果有该属性则为组件虚拟节点,并将其对应的DOM(vNode.componentInstance.$el)返回,最终挂载到父节点上,渲染到页面中。
整个渲染流程画图总结一下:
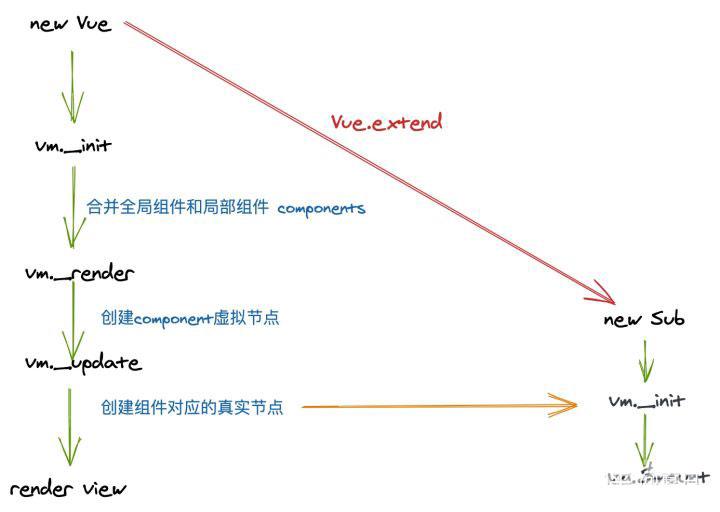
总结
明白了组件渲染流程之后,最后我们来看一下父子组件的生命周期函数的执行过程:
<div id="app">
  {{ name }}
  <aa></aa>
</div>
<script>
  const vm = new Vue({
    el: '#app',
    components: {
      aa: {
        template: `<button>aa</button>`,
        beforeCreate () {
          console.log('child beforeCreate');
        },
        created () {
          console.log('child created');
        },
        beforeMount () {
          console.log('child beforeMount');
        },
        mounted () {
          console.log('child mounted');
        }
      },
    },
    data () {
      return {
        name: 'ss'
      };
    },
    beforeCreate () {
      console.log('parent beforeCreate');
    },
    created () {
      console.log('parent created');
    },
    beforeMount () {
      console.log('parent beforeMount');
    },
    mounted () {
      console.log('parent mounted');
    }
  });
</script>

在理解了Vue的组件渲染流程后,便可以很轻易的解释这个打印结果了:
- 首先会初始化父组件,执行父组件的
beforeCreate,created钩子 - 接下来会挂载父组件,在挂载之前会先执行
beforeMount钩子 - 当父组件开始挂载时,首先会生成组件虚拟节点,之后在创建真实及节点时,要
new SubComponent来创建子组件,得到子组件挂载后的真实DOM:vm.$el - 而在实例化子组件的过程中,会执行子组件的
beforeCreate,created,beforeMount,mounted钩子 - 在子组件挂载完毕后,继续完成父组件的挂载,执行父组件的
mounted钩子
到此这篇关于Vue 组件渲染详情的文章就介绍到这了,更多相关Vue 组件渲染内容请搜索自由互联以前的文章或继续浏览下面的相关文章希望大家以后多多支持自由互联!