目录
- 方案说明:
- 思路说明:
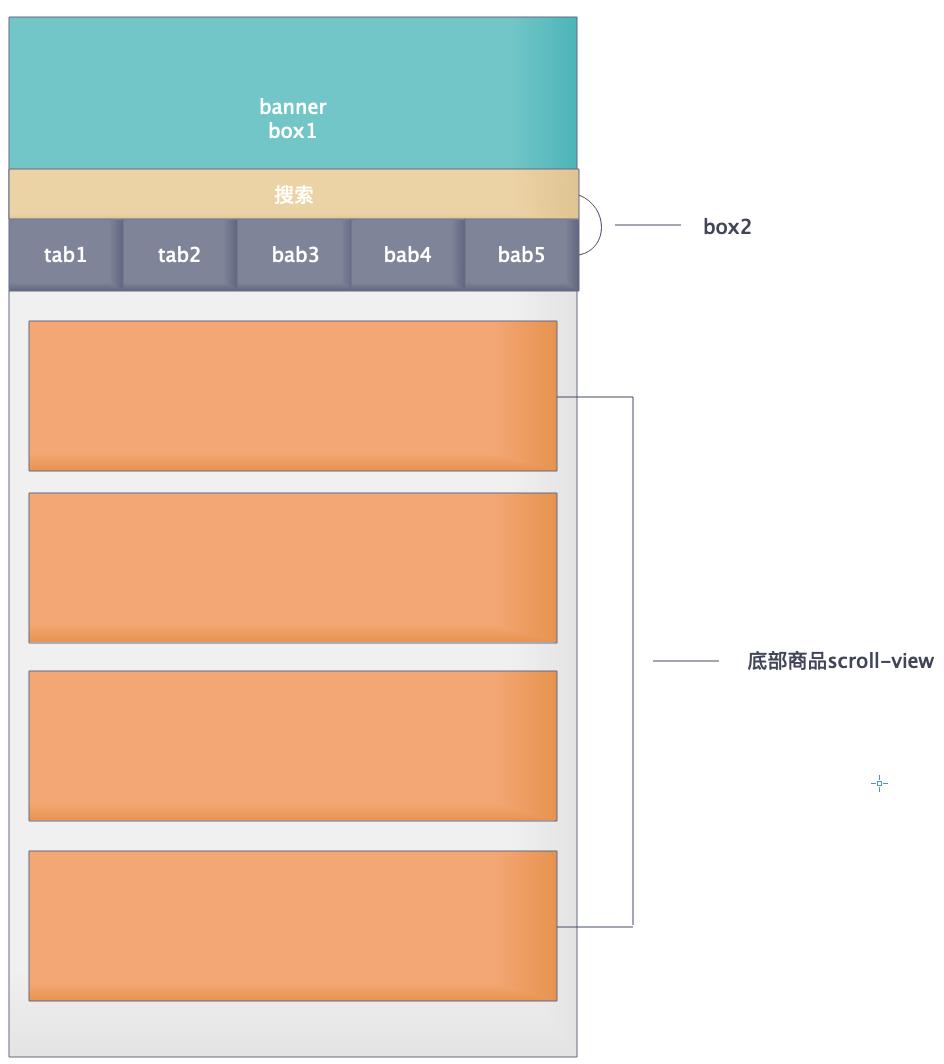
常见商品页效果:顶部banner+分类,下面商品列表。

方案说明:
方案1:整个页面滚动,滚动至某个位置fixed图中“顶部box2”,分页页面触底加载
方案2:页面高度为屏幕高度,商品部分使用scroll-view,scroll-view初始高度为屏幕高度-顶部高度,只滚动scroll-view。
思路说明:
1 将整个页面分为上下两部分,整个页面高度100vh(原因1:scroll-view高度需要固定高度;原因2:出现两个滚动条)
2 页面上半部分包括banner(box1)以及固定的搜索及tab(box2)
3 根据顶部box的高度,算出下面scroll-view的高度(windowHieght - 200)
4 scroll-view滑动到 顶部box1+margin10的高度,将box1隐藏,box2动画移至顶部;下面scroll高度+滚动高度(或box1高度) + margin10高度(确保scroll的商品吸顶之后任然沾满屏幕)
方案3:使用插件
选择的是方案2,为什么不选择方案1,我们来剖析一下。
方案1适合页面交互比较简单,根据页面滚动高度隐藏展示即可。
场景1:tab吸顶之后,切换tab请求数据,页面就会渲染为最初样式,不会吸顶。(请求会重新setData数据,有些数据有多有少)
复制以下代码可以直接演示demo效果
demo.wxml
<!--pages/demo/demo.wxml-->
<view class="wrap">
  <view class="top-box" style="{{boxStyle}}">
    <view class="top-box1" style="{{box1Style}}">顶部box1</view>
    <!-- <view class="top-box2"></view> -->
    <scroll-view class="top-box2" scroll-into-view="{{scrollId}}" scroll-x="true"scroll-with-animation="true" >
      <block wx:for="{{cates}}" wx:key="index">
        <view class="{{item.id === currentId?'cate-item-act cate-item':'cate-item'}}" data-id="{{item.id}}" id="good{{item.id}}" bindtap="cateChange">{{item.name}}</view>
      </block>
    </scroll-view>
  </view>
  <scroll-view scroll-y="true" class="scroll-con" style="{{scrollViewStyle}}" bindscroll="goodsViewScroll" bindscrolltoupper="goodsViewScrollTop">
    <view class="scroll-con-item" wx:for="{{cates}}" wx:key="index">{{item.name}}</view>
  </scroll-view>
</view>
demo.js
Page({
  data: {
    cates:[
      {id:null,name:'全部'},
      {id:1,name:'分类1'},
      {id:2,name:'分类2'},
      {id:3,name:'分类3'},
      {id:4,name:'分类4'},
      {id:5,name:'分类5'},
      {id:6,name:'分类6'},
      {id:7,name:'分类7'},
      {id:8,name:'分类8'}
    ],
    currentId:null,
    serviceList:[
      {id:1,name:'1'},
      {id:2,name:'2'},
      {id:3,name:'3'},
      {id:4,name:'4'},
      {id:5,name:'5'},
      {id:6,name:'6'},
      {id:7,name:'7'},
      {id:8,name:'8'}
    ],
    scrollId:null,//滑动id,切换tab效果
    animationStyle:'',
    isNeedFixed:false
  },
  /**
   * 生命周期函数--监听页面加载
   */
  onLoad(options) {
    let that = this;
    wx.getSystemInfo({
      success: function (res, rect) {
        that.setData({
          // 商品scroll高度 = 可使用窗口 - (顶部box的高度+margin20 -20(底部留白))
          scrollViewHeight: parseInt(res.windowHeight - 220 -20),
          scrollViewStyle:`height:${parseInt(res.windowHeight - 220-20)}px`
        })
      }
    })
  },
  cateChange(e){
    let currentId = e.currentTarget.dataset.id;
    let scrollId = e.currentTarget.id;
    this.setData({
      currentId,
      scrollId
    })
  },
  // 加this.data.isNeedFixed条件防止频繁的setdata
  // 1 隐藏box1,box2会自动吸顶 box2置顶
  // 2 设置scroll-view高度+120, 设置顶部box高度为box2高度
  goodsViewScroll(e){
    console.log(e.detail.scrollTop, this.data.isNeedFixed)
    if(e.detail.scrollTop >= 120 ){
      console.log('可以动画调整位置了')
      this.setData({
        isNeedFixed:true,
        box1Style:`height:0px;`,
        boxStyle:`height:80px;`,
        scrollViewStyle: `height:${this.data.scrollViewHeight + 120}px`,
      }
    }
    // if(e.detail.scrollTop < 120 ) {
    //   console.log('需要保持原样')
    //   this.setData({
    //     isNeedFixed:false,
    //     box1Style:`height:110px;`,
    //     boxStyle:`height:200px;`,
    //     scrollViewStyle: `height:${this.data.scrollViewHeight}px`,
    //   },()=>{
    //     wx.pageScrollTo({
    //       scrollTop: 0,
    //     })
    //   })
    // }
  },

  goodsViewScrollTop(e){
       this.setData({
        isNeedFixed:false,
        box1Style:`height:110px;`,
        boxStyle:`height:200px;`,
        scrollViewStyle: `height:${this.data.scrollViewHeight}px`,
      })
  }
})
demo.wxss
.wrap {
  height: 100vh;
}
.top-box {
  height: 200px;
  height: 200px;
  background-color: #fff;
  border: 1px solid #d1d1d1;
  transition:height 0.2s;
    -webkit-transition:height 0.2s; /* Safari */
}
.top-box1 {
  height: 110px;
  width: 100%;
  margin-bottom: 10px;
  background-color: #3293FF;
  overflow: hidden;
  transition:height 0.2s;
  -webkit-transition:height 0.2s; /* Safari */
}
.top-box2 {
  height: 80px;
  width: 100%;
  background-color: #ffbe32;
  white-space: nowrap;
  padding: 50rpx 0;
  box-sizing: border-box;
}
.top-box2 .cate-item {
  display: inline-block;
  padding: 10rpx 20rpx;
  font-size: 26rpx;
  margin-right: 20rpx;
  color: #767A84;
}
.top-box2 .cate-item:last-child{
  margin-right: 0rpx;
}
.top-box2 .cate-item-act {
  background: #3293FF;
  color: #fff;
  border-radius: 48rpx;
}
.scroll-con {
  padding: 0 10px;
  margin-top: 20px;
  box-sizing: border-box;
  background-color: #fff;
}
.scroll-con-item {
  height: 100px;
  width: 100%;
  background-color: salmon;
  margin-bottom: 10px;
}
.ani-btn {
  display: inline-block;
  padding: 20rpx;
  margin: 10rpx;
  border: 1px solid #d1d1d1;
}
@keyframes move{ from{transform: translateY( 30px)} to {transform: translateY( 0px)}}
说明1:scroll-into-view 设置哪个方向可滚动,则在哪个方向滚动到该元素
scroll-view设置x轴滚动到scrollId位置 scroll-x="true"scroll-into-view="{{scrollId}}"
item子元素设置id="good{{item.id}}" 由于id不能已数字开头,所以前面拼了"good"
说明2:为什么要在bindscrolltoupper触顶事件中处理初始化样式,而不是在bindscroll的时候处理?
使用bindscroll处理,滑动会有来回闪动的情况
这些只是大致思路,还有很多细节需要处理和考.......
到此这篇关于微信小程序实现顶部固定 底部分页滚动效果的文章就介绍到这了,更多相关小程序顶部固定内容请搜索自由互联以前的文章或继续浏览下面的相关文章希望大家以后多多支持自由互联!
