DockPanel:停靠面板 DockPanel定义一个区域,在此区域中,您可以使子元素通过描点的形式排列,这些对象位于 Children 属性中。停靠面板类似于WinForm中控件的Dock属性。DockPanel会对每个子元
DockPanel:停靠面板
DockPanel定义一个区域,在此区域中,您可以使子元素通过描点的形式排列,这些对象位于 Children 属性中。停靠面板类似于WinForm中控件的Dock属性。DockPanel会对每个子元素进行排序,并将根据指定的边进行停靠,多个停靠在同侧的元素则按顺序排序。在DockPanel中,指定停靠边的控件,会根据定义的顺序占领边角,所有控件绝不会交叠。
默认情况下,后添加的元素只能使用剩余空间,无论对DockPanel的最后一个子元素设置任何停靠值,该子元素都将始终填满剩余的空间。如果不希望最后一个元素填充剩余区域,可以将DockPanel属性LastChildFill设置为false,还必须为最后一个子元素显式指定停靠方向。
1、填充整个剩余空间
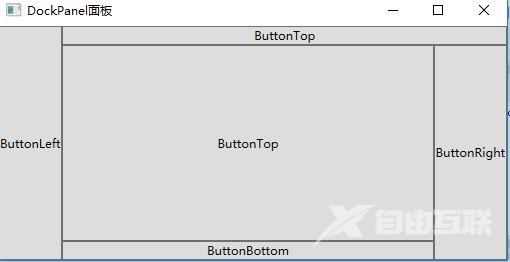
使用XAML代码实现:
<Window x:Class="WpfDemo.MainWindow"
        xmlns="http://schemas.microsoft.com/winfx/2006/xaml/presentation"
        xmlns:x="http://schemas.microsoft.com/winfx/2006/xaml"
        Title="DockPanel面板" Height="237" Width="525" WindowStartupLocation="CenterScreen">
    <DockPanel>
        <Button DockPanel.Dock="Left" Content="ButtonLeft"></Button>
        <Button DockPanel.Dock="Top" Content="ButtonTop"></Button>
        <Button DockPanel.Dock="Right" Content="ButtonRight"></Button>
        <Button DockPanel.Dock="Bottom" Content="ButtonBottom"></Button>
        <Button  Content="ButtonTop"></Button>
    </DockPanel>
</Window>
2、最后元素不填充剩余空间
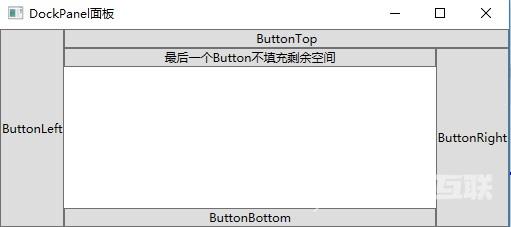
使用XAML代码实现:
<Window x:Class="WpfDemo.MainWindow"
        xmlns="http://schemas.microsoft.com/winfx/2006/xaml/presentation"
        xmlns:x="http://schemas.microsoft.com/winfx/2006/xaml"
        Title="DockPanel面板" Height="237" Width="525" WindowStartupLocation="CenterScreen">
    <DockPanel LastChildFill="False">
        <Button DockPanel.Dock="Left" Content="ButtonLeft"></Button>
        <Button DockPanel.Dock="Top" Content="ButtonTop"></Button>
        <Button DockPanel.Dock="Right" Content="ButtonRight"></Button>
        <Button DockPanel.Dock="Bottom" Content="ButtonBottom"></Button>
        <Button  DockPanel.Dock="Top" Content="最后一个Button不填充剩余空间"></Button>
    </DockPanel>
</Window>
到此这篇关于WPF使用DockPanel停靠面板布局的文章就介绍到这了。希望对大家的学习有所帮助,也希望大家多多支持自由互联。