目录
- 引言
- 1.环境
- 2. Spring Cloud整合Eureka Client 启动入口
- 2.1 封装配置文件的类
- 2.1.1 EurekaClientConfigBean
- 2.1.2 EurekaInstanceConfigBean
- 2.2 EurekaClient
- 2.2.1 ApplicationInfoManager
- 2.2.2 EurekaClient
- 2.3 小结
- 3. DiscoveryClient类的解析
- 3.1 DiscoveryClient 作用
- 3.2 DiscoveryClient 的类结构
- 3.3 DiscoveryClient 构造函数
- 4. Eureka Client 初始化
- 4.1 拉取注册表信息
- 4.1.1 全量拉取注册表信息
- 4.1.2 增量拉取注册表信息
- 4.2 服务注册
- 4.3 定时任务
- 4.3.1 定时更新客户端注册表任务
- 4.3.2 定时服务续约任务
- 4.3.3 定时更新Client信息给Server任务
- 4.4 总结
- 服务注册的时机
- Client实例化
引言
本文主要是解析下Spring Cloud整合Eureka Client的源码,这块代码比较多,而且都是些简单代码,我们稍微看下就行,这就是介绍下Eureka Client初始化过程,不管你Spring Cloud 怎样封装,底层还是Eureka Client的内容,初始化过程包括下面:
- 去Eureka Server 拉取全量注册表,
- 创建定时任务,包括定时去Eureka Server 上增量拉取注册表信息,定时renew (服务续约)。
- 服务注册
1.环境
- eureka版本:1.10.11
- Spring Cloud : 2020.0.2
- Spring Boot :2.4.4
测试代码:github.com/hsfxuebao/s…
2. Spring Cloud整合Eureka Client 启动入口
要看Spring Cloud 怎样整合 Eureka Client ,就需要找到它们的自动装配配置类 在spring-cloud-starter-netflix-eureka-client 依赖的pom文件中,在依赖pom文件中有spring-cloud-netflix-eureka-client, 在这个里面能够找到spring.factories 文件,这个文件是spring spi文件。
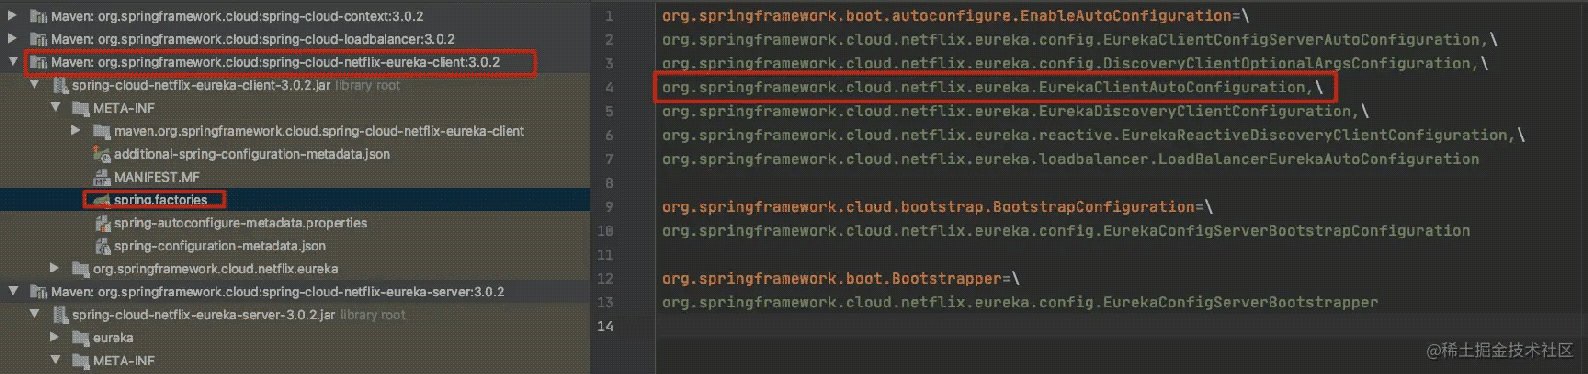
核心就是EurekaClientAutoConfiguration 这个自动装配类:
@Configuration(proxyBeanMethods = false)
@EnableConfigurationProperties
@ConditionalOnClass(EurekaClientConfig.class)
@ConditionalOnProperty(value = "eureka.client.enabled", matchIfMissing = true)
@ConditionalOnDiscoveryEnabled
@AutoConfigureBefore({ CommonsClientAutoConfiguration.class, ServiceRegistryAutoConfiguration.class })
@AutoConfigureAfter(name = { "org.springframework.cloud.netflix.eureka.config.DiscoveryClientOptionalArgsConfiguration",
      "org.springframework.cloud.autoconfigure.RefreshAutoConfiguration",
      "org.springframework.cloud.netflix.eureka.EurekaDiscoveryClientConfiguration",
      "org.springframework.cloud.client.serviceregistry.AutoServiceRegistrationAutoConfiguration" })
public class EurekaClientAutoConfiguration {
}
2.1 封装配置文件的类
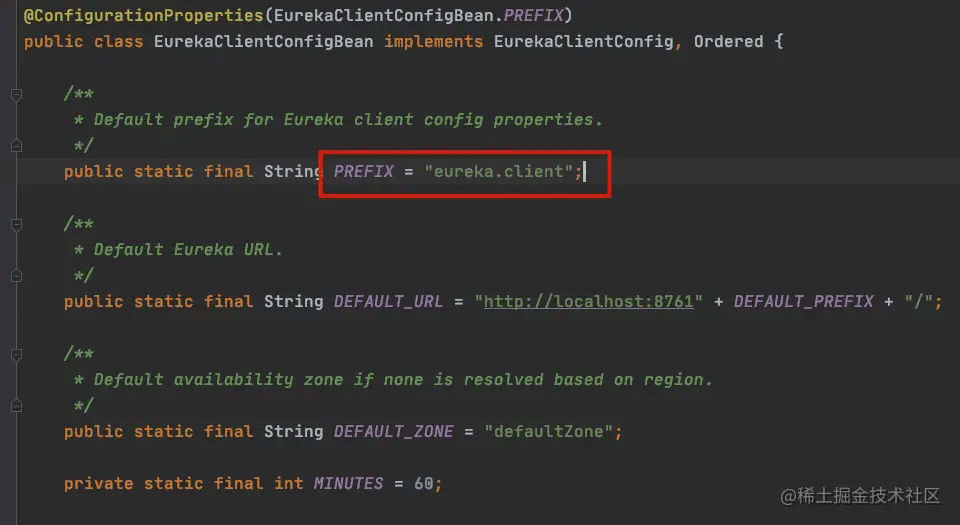
2.1.1 EurekaClientConfigBean
@Bean
@ConditionalOnMissingBean(value = EurekaClientConfig.class, search = SearchStrategy.CURRENT)
public EurekaClientConfigBean eurekaClientConfigBean(ConfigurableEnvironment env) {
   return new EurekaClientConfigBean();
}
其读取的是eureka.client前辍的配置信息。这个类已经被@ConfigurationProperties注解了,所以这些 配置信息可以被自动封装并注册到容器。
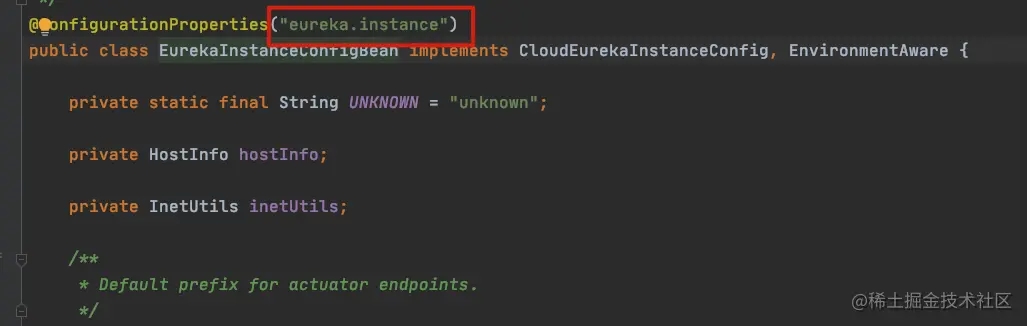
2.1.2 EurekaInstanceConfigBean
@Bean
@ConditionalOnMissingBean(value = EurekaInstanceConfig.class, search = SearchStrategy.CURRENT)
public EurekaInstanceConfigBean eurekaInstanceConfigBean(InetUtils inetUtils,
      ManagementMetadataProvider managementMetadataProvider) {
}
其读取的是eureka.instance的属性值。这个类也已经被@ConfigurationProperties注解了,所以这些配 置信息可以被自动封装并注册到容器。
2.2 EurekaClient
接下来,看看核心类EurekaClient是怎么注入进去的? 在EurekaClientAutoConfiguration文件中,我们发现有两个地方都可以注入EurekaClient,分别为:
@Configuration(proxyBeanMethods = false)
@ConditionalOnMissingRefreshScope
protected static class EurekaClientConfiguration {
   @Bean(destroyMethod = "shutdown")
   @ConditionalOnMissingBean(value = EurekaClient.class, search = SearchStrategy.CURRENT)
   public EurekaClient eurekaClient(ApplicationInfoManager manager, EurekaClientConfig config) {
      return new CloudEurekaClient(manager, config, this.optionalArgs, this.context);
   }
}
// 另一个是:
@Configuration(proxyBeanMethods = false)
@ConditionalOnRefreshScope
protected static class RefreshableEurekaClientConfiguration {
   @Bean(destroyMethod = "shutdown")
   @ConditionalOnMissingBean(value = EurekaClient.class, search = SearchStrategy.CURRENT)
   @org.springframework.cloud.context.config.annotation.RefreshScope
   @Lazy
   public EurekaClient eurekaClient(ApplicationInfoManager manager, EurekaClientConfig config,
         EurekaInstanceConfig instance, @Autowired(required = false) HealthCheckHandler healthCheckHandler) {
      }
}
这就需要分析到底哪一个注解生效了?
@ConditionalOnMissingRefreshScope
@Target({ ElementType.TYPE, ElementType.METHOD })
@Retention(RetentionPolicy.RUNTIME)
@Documented
@Conditional(OnMissingRefreshScopeCondition.class)
@interface ConditionalOnMissingRefreshScope {
}
private static class OnMissingRefreshScopeCondition extends AnyNestedCondition {
   OnMissingRefreshScopeCondition() {
      super(ConfigurationPhase.REGISTER_BEAN);
   }
  @ConditionalOnMissingClass("org.springframework.cloud.context.scope.refresh.RefreshScope")
   static class MissingClass {
   }
   @ConditionalOnMissingBean(RefreshAutoConfiguration.class)
   static class MissingScope {
   }
   @ConditionalOnProperty(value = "eureka.client.refresh.enable", havingValue = "false")
   static class OnPropertyDisabled {
   }
}
大家 可以看看 AnyNestedCondition这个注解,意思就是 只要满足任意一个条件就符合。通过分析,我们知道这三个条件都是满足的,所以这个注解不生效,这个类不生效。
@ConditionalOnRefreshScope
@Target({ ElementType.TYPE, ElementType.METHOD })
@Retention(RetentionPolicy.RUNTIME)
@Documented
@ConditionalOnClass(RefreshScope.class)
@ConditionalOnBean(RefreshAutoConfiguration.class)
@ConditionalOnProperty(value = "eureka.client.refresh.enable", havingValue = "true", matchIfMissing = true)
@interface ConditionalOnRefreshScope {
}
通过这个注解EurekaClientAutoConfiguration上的注解@AutoConfigureAfter,我们知道当前类注入是在RefreshAutoConfiguration之后注入到容器中。而RefreshScope就是在RefreshAutoConfiguration之后中注入的。所以我们需要分析这个类就可以了。
@AutoConfigureAfter(name = { "org.springframework.cloud.netflix.eureka.config.DiscoveryClientOptionalArgsConfiguration",
  "org.springframework.cloud.autoconfigure.RefreshAutoConfiguration",
  "org.springframework.cloud.netflix.eureka.EurekaDiscoveryClientConfiguration",
      "org.springframework.cloud.client.serviceregistry.AutoServiceRegistrationAutoConfiguration" })
public class EurekaClientAutoConfiguration {
}
2.2.1 ApplicationInfoManager
@Bean
@ConditionalOnMissingBean(value = ApplicationInfoManager.class, search = SearchStrategy.CURRENT)
public ApplicationInfoManager eurekaApplicationInfoManager(
		EurekaInstanceConfig config) {
	InstanceInfo instanceInfo = new InstanceInfoFactory().create(config);
	return new ApplicationInfoManager(config, instanceInfo);
}
创建ApplicationInfoManager 对象,这个对象主要就是管着当前实例信息,也就是instanceInfo , 可以看到,在这个方法中先是创建的instanceInfo,然后将instanceInfo 作为构造参数传入了ApplicationInfoManager 中。
这个实例信息instanceInfo 里面维护了你当前实例的ip ,端口,appName等信息,注册的时候就是拿这些信息到Eureka Server 上注册。
2.2.2 EurekaClient
@Bean(destroyMethod = "shutdown")
@ConditionalOnMissingBean(value = EurekaClient.class, search = SearchStrategy.CURRENT)
public EurekaClient eurekaClient(ApplicationInfoManager manager, EurekaClientConfig config) {
	return new CloudEurekaClient(manager, config, this.optionalArgs,
			this.context);
}
创建Eureka Client 对象,这个CloudEurekaClient 类是Spring Cloud 搞得,然后继承Eureka 原生的DiscoveryClient 类。
public class CloudEurekaClient extends DiscoveryClient
我们可以看看它的构造
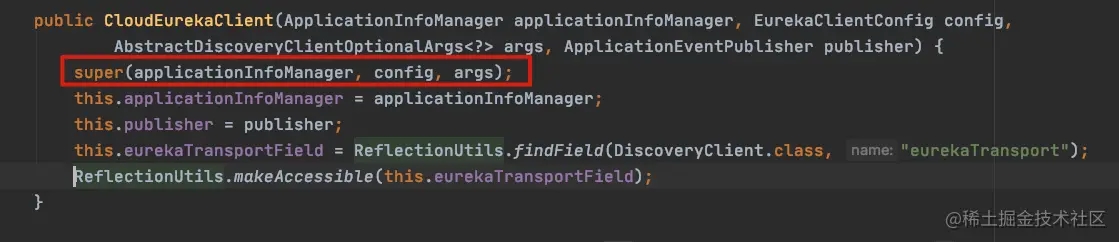
最重要的是,它调用了父类的DiscoveryClient 的构造,下面重点介绍。
2.3 小结
总结以上的信息,从EurekaClientAutoConfiguration等方面可罗列出如下几个比较重要的类,如下:
3. DiscoveryClient类的解析
3.1 DiscoveryClient 作用
DiscoveryClient 是Eureka Client 的核心类,其作用与下:
- 注册实例到 Eureka Server 中
- 发送心跳更新与 Eureka Server 的续约
- 在服务关闭时取消与 Eureka Server 的续约,完成服务下限
- 获取在 Eureka Server 中的服务实例列表
3.2 DiscoveryClient 的类结构
可以先看下 DiscoveryClient 的类结构图:
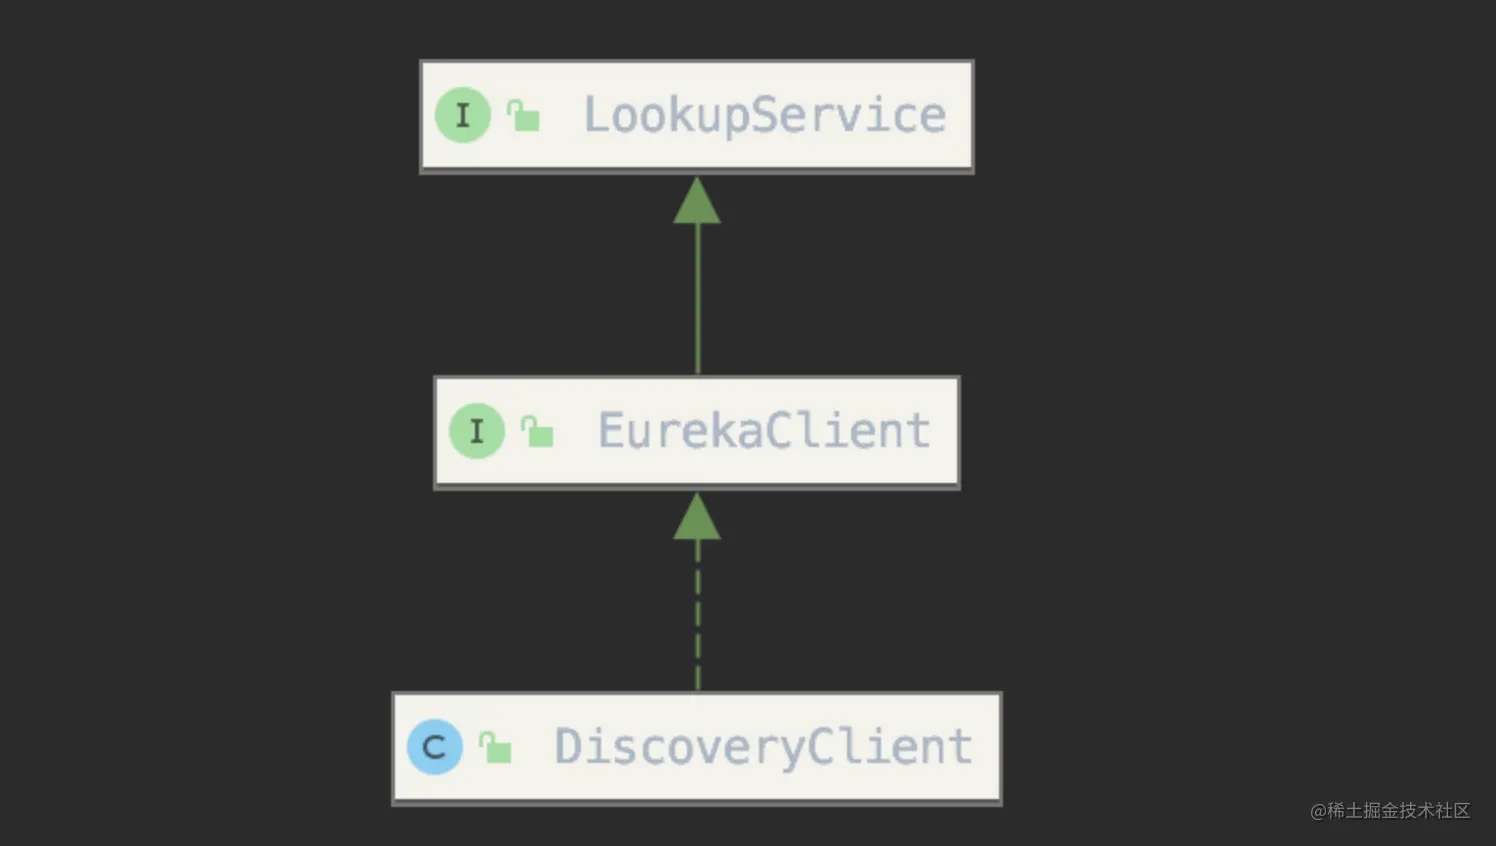
从类结构图上可以看出 DiscoveryClient 类实现了 EurekaCient,EurekaCient 又继承了LookupService,这里看看 LookupService 类:
public interface LookupService<T> {
    // 根据服务实例名称获取 Application
    Application getApplication(String appName);
    // 获取当前注册表中所有的服务实例信息
    Applications getApplications();
    // 根据服务实例 Id 获取服务实例信息
    List<InstanceInfo> getInstancesById(String id);
    InstanceInfo getNextServerFromEureka(String virtualHostname, boolean secure);
}
Application 是持有服务实例信息列表,它表示同一个服务的集群信息,这些服务实例乃是挂载在同一个服务名 appName 之下,而 InstanceInfo 则是代表着一个服务实例的信息,Application 类代码如下:
public class Application {
    private static Random shuffleRandom = new Random();
    // 服务名
    private String name;
    // 标识服务状态
    @XStreamOmitField
    private volatile boolean isDirty = false;
    @XStreamImplicit
    private final Set<InstanceInfo> instances;
    private final AtomicReference<List<InstanceInfo>> shuffledInstances;
    private final Map<String, InstanceInfo> instancesMap;
    // ........
}
在 Application 中对 InstanceInfo 的操作都是同步的,为的是保证其原子性。Applications 则是注册表中所有服务实例的集合,其间的操作也都是同步的。EurekaClient 继承了 LookupService 接口,为 DiscoveryClient 提供一个上层接口,其目的是为了Eureka1.0x 到 Eureka2.x 的升级做过渡。
EurekaCient 接口在 LookupService 的基础上提供了更丰富的方法,譬如:
- 提供做种方式获取 InstanceInfo,例如根据区域、Eureka Server 地址获取等。
- 提供本地客户端(区域、可用区)的数据,这部分与 AWS 相关
- 提供了为客户端注册和获取健康检查处理器的功能
除了相关查询接口外,EurekaClient 提供以下的两个方法,需颇多关注:
public interface EurekaClient extends LookupService {
    // .......
    // 为 Eureka Client 注册健康处理器
    public void registerHealthCheck(HealthCheckHandler healthCheckHandler);
    // 监听 Client 服务实例信息的更新
    public void registerEventListener(EurekaEventListener eventListener);
}
在 Eureka Server 中一般是通过心跳来识别一个实例的状态,而在 Eureka Client 中则存在一个定时任务定时通过 HealthCheckHandler 检测当前 Client 的状态,当 其状态发生变化的时候,将会触发新的注册事件,更新 Eureka Server 的注册表中的相关实例信息。
3.3 DiscoveryClient 构造函数
在 DiscoveryClient 的构造函数中,会有如下操作,如:服注册表信息、服务注册、初始化发送心跳、缓存刷新、注册定时任务等。因此 DiscoveryClient 的构造函数贯穿了 Eureka Client 启动阶段的各项任务。
DiscoveryClient(ApplicationInfoManager applicationInfoManager, EurekaClientConfig config, AbstractDiscoveryClientOptionalArgs args,
                Provider<BackupRegistry> backupRegistryProvider, EndpointRandomizer endpointRandomizer) {
    // 省略相关信息
}
在DiscoveryClient 的构造函数中有如下几个参数:ApplicationInfoManager、EurekaClientConfig、AbstractDiscoveryClientOptionalArgs、Provider<BackupRegistry>、EndpointRandomizer。前两个参数前面已做介绍,AbstractDiscoveryClientOptionalArgs 用于注入一些可选参数,BackupRegistry则充当备份注册中心的职责,EndpointRandomizer 则是作为端点随机器。对DiscoveryClient 的构造函数的职责做一个简单概括:
- 相关配置赋值,如ApplicationInfoManager、EurekaClientConfig等
- 备份注册中心初始化,默认没有实现
- 拉去 Eureka Server 注册表信息
- 注册前预处理
- 向 Eureka Server 注册自身
- 初始化定时任务、缓存刷新、按需注册定时任务
后面将会对这些步骤中对重要点进行相关分析。
4. Eureka Client 初始化
接下来我们看下DiscoveryClient 是怎样初始化的(构造方法中)。代码如下:
@Inject
DiscoveryClient(ApplicationInfoManager applicationInfoManager, EurekaClientConfig config, AbstractDiscoveryClientOptionalArgs args,
                Provider<BackupRegistry> backupRegistryProvider, EndpointRandomizer endpointRandomizer) {
    ...
    // 如果开启拉取注册表的话
    if (clientConfig.shouldFetchRegistry()) {
        try {
            // todo 拉取注册表信息
            boolean primaryFetchRegistryResult = fetchRegistry(false);
            if (!primaryFetchRegistryResult) {
                logger.info("Initial registry fetch from primary servers failed");
            }
            ...
        }
    }
    ...
    // 如果进行服务注册的话 clientConfig.shouldEnforceRegistrationAtInit() 默认false
    if (clientConfig.shouldRegisterWithEureka() && clientConfig.shouldEnforceRegistrationAtInit()) {
        try {
            // todo 进行服务注册
            if (!register()) {
                throw new IllegalStateException("Registration error at startup. Invalid server response.");
            }
        }
        ...
    }
    // finally, init the schedule tasks (e.g. cluster resolvers, heartbeat, instanceInfo replicator, fetch
    // todo 定时任务
    initScheduledTasks();
   ...
}
4.1 拉取注册表信息
 // 如果开启拉取注册表的话
if (clientConfig.shouldFetchRegistry()) {
      // 拉取注册表信息
      boolean primaryFetchRegistryResult = fetchRegistry(false);
}
如果开启拉取注册信息,就会调用fetchRegistry 方法去Eureka Server上面拉取注册表信息。
private boolean fetchRegistry(boolean forceFullRegistryFetch) {
    // If the delta is disabled or if it is the first time, get all
    // applications
     Applications applications = getApplications();
    if (clientConfig.shouldDisableDelta()  // 关闭增量,默认false
            || (!Strings.isNullOrEmpty(clientConfig.getRegistryRefreshSingleVipAddress()))
            || forceFullRegistryFetch
            || (applications == null)
            || (applications.getRegisteredApplications().size() == 0)
            || (applications.getVersion() == -1)) //Client application does not have latest library supporting delta
    {
        // todo 全量拉取注册表信息
        getAndStoreFullRegistry();
    } else {
        // todo 增量更新
        getAndUpdateDelta(applications);
    }
    // 设置hashCode
    applications.setAppsHashCode(applications.getReconcileHashCode());
    logTotalInstances();
}
可以看下最上面的注释,不启用增量 或者是第一次,就拉取全量注册表信息。
不启用增量|| 强制全量|| 本地注册表是空的, 这个时候就会调用getAndStoreFullRegistry 方法去Eureka Server 拉取全量注册表。 否则的话调用 getAndUpdateDelta 方法获取增量注册表信息。
4.1.1 全量拉取注册表信息
接下来我们看下getAndStoreFullRegistry 方法,看看是怎样拉取全量注册表的。
// 获取所有注册表信息
private void getAndStoreFullRegistry() throws Throwable {
    long currentUpdateGeneration = fetchRegistryGeneration.get();
    Applications apps = null;
    // 交给网络传输组件,发起网络请求,获得响应
    EurekaHttpResponse<Applications> httpResponse = clientConfig.getRegistryRefreshSingleVipAddress() == null
              // todo apps请求url
            ? eurekaTransport.queryClient.getApplications(remoteRegionsRef.get())
            : eurekaTransport.queryClient.getVip(clientConfig.getRegistryRefreshSingleVipAddress(), remoteRegionsRef.get());
    if (httpResponse.getStatusCode() == Status.OK.getStatusCode()) {
        apps = httpResponse.getEntity();
    }
    if (apps == null) {
        logger.error("The application is null for some reason. Not storing this information");
    } else if (fetchRegistryGeneration.compareAndSet(currentUpdateGeneration, currentUpdateGeneration + 1)) {
        //
        localRegionApps.set(this.filterAndShuffle(apps));
        logger.debug("Got full registry with apps hashcode {}", apps.getAppsHashCode());
    } else {
        logger.warn("Not updating applications as another thread is updating it already");
    }
}
这里其实就是调用网络组件来发起请求,得到响应了,然后拿到所有得实例信息后,将实例信息设置到本地注册表中。 我们这里再深入一点,看看eurekaTransport.queryClient.getApplications(remoteRegionsRef.get()) 是请求得哪个url:
@Override
public EurekaHttpResponse<Applications> getApplications(String... regions) {
    return getApplicationsInternal("apps/", regions);
}
private EurekaHttpResponse<Applications> getApplicationsInternal(String urlPath, String[] regions) {
    ClientResponse response = null;
    String regionsParamValue = null;
    try {
        WebResource webResource = jerseyClient.resource(serviceUrl).path(urlPath);
        // 拼接region
        if (regions != null && regions.length > 0) {
            regionsParamValue = StringUtil.join(regions);
            webResource = webResource.queryParam("regions", regionsParamValue);
        }
        Builder requestBuilder = webResource.getRequestBuilder();
        addExtraHeaders(requestBuilder);
        // 提交get请求
        response = requestBuilder.accept(MediaType.APPLICATION_JSON_TYPE).get(ClientResponse.class);
        Applications applications = null;
        if (response.getStatus() == Status.OK.getStatusCode() && response.hasEntity()) {
            applications = response.getEntity(Applications.class);
        }
        return anEurekaHttpResponse(response.getStatus(), Applications.class)
                .headers(headersOf(response))
                .entity(applications)
                .build();
    }
}
拉取全量注册表的请求为:GET请求,path为:apps/
4.1.2 增量拉取注册表信息
getAndUpdateDelta(applications);代码如下:
private void getAndUpdateDelta(Applications applications) throws Throwable {
    long currentUpdateGeneration = fetchRegistryGeneration.get();
    Applications delta = null;
    // 提交请求
    EurekaHttpResponse<Applications> httpResponse = eurekaTransport.queryClient.getDelta(remoteRegionsRef.get());
    if (httpResponse.getStatusCode() == Status.OK.getStatusCode()) {
        delta = httpResponse.getEntity();
    }
    if (delta == null) {
        getAndStoreFullRegistry();
    } else if (fetchRegistryGeneration.compareAndSet(currentUpdateGeneration, currentUpdateGeneration + 1)) {
        String reconcileHashCode = "";
        if (fetchRegistryUpdateLock.tryLock()) {
            try {
                /**
                 * 这里要将从Server获取到的所有变更信息更新到本地缓存。这些变
                 * 更信来自于两类Region:本地Region与远程Region。而本地缓存也
                 * 分为两类:缓存本地Region的applications与缓存所有远程Region
                 * 的注册信息的map(key为远程Region,value为该远程Region的注册
                 * 表)
                 */
                // todo
                updateDelta(delta);
                reconcileHashCode = getReconcileHashCode(applications);
            } finally {
                fetchRegistryUpdateLock.unlock();
            }
        }
        ...
}
增量拉取注册表的请求: GET请求 path为: apps/delta
然后,我们重点看一下updateDelta(delta);方法:
private void updateDelta(Applications delta) {
    int deltaCount = 0;
    for (Application app : delta.getRegisteredApplications()) {
        for (InstanceInfo instance : app.getInstances()) {
            Applications applications = getApplications();
            String instanceRegion = instanceRegionChecker.getInstanceRegion(instance);
            // 不是本地region,远程region
            if (!instanceRegionChecker.isLocalRegion(instanceRegion)) {
                Applications remoteApps = remoteRegionVsApps.get(instanceRegion);
                if (null == remoteApps) {
                    remoteApps = new Applications();
                    remoteRegionVsApps.put(instanceRegion, remoteApps);
                }
                applications = remoteApps;
            }
            ++deltaCount;
            // 有新增加的实例信息
            if (ActionType.ADDED.equals(instance.getActionType())) {
                Application existingApp = applications.getRegisteredApplications(instance.getAppName());
                if (existingApp == null) {
                    applications.addApplication(app);
                }
                logger.debug("Added instance {} to the existing apps in region {}", instance.getId(), instanceRegion);
                applications.getRegisteredApplications(instance.getAppName()).addInstance(instance);
            // 有修改的
            } else if (ActionType.MODIFIED.equals(instance.getActionType())) {
                Application existingApp = applications.getRegisteredApplications(instance.getAppName());
                if (existingApp == null) {
                    applications.addApplication(app);
                }
                logger.debug("Modified instance {} to the existing apps ", instance.getId());
                applications.getRegisteredApplications(instance.getAppName()).addInstance(instance);
            // 有删除的
            } else if (ActionType.DELETED.equals(instance.getActionType())) {
                Application existingApp = applications.getRegisteredApplications(instance.getAppName());
                if (existingApp != null) {
                    logger.debug("Deleted instance {} to the existing apps ", instance.getId());
                    existingApp.removeInstance(instance);
                    /*
                     * We find all instance list from application(The status of instance status is not only the status is UP but also other status)
                     * if instance list is empty, we remove the application.
                     */
                    if (existingApp.getInstancesAsIsFromEureka().isEmpty()) {
                        applications.removeApplication(existingApp);
                    }
                }
            }
        }
    }
   ...
}
这个方法就是更新客户端本地的注册表信息。
4.2 服务注册
// 如果进行服务注册的话 clientConfig.shouldEnforceRegistrationAtInit() 默认false
if (clientConfig.shouldRegisterWithEureka() && clientConfig.shouldEnforceRegistrationAtInit()) {
    try {
        // todo 进行服务注册
        if (!register()) {
            throw new IllegalStateException("Registration error at startup. Invalid server response.");
        }
    } catch (Throwable th) {
        logger.error("Registration error at startup: {}", th.getMessage());
        throw new IllegalStateException(th);
    }
}
如果在这里进行服务注册的话,需要配置文件中增加下面配置(默认是false):
eureka.client.should-enforce-registration-at-init: true
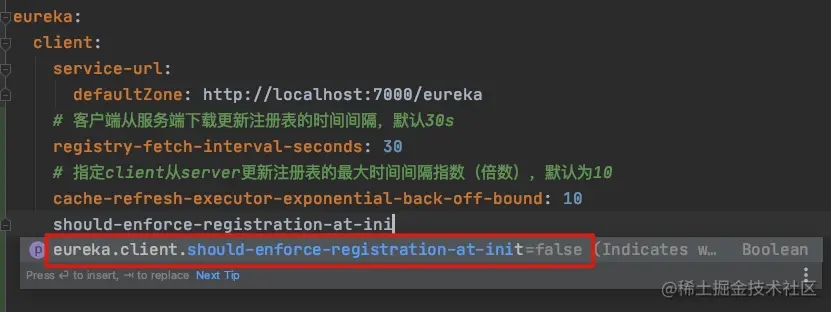
所以在这里是没有服务注册的,那么服务注册是在哪里呢?在会面分析续约定时任务时完成了服务注册,不过,我们在这里也看一下服务注册的代码:
boolean register() throws Throwable {
    EurekaHttpResponse<Void> httpResponse;
    try {
        // todo 进行服务注册
        httpResponse = eurekaTransport.registrationClient.register(instanceInfo);
    }
    ...
    }
    return httpResponse.getStatusCode() == Status.NO_CONTENT.getStatusCode();
}
接下来看:
@Override
public EurekaHttpResponse<Void> register(InstanceInfo info) {
    String urlPath = "apps/" + info.getAppName();
    Response response = null;
    try {
        Builder resourceBuilder = jerseyClient.target(serviceUrl).path(urlPath).request();
        addExtraProperties(resourceBuilder);
        addExtraHeaders(resourceBuilder);
        response = resourceBuilder
                .accept(MediaType.APPLICATION_JSON)
                .acceptEncoding("gzip")
                .post(Entity.json(info));
        return anEurekaHttpResponse(response.getStatus()).headers(headersOf(response)).build();
    } finally {
        if (logger.isDebugEnabled()) {
            logger.debug("Jersey2 HTTP POST {}/{} with instance {}; statusCode={}", serviceUrl, urlPath, info.getId(),
                    response == null ? "N/A" : response.getStatus());
        }
        if (response != null) {
            response.close();
        }
    }
}
服务注册:POST请求,path为:“apps/" + appName
4.3 定时任务
initScheduledTasks();
初始化定时任务。我们分别看一下:
4.3.1 定时更新客户端注册表任务
private void initScheduledTasks() {
    // todo 拉取注册表 增量拉取定时任务
    if (clientConfig.shouldFetchRegistry()) {
        // registry cache refresh timer
        // 拉取间隔 默认是30s
        int registryFetchIntervalSeconds = clientConfig.getRegistryFetchIntervalSeconds();
        int expBackOffBound = clientConfig.getCacheRefreshExecutorExponentialBackOffBound();
        cacheRefreshTask = new TimedSupervisorTask(
                "cacheRefresh",
                scheduler,
                cacheRefreshExecutor,
                registryFetchIntervalSeconds,
                TimeUnit.SECONDS,
                expBackOffBound,
                new CacheRefreshThread()
        );
        // todo 放入定时任务,默认30s执行一次
        // 在这里看只有一个任务,在任务完成的时候会重新开启一个新的任务,可以点进去看看
        scheduler.schedule(
                cacheRefreshTask,
                registryFetchIntervalSeconds, TimeUnit.SECONDS);
    }
}
默认每隔30s 增量拉取注册表信息。拉取注册表信息,最终还是走我们上面介绍的fetchRegistry 方法。
我们看一下com.netflix.discovery.TimedSupervisorTask#run:
@Override
public void run() {
    Future<?> future = null;
    try {
        // 使用Future,可以设定子线程的超时时间,这样当前线程就不用无限等待了
        future = executor.submit(task);
        threadPoolLevelGauge.set((long) executor.getActiveCount());
        // 阻塞 获取任务的执行结果
        future.get(timeoutMillis, TimeUnit.MILLISECONDS);  // block until done or timeout
        // delay是个很有用的变量,后面会用到,这里记得每次执行任务成功都会将delay重置
        delay.set(timeoutMillis);
        threadPoolLevelGauge.set((long) executor.getActiveCount());
        successCounter.increment();
    } catch (TimeoutException e) {
        logger.warn("task supervisor timed out", e);
        timeoutCounter.increment();
        long currentDelay = delay.get();
        // 任务线程超时的时候,就把delay变量翻倍,但不会超过外部调用时设定的最大延时时间
        long newDelay = Math.min(maxDelay, currentDelay * 2);
        // 设置为最新的值,考虑到多线程,所以用了CAS
        delay.compareAndSet(currentDelay, newDelay);
    } catch (RejectedExecutionException e) {
        // 一旦线程池的阻塞队列中放满了待处理任务,触发了拒绝策略,就会将调度器停掉
        if (executor.isShutdown() || scheduler.isShutdown()) {
            logger.warn("task supervisor shutting down, reject the task", e);
        } else {
            logger.warn("task supervisor rejected the task", e);
        }
        rejectedCounter.increment();
    } catch (Throwable e) {
        // 一旦出现未知的异常,就停掉调度器
        if (executor.isShutdown() || scheduler.isShutdown()) {
            logger.warn("task supervisor shutting down, can't accept the task");
        } else {
            logger.warn("task supervisor threw an exception", e);
        }
        throwableCounter.increment();
    } finally {
        // 这里任务要么执行完毕,要么发生异常,都用cancel方法来清理任务;
        if (future != null) {
            future.cancel(true);
        }
        // 只要调度器没有停止,就再指定等待时间之后在执行一次同样的任务
        if (!scheduler.isShutdown()) {
            // todo 下一次时间 再次执行这个任务
            //这里就是周期性任务的原因:只要没有停止调度器,就再创建一次性任务,执行时间时delay的值,
            //假设外部调用时传入的超时时间为30秒(构造方法的入参timeout),最大间隔时间为50秒(构造方法的入参expBackOffBound)
            //如果最近一次任务没有超时,那么就在30秒后开始新任务,
            //如果最近一次任务超时了,那么就在50秒后开始新任务(异常处理中有个乘以二的操作,乘以二后的60秒超过了最大间隔50秒)
            scheduler.schedule(this, delay.get(), TimeUnit.MILLISECONDS);
        }
    }
}
在这个Task中时机执行的还是入参的方法new CacheRefreshThread():
new TimedSupervisorTask(
        "cacheRefresh",
        scheduler,
        cacheRefreshExecutor,
        registryFetchIntervalSeconds,
        TimeUnit.SECONDS,
        expBackOffBound,
        new CacheRefreshThread()
);
class CacheRefreshThread implements Runnable {
    public void run() {
        refreshRegistry();
    }
}
@VisibleForTesting
void refreshRegistry() {
    try {
        ...
        // todo 拉取注册表
        boolean success = fetchRegistry(remoteRegionsModified);
        if (success) {
            registrySize = localRegionApps.get().size();
            lastSuccessfulRegistryFetchTimestamp = System.currentTimeMillis();
        }
       ...
    }
    ...
}
在执行完这个任务之后,会调用TimedSupervisorTask#run中finally代码,在这里又重新开启了新的定时任务:
finally {
        // 这里任务要么执行完毕,要么发生异常,都用cancel方法来清理任务;
        if (future != null) {
            future.cancel(true);
        }
        // 只要调度器没有停止,就再指定等待时间之后在执行一次同样的任务
        if (!scheduler.isShutdown()) {
            // todo 下一次时间 再次执行这个任务
            //这里就是周期性任务的原因:只要没有停止调度器,就再创建一次性任务,执行时间时delay的值,
            //假设外部调用时传入的超时时间为30秒(构造方法的入参timeout),最大间隔时间为50秒(构造方法的入参expBackOffBound)
            //如果最近一次任务没有超时,那么就在30秒后开始新任务,
            //如果最近一次任务超时了,那么就在50秒后开始新任务(异常处理中有个乘以二的操作,乘以二后的60秒超过了最大间隔50秒)
            scheduler.schedule(this, delay.get(), TimeUnit.MILLISECONDS);
        }
    }
这样就实现了每隔30s调用一个拉取注册表的任务。
4.3.2 定时服务续约任务
private void initScheduledTasks() {
    ...
    // 开启注册
    if (clientConfig.shouldRegisterWithEureka()) {
        // todo 服务续约定时任务
        // 续约间隔时间 30s
        int renewalIntervalInSecs = instanceInfo.getLeaseInfo().getRenewalIntervalInSecs();
        // 指定client从server更新注册表的最大时间间隔指数(倍数),默认为10
        int expBackOffBound = clientConfig.getHeartbeatExecutorExponentialBackOffBound();
        logger.info("Starting heartbeat executor: " + "renew interval is: {}", renewalIntervalInSecs);
        // Heartbeat timer
        // todo 续约,心跳定时任务
        heartbeatTask = new TimedSupervisorTask(
                "heartbeat",
                scheduler,
                heartbeatExecutor,
                renewalIntervalInSecs,
                TimeUnit.SECONDS,
                expBackOffBound,
                new HeartbeatThread()
        );
        // 续约定时任务
        scheduler.schedule(
                heartbeatTask,
                renewalIntervalInSecs, TimeUnit.SECONDS);
每30s 执行一次服务续约。直接看下HeartbeatThread 类。
private class HeartbeatThread implements Runnable {
    public void run() {
        if (renew()) {
            lastSuccessfulHeartbeatTimestamp = System.currentTimeMillis();
        }
    }
}
走的是renew 方法请求服务续约,成功后会更新lastSuccessfulHeartbeatTimestamp 字段。
boolean renew() {
    EurekaHttpResponse<InstanceInfo> httpResponse;
    try {
        httpResponse = eurekaTransport.registrationClient.sendHeartBeat(instanceInfo.getAppName(), instanceInfo.getId(), instanceInfo, null);
        logger.debug(PREFIX + "{} - Heartbeat status: {}", appPathIdentifier, httpResponse.getStatusCode());
        // 如果是没有发现该实例信息的话
        if (httpResponse.getStatusCode() == Status.NOT_FOUND.getStatusCode()) {
            REREGISTER_COUNTER.increment();
            logger.info(PREFIX + "{} - Re-registering apps/{}", appPathIdentifier, instanceInfo.getAppName());
            long timestamp = instanceInfo.setIsDirtyWithTime();
            // todo 进行服务注册,如果我们不在配置文件中指定服务初始化就注册该服务,那么服务的注册实际是在这里注册的
            boolean success = register();
            if (success) {
                instanceInfo.unsetIsDirty(timestamp);
            }
            return success;
        }
        return httpResponse.getStatusCode() == Status.OK.getStatusCode();
    } catch (Throwable e) {
        logger.error(PREFIX + "{} - was unable to send heartbeat!", appPathIdentifier, e);
        return false;
    }
}
很简单,就是调用 eurekaTransport.registrationClient.sendHeartBeat 方法发送服务续约的请求,如果你实例信息在Eureka Server中不存在的话,就进行服务注册,我们再稍微看下sendHeartBeat 方法,里面请求uri就是 String urlPath = “apps/” + appName + ‘/’ + id;
服务续约请求:PUT请求, path为:apps/{appName}/{instanceId}
4.3.3 定时更新Client信息给Server任务
private void initScheduledTasks() {
    ...
    // 开启注册
    if (clientConfig.shouldRegisterWithEureka()) {
        ...
        // todo 定时更新Client信息给服务端
        // InstanceInfo replicator
        instanceInfoReplicator = new InstanceInfoReplicator(
                this,
                instanceInfo,
                clientConfig.getInstanceInfoReplicationIntervalSeconds(),
                2); // burstSize
        statusChangeListener = new ApplicationInfoManager.StatusChangeListener() {
            @Override
            public String getId() {
                return "statusChangeListener";
            }
            // 监听到StatusChangeEvent 事件,调用notify方法
            @Override
            public void notify(StatusChangeEvent statusChangeEvent) {
                logger.info("Saw local status change event {}", statusChangeEvent);
                // todo 通知执行方法,这个方法就是立即向 服务端发起注册请求
                instanceInfoReplicator.onDemandUpdate();
            }
        };
        // 向applicationInfoManager 中注册 状态变化事件监听器
        if (clientConfig.shouldOnDemandUpdateStatusChange()) {
            applicationInfoManager.registerStatusChangeListener(statusChangeListener);
        }
        // todo  参数默认40s
        instanceInfoReplicator.start(clientConfig.getInitialInstanceInfoReplicationIntervalSeconds());
    }
    ...
}
我们看下这个start启动 方法:
public void start(int initialDelayMs) {
     if (started.compareAndSet(false, true)) {
         instanceInfo.setIsDirty();  // for initial register
         Future next = scheduler.schedule(this, initialDelayMs, TimeUnit.SECONDS);
         scheduledPeriodicRef.set(next);
     }
}
这里有个非常重要的点,调用了实例信息的setIsDirty 方法,后面的注释说是为了初始化服务注册。
创建一个延时任务,默认是40s。看看40s执行啥东西。com.netflix.discovery.InstanceInfoReplicator#run:
public void run() {
    try {
        // 刷新实例信息
        discoveryClient.refreshInstanceInfo();
        // 获取脏的时间戳
        Long dirtyTimestamp = instanceInfo.isDirtyWithTime();
        if (dirtyTimestamp != null) {
            // todo 客户端重新发起  注册请求
            discoveryClient.register();
            instanceInfo.unsetIsDirty(dirtyTimestamp);
        }
    } catch (Throwable t) {
        logger.warn("There was a problem with the instance info replicator", t);
    } finally {
        Future next = scheduler.schedule(this, replicationIntervalSeconds, TimeUnit.SECONDS);
        scheduledPeriodicRef.set(next);
    }
}
如果这个时间戳不是null的话,调用register 方法进行服务注册,这个时间戳肯定不是null的, instanceInfo.setIsDirty(); // for initial register 我们上面这个方法就是设置了这个时间戳。最后又将这个任务放入延时调度中。
其实这个定时任务是为了检测服务信息有没有变动,如果有变动重新注册到Eureka Server上去。
下面我们来看一下状态改变监听器statusChangeListener:
statusChangeListener = new ApplicationInfoManager.StatusChangeListener() {
    @Override
    public String getId() {
        return "statusChangeListener";
    }
    // 监听到StatusChangeEvent 事件,调用notify方法
    @Override
    public void notify(StatusChangeEvent statusChangeEvent) {
        logger.info("Saw local status change event {}", statusChangeEvent);
        // todo 通知执行方法,这个方法就是立即向 服务端发起注册请求
        instanceInfoReplicator.onDemandUpdate();
    }
};
// 向applicationInfoManager 中注册 状态变化事件监听器
if (clientConfig.shouldOnDemandUpdateStatusChange()) {
    applicationInfoManager.registerStatusChangeListener(statusChangeListener);
}
如果 Eureka Client 状态发生变化(在Spring Boot 通过 Actuator 对服务状态进行监控,具体实现为 EurekaHealthCheckHandler),注册在 ApplicationInfoManager 的状态改变监控器将会被触发,从而调用InstanceInfoReplicator#onDemandUpdate方法,检查服务实例信息和服务状态的变化,可能会引起按需注册任务,代码如下:
public boolean onDemandUpdate() {
    if (rateLimiter.acquire(burstSize, allowedRatePerMinute)) {
        if (!scheduler.isShutdown()) {
            // 提交
            scheduler.submit(new Runnable() {
                @Override
                public void run() {
                    logger.debug("Executing on-demand update of local InstanceInfo");
                    Future latestPeriodic = scheduledPeriodicRef.get();
                    if (latestPeriodic != null && !latestPeriodic.isDone()) {
                        logger.debug("Canceling the latest scheduled update, it will be rescheduled at the end of on demand update");
                        // 取消定时任务
                        latestPeriodic.cancel(false);
                    }
                    // todo 执行 向 Server端重新 注册的请求
                    InstanceInfoReplicator.this.run();
                }
            });
            return true;
        } else {
            logger.warn("Ignoring onDemand update due to stopped scheduler");
            return false;
        }
    } else {
        logger.warn("Ignoring onDemand update due to rate limiter");
        return false;
    }
}
InstanceInfoReplicator#onDemandUpdate 方法中调用 InstanceInfoReplicator#run 方法检查服务实例信息和服务状态的变化,并在服务实例信息和服务状态发生变化的情况下向 Eureka Server 发起重新注册的请求,为了防止重新执行 run 方法,onDemandUpdate 方法还会取消执行上次已经提交且未完成的 run方法,执行最新的按需注册任务。
4.4 总结
服务注册的时机
Client提交register()请求的情况有三种:
- 在应用启动时就可以直接进行
register(),不过,需要提前在配置文件中配置 - 在
renew时,如果server端返回的是NOT_FOUND,则提交register() - 当Client的配置信息发生了变更,则Client提交
register()
Client实例化
Eureka Client 实例化的时候有几个重要步骤,分别如下:
全量拉取注册表信息,放入自己本地注册表中。
创建定时任务,
- 定时服务续约任务,默认是30s,
- 定时更新 客户端注册表信息,默认是30s,
- 定时更新Client信息给Server端,重新服务注册,默认是40s。
参考文章
eureka-0.10.11源码(注释)
springcloud-source-study学习github地址
以上就是Eureka源码阅读Client启动入口注册续约及定时任务的详细内容,更多关于Eureka源码Client启动入口的资料请关注自由互联其它相关文章!