目录 一、Swagger2介绍 二、配置Swagger2 1、引入相关依赖 2、创建swagger的配置类 3、在启动类上添加注解扫描swagger的配置类,进行测试 4、API模型 5、定义接口说明和参数说明 6、测试,查
目录
- 一、Swagger2介绍
- 二、配置Swagger2
- 1、引入相关依赖
- 2、创建swagger的配置类
- 3、在启动类上添加注解扫描swagger的配置类,进行测试
- 4、API模型
- 5、定义接口说明和参数说明
- 6、测试,查看效果
一、Swagger2介绍
前后端分离开发模式中,api文档是最好的沟通方式。
Swagger 是一个规范和完整的框架,用于生成、描述、调用和可视化 RESTful 风格的 Web 服务。
- 及时性(接口变更后,能够及时准确地通知相关前后端开发人员)
- 规范性(并且保证接口的规范性,如接口的地址,请求方式,参数及响应格式和错误信息)
- 一致性(接口信息一致,不会出现因开发人员拿到的文档版本不一致,而出现分歧)
- 可测性(直接在接口文档上进行测试,以方便理解业务)
二、配置Swagger2
1、引入相关依赖
<!--swagger-->
<dependency>
<groupId>io.springfox</groupId>
<artifactId>springfox-swagger2</artifactId>
<version>2.7.0</version>
</dependency>
<!--swagger ui-->
<dependency>
<groupId>io.springfox</groupId>
<artifactId>springfox-swagger-ui</artifactId>
<version>2.7.0</version>
</dependency>
2、创建swagger的配置类
@Configuration
@EnableSwagger2
public class SwaggerConfig {

@Bean
public Docket webApiConfig(){
return new Docket(DocumentationType.SWAGGER_2)
.groupName("webApi")
.apiInfo(webApiInfo())
.select()
.paths(Predicates.not(PathSelectors.regex("/admin/.*")))
.paths(Predicates.not(PathSelectors.regex("/error.*")))
.build();

}

private ApiInfo webApiInfo(){
return new ApiInfoBuilder()
.title("XX平台API文档")
.description("本文档描述了xxx接口定义")
.version("1.0")
// 创建人
.contact(new Contact("Jade", "http://jade.com", "55317362@qq.com"))
.build();
}
}
3、在启动类上添加注解扫描swagger的配置类,进行测试
要能扫描到swagger的配置类SwaggerConfig
@SpringBootApplication
// 要能扫描到swagger的配置类SwaggerConfig
@ComponentScan(basePackages = {"com.jade"})
public class Application {
public static void main(String[] args) {
SpringApplication.run(Application.class, args);
}
}
4、API模型
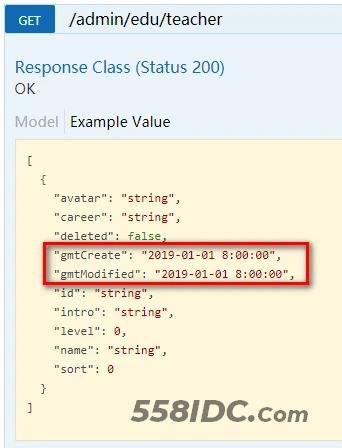
可以添加一些自定义设置,例如:
定义样例数据
@ApiModelProperty(value = "创建时间", example = "2019-01-01 8:00:00")
@TableField(fill = FieldFill.INSERT)
private Date gmtCreate;

@ApiModelProperty(value = "更新时间", example = "2019-01-01 8:00:00")
@TableField(fill = FieldFill.INSERT_UPDATE)
private Date gmtModified;

5、定义接口说明和参数说明
- 定义在类上:@Api
- 定义在方法上:@ApiOperation
- 定义在参数上:@ApiParam
@Api(description="讲师管理")
@RestController
@RequestMapping("/admin/edu/teacher")
public class TeacherAdminController {

@Autowired
private TeacherService teacherService;

@ApiOperation(value = "所有讲师列表")
@GetMapping
public List<Teacher> list(){
return teacherService.list(null);
}

@ApiOperation(value = "根据ID删除讲师")
@DeleteMapping("{id}")
public boolean removeById(
@ApiParam(name = "id", value = "讲师ID", required = true)
@PathVariable String id){
return teacherService.removeById(id);
}
}
6、测试,查看效果
访问http://localhost:8080/swagger-ui.html 即可

到此这篇关于Spring Boot2配置Swagger2生成API接口文档详情的文章就介绍到这了,更多相关Spring Boot2生成API接口文档内容请搜索自由互联以前的文章或继续浏览下面的相关文章希望大家以后多多支持自由互联!
