目录
- 一、IDEA自带打包插件
- 二、maven插件打包
- 2.1 制作瘦包(直接打包,不打包依赖包)
- 2.2 制作瘦包和依赖包(相互分离)
- 2.3 制作胖包(项目依赖包和项目打为一个包)
- 2.4 制作胖包(transform部分自定义)
- 三、SpringBoot项目打包
- 四、Scala项目打包
- 五、groovy项目打包
- 总结
一、IDEA自带打包插件
内容:此种方式可以自己选择制作胖包或者瘦包,但推荐此种方式制作瘦包。
输出:输出目录在out目录下
流程步骤:
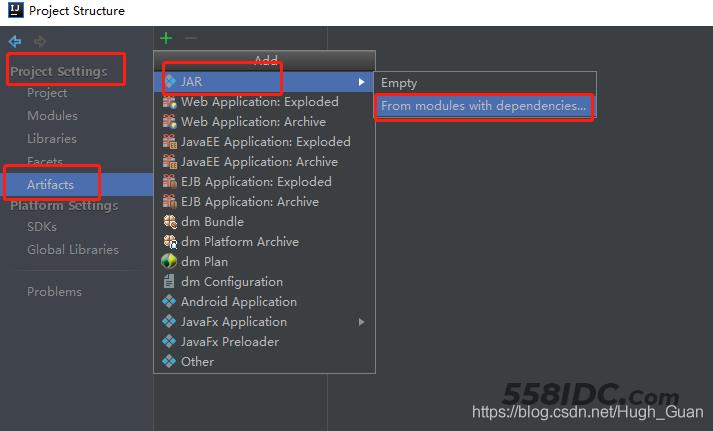
第一步: 依次选择 file->projecct structure->artifacts->点击+ (选择jar)->选择 from module with dependencies

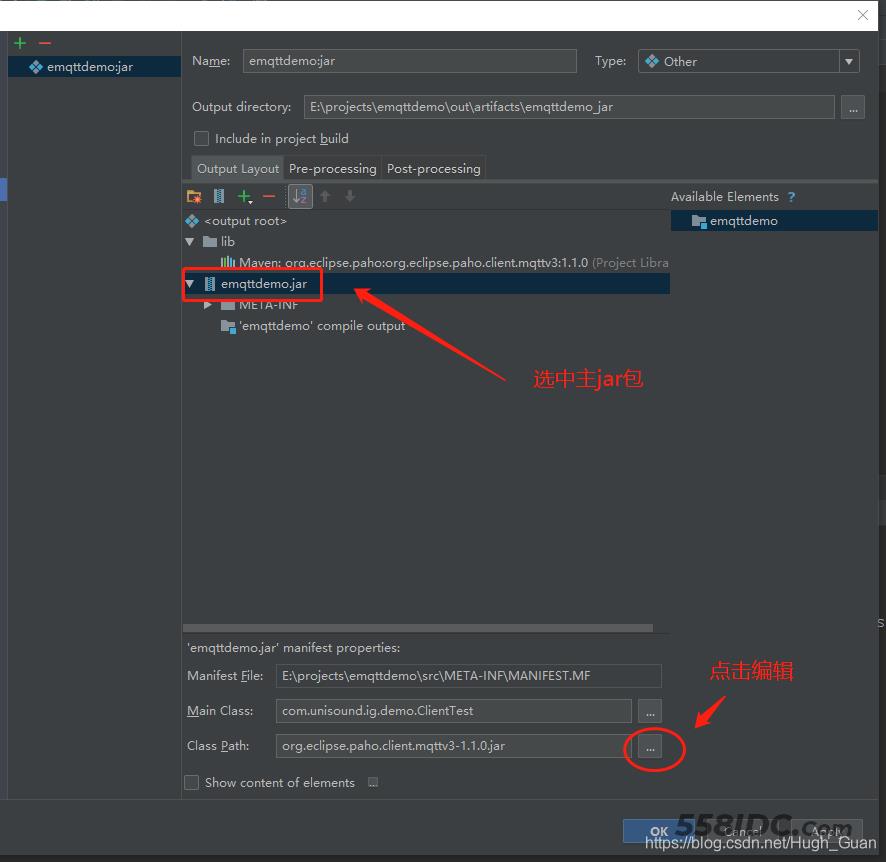
第二步:弹出窗口中指定Main Class,是否选择依赖jar包,是否包含测试。(尽量不选依赖包,防止依赖包选择不全)


第三步:点击Build–>Build Artifacts–>选择bulid
二、maven插件打包
输出:输出目录在target目录下
2.1 制作瘦包(直接打包,不打包依赖包)
内容:仅打包出项目中的代码到JAR包中。
方式:在pom.xml中添加如下plugin; 随后执行maven install
 <!-- java编译插件 -->
<plugin>
	<groupId>org.apache.maven.plugins</groupId>
	<artifactId>maven-compiler-plugin</artifactId>
	<version>指定版本</version>
	<configuration>
		<source>1.8</source>
		<target>1.8</target>
		<encoding>UTF-8</encoding>
	</configuration>
</plugin>
2.2 制作瘦包和依赖包(相互分离)
内容:将依赖JAR包输出到lib目录方式(打包方式对于JAVA项目是通用的)
将项目中的JAR包的依赖包输出到指定的目录下,修改outputDirectory配置,如下面的${project.build.directory}/lib。
方式:
- pom.xml的build>plugins中添加如下配置。
- 点击maven project(右边栏)->选择Lifecycle->点击package打包
注意:如果想将打包好的JAR包通过命令直接运行,如java -jar xx.jar。需要制定manifest配置的classpathPrefix与上面配置的相对应。如上面把依赖JAR包输出到了lib,则这里的classpathPrefix也应指定为lib/;同时,并指定出程序的入口类,在配置mainClass节点中配好入口类的全类名。
<plugins>
<!-- java编译插件 -->
<plugin>
	<groupId>org.apache.maven.plugins</groupId>
	<artifactId>maven-compiler-plugin</artifactId>
	<configuration>
		<source>1.8</source>
		<target>1.8</target>
		<encoding>UTF-8</encoding>
	</configuration>
</plugin>
<plugin>
	<groupId>org.apache.maven.plugins</groupId>
	<artifactId>maven-jar-plugin</artifactId>
	<configuration>
		<archive>
			<manifest>
				<addClasspath>true</addClasspath>
				<classpathPrefix>lib/</classpathPrefix>
				<mainClass>com.yourpakagename.mainClassName</mainClass>
			</manifest>
		</archive>
	</configuration>
</plugin>
<plugin>
	<groupId>org.apache.maven.plugins</groupId>
	<artifactId>maven-dependency-plugin</artifactId>
	<executions>
		<execution>
			<id>copy</id>
			<phase>install</phase>
			<goals>
				<goal>copy-dependencies</goal>
			</goals>
			<configuration>
				<outputDirectory>${project.build.directory}/lib</outputDirectory>
			</configuration>
		</execution>
	</executions>
</plugin>
</plugins>
注意:默认的classpath会在jar包内。为了方便,可以在Main方法配置后加上manifestEntries配置,指定classpath。
<plugin>
	<groupId>org.apache.maven.plugins</groupId>
	<artifactId>maven-jar-plugin</artifactId>
	<configuration>
		<classesDirectory>target/classes/</classesDirectory>
		<archive>
			<manifest>
				<!-- 主函数的入口 -->
				<mainClass>com.yourpakagename.mainClassName</mainClass>
				<!-- 打包时 MANIFEST.MF文件不记录的时间戳版本 -->
				<useUniqueVersions>false</useUniqueVersions>
				<addClasspath>true</addClasspath>
				<classpathPrefix>lib/</classpathPrefix>
			</manifest>
			<manifestEntries>
				<Class-Path>.</Class-Path>
			</manifestEntries>
		</archive>
	</configuration>
</plugin>
2.3 制作胖包(项目依赖包和项目打为一个包)
内容:将项目中的依赖包和项目代码都打为一个JAR包
方式:
pom.xml的build>plugins中添加如下配置;
点击maven project(右边栏)->选择Plugins->选择assembly->点击assembly:assembly
注意:1. 针对传统的JAVA项目打包;
2. 打包指令为插件的assembly命令,尽量不用package指令。
<plugin>
	<groupId>org.apache.maven.plugins</groupId>
	<artifactId>maven-assembly-plugin</artifactId>
	<version>2.5.5</version>
	<configuration>
		<archive>
			<manifest>
				<mainClass>com.xxg.Main</mainClass>
			</manifest>
		</archive>
		<descriptorRefs>
			<descriptorRef>jar-with-dependencies</descriptorRef>
		</descriptorRefs>
	</configuration>
</plugin>
2.4 制作胖包(transform部分自定义)
<plugin>
	<groupId>org.apache.maven.plugins</groupId>
	<artifactId>maven-shade-plugin</artifactId>
	<version>2.4.3</version>
	<executions>
		<execution>
			<phase>package</phase>
			<goals>
				<goal>shade</goal>
			</goals>
			<configuration>
				<filters>
					<filter>
						<artifact>*:*</artifact>
						<excludes>
							<exclude>META-INF/*.SF</exclude>
							<exclude>META-INF/*.DSA</exclude>
							<exclude>META-INF/*.RSA</exclude>
						</excludes>
					</filter>
				</filters>
				<transformers>
					<transformer implementation="org.apache.maven.plugins.shade.resource.AppendingTransformer">
						<resource>META-INF/spring.handlers</resource>
					</transformer>
					<transformer implementation="org.apache.maven.plugins.shade.resource.AppendingTransformer">
						<resource>META-INF/spring.schemas</resource>
					</transformer>
					<transformer implementation="org.apache.maven.plugins.shade.resource.AppendingTransformer">
						<resource>META-INF/spring.tooling</resource>
					</transformer>
					<transformer implementation="org.apache.maven.plugins.shade.resource.ManifestResourceTransformer">
						<mainClass>com.xxx.xxxInvoke</mainClass>
					</transformer>
				</transformers>
				<minimizeJar>true</minimizeJar>
				<shadedArtifactAttached>true</shadedArtifactAttached>
			</configuration>
		</execution>
	</executions>
</plugin>
三、SpringBoot项目打包
内容:将当前项目里所有依赖包和当前项目的源码都打成一个JAR包,同时还会将没有依赖包的JAR包也打出来,以.original保存
方式:
在pom.xml的build>plugins中加入如下配置点击maven project(右边栏)->选择Lifecycle->点击package或install打包
<plugin>
	<groupId>org.springframework.boot</groupId>
	<artifactId>spring-boot-maven-plugin</artifactId>
</plugin>
四、Scala项目打包
方式:
在pom.xml的build>plugins中加入如下配置
点击maven project(右边栏)->选择Lifecycle->点击package或install打包
<plugin>
	<groupId>org.scala-tools</groupId>
	<artifactId>maven-scala-plugin</artifactId>
	<executions>
		<execution>
			<goals>
				<goal>compile</goal>
					<goal>testCompile</goal>
				</goals>
		</execution>
	</executions>
	<configuration>
		<scalaVersion>${scala.version}</scalaVersion>
		<args>
			<arg>-target:jvm-1.5</arg>
		</args>
	</configuration>
</plugin>
五、groovy项目打包
方式:
在pom.xml的build>plugins中加入如下配置
点击maven project(右边栏)->选择Lifecycle->点击package或install打包
<plugin>
	<groupId>org.codehaus.gmavenplus</groupId>
	<artifactId>gmavenplus-plugin</artifactId>
	<version>1.2</version>
	<executions>
		<execution>
			<goals>
				<goal>addSources</goal>
				<goal>addStubSources</goal>
				<goal>compile</goal>
				<goal>execute</goal>
			</goals>
		</execution>
	</executions>
</plugin>
总结
到此这篇关于Maven工程打jar包的N种方式的文章就介绍到这了,更多相关Maven工程打jar包内容请搜索自由互联以前的文章或继续浏览下面的相关文章希望大家以后多多支持自由互联!
