一、Hystrix简介
Hystrix(https://github.com/Netflix/Hystrix)是由Netflix开源的一个延迟和容错库,用于隔离访问远程系统、服务或者第三方库,防止级联失败,从而提升系统的可用性、容错性与局部应用的弹性,是一个实现了超时机制和断路器模式的工具类库。
Hystrix是一个用于处理分布式系统的延迟和容错的开源库,在分布式系统里,许多依赖不可避免的会调用失败,比如超时,异常等,Hystrix能保证在一个依赖出问题的情况下,不会导致整体服务失败,避免级联故障,以提高分布式系统的弹性。
“断路器” 本身是一种开关设置,当某个服务单元发生故障之后,通过断路器的故障监控(类似熔断保险丝),向调用方返回一个符合预期的,可处理的备选响应(fallBack),而不是长时间的等待或者抛出调用方法无法处理的异常,这样就保证了服务调用方的线程不会长时间,不必要的占用,从而避免了故障在分布式系统中的蔓延,乃至雪崩。
在大中型分布式系统中,通常系统很多依赖(HTTP、hession、Netty、Dubbo等),如下图:
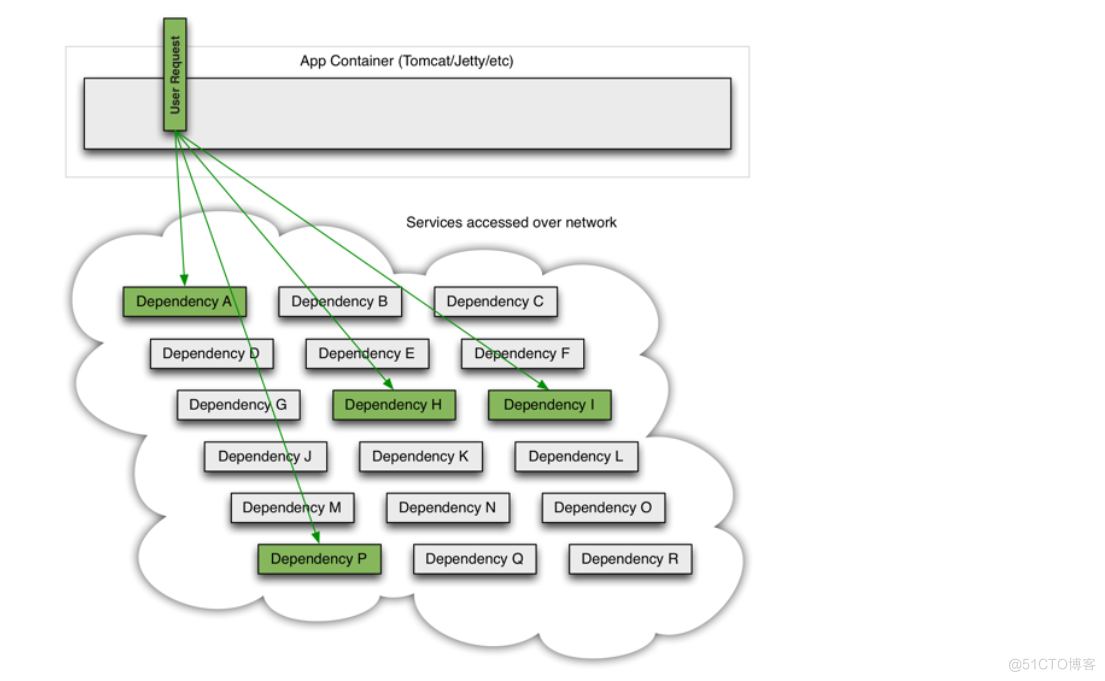
在高并发访问下,这些依赖的稳定性与否对系统的影响非常大,但是依赖有很多不可控问题:如网络连接缓慢,资源繁忙,暂时不可用,服务脱机等。
如下图:QPS为50的依赖 I 出现不可用,但是其他依赖仍然可用。
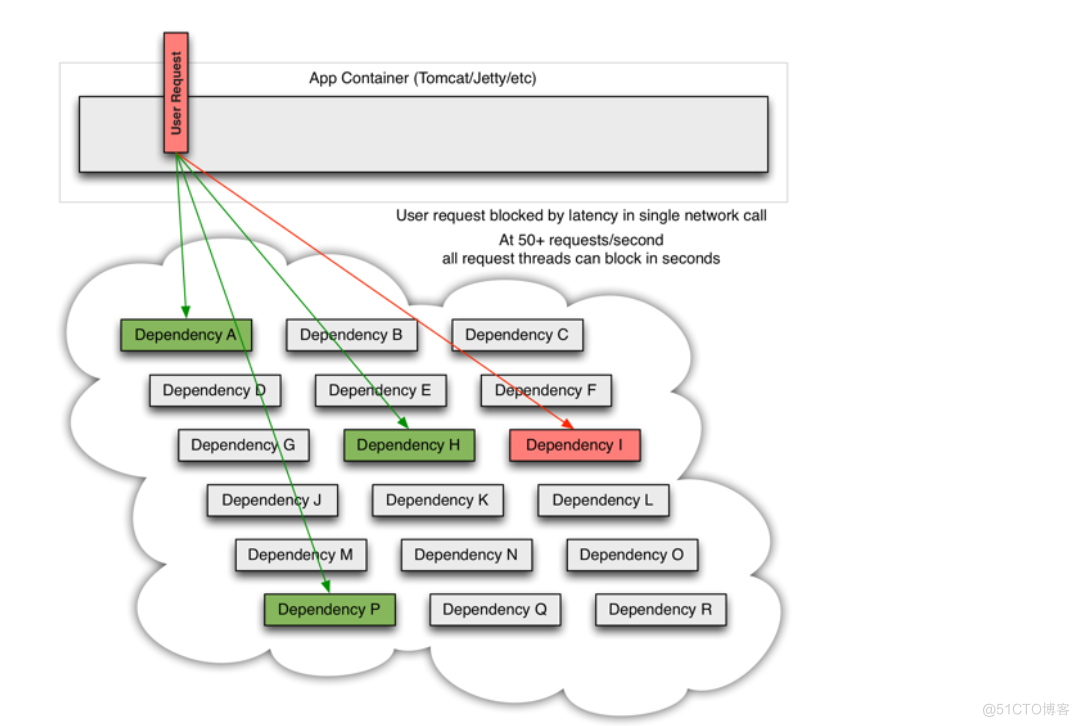
当依赖 I 阻塞时,大多数服务器的线程池就出现阻塞(BLOCK),影响整个线上服务的稳定性。如下图:
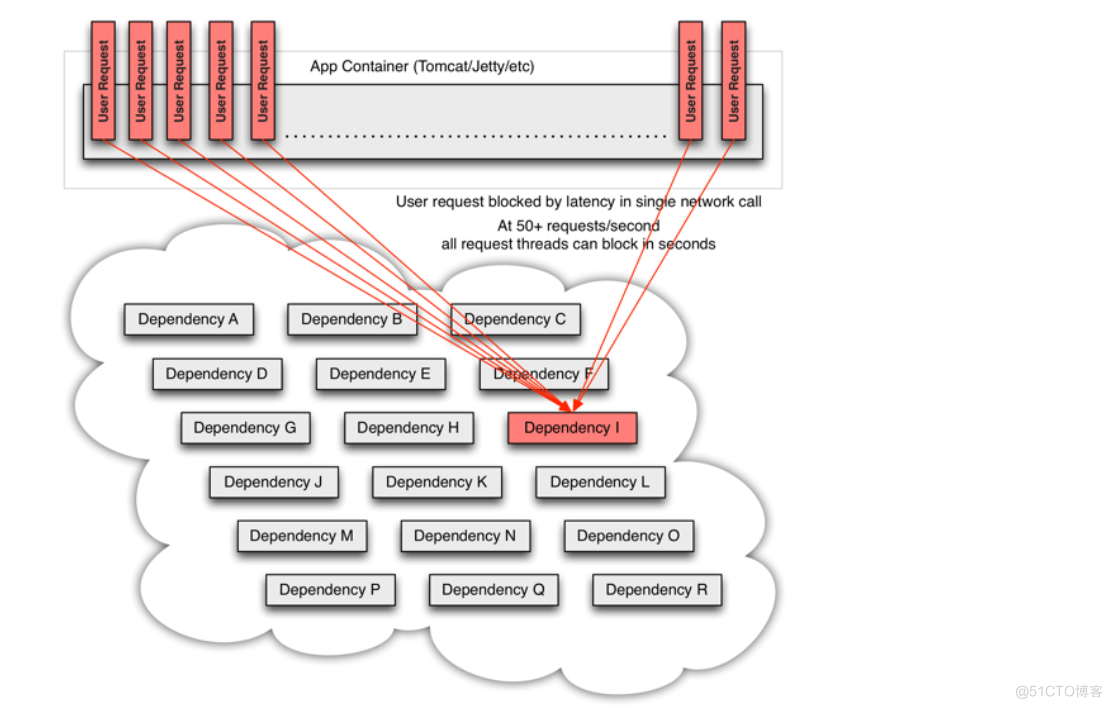
在复杂的分布式架构的应用程序有很多的依赖,都会不可避免地在某些时候失败。高并发的依赖失败时如果没有隔离措施,当前应用服务就有被拖垮的风险。
解决问题方案:对依赖做隔离,Hystrix就是处理依赖隔离的框架,同时也是可以帮我们做依赖服务的治理和监控。
二、Hystrix如何解决依赖隔离
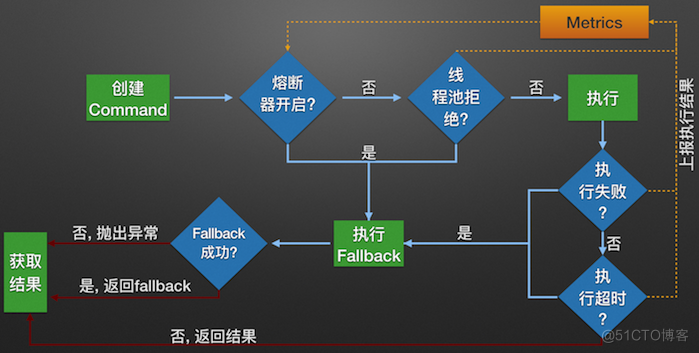
- 1、包裹请求:使用HystrixCommand包裹对依赖的调用逻辑,每个命令在独立的线程中执行,使用了设计模式中的“命令模式”;
- 2、跳闸机制:当某服务的错误率超过一定阈值时,Hystrix可以自动或者手动跳闸,停止请求该服务一段时间;
- 3、资源隔离:Hystrix为每个依赖都维护了一个小型的线程池(或者信号量)。如果该线程已满,则发向该依赖的请求就会被立即拒绝,而不是排队等候,从而加速失败判定;
- 4、监控:Hystrix可以近乎实时地监控运行指标和配置的变化,例如成功、失败、超时、以及被拒绝的请求等;
- 5、回退机制:当请求失败、超时、被拒绝,或当断路器打开时,执行回退逻辑,回退逻辑由开发人员自行提供,如返回一个缺省值;
- 6、自我修复:断路器打开一段时间后,会自动进入“半开”状态,此时断路器可允许一个请求访问依赖的服务,若请求成功,则断路器关闭,否则断路器转为“打开”状态;
三、服务熔断
熔断机制是应对雪崩效应的一种微服务链路保护机制。
当扇出链路(即上面的图二)的某个微服务(I)不可用或者响应时间太长,会进行服务的降级,进而熔断该节点微服务的调用,快速返回"错误"的响应信息。当检测到该节点微服务调用响应正常回复后恢复调用链路。在springCloud框架里熔断机制通过Hystrix实现。Hystrix会监控微服务服务间调用的状况,当失败的调用到达一定的阈值,缺省是5秒内20次调用失败就会启动熔断机制,熔断机制的注解是**@HystrixCommand**
Hystrix中的三种降级方案
- 熔断触发降级
- 请求超时触发降级
- 资源隔离触发降级
四、Hystrix在SpringCloud中的简单应用
4.1、熔断触发降级
- 4.1.1、添加依赖
-
4.1.2、application.yml 不需要修改修改
-
4.1.3、修改Controller 接口 ,添加注解 @HystrixCommand
修改原来的cloud-provider服务:
@GetMapping("/hello") public String helloEureka(String id){ if (StringUtils.isEmpty(id)) { throw new RuntimeException(); } return "Hello Eureka Provider"; }- 4.1.4、修改主启动类
这样就配置好了服务熔断,当某个接口发生异常时,就会跳转进配置的方法。
4.2、请求超时触发熔断:
- 4.2.1、在客户端新增一个接口:
- 4.2.2、在服务提供方新增测试接口:
启动测试即可。
4.3、资源隔离熔断
- 资源隔离熔断可以分为信号量隔离和线程池隔离。
基于资源隔离我们可能需要借助 dashboard 来看效果,首先要开启 management.endpoints.web.exposure.include=refresh,hystrix.stream,然后通过Jmeter进行压测,就可以看到效果。
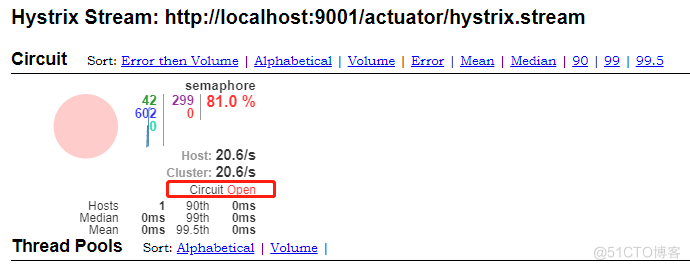
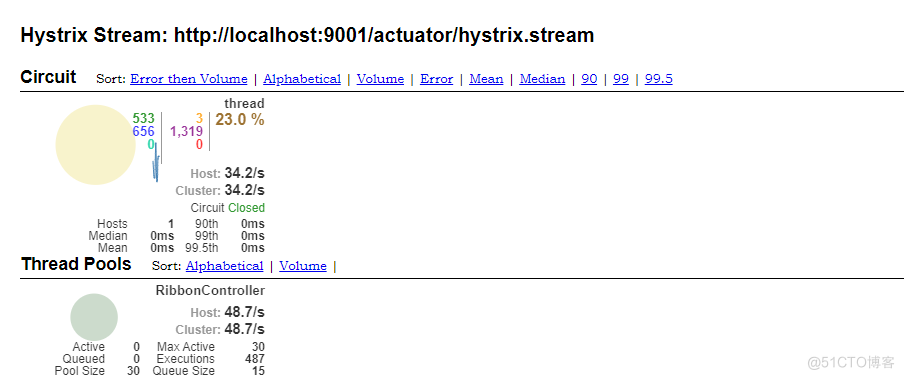
五、基于Feign 客户端的熔断实现
@FeignClient(value = "cloud-provider", fallbackFactory = HystrixClientService.class) public interface ClientService { //如果feign代理的是get请求 // 每个参数必须带上@RequestParam,否则会报post not support! @RequestMapping(value = "/hello", method = RequestMethod.GET) String hello(@RequestParam("id") String id) throws InterruptedException; } @Component public class HystrixClientService implements FallbackFactory<ClientService> { @Override public ClientService create(Throwable throwable) { return new ClientService() { @Override public String hello(String id) { System.out.println("feign 服务降级"); return "feign 服务降级"; } }; } }接着开启 Feign 熔断、及Feign Service 的方法级别的熔断策略
feign: hystrix: enabled: true hystrix: command: default: #全局配置, feignclient#method(param) execution: timeout: enable: true isolation: thread: timeoutInMilliseconds: 3000 # ClientService#hello(String): # execution: # isolation: # strategy: SEMAPHORE # semaphore: # maxConcurrentRequests: 10 ClientService#hello(String): execution: isolation: strategy: THREAD threadpool: cloud-provider: coreSize: 2 maxQueueSize: 1000 queueSizeRejectionThreshold: 800测试结果如下:
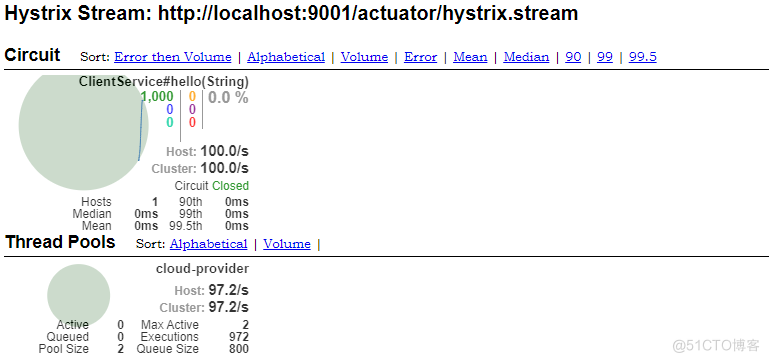
使用详解:
上面通过Hystrix 中的核心注解 @HystrixCommand, 通过它创建了 HystrixCommand 的实现,同时利用 fallback 属性指定了服务降级的实现方法。然而这些还只是 Hystrix 使用的一 小部分,在实现一个大型分布式系统时,往往还需要更多高级的配置功能。 接下来我们将详细介绍 Hystrix 各接口和注解的使用方法。创建请求命令:
Hystrix 命令就是我们之前所说的 HystrixCommand,它用来封装具体的依赖服务调用逻辑。我们可以通过继承的方式来实现, 比如:
public class HelloCommand extends HystrixCommand<String> { private RestTemplate restTemplate; private HashMap map; public HelloCommand(RestTemplate restTemplate, HashMap paramMap) { super(com.netflix.hystrix.HystrixCommand.Setter.withGroupKey( HystrixCommandGroupKey.Factory.asKey("")).andCommandPropertiesDefaults( HystrixCommandProperties.Setter().withExecutionTimeoutInMilliseconds(5000))); this.restTemplate = restTemplate; this.map = paramMap; } @Override protected String run() { return restTemplate.getForObject("http://cloud-provider/hello?id={id}", String.class, map); } // 服务降级 @Override protected String getFallback() { return "error-err"; } }通过上面实现的HelloCommand,我们既可以实现请求的同步执行也可以实现异步执行。除了传统的同步执行与异步执行之外, 我们还可以将 HystrixComrnand 通过Observable 来实现响应式执行方式。通过调用 observe()和toObservable ()方法可以返回 Observable 对象observe ()和toObservable ()虽然都返回了 Observable,但是它们略有不同,前者返回的是一 个Hot Observable,该命令会在 observe ()调用的时候立即执行, 当Observable 每次被订阅的时候会重放它的行为;而后者返回的是一 个Cold Observable,toObservable ()执行之后,命令不会被立即执行,只有当所有订阅者都订阅它之后才会执行。
//继承HystrixCommand的实现 @RequestMapping(value = "/helloCommand") public String helloCommand(Long id) { HashMap map = new HashMap<>(); map.put("id", id); //同步 String result = new HelloCommand(restTemplate, map).execute(); //异步 //Future<String> result = new HelloCommand(restTemplate, map).queue(); //响应式执行方式 //Observable<String> hotObserve = new HelloCommand(restTemplate, map).observe(); //Observable<String> coldObservable = new HelloCommand(restTemplate, map).toObservable(); return result; }异步执行的时候, 可以通过对返回的 result 调用 get 方法来获取结果。另外, 也可以通过 上文@HystrixCommand 注解来更为优雅地实现 Hystrix 命令的定义,虽然 @HystrixCommand 注解可以非常优雅地定义 Hystrix 命令的实现, 但是如上定义的 get 方式只是同步执行的实现,若要实现异步执行则还需另外定义,比如:
//异步 @HystrixCommand(fallbackMethod = "getByidAsyncFailed")//熔断机制 @RequestMapping(value = "/getByidAsync") public String getUserByidAsync(String id) { HashMap map = new HashMap<>(); map.put("id", id); AsyncResult<String> asyncResult = new AsyncResult<String>() { @Override public String invoke() { return restTemplate.getForObject(REST_URL_PREFIX + "/hello?id={id}", String.class, map); } @Override public String get() { return invoke(); } }; return asyncResult.get(); }虽然 HystrixCommand 具备了 observe ()和toObservable() 的功能,但是它的实现有 一 定的局限性,它返回的 Observable 只能发射 一 次数据,所以 Hystrix 还提供了另外 一 个特殊命令封装 HystrixObservableCommand,通过它实现的命令可以获取能发射多次的 Observable 。如果使用 HystrixObservableCommand 来实现命令封装,需要将命令的执行逻辑在construct 方法中重载,这样 Hystrix 才能将具体逻辑包装到 Observable 内,如下所示:
public class HelloObservableCommand extends HystrixObservableCommand<String> { private RestTemplate restTemplate; private HashMap map; public HelloObservableCommand(RestTemplate restTemplate, HashMap paramMap) { super(com.netflix.hystrix.HystrixObservableCommand.Setter.withGroupKey( HystrixCommandGroupKey.Factory.asKey("")).andCommandPropertiesDefaults( HystrixCommandProperties.Setter().withExecutionTimeoutInMilliseconds(5000))); this.restTemplate = restTemplate; this.map = paramMap; } @Override protected Observable<String> construct() { return Observable.create(new Observable.OnSubscribe<String>() { @Override public void call(Subscriber<? super String> observer) { try { if (!observer.isUnsubscribed()) { String string = restTemplate.getForObject("http://cloud-provider/hello?id={id}", String.class, map); observer.onNext(string); observer.onCompleted(); } } catch (Exception e) { observer.onError(e); } } }); } }而对此的注解实现依然是使用 @HystrixCommand, 只是方法定义需要做 一 些变化,具体内容与 construct ()的实现类似,如下所示:
//HystrixObservableCommand //EAGER 是该参数的模式值, 表示使用 observe ()执行方式。 @HystrixCommand(fallbackMethod = "getByidAsyncFailed", observableExecutionMode = ObservableExecutionMode.EAGER) // //表示使用 toObservable() 执行方式。 // @HystrixCommand(fallbackMethod = "getByidAsyncFailed",observableExecutionMode = ObservableExecutionMode.LAZY) @RequestMapping(value = "/helloHystrixObservableCommand") public Observable<String> helloHystrixObservableCommand(String id) { HashMap map = new HashMap<>(); map.put("id", id); return Observable.create(new Observable.OnSubscribe<String>() { @Override public void call(Subscriber<? super String> observer) { try { if (!observer.isUnsubscribed()) { String string = restTemplate.getForObject("http://cloud-provider/hello?id={id}", String.class, map); observer.onNext(string); observer.onCompleted(); } } catch (Exception e) { observer.onError(e); } } }); }异常处理
异常传播
在HystrixCommand实现的run()方法中抛出异常时, 除了HystrixBadRequestException 之外,其他异常均会被 Hystrix 认为命令执行失败并触发服务降级的处理逻辑,所以当需要在命令执行中抛出不触发服务降级的异常时来使用它。而在使用注册配置实现 Hystrix 命令时,它还支持忽略指定异常类型功能, 只需要通过设置 @HystrixCommand 注解的 ignoreExceptions 参数, 比如:**@HystrixCommand(ignoreExceptions = {BadRequestException.class})**当方法抛出了类型为 BadRequestException的异常时, Hystrix 会将它包装在 HystrixBadRequestException 中抛出, 这样就不会触发后续的 fallback 逻辑。
异常获取
当 Hystrix 命令因为异常(除了 HystrixBadRequestException 的异常)进入服务降级逻辑之后, 往往需要对不同异常做针对性的处理, 那么我们如何来获取当前抛出的异常呢?在以传统继承方式实现的 Hystrix 命令中, 我们可以用 getFallback ()方法通过 getExecutionException() 方法来获取具体的异常, 通过判断来进入不同的处理逻辑。
除了传统的实现方式之外,注解配置方式也同样可以实现异常的获取。 它的实现也非常简单, 只需要在 fallback 实现方法的参数中增加 Throwable e 对象的定义, 这样在方法内部就可以获取触发服务降级的具体异常内容了, 比如:fallbackl(Throwable e)
请求缓存
在高并发的场景之下, Hystrix 中提供了请求缓存的功能, 我们可以方便地开启和使用请求缓存来优化系统, 达到减轻高并发时的请求线程消耗、 降低请求响应时间的效果。
开启请求缓存功能 :Hystrix 请求缓存的使用非常简单, 我们只需要在实现 HystrixCommand 或 HystrixObservableCommand 时, 通过重载 getCacheKey ()方法来开启请求缓存。通过开启请求缓存可以让我们实现的 Hystrix 命令具备下面几项好处:
- 减少重复的请求数, 降低依赖服务的并发度。
- 在同一用户请求的上下文中, 相同依赖服务的返回数据始终保持 一 致。
- 请求缓存在 run() 和 construct ()执行之前生效, 所以可以有效减少不必要的线程开销。
清理失效缓存功能,清除缓存有两个方式
///刷新缓存,根据id进行清理 自己写一个flush方法。通过idzuoweikey清除 HystrixRequestCache.getInstance(GETTER_KEY,HystrixConcurrencyStrategyDefault.getinstance()).clear(String.valueOf(id)); //刷新缓存, 清理缓存中失效的User,直接调用flush方法 HelloCommand.flushCache(id);请求合并
微服务架构中的依赖通常通过远程调用实现, 而远程调用中最常见的问题就是通信消耗与连接数占用。 在高并发的情况之下, 因通信次数的增加, 总的通信时间消耗将会变得不那么理想。 同时, 因为依赖服务的线程池资源有限,将出现排队等待与响应延迟的清况。为了优化这两个问题, Hystrix 提供了 HystrixCollapser 来实现请求的合并,以减少通信消耗和线程数的占用。
HystrixCollapser 实现 了在 HystrixCommand 之前放置 一 个合并处理器, 将处于一个很短的时间窗(默认 10 毫秒)内对同 一 依赖服务的多个请求进行整合并以批量方式发起请 求 的功能(服 务提供方也需 要 提供相应的批 量实 现 接口)。 通 过HystrixCollapser 的封装, 开发者不需要关注线程合并的细节过程, 只需关注批量化服务和处理。 下面我们从 HystrixCollapser 的使用实例 中对其合并请求的过程 一 探究竟。
public abstract class HystrixCollapser<BatchReturnType, ResponseType, RequestArgumentType> implements HystrixExecutable<ResponseType>, HystrixObservable<ResponseType> { //BatchReturnType: 合并后批量请求的返回类型。 // ResponseType: 单个请求返回的类型。 //RequestArgumentType: 请求参数类型。 //该函数用来定义获取请求参数的方法。 public abstract RequestArgumentType getRequestArgument(); //合并请求产生批量命令的具体实现方法。 protected abstract HystrixCommand<BatchReturnType> createCommand(Collection<CollapsedRequest<ResponseType, RequestArgumentType>> requests); //批量命令结果返回后 的处理, 这里需要实现将批量结果拆分并传递给合并前的各个原子请求命令的逻辑。 protected abstract void mapResponseToRequests(BatchReturnType batchResponse, Collection<CollapsedRequest<ResponseType, RequestArgumentType>> requests); }接下来, 我们通过 一 个简单的示例来直观理解实现请求合并的过程。
首先在我们原来的服务提供者 cloud-provider工程中加入一个批量获取的接口,那么现在两个接口如下:
@GetMapping("/hello") public String helloEureka(){ return "Hello Eureka Provider1"; } @GetMapping("/hi") public List<String> hi(String ids) { //ids是 , 隔开的字符串 String[] split = ids.split(","); ArrayList<String> objects = new ArrayList<String>(); for(String s:split){ objects.add("hi! wuzz:ID: " + s); } return objects; }创建一个独立的消费者服务,用于通过 RestTemplate 实现了简单的调用
@Service public class HelloCollapseService { @Autowired private RestTemplate restTemplate; private static final String REST_URL_PREFIX = "http://cloud-provider"; //同步 public String hello(String id) { return restTemplate.getForObject(REST_URL_PREFIX + "/hello/{1}", String.class, id); } //同步 public List<String> hi(List<String> ids) { String[] forObject = restTemplate.getForObject(REST_URL_PREFIX + "/hi?ids={1}", String[].class, StringUtils.join(ids, ",")); return Arrays.asList(forObject); } }接着, 我们实现将短时间内多个获取单一对象的请求命令进行合并。第 一 步,为请求合并的实现准备 一 个批量请求命令的实现, 具体如下:
//为请求合并的实现准备 一 个批量请求命令的实现 //批量请求命令实际上就是 一 个简单的HystrixCommand实现 public class HelloBatchCommand extends HystrixCommand<List<String>> { private HelloCollapseService helloCollapseService; private List<String> ids; public HelloBatchCommand(HelloCollapseService helloCollapseService, List<String> ids) { super(Setter.withGroupKey(HystrixCommandGroupKey.Factory.asKey("helloBatchCommand"))); this.helloCollapseService = helloCollapseService; this.ids = ids; } @Override protected List<String> run() { //这段打印用域等等测试,查看是否是调用这个接口去服务获取数据的 System.out.println("finaAll request:---------" + ids + "Thread.currentThread().getName():-------" + Thread.currentThread().getName()); return helloCollapseService.hi(ids); } @Override protected List<String> getFallback() { List<String> users = new ArrayList<String>(); users.add("失败者"); return new ArrayList<String>(users); } }批量请求命令实际上就是 一 个简单的HystrixCommand实现,从上面的实现中可以看到它通过调用 helloCollapseService.hi(ids) 来批量获取结果。
第二步, 通过继承HystrixCollapser实现请求合并器,关于这个类的定义以及需要实现的方法已经在上面说明:
//通过继承HystrixCollapser实现请求合并器 public class HelloCollapseCommand extends HystrixCollapser<List<String>, String, String> { private HelloCollapseService helloCollapseService; private String id; public HelloCollapseCommand(HelloCollapseService helloCollapseService, String id) { super(Setter.withCollapserKey(HystrixCollapserKey.Factory.asKey("helloCollapseCommand")) .andCollapserPropertiesDefaults( HystrixCollapserProperties.Setter() .withTimerDelayInMilliseconds(100))); this.helloCollapseService = helloCollapseService; this.id = id; } @Override public String getRequestArgument() { return id; } @Override protected HystrixCommand<List<String>> createCommand(Collection<CollapsedRequest<String, String>> collapsedRequests) { List<String> userids = new ArrayList<>(collapsedRequests.size()); userids.addAll(collapsedRequests.stream().map(CollapsedRequest::getArgument).collect(Collectors.toList())); return new HelloBatchCommand(helloCollapseService, userids); } @Override protected void mapResponseToRequests(List<String> batchResponse, Collection<CollapsedRequest<String, String>> collapsedRequests) { int count = 0; for (CollapsedRequest<String, String> collapsedRequest : collapsedRequests) { String user = batchResponse.get(count++); collapsedRequest.setResponse(user); } } }最后创建测试类,从以下这个测试方法可以看出,我们想要的结果是一共发送了两次请求,一次是6、5、9作为批量的请求。由于程序sleep了 3秒,而我们设置的时间间隔为1秒,所以这里8这个ID的请求会单独发送:
@RequestMapping(value = "/batchHello") public List<String> batchHello() throws InterruptedException, ExecutionException { //需要开启HystrixRequest上下文,合并请求和缓存必须开启 HystrixRequestContext context = HystrixRequestContext.initializeContext(); List<String> result = new ArrayList<>(); HelloCollapseCommand bc1 = new HelloCollapseCommand(helloCollapseService, "6"); HelloCollapseCommand bc2 = new HelloCollapseCommand(helloCollapseService, "9"); HelloCollapseCommand bc3 = new HelloCollapseCommand(helloCollapseService, "5"); HelloCollapseCommand bc4 = new HelloCollapseCommand(helloCollapseService, "8"); Future<String> q1 = bc1.queue(); Future<String> q2 = bc2.queue(); Future<String> q3 = bc3.queue(); String result1 = q1.get(); String result2 = q2.get(); String result3 = q3.get(); Thread.sleep(3000); Future<String> q4 = bc4.queue(); String result4 = q4.get(); return result; }启动服务调用 http://localhost:9001/batchHello ,然后查看控制台,可以看到结果是我们所预期的:

注解的方式实现请求合并
在原来的 HelloCollapseService 上做改动,增加find、findAll方法如下:
@Service public class HelloCollapseService { @Autowired private RestTemplate restTemplate; private static final String REST_URL_PREFIX = "http://cloud-provider"; //同步 public String hello(String id) { return restTemplate.getForObject(REST_URL_PREFIX + "/hello/{1}", String.class, id); } //同步 public List<String> hi(List<String> ids) { String[] forObject = restTemplate.getForObject(REST_URL_PREFIX + "/hi?ids={1}", String[].class, StringUtils.join(ids, ",")); return Arrays.asList(forObject); } @HystrixCollapser(batchMethod = "findAll", collapserProperties = {@HystrixProperty(name = "timerDelayInMilliseconds", value = "100")}) public Future<String> find(String id) { throw new RuntimeException("This method body should not be executed"); } @HystrixCommand(fallbackMethod = "annotationBatchHelloBack") public List<String> findAll(List<String> ids) { System.out.println("Annotation---------" + ids + "Thread.currentThread().getName():" + Thread.currentThread().getName()); String[] users = restTemplate.getForObject(REST_URL_PREFIX + "/hi?ids={1}", String[].class, StringUtils.join(ids, ",")); return Arrays.asList(users); } public List<String> annotationBatchHelloBack(List<Long> ids) { return Arrays.asList("annotationBatchHelloBack Hystrix" +ids); } }增加测试方法:
@RequestMapping(value = "/annotationBatchHello") public String find(String id) throws ExecutionException, InterruptedException { HystrixRequestContext context = HystrixRequestContext.initializeContext(); Future<String> stringFuture = helloCollapseService.find(id); Future<String> stringFuture2 = helloCollapseService.find("6"); return stringFuture.get()+"======"+stringFuture2.get(); }这个时候我访问的路径变为 http://localhost:9001/annotationBatchHello?id=88 应该看到的结果是 88 +6 两个ID组成一个批量请求发送,如下图所示:

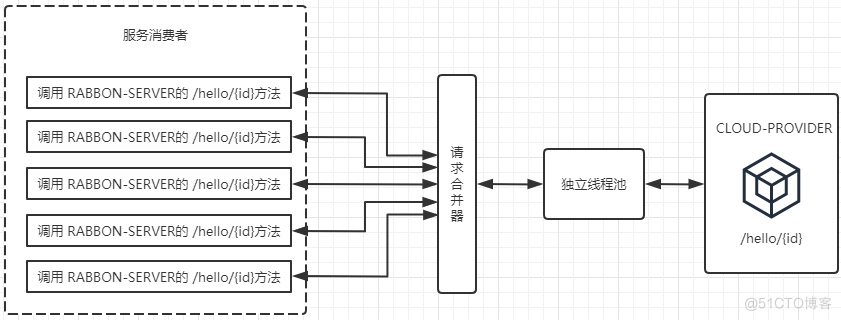
下图展示了在未使用HystrixCollapser请求合并器之前的线程使用情况。 可以看到, 当服务消费者同时对RIBBON-SERVER的 /hello/{id}接口发起了5个请求时, 会向该依赖服务的独立线程池中申请5个线程来完成各自的请求操作。
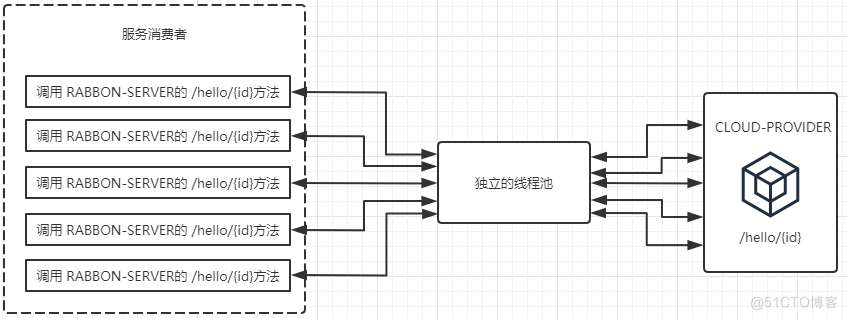
而在使用了HystrixCollapser请求合并器之后, 相同情况下的线程占用如下图所示。由于同一 时间发生的5个请求处于请求合并器的 一 个时间窗内,这些发向/hello/{id}接口的请求被请求合并器拦截下来, 并在合并器中进行组合, 然后将这些请求合并成 一 个请求发向 CLOUD-PROVIDER 的批量接口 /hi/{ids} 。在获取到批量请求结果之后,通过请求合并器再将批量结果拆分并分配给每个被合并的请求。 从图中我们可以看到, 通过使用请求合并器有效减少了对线程池中资源的占用。 所以在资源有效并且短时间内会产生高并发请求的时候, 为避免连接不够用而引起的延迟可以考虑使用请求合并器的方式来处理和优化。
请求合并的额外开销
虽然通过请求合并可以减少请求的数量以缓解依赖服务线程池的资源, 但是在使用的时候也需要注意它所带来的额外开销: 用于请求合并的延迟时间窗会使得依赖服务的请求延迟增高。 比如, 某个请求不通过请求合并器访问的平均耗时为5ms, 请求合并的延迟时间窗为10ms (默认值), 那么当该请求设置了请求合并器之后, 最坏情况下(在延迟时间窗结束时才发起请求)该请求需要 15ms才能完成。由于请求合并器的延迟时间窗会带来额外开销, 所以我们是否使用请求合并器需要 根据依赖服务调用的实际情况来选择, 主要考虑下面两个方面。
请求命令本身的延迟。 如果依赖服务的请求命令本身是 一 个高延迟的命令, 那么可以使用请求合并器, 因为延迟时间窗的时间消耗显得微不足道了。 延迟时间窗内的并发量。 如果 一 个时间窗内只有1-2个请求, 那么这样的依赖服务不适合使用请求合并器。 这种情况不但不能提升系统性能, 反而会成为系统瓶颈,因为每个请求都需要多消耗 一 个时间窗才响应。 相反, 如果 一 个时间窗内具有很高的并发量, 并且服务提供方也实现了批量处理接口, 那么使用请求合并器可以有效减少网络连接数量并极大提升系统吞吐量, 此时延迟时间窗所增加的消耗就可以忽略不计了。
属性详解
我们可以根据实现 HystrixCommand 的不同方式将配置方法分为如下两类。
当通过继承的方式实现时, 可使用 Setter 对象来对请求命令的属性进行设置, 比如下面的例子:
public HelloCommand(RestTemplate restTemplate, HashMap paramMap) { super(com.netflix.hystrix.HystrixCommand.Setter.withGroupKey( HystrixCommandGroupKey.Factory.asKey("helloCommand")).andCommandPropertiesDefaults( HystrixCommandProperties.Setter().withExecutionTimeoutInMilliseconds(5000))); this.restTemplate = restTemplate; this.map = paramMap; }当通过注解的方法实现时, 只需使用 @HystrixCommand 中的 command Properties 属性来设置, 比如:
@HystrixCollapser(batchMethod = "findAll", collapserProperties = {@HystrixProperty(name = "timerDelayInMilliseconds", value = "100")})具体的参数配置还可以分为
- Command属性:主要用来控制HystrixCommand命令的行为。包括隔离策略配置、超时时间配置等。
- fallback配置:用来控制HystrixComrnand.getFallback ()的执行。 这些属性同时适用于线程池的信号量的隔离策略。包括getFallback 方法执行的最大并发数、服务降级策略是否启用等。
- circuitBreaker配置:用来控制HystrixCircuitBreaker的行为。包括熔断最小请求数、休眠时间窗等。
- metrics配置:与 HystrixCommand 和 HystrixObservableCommand 执行中捕获的指标信息有关。包括滚动时间窗的长度、滚动时间窗统计指标信息时划分“桶”的数量等
- requestContext配置:涉及HystrixCommand使用的HystrixRequestContext的设置。包括是否开启请求缓存,是否执行和事件记录到日志等。
- collapser属性:用来控制命令合并相关的行为。包括一 次请求合并批处理中允许的最大请求数、每个命令延迟的时间等。
- threadPool属性:用来控制Hy strix命令所属线程池的配置。包括执行命令线程池的核心线程数,该值也就是命令执行的最大并发量等。
更加详细的信息可以参阅《Spring Cloud微服务实战》。参考HystrixCommandProperties 类。
参考: https://www.cnblogs.com/wuzhenzhao/p/9473073.html
https://www.cnblogs.com/lfalex0831/p/9199459.html
https://www.cnblogs.com/lfalex0831/p/9199459.html
