目录
- 原生拖拽 API 实现拖拽
- 设置元素 dragable
- 拖放事件
- 拖拽排序
- 拖拽API + 防抖实现
- vue awe-dnd 拖拽组件
- 安装 awe-dnd 组件库
- 在 main.js 中将 awe 挂载到全局
- 实现案例
- 项目中-- 拖拽的效果 不理想
- vue-smooth-DnD
- 安装 smooth-dnd
- API: container
- smooth-dnd 生命周期
- 回调
- 事件
- API: Draggable
- 效果实现
- 项目中实现 – 拖拽位置无法确定
- vuedraggable
- 安装
- 引入
- demo
- 事件
- 最佳事件
- 总结
原生拖拽 API 实现拖拽
设置元素 dragable
将元素的 dragable 属性设置 为 true (文本 图片 链接 的draggable 属性默认为 true)则元素可拖放
<div :draggable="true">拖拽</div>
拖放事件
在拖放的过程中涉及到两种元素,一种是被拖拽元素(源对象),一种是放置区元素(目标对象),不同的对象有不同的拖放事件。
dragenter和dragover事件的默认行为是拒绝接受任何被拖放的元素。因此,我们要在这两个拖放事件中使用preventDefault来阻止浏览器的默认行为;而且目标对象想要变成可释放区域,必须设置dragover和drop事件处理程序属性。
拖拽排序
利用拖放API来实现列表的拖拽排序
- 由于拖动是实时的,所以没有使用drop而是使用了dragenter触发排序。
- 在源对象开始被拖拽时记录其索引dragIndex,当它进入目标对象时(对应dragenter事件),将其插入到目标对象的位置。
- 其中dragenter方法中有一个判断this.dragIndex !== index(index为当前目标对象的索引),这是因为源对象同时也是目标对象,当没有这个判断时,源对象开始被拖拽时就会立刻触发自身的dragenter事件,这是不合理的。
拖拽API + 防抖实现
<template>
    <transition-group class="list">
      <ul
        @dragstart="dragstart(index)"
        @dragenter="dragenter($event, index)"
        @dragover="dragover($event, index)"
        draggable= "true"
        v-for="(item, index) in list"
        :key="item.label"
        class="list-item"
      >
        {{item.label}}
      </ul>
    </transition-group>
</template>

<script>
export default {
  data() {
    return {
       list: [
        { label: '列表1' },
        { label: '列表2' },
        { label: '列表3' },
        { label: '列表4' },
        { label: '列表5' },
        { label: '列表6' },
      ],
      // 源对象的下标
      dragIndex: '',
      // 目标对象的下标
      enterIndex: '',
      timeout: null,

    }
  },
  destroyed() {
   // 每次离开当前界面时,清除定时器
    clearInterval(this.timeout)
    this.timeout = null
  },
  methods: {
    dragstart(index) {
      console.log('start index ===>>> ',index)
      this.dragIndex = index
    },

    // dragenter 和 dragover 事件的默认行为是拒绝接受任何被拖放的元素。
    // 因此,我们要在这两个拖放事件中使用`preventDefault`来阻止浏览器的默认行为
    dragenter(e,index) {
      e.preventDefault();
      this.enterIndex = index
      if( this.timeout !== null) {
        clearTimeout(this.timeout)
      }
      // 拖拽事件的防抖
      this.timeout = setTimeout(() => {
         if( this.dragIndex !== index){
            const source = this.list[this.dragIndex]
            this.list.splice(this.dragIndex,1)
            this.list.splice(index, 0 , source )
            // 排序变化后目标对象的索引变成源对象的索引
            this.dragIndex = index;
          }
      }, 100);
    },
    dragover(e, index) {
      e.preventDefault();
    }
  },
}
</script>

<style lang='scss' scoped>
.list {
  list-style: none;
  .list-item {
    // 设置 动画效果
    transition: transform .3s;
    cursor: move;
    width: 300px;
    background: #EA6E59;
    border-radius: 4px;
    color: #FFF;
    margin-bottom: 6px;
    height: 50px;
    line-height: 50px;
    text-align: center;
  }
}
</style>
vue awe-dnd 拖拽组件
安装 awe-dnd 组件库
yarn add awe-dnd -S
在 main.js 中将 awe 挂载到全局
// 引入拖拽排序插件
import VueDND from 'awe-dnd'

Vue.use(VueDND)
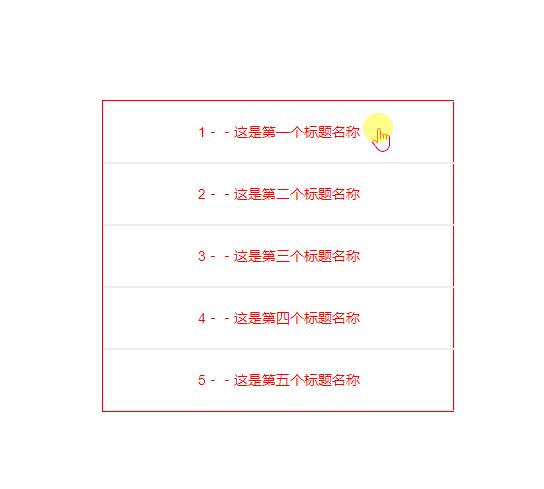
实现案例
<template>
    <div class="title-list">
        <div
            v-dragging="{item: item, list:list}"
            v-for="item in list"
            :key="item.id"
            class="title-item">
            <div class="title-child">
                <span>{{item.id +"--"+ item.name }}</span>
            </div>

        </div>
    </div>
</template>
<script>
export default {
    name: "titleList",
    data() {
        return {
            list: [
                {id:1,name:"这是第一个标题名称"},
                {id:2,name:"这是第二个标题名称"},
                {id:3,name:"这是第三个标题名称"},
                {id:4,name:"这是第四个标题名称"},
                {id:5,name:"这是第五个标题名称"},
            ],
        };
    },
    mounted() {
        // 拖拽事件
        this.$dragging.$on("dragged", (result) => {
            // 将排序后的结果重新赋值
            this.list = result.value.list;
        });
    },
};
</script>

<style lang="scss" scoped>
    .title-list {
        width: 350px;
        background:#fff;
        margin:100px auto 0;
        border: 1px solid red;
        .title-item {
            width: 350px;
            cursor: pointer;
            border: 1px solid #ededed;
            .title-child {
                width: 330px;
                height: 60px;
                margin: 0 auto;
                position: relative;
                span {
                    width: 100%;
                    font-size: 14px;
                    color: red;
                    line-height: 30px;
                    // 只显示两行,多余的以省略号显示
                    white-space: normal;
                    overflow: hidden;
                    text-overflow: ellipsis;
                    display: -webkit-box;
                    -webkit-line-clamp: 2;
                    -webkit-box-orient: vertical;
                    // 无论一行还是两行均居中显示
                    position: absolute;
                    left: 0;
                    top: 50%;
                    transform: translate(0, -50%);
                }
            }
        }
    }
</style>

v-dragging=“{ item: item, list: colors, group: ‘item’,otherData:‘whatever u want’, comb: ‘isComb’}”
list: 列表的遍历数据,
item: 是当前循环值 , 遍历后需要拖拽功能的元素
group: “unique key of dragable list”即拖拽列表的独特key值
// 拖拽事件
this.$dragging.$on("dragged", (result) => {
    debugger  // console.log('result===>',result)
    // result 拖拽后的信息  将排序后console.log的结果重新赋值
    this.list = result.value.list;
});
项目中-- 拖拽的效果 不理想
功能能够实现,但拖拽的效果不是很好,无法修改拖拽图层的透明度
vue-smooth-DnD
Vue Smooth DnD 是一个快速、轻量级的拖放、可排序的 Vue.js 库,封装了 smooth-dnd 库。
vue-smooth-DnD 文档 : https://github.com/kutlugsahin/vue-smooth-dnd
安装 smooth-dnd
yarn add vue-smooth-dnd -S
API: container
可以为 move (容器间相互移动) 或 copy(将元素复制到其他容器,但本容器内元素不变) 或 drop-zone(在容器间移动,但是容器内元素的顺序是固定的) 或 contain (只能在容器内移动。)
:tag=“{value: ‘table’, props: {class: ‘my-table’}}”
例如 drag-handle-selector=“.column-drag-handle”
dropPlaceholderOptions: {
className: “drop-preview”,
animationDuration: “150”,
showOnTop: true,
},
Container 属性的使用
<Container
group-name="col"
@drop="(e) => onCardDrop(column.id, e)"
:get-child-payload="getCardPayload(column.id)"
drag-class="card-ghost"
drop-class="card-ghost-drop"
:drop-placeholder="dropPlaceholderOptions"
class="draggable-container"
>
    <Draggable v-for="task in column.list" :key="task.id">
        <div class="task-card">
            <div class="task-title">{{ task.name }}</div>
            <div
            class="task-priority"
            :style="{ background: priorityMap[task.priority].color }"
            >
            {{ priorityMap[task.priority].label }}
            </div>
        </div>
    </Draggable>
</Container>
data() {
    /// 拖拽时占位符样式
	dropPlaceholderOptions: {
        className: "drop-preview",
        animationDuration: "150",
        showOnTop: true,
     },
}
smooth-dnd 生命周期
一次拖动的生命周期通过一系列回调和事件进行描述和控制,下面以包含 3 个容器的示例为例进行说明
Mouse Calls Callback / Event Parameters Notes
down o Initial click
move o Initial drag
|
| get-child-payload() index Function should return payload // 自定义传给 onDrop() 的payload对象。
|
| 3 x should-accept-drop() srcOptions, payload Fired for all containers // 用来确定容器是否可被放置,会覆盖group-name属性。
|
| 3 x drag-start dragResult Fired for all containers
|
| drag-enter
vmove o Drag over containers
|
| n x drag-leave Fired as draggable leaves container
| n x drag-enter Fired as draggable enters container
vup o Finish drag
should-animate-drop() srcOptions, payload Fires once for dropped container // 返回 false 则阻止放置动画
3 x drag-end dragResult Fired for all containers
n x drop dropResult Fired only for droppable containers
在每次拖动开始 (drag-start) 之前和每次拖动结束 (drag-end)之前触发should-accept-drop。
dragResult 参数配置 来源于 事件对象
(在事件处理函数中,可以传递一个参数e,这个参数我们叫做事件对象,也叫事件参数。事件对象e是系统传递过去,事件函数也是系统调用的。系统调用事件函数的时候,会给事件函数传递一个参数,传递的参数具有具体值,可以在事件函数执行时获取e中携带的值。)
drag-start 中的 dragResult 参数格式
dragResult: {
    payload,        // 负载 可以理解为用来记录被拖动的对象
    isSource,       // 是否是被拖动的容器本身
    willAcceptDrop, // 是否可以被放置
}
drag-end 中的 dragResult 参数格式
dragResult: {
    addedIndex,     // 被放置的新添加元素的下标,没有则为 null
    removedIndex,   // 将被移除的元素下标,没有则为 null
    payload,        // 拖动的元素对象,可通过 getChildPayload 指定
    droppedElement, // 放置的 DOM 元素
}
回调
回调在用户交互之前和期间提供了额外的逻辑和检查。
- get-child-payload(index)
自定义传给 onDrop() 的 payload 对象。
<Container :get-child-payload="getChildPayload">

getChildPayload (index) {
  return {
    // generate custom payload data here
  }
}
- should-accept-drop(sourceContainerOptions, payload)
在开始拖放之前,所有容器都要调用的函数用来确定容器是否可被放置,会覆盖 group-name 属性。
<Container :should-accept-drop="shouldAcceptDrop">

shouldAcceptDrop (sourceContainerOptions, payload) {
  return true;
}
- should-animate-drop(sourceContainerOptions, payload) 返回 false 则阻止放置动画。
<Container :should-animate-drop="shouldAnimateDrop">

shouldAnimateDrop (sourceContainerOptions, payload) {
  return false;
}
- get-ghost-parent() 返回幽灵元素(拖动时显示的元素)应该添加到的元素,默认是父元素,某些情况定位会出现问题,则可以选择自定义,如返回 document.body。
<Container :get-ghost-parent="getGhostParent">

getGhostParent() {
  // i.e return document.body;
}
事件
- @drag-start 在拖动开始时由所有容器发出的事件。参数 dragResult。
<Container @drag-start="onDragStart">

onDragStart (dragResult) {
  const { isSource, payload, willAcceptDrop } = dragResult
}
- @drag-end 所有容器在拖动结束时调用的函数。 在 @drop 事件之前调用。参数 dragResult。
- @drag-enter 每当拖动的项目在拖动时进入其边界时,相关容器要发出的事件。
- @drag-leave 每当拖动的项目在拖动时离开其边界时,相关容器要发出的事件。
- @drop-ready 当容器中可能放置位置的索引发生变化时,被拖动的容器将调用的函数。基本上,每次容器中的可拖动对象滑动以打开拖动项目的空间时都会调用它。参数 dropResult。
- @drop 放置结束时所有相关容器会发出的事件(放置动画结束后)。源容器和任何可以接受放置的容器都被认为是相关的。参数 dropResult。
API: Draggable
Draggable 容器子组件的包装器。每个子元素都应该用可拖动组件包装。
tag
同容器的 tag 指定可拖拽元素的 DOM 元素标签。 标记名称或节点定义来呈现Draggable的根元素。默认值为’div’。
<Draggable v-for="column in taskColumnList" :key="column.name" :tag="{value: 'tr', props: {class: 'my-table-row'}}">
</Draggable>

// --------------或者-----------------

<Draggable v-for="column in taskColumnList" :key="column.name" tag="tr">
</Draggable>
效果实现
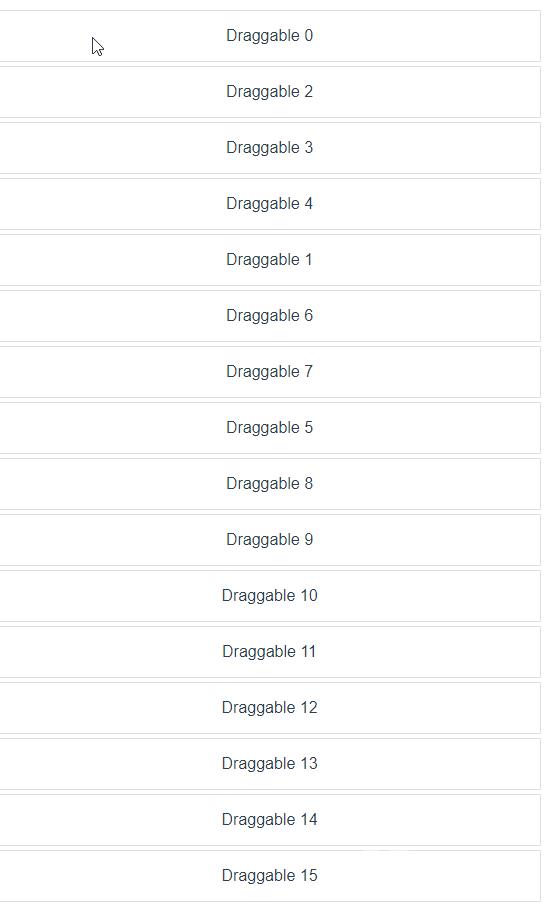
Vue Smooth DnD 主要包含了两个组件,Container 和 Draggable,Container 包含可拖动的元素或组件,它的每一个子元素都应该被 Draggable 包裹。
每一个要被设置为可拖动的元素都需要被 Draggable 包裹
<template>
  <div>
    <div class="simple-page">
      <Container @drop="onDrop">
        <Draggable v-for="item in items" :key="item.id">
          <div class="draggable-item">
            {{ item.data }}
          </div>
        </Draggable>
      </Container>
    </div>
  </div>
</template>

<script>
import { Container, Draggable } from "vue-smooth-dnd";

const applyDrag = (arr, dragResult) => {
  const { removedIndex, addedIndex, payload } = dragResult;
  console.log(removedIndex, addedIndex, payload);
  if (removedIndex === null && addedIndex === null) return arr;

  const result = [...arr];
  let itemToAdd = payload;

  if (removedIndex !== null) {
    itemToAdd = result.splice(removedIndex, 1)[0];
  }

  if (addedIndex !== null) {
    result.splice(addedIndex, 0, itemToAdd);
  }

  return result;
};

const generateItems = (count, creator) => {
  const result = [];
  for (let i = 0; i < count; i++) {
    result.push(creator(i));
  }
  return result;
};

export default {
  name: "Simple",
  components: { Container, Draggable },
  data() {
    return {
      items: generateItems(50, (i) => ({ id: i, data: "Draggable " + i })),
    };
  },
  methods: {
    onDrop(dropResult) {
      this.items = applyDrag(this.items, dropResult);
    },
  },
};
</script>

<style>
.draggable-item {
  height: 50px;
  line-height: 50px;
  text-align: center;
  display: block;
  background-color: #fff;
  outline: 0;
  border: 1px solid rgba(0, 0, 0, 0.125);
  margin-bottom: 2px;
  margin-top: 2px;
  cursor: default;
  user-select: none;
}
</style>

项目中实现 – 拖拽位置无法确定
smooth 的 :orientation 属性限制了容器拖拽的方式,占位为一行默认为 vertical ,默认占位容器的一行
vuedraggable
安装
yarn add vuedraggable
引入
import draggable from 'vuedraggable'
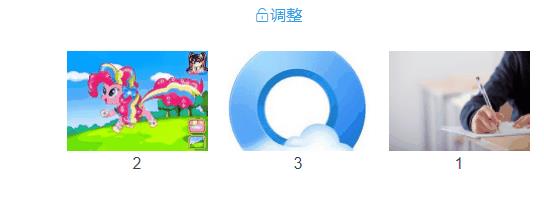
demo
<template>
  <div class="app-container">
      <div :class="canEdit? 'dargBtn-lock el-icon-unlock': 'dargBtn-lock el-icon-lock' " @click="removeEvent()">{{canEdit? '调整':'锁定'}}</div>
      <ul class="projset-content">
        <draggable
          :forceFallback="true"
          :move="onMove"
          :list="imgList"
          handle=".dargBtn"
          :animation="1000"
          filter=".undraggable"
          fallbackClass="fallbackStyle"
          ghostClass="item_ghost"
          chosenClass="chosenStyle"
          dragClass="dragStyle"

        >
          <li v-for="(item, index) in imgList" :key="index" :class="canEdit ? 'draggable' : 'undraggable'">
            <div class="dargBtn">
              <svg-icon icon-class="drag" />
            </div>
            <img :src="item.path" alt="">
            <span>{{item.name}}</span>
          </li>
        </draggable>
      </ul>
  </div>
</template>

<script>
  import draggable from 'vuedraggable';
  export default {
    components: { draggable},
    data(){
      return{
        canEdit:true,
        imgList: [
          {
            path: 'https://lupic.cdn.bcebos.com/20210629/3000005161_14.jpg',
            name: '1',
          },
          {
            path: 'https://lupic.cdn.bcebos.com/20210629/26202931_14.jpg',
            name: '2',
          },
          {
            path: 'https://lupic.cdn.bcebos.com/20210629/27788166_14.jpg',
            name: '3',
          }
        ]
      }
    },
    created() {
    },
    mounted(){},
    methods:{
      onMove(relatedContext, draggedContext){
        console.log(relatedContext.relatedContext.list);
      },
      removeEvent (item) {
        if(this.canEdit){
          this.canEdit = false;
        }else{
          this.canEdit = true;
        }
        console.log(this.canEdit);
      }
    }
  }
</script>


<style scoped lang="scss">
  .app-container{
    background: #ffffff;
    height: 100%;
    .dargBtn-lock{
      margin: 0px 50px;
      color: #2ea9df;
    }
    .dragStyle {
      padding: 10px;
      border-radius: 4px;
      opacity: 1;
    }
    .fallbackStyle{
      padding: 10px;
      border-radius: 4px;
      opacity: 1;

    }
    .chosenStyle {
      padding: 10px;
      border-radius: 4px;
      opacity: 1 !important;

    }
    .item_ghost {
      opacity: 0 !important;
    }
    .projset-content{
      list-style-type: none;
      position: relative;
      li{
        display: inline-block;
        margin: 10px;
      }
      img{
        width: 141px;
        height: 100px;
      }
      span{
        justify-content: center;
        display: flex;
      }
      .dargBtn{
        position: absolute;
        line-height: 100px;
        text-align: center;
        width: 141px;
        height: 100px;
        display: none;
        color: white;
        // background: rgba(101, 101, 101, 0.6);
      }
      .draggable{
        cursor: pointer;
        width: 141px;
        height: 100px;
      }
      .draggable:hover .dargBtn{
        display: block;
      }

    }
  }
</style>

参数说明
事件
最佳事件
  <transition>
      <draggable
        :delay="300"
        :fallback-tolerance="0"
        :list="dragList"
        :force-fallback="true"
        fallback-class="dragging_style"
        handle=".card-title"
        drag-class="drag-style"
        ghost-class="ghost-style"
        chosen-class="chosen-style"
        @update="handleUpdateDrag"
        class="home-drag-wrapper">
        <div v-for=" item in dragList" :key="item.id" :class="item.className" class="home-part">
          <component :is="item.name" :ref="item.name" class="drag-handle " :class=" item.id !== 1? (item.id !== 2? 'card': ''):''">				 </component>
        </div>
      </draggable>
    </transition>
.ghost-style {
  opacity: 0;
  cursor: grabbing !important;
}
.chosen-style {
  background-color: rgba(242, 245, 250, .5);
  border-radius: 8px;
  z-index: 1000;
  box-shadow: 0px 3px 28px #BAC4D4;
  cursor: grabbing !important;

}
.dragging-style {
  border: 1px solid yellow;
}
.drag-style {
  background-color: rgba(242, 245, 250, .5);
  border-radius: 8px;
  z-index: 1000;
  box-shadow: 0px 3px 28px #BAC4D4;
  opacity: 1 !important;
}
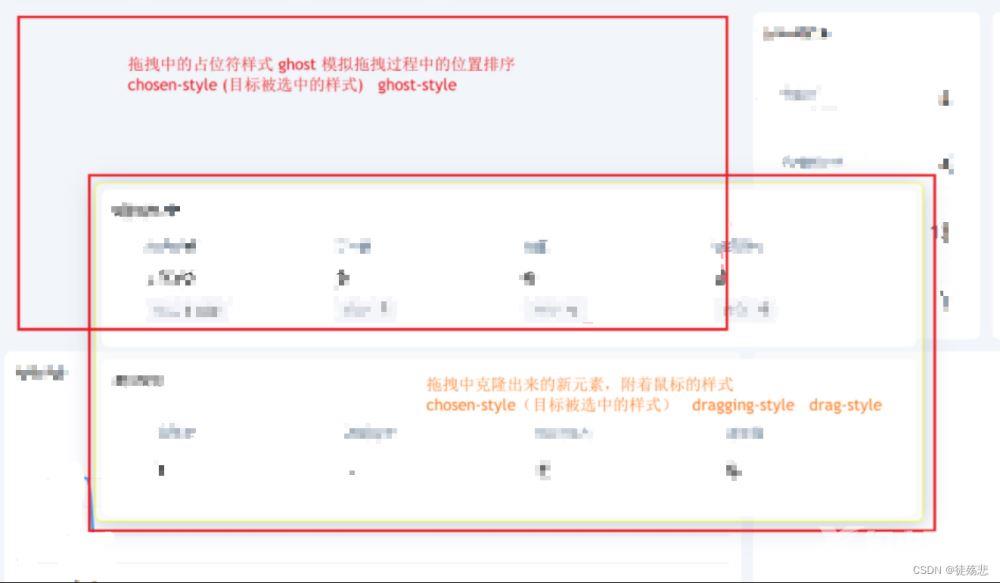
ghost-class 为排序中的占位样式。
chosen-class 占位符、拖动过程中鼠标附着的副本样式的共同样式。
设置 :force-fallback=“true” 可修改拖放过程中的样式
fallback-class 设置鼠标附着的副本样式, 通过 !important 提升样式优先级。
drag-class 拖拽过程中的样式(鼠标附着样式 opacity: 1 !important; 设置副本的透明度)。
在拖拽过程中配置的类名作用的相应区域:


总结
通过试用多个不同的组件库,恍惚比较总结,最后在项目重采用vuedraggable,因为该组件的实现方式简单,并且能够灵活控制拖拽的样式,达到所需的效果。
到此这篇关于vue中实现拖拽排序功能的文章就介绍到这了,更多相关vue实现拖拽排序内容请搜索易盾网络以前的文章或继续浏览下面的相关文章希望大家以后多多支持易盾网络!
参考
smooth- dnd 参考自 : https://blog.51cto.com/u_15127632/4038149
vuedraggable 参考自:https://blog.csdn.net/Kiruthika/article/details/123903706
