目录
- 前言
- 拆分思路
- 自定义webpack配置
- 使用DLL
- 路由级CodeSpliting
- dashboard.module.ts:
- 后续
前言
本文描述如何合理拆分项目,关于性能优化等方面后续的文章再讨论。
Angular 让人诟病的一点就是打包后体积很大,一不小心 main.js就大的离谱,其实遇到类似的问题,不管是体积大、数据大、还是流量大,就一个思路:拆分。再配合浏览器的缓存机制,能很好的优化项目访问速度。
本文相关代码在:https://github.com/Vibing/ang...
拆分思路
- 整个项目包括:强依赖库(Angular框架本身)、UI组件库及第三方库、业务代码部分;
- 用户行为维度:用户的所有访问基于路由,一个路由一个页面;
从以上两点可以进行拆分,基于第 1 点可以把强依赖库和几乎不会变动的库打包成一个 vendor_library,里面可以包含@angular/common、@angular/core、@angular/forms、@angular/router等类似的包,UI组件库或lodash这类库不建议一起打包,因为我们要运用 TreeShaking ,没必要把不用的代码也打包进来,否则只会增加体积。
强依赖包搞定了,下面基于第 2 点思路打包业务代码。我们使用基于路由的 code spliting来打包。思路很简单,用户访问哪个页面,就把该页面对应的 js 下载下来,没必要把没访问的页面一起打包,那样不仅造成体积增大,还会增加下载时间,用户体验也会随之变差。
自定义webpack配置
我们要想使用 DLL 将强依赖包打进一个 vendor 里就要使用 webpack 的功能,Angular CLI 中已经内嵌了 webpack,但这些配置对我们来说是黑盒子。
Angular 允许我们自定义 webpack 配置,步骤如下
- 安装
@angular-builders/custom-webpack和@angular-devkit/build-angular - 新建一个 webpack.extra.config.ts 用于 webpack 配置
- 在 angular.json 中做如下修改
...
"architect": {
  "build": {
    "builder": "@angular-builders/custom-webpack:browser",
    "options": {
      ...
      "customWebpackConfig": {
        // 引用要拓展的 webpack 配置
        "path": "./webpack.extra.config.ts",
        // 是否替换重复插件
        "replaceDuplicatePlugins": true
      }
    }
  },
  "serve": {
    "builder": "@angular-builders/custom-webpack:dev-server",
    "options": {
      "browserTarget": "angular-webpack:build"
    }
  }
  ...
使用DLL
可以自定义 webpack 配置后,新建 webpack.dll.js 文件来写 DLL 的配置:
const path = require("path");
const webpack = require("webpack");
module.exports = {
  mode: "production",
  entry: {
    vendor: [
      "@angular/platform-browser",
      "@angular/platform-browser-dynamic",
      "@angular/common",
      "@angular/core",
      "@angular/forms",
      "@angular/router"
    ],
  },
  output: {
    path: path.resolve(__dirname, "./dll"),
    filename: "[name].dll.js",
    library: "[name]_library",
  },
  plugins: [
    new webpack.DllPlugin({
      context: path.resolve(__dirname, "."),
      path: path.join(__dirname, "./dll", "[name]-manifest.json"),
      name: "[name]_library",
    }),
  ],
};
然后在 webpack.extra.config.ts 中进行 dll 引入
import * as path from 'path';
import * as webpack from 'webpack';
export default {
  plugins: [
    new webpack.DllReferencePlugin({
      manifest: require('./dll/vendor-manifest.json'),
      context: path.resolve(__dirname, '.'),
    })
  ],
} as webpack.Configuration;
最后在 package.json 中添加一条打包 dll 的命令:
"dll": "rm -rf dll && webpack --config webpack.dll.js"
执行 npm run dll后在项目根部就会有 dll 的文件夹,里面就是打包的内容:

打包完成后,我们要在项目中使用 vendor.dll.js,在 angular.json 中进行配置:
"architect": {
  ...
  "build": {
    ...
    "options": {
      ...
       "scripts": [
         {
            "input": "./dll/vendor.dll.js",
            "inject": true,
            "bundleName": "vendor_library"
         }
       ]
    }
  }
}
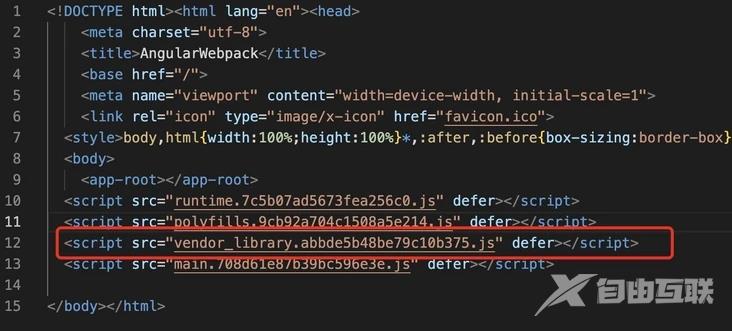
打包后可以看到讲 vendor_library.js 已经引入进来了:

DLL 的用处是将不会频繁更新的强依赖包打包合并为一个 js 文件,一般用于打包 Angular 框架本身的东西。用户第一次访问时浏览器会下载 vendor_library.js并会将其缓存,以后每次访问直接从缓存里拿,浏览器只会下载业务代码的 js 而不会再下载框架相关的代码,大大提升应用加载速度,提升用户体验。
ps: vendor_library 后面的 hash 只有打包时里面代码有变动才会重新改变 hash,否则不会变。
路由级CodeSpliting
DLL 把框架部分的代码管理好了,下面我们看看如何在 Angular 中实现路由级别的页面按需加载。
这里打个岔,在 React 或 Vue 中,是如何做路由级别代码拆分的?大概是这样:
{
  path:'/home',
  component: () => import('./home')
}
这里的 home 指向的是对应的 component,但在 Angular 中无法使用这种方式,只能以 module 为单位进行代码拆分:
{
  path:'/home',
  loadChild: ()=> import('./home.module').then(m => m.HomeModule)
}
然后在具体的模块中使用路由访问具体的组件:
import { HomeComponent } from './home.component'
{
  path:'',
  component: HomeComponent
}
虽然不能直接在 router 中 import() 组件,但 Angular 提供了组件动态导入的功能:
@Component({
  selector: 'app-home',
  template: ``,
})
export class HomeContainerComponent implements OnInit {
  constructor(
      private vcref: ViewContainerRef,
      private cfr: ComponentFactoryResolver
  ){}
  ngOnInit(){
    this.loadGreetComponent()
  }
  async loadGreetComponent(){
      this.vcref.clear();
      // 使用 import() 懒加载组件
      const { HomeComponent } = await import('./home.component');
      let createdComponent = this.vcref.createComponent(
        this.cfr.resolveComponentFactory(HomeComponent)
      );
  }
}
这样在路由访问某个页面时,只要让被访问的页面内容使用 import() 配合组件动态导入,不就能达到页面 lazyLoad 的效果了吗?
答案是可以的。但是这样会有一个大问题:被 lazyLoad 的组件中,其内容仅仅是当前组件的代码,并不包含引用的其他模块中组件的代码。
原因是 Angular 应用由多个模块组成,每个模块中需要的功能可能来自其他模块,比如 A 模块里要用到 table 组件,而 table 需取自于 ng-zorro-antd/table 模块。
打包时 Angular 不像 React 或 Vue 可以把当前组件和用到的其他包一起打包,以 React 为例:在 A 组件引入 table 组件,打包时 table 代码会打包到 A 组件中。而 Angular 中,在 A 组件中使用 table 组件时,并且使用 imprt() 对 A 组件进行动态加载,打包出来的 A 组件并不包含 table 的代码, 而是会把 table 代码打包到当前模块中去,如果一个模块中包含多个页面,这么多页面用了不少UI组件,那么打包出来的模块肯定会很大。
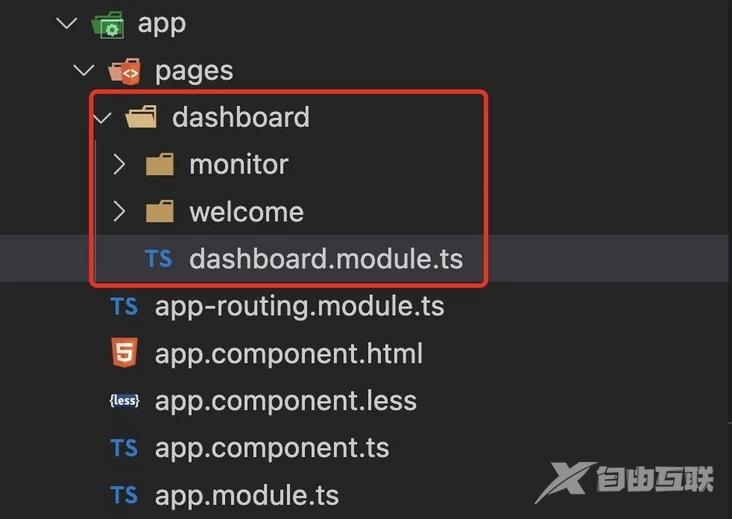
那么就没有别的方法了吗?答案是有的,那就是把每个页面拆成一个 module,每个页面所用到的其他模块或组件由当前页面对应的模块所承担。

上图中 dashboard 作为一个模块,其下有两个页面,分别是 monitor 和 welcome
dashboard.module.ts:
import { NgModule } from '@angular/core';
import { CommonModule } from '@angular/common';
import { RouterModule, Routes } from '@angular/router';
const routes: Routes = [
  {
    path: 'welcome',
    loadChildren: () => import('./welcome/welcome.module').then((m) => m.WelcomeModule),
  },
  {
    path: 'monitor',
    loadChildren: () => import('./monitor/monitor.module').then((m) => m.MonitorModule),
  },
];
@NgModule({
  imports: [CommonModule, RouterModule.forChild(routes)],
  exports: [RouterModule],
  declarations: [],
})
export class DashboardModule {}
在模块中使用路由 loadChildren 来 lazyLoad 两个页面模块,现在再看看 WelcomeModule:
import { NgModule } from '@angular/core';
import { CommonModule } from '@angular/common';
import { WelcomeComponent } from './welcome.component';
import { RouterModule, Routes } from '@angular/router';
const routes: Routes = [
  { path: '', component: WelcomeComponent }
];
@NgModule({
  declarations: [WelcomeComponent],
  imports: [RouterModule.forChild(routes), CommonModule]
})
export class WelcomeModule {}
就是这么简单,就把页面级的 lazyLoad 完成了。当需要使用外部组件时,比如 table 组件,只要在 imports 引入即可:
import { NzTableModule } from 'ng-zorro-antd/table';
@NgModule({
  ...
  imports: [..., NzTableModule]
})
export class WelcomeModule {}
题外话:我更喜欢 React 的拆分方式,举个例子:React 中使用 table 组件,table 组件本身代码量比较大,如果很多页面都使用 table,那么每个页面都会有 table 代码,造成不必要的浪费。所以可以配合 import()把 table组件单拉出来,打包时 table 作为单独的 js 被浏览器下载并提供给需要的页面使用,所有页面共享这一份 js即可。但 Angular 做不到,它无法在模块的 imports 中使用 import()的模块 。
后续
以上都是对项目代码做了比较合理的拆分,后续会对 Angular 性能上做合理的优化,主要从编译模式、变更检测、ngFor、Worker等角度来阐述。更多关于Angular split项目拆分的资料请关注易盾网络其它相关文章!
