目录
- 参考
- 描述
- 获取
- vanilla-tilt
- 特点
- 使用
- 总结
参考
描述
获取
- Vanilla-tilt.js
- GitHub
- npm
npm install vanilla-tilt
vanilla-tilt
vanilla-tilt.js 是 JavaScript 中的一个平滑的 3D 倾斜库,该库存在 JQuery 版本——Tilt.js 。
特点
vanilla-tilt 存在以下特点:
- 轻量级
- 无依赖项
- 使用简单
- 60 FPS
- 丝滑
使用
示例
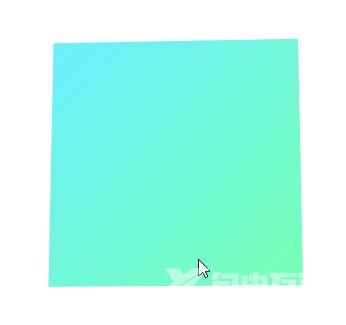
<!DOCTYPE html>
<html lang="en">
<head>
    <meta charset="UTF-8">
    <meta http-equiv="X-UA-Compatible" content="IE=edge">
    <meta name="viewport" content="width=device-width, initial-scale=1.0">
    <title>vanilla-tilt</title>
    <style>
        *{
            /* 去除元素默认的内外边距 */
            margin: 0px;
            padding: 0px;
        }

        body{
            /* 设置显示区域的最小高度值为显示窗口的高度值 */
            min-height: 100vh;
            /* 使 body 中的元素居中显示 */
            display: flex;
            justify-content: center;
            align-items: center;
        }

        #card{
            /* 为目标元素指定宽高并为其设置渐变背景颜色 */
            width: 200px;
            height: 200px;
            background: linear-gradient(to right bottom, rgb(108, 240, 255), rgb(118, 255, 180));
        }
    </style>
</head>
<body>
    <!-- 需要添加 3D 倾斜特效的元素 -->
    <div id="card"></div>

	<!-- 导入 vanilla-tilt.js -->
	<script src="./vanilla-tilt.js"></script>
	<script>
    	VanillaTilt.init(document.querySelector('#card'), {
        	max: 15 // 设置倾斜的最大角度
    	});
	</script>
</body>
</html>
效果:
使用
为目标元素应用倾斜样式可以有两种方式。
1. data-tilt
我们可以通过为元素添加属性 data-tilt 来指定该元素为目标元素并为其应用默认的倾斜配置。如果对默认的倾斜配置中的某个选项不满,需要对其进行更换,则可以通过为目标元素添加合适的属性并为其设置满意的属性值即可。
如下示例将设置 #card 元素为目标元素并将其 max 配置选项的值设置为 25。
<!DOCTYPE html>
<html lang="en">
<head>
    <meta charset="UTF-8">
    <meta http-equiv="X-UA-Compatible" content="IE=edge">
    <meta name="viewport" content="width=device-width, initial-scale=1.0">
    <title>vanilla-tilt</title>
    <style>
        *{
            /* 去除元素默认的内外边距 */
            margin: 0px;
            padding: 0px;
        }

        body{
            /* 设置显示区域的最小高度值为显示窗口的高度值 */
            min-height: 100vh;
            /* 使 body 中的元素居中显示 */
            display: flex;
            justify-content: center;
            align-items: center;
        }

        #card{
            /* 为目标元素指定宽高并为其设置渐变背景颜色 */
            width: 200px;
            height: 200px;
            background: linear-gradient(to right bottom, rgb(108, 240, 255), rgb(118, 255, 180));
        }
    </style>
</head>
<body>
    <!-- 需要添加 3D 倾斜特效的元素 -->
    <div id="card" data-tilt data-tilt-max="25"></div>

	<!-- 导入 vanilla-tilt.js -->
	<script src="./vanilla-tilt.js"></script>
</body>
</html>
效果:

2. VanillaTilt.init()
VanillaTilt.init() 函数接收两个参数,第一个参数为需要添加倾斜效果的元素对象,第二个参数则是用于添加倾斜效果的配置对象。
如下示例将设置 #card 元素为目标元素并将其 max 配置选项的值设置为 25。
<!DOCTYPE html>
<html lang="en">
<head>
    <meta charset="UTF-8">
    <meta http-equiv="X-UA-Compatible" content="IE=edge">
    <meta name="viewport" content="width=device-width, initial-scale=1.0">
    <title>vanilla-tilt</title>
    <style>
        *{
            /* 去除元素默认的内外边距 */
            margin: 0px;
            padding: 0px;
        }

        body{
            /* 设置显示区域的最小高度值为显示窗口的高度值 */
            min-height: 100vh;
            /* 使 body 中的元素居中显示 */
            display: flex;
            justify-content: center;
            align-items: center;
        }

        #card{
            /* 为目标元素指定宽高并为其设置渐变背景颜色 */
            width: 200px;
            height: 200px;
            background: linear-gradient(to right bottom, rgb(108, 240, 255), rgb(118, 255, 180));
        }
    </style>
</head>
<body>
    <!-- 需要添加 3D 倾斜特效的元素 -->
    <div id="card"></div>

    <!-- 导入 vanilla-tilt.js -->
    <script src="./vanilla-tilt.js"></script>
    <script>
        VanillaTilt.init(document.querySelector('#card'), {
            max: 25
        })
    </script>
</body>
</html>
优先级
当使用 data-tilt-{option} 及 VanillaTilt.init() 同时对配置选项进行设置时,将优先使用 data-tilt-{option} 提供的配置,VanillaTilt.init() 的所有配置都将失效。
示例
<!DOCTYPE html>
<html lang="en">
<head>
    <meta charset="UTF-8">
    <meta http-equiv="X-UA-Compatible" content="IE=edge">
    <meta name="viewport" content="width=device-width, initial-scale=1.0">
    <title>vanilla-tilt</title>
    <style>
        *{
            /* 去除元素默认的内外边距 */
            margin: 0px;
            padding: 0px;
        }

        body{
            /* 设置显示区域的最小高度值为显示窗口的高度值 */
            min-height: 100vh;
            /* 使 body 中的元素居中显示 */
            display: flex;
            justify-content: center;
            align-items: center;
        }

        #card{
            /* 为目标元素指定宽高并为其设置渐变背景颜色 */
            width: 200px;
            height: 200px;
            background: linear-gradient(to right bottom, rgb(108, 240, 255), rgb(118, 255, 180));
        }
    </style>
</head>
<body>
    <!-- 需要添加 3D 倾斜特效的元素 -->
    <div id="card" data-tilt data-tilt-max="70"></div>

    <!-- 导入 vanilla-tilt.js -->
    <script src="./vanilla-tilt.js"></script>
    <script>
        VanillaTilt.init(document.querySelector('#card'), {
            max: 10,
            scale: 2 // 在鼠标悬停于目标元素之上时,将目标元素放缩指定倍数
        })
    </script>
</body>
</html>
效果:

可以看到目标元素使用了 data-tilt-max 所设定的配置选项的值,忽视了 VanillaTilt.init() 提供的 max 及 scale 。
配置选项
其他
配置选项中还存在其他选项,但目前这些选项我并没有弄清楚他们的用法。为避免误人子弟,我并没有对这些选项进行翻译,请见谅。
总结
到此这篇关于JavaScript库之vanilla-tilt使用教程的文章就介绍到这了,更多相关JS库vanilla-tilt使用内容请搜索自由互联以前的文章或继续浏览下面的相关文章希望大家以后多多支持自由互联!