一、第一种创建UISwitch控件的方法,在代码中动态创建。
1、打开Xcode 4.3.2, 新建项目Switch,选择Single View Application。
2、打开ViewController.m文件在viewDidLoad方法里添加代码:
复制代码 代码如下:
- (void)viewDidLoad
{
[super viewDidLoad];
UISwitch *switchButton = [[UISwitch alloc] initWithFrame:CGRectMake(50, 100, 20, 10)];
[switchButton setOn:YES];
[switchButton addTarget:self action:@selector(switchAction:) forControlEvents:UIControlEventValueChanged];
[self.view addSubview:switchButton];
// Do any additional setup after loading the view, typically from a nib.
}
代码中selector中的switchAction:需要我们自己实现,就是按下时接收到的事件。
记得把switchButton加到当前view,调用[self.viewaddSubview:switchButton];
3、监听UISwitch按下事件
实现代码如下:
复制代码 代码如下:
-(void)switchAction:(id)sender
{
UISwitch *switchButton = (UISwitch*)sender;
BOOL isButtonOn = [switchButton isOn];
if (isButtonOn) {
showSwitchValue.text = @"是";
}else {
showSwitchValue.text = @"否";
}
}
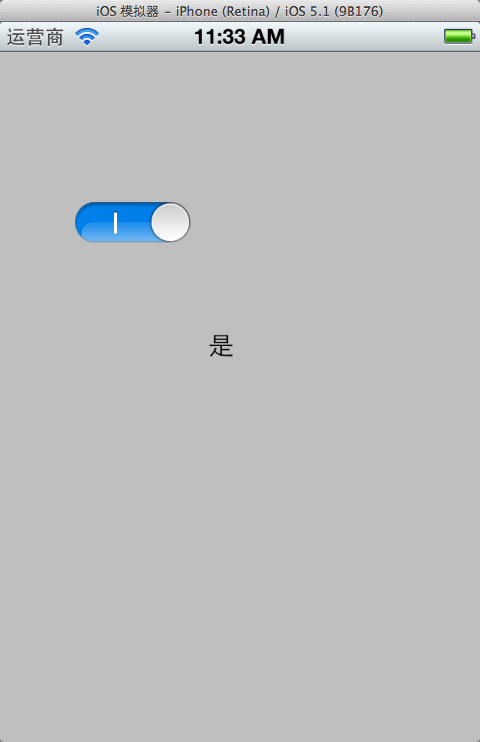
showSwitchValue是我通过拖拽控件方法放到界面上的Label,方便显示效果
运行,效果:

二、通过拖拽方法使用UISwitch
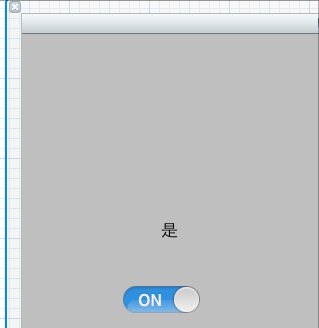
1、往xib文件上拖拽一个UISwitch控件。

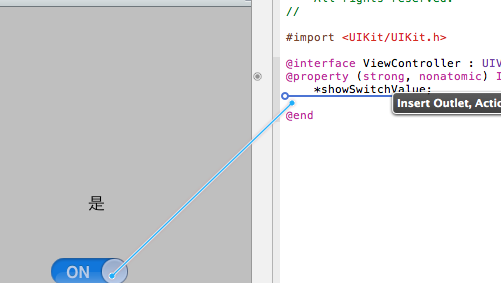
2、按alt+command + return键开启Assistant Editor模式,选中UISwitch控件,按住Control键,往ViewController.h拖拽

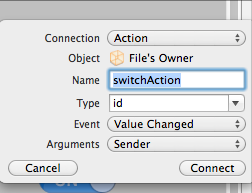
3、选Action方式

4、.m文件中实现switchAction 。刚才动态创建的时候也用到这个方法名称,可以先注释掉刚才的。
复制代码 代码如下:
- (IBAction)switchAction:(id)sender {
UISwitch *switchButton = (UISwitch*)sender;
BOOL isButtonOn = [switchButton isOn];
if (isButtonOn) {
showSwitchValue.text = @"是";
}else {
showSwitchValue.text = @"否";
}
}
这里我们来看一下.m文件的源码:
复制代码 代码如下:
#import "HMCustomSwitch.h"
@implementation HMCustomSwitch
@synthesize on;
@synthesize tintColor, clippingView, leftLabel, rightLabel;
+(HMCustomSwitch *)switchWithLeftText:(NSString *)leftText andRight:(NSString *)rightText
{
HMCustomSwitch *switchView = [[HMCustomSwitch alloc] initWithFrame:CGRectZero];
switchView.leftLabel.text = leftText;
switchView.rightLabel.text = rightText;
return [switchView autorelease];
}
-(id)initWithFrame:(CGRect)rect
{
if ((self=[super initWithFrame:CGRectMake(rect.origin.x,rect.origin.y,95,27)]))
{
// self.clipsToBounds = YES;
[self awakeFromNib]; // do all setup in awakeFromNib so that control can be created manually or in a nib file
}
return self;
}
-(void)awakeFromNib
{
[super awakeFromNib];
self.backgroundColor = [UIColor clearColor];
[self setThumbImage:[UIImage imageNamed:@"switchThumb.png"] forState:UIControlStateNormal];
[self setMinimumTrackImage:[UIImage imageNamed:@"switchBlueBg.png"] forState:UIControlStateNormal];
[self setMaximumTrackImage:[UIImage imageNamed:@"switchOffPlain.png"] forState:UIControlStateNormal];
self.minimumValue = 0;
self.maximumValue = 1;
self.continuous = NO;
self.on = NO;
self.value = 0.0;
self.clippingView = [[UIView alloc] initWithFrame:CGRectMake(4,2,87,23)];
self.clippingView.clipsToBounds = YES;
self.clippingView.userInteractionEnabled = NO;
self.clippingView.backgroundColor = [UIColor clearColor];
[self addSubview:self.clippingView];
[self.clippingView release];
NSString *leftLabelText = NSLocalizedString(@"ON","Custom UISwitch ON label. If localized to empty string then I/O will be used");
if ([leftLabelText length] == 0)
{
leftLabelText = @"l"; // use helvetica lowercase L to be a 1.
}
self.leftLabel = [[UILabel alloc] init];
self.leftLabel.frame = CGRectMake(0, 0, 48, 23);
self.leftLabel.text = leftLabelText;
self.leftLabel.textAlignment = NSTextAlignmentCenter;
self.leftLabel.font = [UIFont boldSystemFontOfSize:17];
self.leftLabel.textColor = [UIColor whiteColor];
self.leftLabel.backgroundColor = [UIColor clearColor];
// self.leftLabel.shadowColor = [UIColor redColor];
// self.leftLabel.shadowOffset = CGSizeMake(0,0);
[self.clippingView addSubview:self.leftLabel];
[self.leftLabel release];
NSString *rightLabelText = NSLocalizedString(@"OFF","Custom UISwitch OFF label. If localized to empty string then I/O will be used");
if ([rightLabelText length] == 0)
{
rightLabelText = @"O"; // use helvetica uppercase o to be a 0.
}
self.rightLabel = [[UILabel alloc] init];
self.rightLabel.frame = CGRectMake(95, 0, 48, 23);
self.rightLabel.text = rightLabelText;
self.rightLabel.textAlignment = NSTextAlignmentCenter;
self.rightLabel.font = [UIFont boldSystemFontOfSize:17];
self.rightLabel.textColor = [UIColor grayColor];
self.rightLabel.backgroundColor = [UIColor clearColor];
// self.rightLabel.shadowColor = [UIColor redColor];
// self.rightLabel.shadowOffset = CGSizeMake(0,0);
[self.clippingView addSubview:self.rightLabel];
[self.rightLabel release];
}
-(void)layoutSubviews
{
[super layoutSubviews];
// NSLog(@"leftLabel=%@",NSStringFromCGRect(self.leftLabel.frame));
// move the labels to the front
[self.clippingView removeFromSuperview];
[self addSubview:self.clippingView];
CGFloat thumbWidth = self.currentThumbImage.size.width;
CGFloat switchWidth = self.bounds.size.width;
CGFloat labelWidth = switchWidth - thumbWidth;
CGFloat inset = self.clippingView.frame.origin.x;
// NSInteger xPos = self.value * (self.bounds.size.width - thumbWidth) - (self.leftLabel.frame.size.width - thumbWidth/2);
NSInteger xPos = self.value * labelWidth - labelWidth - inset;
self.leftLabel.frame = CGRectMake(xPos, 0, labelWidth, 23);
// xPos = self.value * (self.bounds.size.width - thumbWidth) + (self.rightLabel.frame.size.width - thumbWidth/2);
xPos = switchWidth + (self.value * labelWidth - labelWidth) - inset;
self.rightLabel.frame = CGRectMake(xPos, 0, labelWidth, 23);
// NSLog(@"value=%f xPos=%i",self.value,xPos);
// NSLog(@"thumbWidth=%f self.bounds.size.width=%f",thumbWidth,self.bounds.size.width);
}
- (UIImage *)image:(UIImage*)image tintedWithColor:(UIColor *)tint
{
if (tint != nil)
{
UIGraphicsBeginImageContext(image.size);
//draw mask so the alpha is respected
CGContextRef currentContext = UIGraphicsGetCurrentContext();
CGImageRef maskImage = [image CGImage];
CGContextClipToMask(currentContext, CGRectMake(0, 0, image.size.width, image.size.height), maskImage);
CGContextDrawImage(currentContext, CGRectMake(0,0, image.size.width, image.size.height), image.CGImage);
[image drawAtPoint:CGPointMake(0,0)];
[tint setFill];
UIRectFillUsingBlendMode(CGRectMake(0,0,image.size.width,image.size.height),kCGBlendModeColor);
UIImage *newImage = UIGraphicsGetImageFromCurrentImageContext();
UIGraphicsEndImageContext();
return newImage;
}
else
{
return image;
}
}
-(void)setTintColor:(UIColor*)color
{
if (color != tintColor)
{
[tintColor release];
tintColor = [color retain];
[self setMinimumTrackImage:[self image:[UIImage imageNamed:@"switchBlueBg.png"] tintedWithColor:tintColor] forState:UIControlStateNormal];
}
}
- (void)setOn:(BOOL)turnOn animated:(BOOL)animated;
{
on = turnOn;
if (animated)
{
[UIView beginAnimations:nil context:nil];
[UIView setAnimationDuration:0.2];
}
if (on)
{
self.value = 1.0;
}
else
{
self.value = 0.0;
}
if (animated)
{
[UIView commitAnimations];
}
}
- (void)setOn:(BOOL)turnOn
{
[self setOn:turnOn animated:NO];
}
- (void)endTrackingWithTouch:(UITouch *)touch withEvent:(UIEvent *)event
{
NSLog(@"preendTrackingWithtouch");
[super endTrackingWithTouch:touch withEvent:event];
NSLog(@"postendTrackingWithtouch");
m_touchedSelf = YES;
[self setOn:on animated:YES];
}
- (void)touchesBegan:(NSSet*)touches withEvent:(UIEvent*)event
{
[super touchesBegan:touches withEvent:event];
NSLog(@"touchesBegan");
m_touchedSelf = NO;
on = !on;
}
- (void)touchesEnded:(NSSet*)touches withEvent:(UIEvent*)event
{
[super touchesEnded:touches withEvent:event];
NSLog(@"touchesEnded");
if (!m_touchedSelf)
{
[self setOn:on animated:YES];
[self sendActionsForControlEvents:UIControlEventValueChanged];
}
}
-(void)dealloc
{
[tintColor release];
[clippingView release];
[rightLabel release];
[leftLabel release];
[super dealloc];
}
@end
看代码可以知道,其实它是通过继承UISlider控件实现的,UISlider的左右分别是个UILabel,当YES的时候,滑块滑到了最右边,NO的时候滑到了最左边。
所以在代码中使用它呢?这里再举一个例子:
复制代码 代码如下:
- (void)loadView
{
UIView *contentView = [[UIView alloc] initWithFrame:[[UIScreen mainScreen] applicationFrame]];
self.view = contentView;
contentView.backgroundColor = [UIColor whiteColor];
// Standard ON/OFF
HMCustomSwitch *switchView = [[HMCustomSwitch alloc] initWithFrame:CGRectZero];
switchView.center = CGPointMake(160.0f, 20.0f);
switchView.on = YES;
[contentView addSubview:switchView];
[switchView release];
// Custom YES/NO
switchView = [HMCustomSwitch switchWithLeftText:@"YES" andRight:@"NO"];
switchView.center = CGPointMake(160.0f, 60.0f);
switchView.on = YES;
[contentView addSubview:switchView];
// Custom font and color
switchView = [HMCustomSwitch switchWithLeftText:@"Hello " andRight:@"ABC "];
switchView.center = CGPointMake(160.0f, 100.0f);
switchView.on = YES;
[switchView.leftLabel setFont:[UIFont boldSystemFontOfSize:13.0f]];
[switchView.rightLabel setFont:[UIFont italicSystemFontOfSize:15.0f]];
[switchView.rightLabel setTextColor:[UIColor blueColor]];
[contentView addSubview:switchView];
// Multiple lines
switchView = [HMCustomSwitch switchWithLeftText:@"Hello\nWorld" andRight:@"Bye\nWorld"];
switchView.center = CGPointMake(160.0f, 140.0f);
switchView.on = YES;
switchView.tintColor = [UIColor orangeColor];
switchView.leftLabel.font = [UIFont boldSystemFontOfSize:9.0f];
switchView.rightLabel.font = [UIFont boldSystemFontOfSize:9.0f];
switchView.leftLabel.numberOfLines = 2;
switchView.rightLabel.numberOfLines = 2;
switchView.leftLabel.lineBreakMode = NSLineBreakByWordWrapping;
switchView.rightLabel.lineBreakMode = NSLineBreakByWordWrapping;
[contentView addSubview:switchView];
switchView = [[HMCustomSwitch alloc] init];
switchView.center = CGPointMake(160.0f, 180.0f);
switchView.on = YES;
switchView.tintColor = [UIColor purpleColor];
[contentView addSubview:switchView];
[switchView release];
switchView = [HMCustomSwitch switchWithLeftText:@"l" andRight:@"O"];
switchView.center = CGPointMake(160.0f, 220.0f);
// customSwitch.tintColor = [UIColor colorWithRed:125.f/255.f green:157.f/255.f blue:93.f/255.f alpha:1.0];
// customSwitch.tintColor = [UIColor colorWithRed:125.f/255.f green:157.f/255.f blue:93.f/255.f alpha:1.0];
[contentView addSubview:switchView];
// Standard ON/OFF
switchView = [[HMCustomSwitch alloc] init];
switchView.center = CGPointMake(160.0f, 260.0f);
switchView.tintColor = [UIColor colorWithRed:125.f/255.f green:157.f/255.f blue:93.f/255.f alpha:1.0];
[switchView addTarget:self action:@selector(switchFlipped:) forControlEvents:UIControlEventValueChanged];
[contentView addSubview:switchView];
[switchView release];
UIToolbar *toolbar = [[UIToolbar alloc] initWithFrame:CGRectMake(0, 420, 320, 40)];
toolbar.tintColor = [UIColor colorWithRed:125.f/255.f green:157.f/255.f blue:93.f/255.f alpha:1.0];
[contentView addSubview:toolbar];
[contentView release];
}
-(void)switchFlipped:(HMCustomSwitch*)switchView
{
NSLog(@"switchFlipped=%f on:%@",switchView.value, (switchView.on?@"Y":@"N"));
}
