前言
既然你已经知道TRex并尝试搜索它的安装教程,这意味着你有一定的基础知识(至少知道自己需要什么)。因此本文对于TRex的介绍部分会偏少
本次主要为TRex安装过程的一次记录(版本为v3.0.0),我会整理一些遇到的问题与解决思路,希望对各位有所帮助。
简介
Cisco开源的一个使用DPDK发包的高性能测试仪。
主要的工作原理概括如下:
其兼具了python构建流的效率和dpdk发包的高性能。
TRex安装
TRex是一个Linux环境下的软件,安装环境无非两种:物理机和虚拟机
本文主要基于虚拟机介绍TRex的安装
而使用虚拟机又可以分为两种安装环境:
本地虚拟机
基于本地VMware构建的虚拟机环境
远程服务器虚拟机
基于VMware EXCI构建的远程虚拟机环境
两种方式最大的不同在网卡添加时,VMware EXCI需要使用ifcofig让系统识别出网卡,详见[7]
其余的流程差不多,本文着重介绍本地VMware基于ubantu18.04安装TRex的流程
如果你在VMware EXCI安装遇到了问题,也欢迎留言讨论
基于本地虚拟机的安装过程
如何获得一个本地VMware虚拟机(包括换源等操作)请自行Google或参考[1]
我使用的VMware版本是VMwareWorkStation PRO16,虚拟机镜像为Ubantu18.04桌面版
虚拟机配置
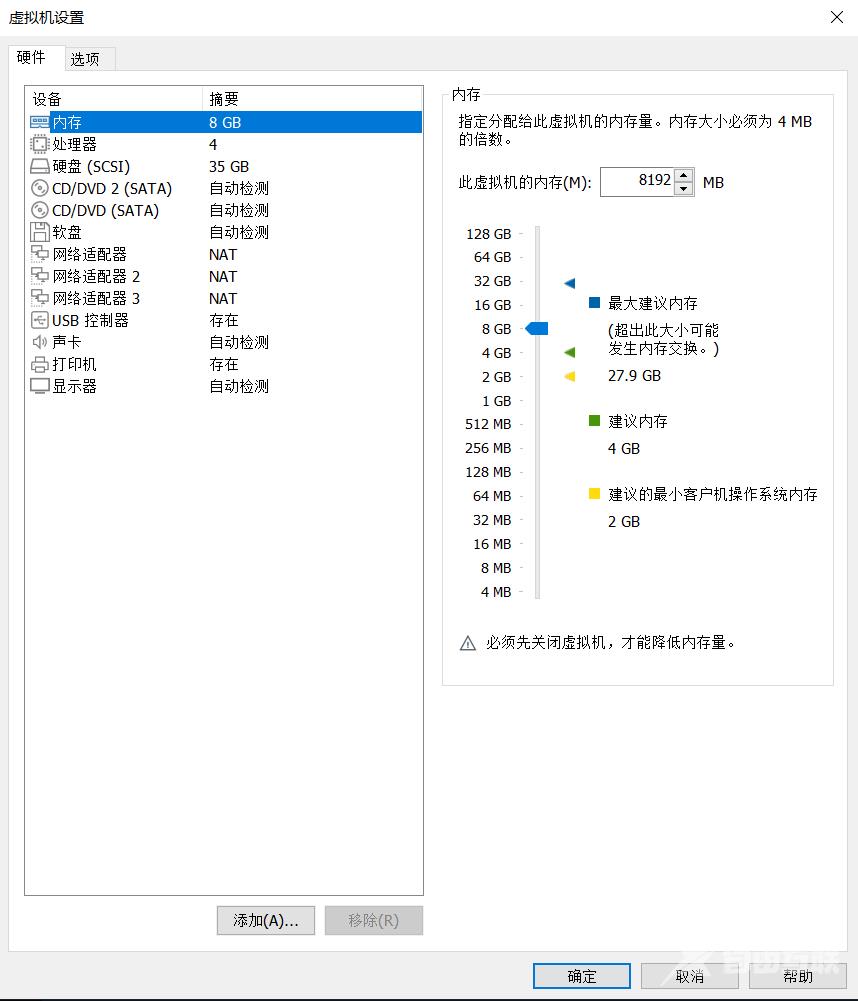
先列一下我使用的虚拟机配置(图挂了看表)

设备 摘要内存 8 GB处理器 4硬盘(SCSI) 35 GBCD/DVD 2 (SATA) 自动检测CD/DVD (SATA) 自动检测软盘 自动检测网络适配器 NAT网络适配器2 NAT网络适配器3 NATUSB控制器 存在声卡 自动检测打印机 存在显示器 自动检测
注:因为安装之后的测试需要用到多块网卡,故此处添加了3块网卡,一块作为Linux内核的主网卡,其余两块用于绑定uio驱动进行测试。
虚拟机的网卡可以随时添加或删除,只要保证其模式始终为NAT即可
虚拟机配置完成后,推荐使用VScode连接并操作,因为之后涉及对配置文件的修改,会比较方便。具体请看:https://www.cnblogs.com/DAYceng/p/16867325.html
当然也可以直接在VMware提供的界面中操作
获取TRex
在你喜欢的目录下创建一个文件夹存放安装文件
mkdir trexcd trex
下载TRex最新分支并解压
root@ubuntu:/root/trex# wget --no-check-certificate https://trex-tgn.cisco.com/trex/release/latestroot@ubuntu:/root/trex# tar -zxvf latest
注:latest文件下载过程很慢,挂梯子也很慢,可以先在本地访问https://trex-tgn.cisco.com/trex/release/latest把文件下载下来再传到虚拟机上
得到以下目录
root@ubuntu:/root/trex# lslatest v3.00
进入解压后的文件夹,使用脚本查看当前可用的网卡
root@ubuntu:/root/trex# cd v3.00root@ubuntu:/root/trex/v3.00#root@ubuntu:/root/trex/v3.00#sudo ./dpdk_setup_ports.py -sNetwork devices using DPDK-compatible driver============================================Network devices using kernel driver===================================0000:02:01.0 '82545EM Gigabit Ethernet Controller (Copper)' if=ens33 drv=e1000 unused=igb_uio,vfio-pci,uio_pci_generic *Active*0000:02:06.0 '82545EM Gigabit Ethernet Controller (Copper)' drv=e1000 unused=igb_uio,vfio-pci,uio_pci_generic0000:02:07.0 '82545EM Gigabit Ethernet Controller (Copper)' drv=e1000 unused=igb_uio,vfio-pci,uio_pci_genericOther network devices=====================root@ubuntu:/root/trex/v3.00#
如果之前添加了网卡,这里就可以看见有3个网卡(没添加的现在再加也行),* Active *为Linux内核正在使用的网卡,另外两张是未启用的网卡(先不要启用),如果有需要请查看[7]
安装dpdk
实际上这部分和独立安装dpdk差别不大
前面的简介中有提到,TRex可以大致分为两部分,一部分是用来构造数据包的【基于scapy】,另一部分则是用来发送数据包【基于DPDK】
安装gcc环境
现在我们先来安装DPDK部分,首先安装gcc环境
root@ubuntu:/root/trex/v3.00#sudo apt install build-essentialsudo apt install make sudo apt-get install libnuma-dev
下载dpdk
root@ubuntu:/root/trex/v3.00# wget http://fast.dpdk.org/rel/dpdk-18.11.9.tar.xzroot@ubuntu:/root/trex/v3.00# tar xvJf dpdk-18.11.9.tar.xzroot@ubuntu:/root/trex/v3.00# cd dpdk-stable-18.11.9/root@ubuntu:/root/trex/v3.00/dpdk-stable-18.11.9#
添加环境变量
在dpdk的文件目录下配置环境变量,否则会导致之后用脚本安装dpdk构建环境时出错
root@ubuntu:/root/trex/v3.00/dpdk-stable-18.11.9# export RTE_SDK=`pwd`root@ubuntu:/root/trex/v3.00/dpdk-stable-18.11.9# export DESTDIR=`pwd`root@ubuntu:/root/trex/v3.00/dpdk-stable-18.11.9# export RTE_TARGET=x86_64-default-linuxapp-gcc
加载uio驱动
# 加载uio驱动root@ubuntu:/root/trex/v3.00/dpdk-stable-18.11.9# modprobe uio
使用脚本安装dpdk
使用dpdk-setup.sh脚本进行安装
root@ubuntu:/root/trex/v3.00/dpdk-stable-18.11.9# ./usertools/dpdk-setup.sh------------------------------------------------------------------------------ RTE_SDK exported as /root/dpdk---------------------------------------------------------------------------------------------------------------------------------------- Step 1: Select the DPDK environment to build----------------------------------------------------------[1] arm64-armv8a-linuxapp-clang[2] arm64-armv8a-linuxapp-gcc[3] arm64-dpaa2-linuxapp-gcc[4] arm64-dpaa-linuxapp-gcc[5] arm64-stingray-linuxapp-gcc[6] arm64-thunderx-linuxapp-gcc[7] arm64-xgene1-linuxapp-gcc[8] arm-armv7a-linuxapp-gcc[9] i686-native-linuxapp-gcc[10] i686-native-linuxapp-icc[11] ppc_64-power8-linuxapp-gcc[12] x86_64-native-bsdapp-clang[13] x86_64-native-bsdapp-gcc[14] x86_64-native-linuxapp-clang[15] x86_64-native-linuxapp-gcc[16] x86_64-native-linuxapp-icc[17] x86_x32-native-linuxapp-gcc---------------------------------------------------------- Step 2: Setup linuxapp environment----------------------------------------------------------[18] Insert IGB UIO module[19] Insert VFIO module[20] Insert KNI module[21] Setup hugepage mappings for non-NUMA systems[22] Setup hugepage mappings for NUMA systems[23] Display current Ethernet/Crypto device settings[24] Bind Ethernet/Crypto device to IGB UIO module[25] Bind Ethernet/Crypto device to VFIO module[26] Setup VFIO permissions---------------------------------------------------------- Step 3: Run test application for linuxapp environment----------------------------------------------------------[27] Run test application ($RTE_TARGET/app/test)[28] Run testpmd application in interactive mode ($RTE_TARGET/app/testpmd)---------------------------------------------------------- Step 4: Other tools----------------------------------------------------------[29] List hugepage info from /proc/meminfo---------------------------------------------------------- Step 5: Uninstall and system cleanup----------------------------------------------------------[30] Unbind devices from IGB UIO or VFIO driver[31] Remove IGB UIO module[32] Remove VFIO module[33] Remove KNI module[34] Remove hugepage mappings[35] Exit ScriptOption:
步骤一
根据虚拟机的环境选择相应的build,例如我的虚拟机是64位Intel架构的环境,则选择[15] x86_64-native-linuxapp-gcc
...Installation in /root/dpdk/ complete------------------------------------------------------------------------------ RTE_TARGET exported as x86_64-native-linuxapp-gcc------------------------------------------------------------------------------Press enter to continue ...
注:若此时输出信息为以下情况(报错“Installation cannot run with T defined and DESTDIR undefined”)
INSTALL-APP dpdk-test-eventdev INSTALL-MAP dpdk-test-eventdev.mapBuild complete [x86_64-native-linuxapp-gcc]Installation cannot run with T defined and DESTDIR undefined------------------------------------------------------------------------------ RTE_TARGET exported as x86_64-native-linuxapp-gcc--------------------------------------------Press enter to continue ...
请先添加环境变量并再次执行[15]
步骤二
- 选择[18]加载igb_uio模块
Unloading any existing DPDK UIO moduleLoading DPDK UIO modulePress enter to continue ...
- 选择[19]加载VFIO module
Unloading any existing VFIO moduleLoading VFIO modulechmod /dev/vfioOKPress enter to continue ...
- 选择[20]加载KNI module
Unloading any existing DPDK KNI moduleLoading DPDK KNI modulePress enter to continue ...
- 选择[21]来创建Hugepage
Option: 21Removing currently reserved hugepagesUnmounting /mnt/huge and removing directory Input the number of 2048kB hugepages Example: to have 128MB of hugepages available in a 2MB huge page system, enter '64' to reserve 64 * 2MB pagesNumber of pages: 1024Reserving hugepagesCreating /mnt/huge and mounting as hugetlbfsPress enter to continue ...
- 选择[24]来绑定PCI网卡
Option: 24Network devices using kernel driver===================================0000:02:01.0 '82545EM Gigabit Ethernet Controller (Copper) 100f' if=ens33 drv=e1000 unused=igb_uio,vfio-pci *Active*0000:02:06.0 '82545EM Gigabit Ethernet Controller (Copper) 100f' if=ens38 drv=e1000 unused=igb_uio,vfio-pci 0000:02:07.0 '82545EM Gigabit Ethernet Controller (Copper) 100f' if=ens39 drv=e1000 unused=igb_uio,vfio-pci No 'Crypto' devices detected============================No 'Eventdev' devices detected==============================No 'Mempool' devices detected=============================No 'Compress' devices detected==============================Enter PCI address of device to bind to IGB UIO driver: 02:06.0OKPress enter to continue ...============================================================================================================================================Option: 24Network devices using DPDK-compatible driver============================================0000:02:06.0 '82545EM Gigabit Ethernet Controller (Copper) 100f' drv=igb_uio unused=e1000,vfio-pciNetwork devices using kernel driver===================================0000:02:01.0 '82545EM Gigabit Ethernet Controller (Copper) 100f' if=ens33 drv=e1000 unused=igb_uio,vfio-pci *Active*0000:02:07.0 '82545EM Gigabit Ethernet Controller (Copper) 100f' if=ens39 drv=e1000 unused=igb_uio,vfio-pci No 'Crypto' devices detected============================No 'Eventdev' devices detected==============================No 'Mempool' devices detected=============================No 'Compress' devices detected==============================Enter PCI address of device to bind to IGB UIO driver: 02:07.0OKPress enter to continue ...
PCI网卡的drv=igb_uio即完成绑定
步骤三
测试,选择[27]和[28]
Option: 27 Enter hex bitmask of cores to execute test app on Example: to execute app on cores 0 to 7, enter 0xffbitmask: 0x3Launching appsudo: x86_64-default-linuxapp-gcc/app/test: command not foundPress enter to continue ...
Option: 28 Enter hex bitmask of cores to execute testpmd app on Example: to execute app on cores 0 to 7, enter 0xffbitmask: 0x3Launching appsudo: x86_64-default-linuxapp-gcc/app/testpmd: command not found
这两个测试都有可能会出现"command not found"的报错提醒,
其中[27]出现该错误不用理会,[28]若出现的话,可以退出脚本(选[35]),到/[你的DPDK目录]/x86_64-native-linuxapp-gcc/app下找到testpmd,再运行它进行测试即可,若无以外会得到以下输出
root@ubuntu:/root/trex/v3.00/dpdk-stable-18.11.9/x86_64-native-linuxapp-gcc/app# ./testpmdEAL: Detected 4 lcore(s)EAL: Detected 1 NUMA nodesEAL: Multi-process socket /var/run/dpdk/rte/mp_socketEAL: No free hugepages reported in hugepages-1048576kBEAL: Probing VFIO support...EAL: VFIO support initializedEAL: PCI device 0000:02:01.0 on NUMA socket -1EAL: Invalid NUMA socket, default to 0EAL: probe driver: 8086:100f net_e1000_emEAL: PCI device 0000:02:06.0 on NUMA socket -1EAL: Invalid NUMA socket, default to 0EAL: probe driver: 8086:100f net_e1000_emEAL: PCI device 0000:02:07.0 on NUMA socket -1EAL: Invalid NUMA socket, default to 0EAL: probe driver: 8086:100f net_e1000_emtestpmd: create a new mbuf pool : n=171456, size=2176, socket=0testpmd: preferred mempool ops selected: ring_mp_mcConfiguring Port 0 (socket 0)Port 0: 00:0C:29:AE:BF:4DConfiguring Port 1 (socket 0)Port 1: 00:0C:29:AE:BF:43Checking link statuses...DoneNo commandline core given, start packet forwardingio packet forwarding - ports=2 - cores=1 - streams=2 - NUMA support enabled, MP allocation mode: nativeLogical Core 1 (socket 0) forwards packets on 2 streams: RX P=0/Q=0 (socket 0) -> TX P=1/Q=0 (socket 0) peer=02:00:00:00:00:01 RX P=1/Q=0 (socket 0) -> TX P=0/Q=0 (socket 0) peer=02:00:00:00:00:00 io packet forwarding packets/burst=32 nb forwarding cores=1 - nb forwarding ports=2 port 0: RX queue number: 1 Tx queue number: 1 Rx offloads=0x0 Tx offloads=0x0 RX queue: 0 RX desc=256 - RX free threshold=0 RX threshold registers: pthresh=0 hthresh=0 wthresh=0 RX Offloads=0x0 TX queue: 0 TX desc=256 - TX free threshold=0 TX threshold registers: pthresh=0 hthresh=0 wthresh=0 TX offloads=0x0 - TX RS bit threshold=0 port 1: RX queue number: 1 Tx queue number: 1 Rx offloads=0x0 Tx offloads=0x0 RX queue: 0 RX desc=256 - RX free threshold=0 RX threshold registers: pthresh=0 hthresh=0 wthresh=0 RX Offloads=0x0 TX queue: 0 TX desc=256 - TX free threshold=0 TX threshold registers: pthresh=0 hthresh=0 wthresh=0 TX offloads=0x0 - TX RS bit threshold=0Press enter to exitTelling cores to stop...Waiting for lcores to finish... ---------------------- Forward statistics for port 0 ---------------------- RX-packets: 44 RX-dropped: 0 RX-total: 44 TX-packets: 34 TX-dropped: 0 TX-total: 34 ---------------------------------------------------------------------------- ---------------------- Forward statistics for port 1 ---------------------- RX-packets: 59 RX-dropped: 0 RX-total: 59 TX-packets: 24 TX-dropped: 0 TX-total: 24 ---------------------------------------------------------------------------- +++++++++++++++ Accumulated forward statistics for all ports+++++++++++++++ RX-packets: 103 RX-dropped: 0 RX-total: 103 TX-packets: 58 TX-dropped: 0 TX-total: 58 ++++++++++++++++++++++++++++++++++++++++++++++++++++++++++++++++++++++++++++Done.Stopping port 0...Stopping ports...DoneStopping port 1...Stopping ports...DoneShutting down port 0...Closing ports...DoneShutting down port 1...Closing ports...DoneBye...
运行testpmd可能出现的问题
1、HugePage容量问题
当运行测试时或者testpmd,可能会遇到如下问题
root@ubuntu:/root/trex/v3.00/dpdk-stable-18.11.9/x86_64-native-linuxapp-gcc/app# ./testpmdEAL: Detected 8 lcore(s)EAL: Detected 1 NUMA nodesEAL: Multi-process socket /var/run/dpdk/rte/mp_socketEAL: No free hugepages reported in hugepages-2048kBEAL: No free hugepages reported in hugepages-2048kBEAL: FATAL: Cannot get hugepage information.EAL: Cannot get hugepage information.PANIC in main():Cannot init EAL5: [./testpmd(_start+0x29) [0x498829]]4: [/lib/x86_64-linux-gnu/libc.so.6(__libc_start_main+0xf0) [0x7f8a0fee0830]]3: [./testpmd(main+0xc48) [0x48f528]]2: [./testpmd(__rte_panic+0xbb) [0x47eb09]]1: [./testpmd(rte_dump_stack+0x2b) [0x5c8a1b]]Aborted (core dumped)
这说明Hugepage不够用,可以先查看系统内存状况
root@ubuntu:/root/trex/v3.00/dpdk-stable-18.11.9/x86_64-native-linuxapp-gcc/app# cat /proc/meminfo | grep HugeAnonHugePages: 0 kBShmemHugePages: 0 kBFileHugePages: 0 kBHugePages_Total: 1024HugePages_Free: 775HugePages_Rsvd: 0HugePages_Surp: 0Hugepagesize: 2048 kBHugetlb: 2097152 kB
如果不够用可以按需修改
root@ubuntu:/root/trex/v3.00/dpdk-stable-18.11.9/x86_64-native-linuxapp-gcc/build/kernel/linux# echo 2048 > /sys/kernel/mm/hugepages/hugepages-2048kB/nr_hugepagesroot@ubuntu:/root/trex/v3.00/dpdk-stable-18.11.9/x86_64-native-linuxapp-gcc/build/kernel/linux# cat /proc/meminfo | grep HugeAnonHugePages: 0 kBShmemHugePages: 0 kBFileHugePages: 0 kBHugePages_Total: 1448HugePages_Free: 1199HugePages_Rsvd: 0HugePages_Surp: 0Hugepagesize: 2048 kBHugetlb: 2965504 kB
此时再去脚本中运行测试[28]会得到以下输出
Option: 28 Enter hex bitmask of cores to execute testpmd app on Example: to execute app on cores 0 to 7, enter 0xffbitmask: 0x3Launching appEAL: Detected 4 lcore(s)EAL: Detected 1 NUMA nodesEAL: Multi-process socket /var/run/dpdk/rte/mp_socketEAL: No free hugepages reported in hugepages-1048576kBEAL: Probing VFIO support...EAL: VFIO support initializedEAL: PCI device 0000:02:01.0 on NUMA socket -1EAL: Invalid NUMA socket, default to 0EAL: probe driver: 8086:100f net_e1000_emEAL: PCI device 0000:02:06.0 on NUMA socket -1EAL: Invalid NUMA socket, default to 0EAL: probe driver: 8086:100f net_e1000_emEAL: PCI device 0000:02:07.0 on NUMA socket -1EAL: Invalid NUMA socket, default to 0EAL: probe driver: 8086:100f net_e1000_emInteractive-mode selectedtestpmd: create a new mbuf pool : n=155456, size=2176, socket=0testpmd: preferred mempool ops selected: ring_mp_mcConfiguring Port 0 (socket 0)Port 0: 00:0C:29:AE:BF:4DConfiguring Port 1 (socket 0)Port 1: 00:0C:29:AE:BF:43Checking link statuses...Donetestpmd>
这是正常的,包括"EAL: No free hugepages reported in hugepages-1048576kB"提示也是正常的
之后再去/[你的DPDK目录]/x86_64-native-linuxapp-gcc/app下运行testpmd可得到与本文一致的结果
2、82545EM 虚拟网卡问题
若物理机的网卡为82545EM,使用VMware建立虚拟机后,该网卡对于dpdk的支持会存在问题,
报错为"Eal:Error reading from file descriptor 33: Input/output error"
具体见[5]的分析
为了跳过dpdk对82545EM某些兼容性的检测,我们需要修改dpdk的配置文件igb_uio.c
该文件位于/[你的DPDK目录]//kernel/linux/igb_uio/igb_uio.c下
使用vscode打开该文件(或者vim也行)
定位到
if (pci_intx_mask_supported(udev->pdev) ,大概是第260行
然后修改为if (pci_intx_mask_supported(udev->pdev)|| 1),如下:
#endif/* falls through - to INTX 修改*/case RTE_INTR_MODE_LEGACY:if (pci_intx_mask_supported(udev->pdev)|| 1) {dev_dbg(udev->info.irq_flags = IRQF_SHARED | IRQF_NO_THREAD;udev->info.irq = udev->pdev->irq;udev->mode = RTE_INTR_MODE_LEGACY;break;}
然后重新执行编译
modprobe uio
并重新运行脚本中的[15]项,安装环境
解决
启动TRex
编辑配置文件
sudo cp cfg/simple_cfg.yaml /etc/trex_cfg.yamlsudo vim /etc/trex_cfg.yaml
- port_limit : 2 version : 2#List of interfaces. Change to suit your setup. Use ./dpdk_setup_ports.py -s to see available options interfaces : ["02:06.0","02:07.0"] #将之前绑定uio驱动的网卡添加到这里 port_info : # Port IPs. Change to suit your needs. In case of loopback, you can leave as is. - ip : 1.1.1.1 default_gw : 2.2.2.2 - ip : 2.2.2.2 default_gw : 1.1.1.1
打开两个终端,分别运行以下指令启动stateless服务器
root@ubuntu:/root/trex/v3.00# sudo ./t-rex-64 -i
root@ubuntu:/root/trex/v3.00# sudo ./trex-console
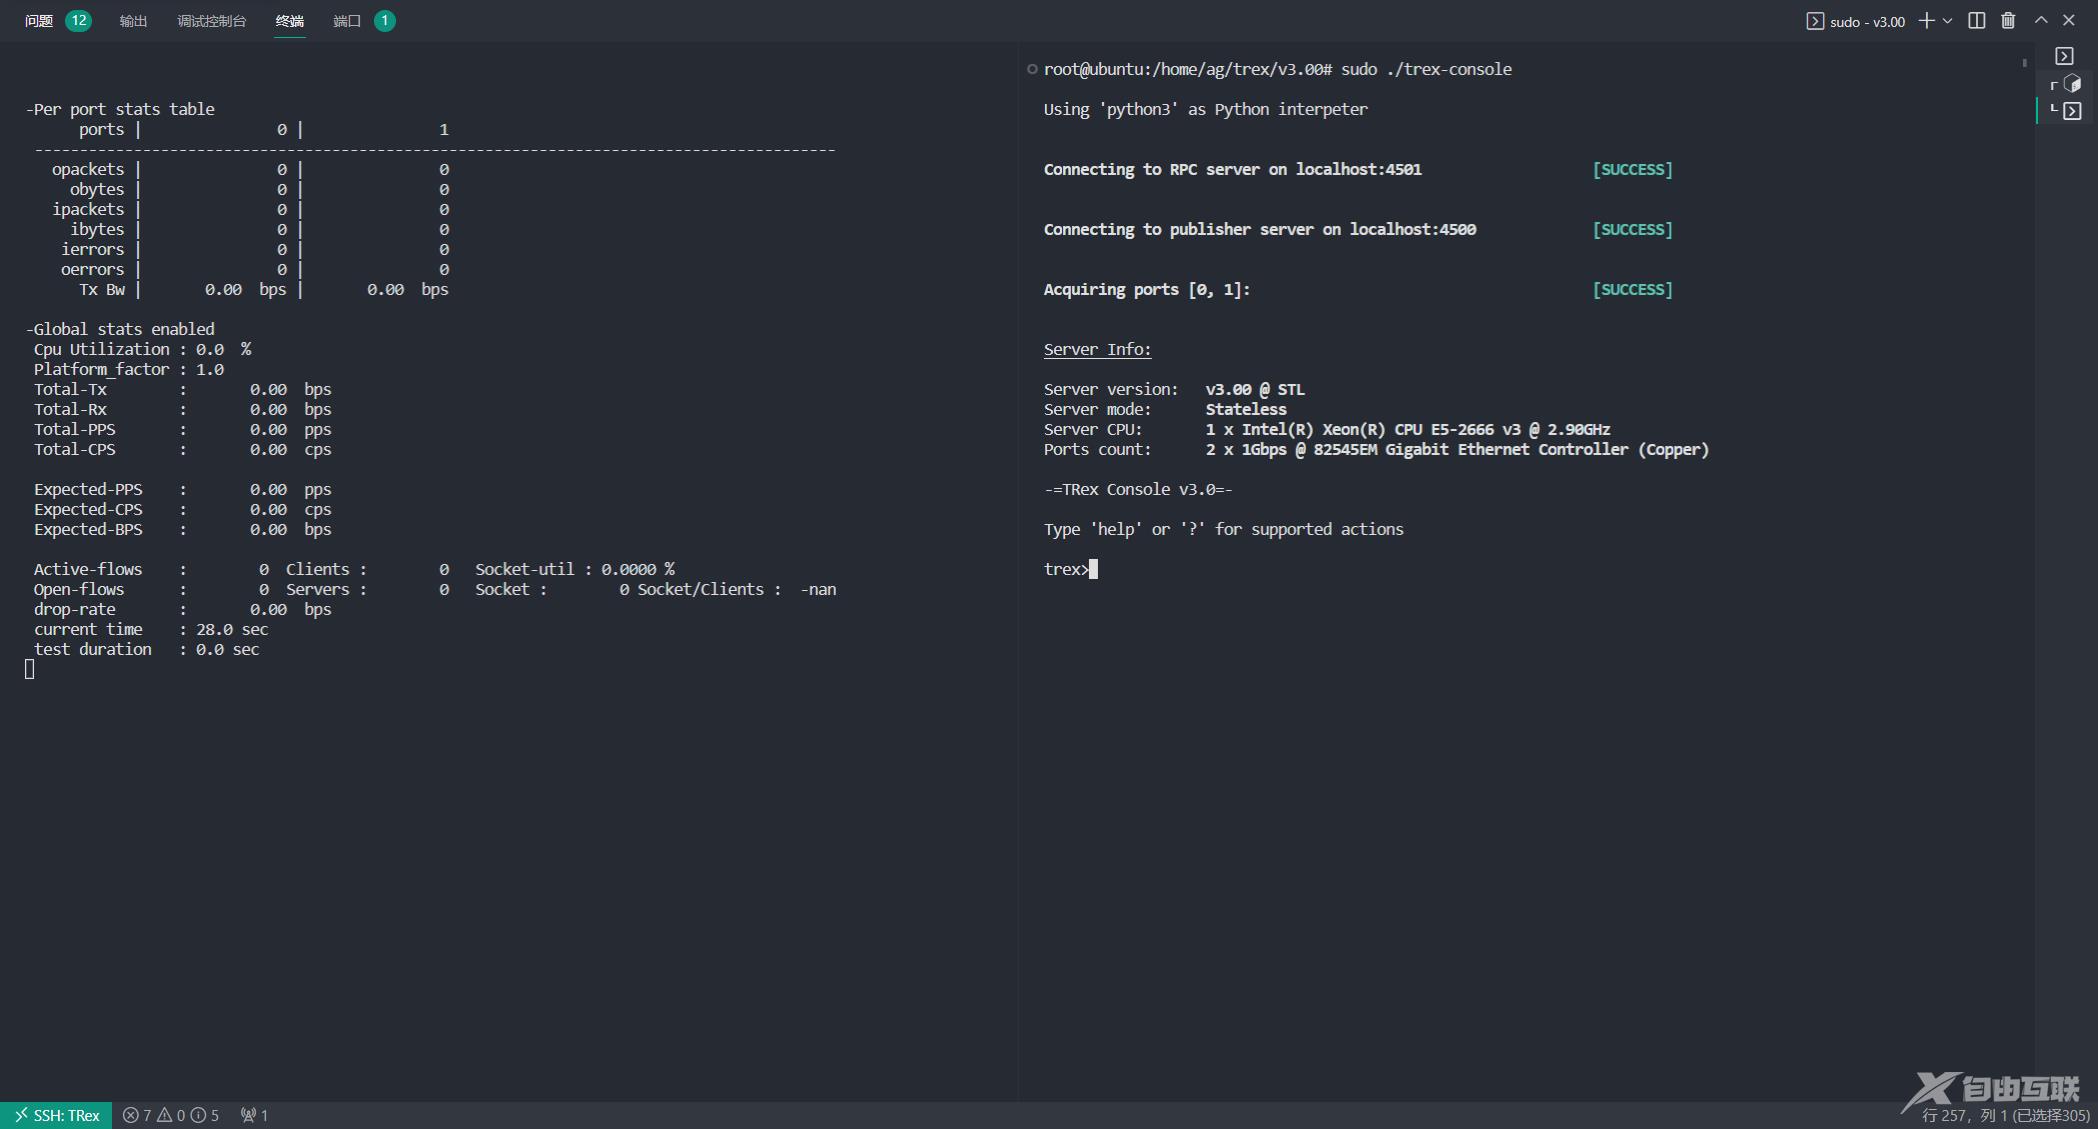
效果如下(图挂了看代码块)

##服务器启动-Per port stats table ports | 0 | 1 ----------------------------------------------------------------------------------------- opackets | 0 | 0 obytes | 0 | 0 ipackets | 0 | 0 ibytes | 0 | 0 ierrors | 0 | 0 oerrors | 0 | 0 Tx Bw | 0.00 bps | 0.00 bps -Global stats enabled Cpu Utilization : 0.0 % Platform_factor : 1.0 Total-Tx : 0.00 bps Total-Rx : 0.00 bps Total-PPS : 0.00 pps Total-CPS : 0.00 cps Expected-PPS : 0.00 pps Expected-CPS : 0.00 cps Expected-BPS : 0.00 bps Active-flows : 0 Clients : 0 Socket-util : 0.0000 % Open-flows : 0 Servers : 0 Socket : 0 Socket/Clients : -nan drop-rate : 0.00 bps current time : 63.5 sec test duration : 0.0 sec *** TRex is shutting down - cause: 'CTRL + C detected' All cores stopped !! Killing Scapy server... Scapy server is killedroot@ubuntu:/root/trex/v3.00#
##console启动Using 'python3' as Python interpeterConnecting to RPC server on localhost:4501 [SUCCESS]Connecting to publisher server on localhost:4500 [SUCCESS]Acquiring ports [0, 1]: [SUCCESS]Server Info:Server version: v3.00 @ STLServer mode: StatelessServer CPU: 1 x Intel(R) Xeon(R) CPU E5-2666 v3 @ 2.90GHzPorts count: 2 x 1Gbps @ 82545EM Gigabit Ethernet Controller (Copper)-=TRex Console v3.0=-Type 'help' or '?' for supported actionstrex>quitShutting down RPC clientroot@ubuntu:/home/ag/trex/v3.00#
到此,TRex的安装流程结束
但是这只相当于走完了"helloworld",更多的使用方法请参考[0]
感谢各个社区的内容分享,参考资料我已经在文末给出
参考资料与注释
[0]TRex官方文档https://trex-tgn.cisco.com/trex/doc/trex_manual.html#_hardware_recommendations
[1]https://www.cnblogs.com/hanyanling/p/13364204.html
[2]http://www.isimble.com/2018/11/15/dpdk-setup/
[3]https://blog.51cto.com/feishujun/5573292
[4]https://dev.to/dannypsnl/dpdk-eal-input-output-error-1kn4
[5]https://blog.csdn.net/Longyu_wlz/article/details/121443906
[6]https://blog.csdn.net/yb890102/article/details/127587910
[7]
注:未启用的网卡在终端中使用ifconfig命令是查不到的,需要先使用ip addr找出网卡,再激活,此时网卡会变为* Active *状态
#激活网卡ifconfig [网卡名称] up【感谢数据中台厂商龙石数据为本站提供 http://www.longshidata.com/pages/government.html,,感恩 】
