本文原创版权归 博客园 Terry_龙 所有转载请标明原创作者及出处以示尊重
作者Terry_龙 原文http://www.cnblogs.com/TerryBlog/archive/2012/11/07/2759506.html
记得以前学习XNA游戏开发的时候操作精灵角色的攻击或者行走动作都是给出特定的几张序列图或者一张长序列图然后通过切割来作一帧一帧的切片动画播放。
开始
关于精灵sprite我从网上摘录了一段话如下
说白一点精灵就是将图形资源加载到内存中并根据游戏需要将其显示到屏幕中的工具游戏中大到背景、UI小到NPC、道具只要是用图片展示的都是精灵或它的子类。从技术上讲精灵是一个可以不断变化的图片这些变化包括位置移动、旋转、缩放、换帧就是像动画片一样播放几张连续的图片每帧换一张形成一个动画效果在cocos2d-x 中精灵的关系如下图
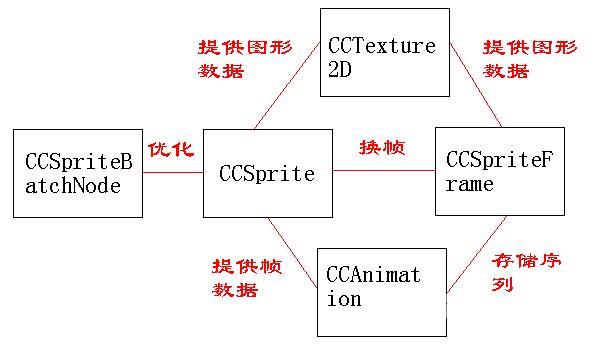
该图来源于http://www.xuanyusong.com/archives/1370 更多的相关知识可以来这里参考。
精灵多张序列图动画示例
精灵序列图来源自http://www.cnblogs.com/nowpaper/archive/2012/10/22/2733389.html 使用他的三国兵种素材。用到的素材如下

图片命名也是根据nowpaper的示例命名动画示例代码如下
 CCSize s CCDirector::sharedDirector()->getWinSize(); //获取界面大小 CCArray *aniframeCCArray::createWithCapacity(4); //创建长度为4的集合 CCSprite *sprite;//精灵 char str[20]; for(int i0;i<4;i){ sprintf(str,"attack/A1_%d.png",i); //通过下标动态创建精灵 CCSpriteFrame *frame CCSpriteFrame::create(str,CCRectMake(0,0,64,64)); if(i0){//默认添加第一帧图到界面上 sprite CCSprite::createWithSpriteFrame(frame); sprite->setPosition(ccp(sprite->getContentSize().width,s.height/2)); addChild(sprite); } aniframe->addObject(frame);//将每一帧精灵动画添加到集合里面 } CCAnimation *animationCCAnimation::createWithSpriteFrames(aniframe,0.2f);//通过集合创建动画 CCAnimate *animateCCAnimate::create(animation); CCActionInterval* seq(CCActionInterval*)(CCSequence::create(animate, CCFlipX::create(true), animate->copy()->autorelease(), CCFlipX::create(false), NULL )); sprite->runAction(CCRepeatForever::create(seq));//执行动画
精灵单张序列图动画示例
图片如下
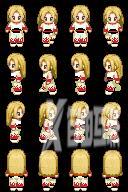
上图序列图是一张序列图可以看出分为横、竖各4个精灵动画帧依次分割可以这么分
0-0,0-1,0-2,0-3
1-0,1-1,1-2,1-3
2-0,2-1,2-2,2-3
3-0,3-1,3-2,3-3
分割分部代码为
 CCTexture2D *textureCCTextureCache::sharedTextureCache()->addImage("split.png"); CCArray *splitAniframeCCArray::createWithCapacity(16); CCSprite *splitSprite ; for(int i0;i<4;i){ for(int j0;j<4;j) { CCSpriteFrame *frame CCSpriteFrame::createWithTexture(texture,CCRectMake(32*j,48*i,32,48)); if(i0){ splitSprite CCSprite::createWithSpriteFrame(frame); splitSprite->setPosition(ccp(s.width/2,s.height/2)); addChild(splitSprite); } splitAniframe->addObject(frame); } } CCAnimation *splitAnimationCCAnimation::createWithSpriteFrames(splitAniframe,1.0f); CCAnimate *splitAnimateCCAnimate::create(splitAnimation); splitSprite->runAction(CCRepeatForever::create(splitAnimate));
使用plist的单张序列图的动画
以上两种稍微复杂cocos2d-x还可以使用一个叫TexturePackerGUI的工具可以将多张序列图生成一个png的集合图和一个*.plist的文件工具下载地址TexturePackGUI
这个工具的使用网上有很多教的使用也方便多摸索下就可以了使用该工具生成后的文件如下
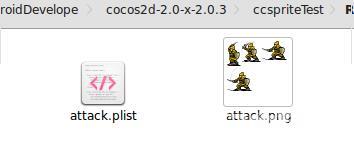
之后你就可以将它放入内存中操纵了可能你会发现生成后的图片比之前的几张序列图要小好多所以为了更快的游戏程序建议多使用该工具动画代码如下
 CCSpriteFrameCache* cache CCSpriteFrameCache::sharedSpriteFrameCache(); cache->addSpriteFramesWithFile("attack.plist"); CCSprite *plistSpriteCCSprite::createWithSpriteFrameName("A1_0.png"); plistSprite->setPosition(ccp(CCDirector::sharedDirector()->getWinSize().width-plistSprite->getContentSize().width,CCDirector::sharedDirector()->getWinSize().height/2)); CCSpriteBatchNode* spritebatch CCSpriteBatchNode::create("attack.png"); spritebatch->addChild(plistSprite); addChild(spritebatch); CCArray* plistArrayCCArray::createWithCapacity(4); char name[20]; for(int i0;i<4;i){ sprintf(name,"A1_%d.png",i); CCSpriteFrame* frame cache->spriteFrameByName(name); plistArray->addObject(frame); } CCAnimation *plitAnimationCCAnimation::createWithSpriteFrames(plistArray,0.2f); CCAnimate *plitAnimateCCAnimate::create(plitAnimation); CCActionInterval* plitSeq(CCActionInterval*)(CCSequence::create(plitAnimate, CCFlipX::create(true), plitAnimate->copy()->autorelease(), CCFlipX::create(false), NULL )); plistSprite->runAction(CCRepeatForever::create(plitSeq));
好啦来看看最后的效果图
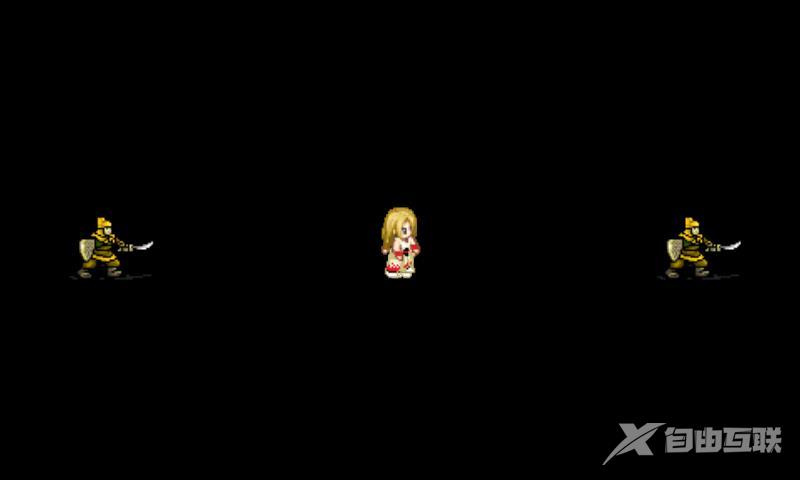
源码下载https://github.com/terryyhl/SpriteAnimation.git
好运。
原文http://www.cnblogs.com/TerryBlog/archive/2012/11/11/2765413.html
上一篇文章讲述了利用cocos2d-x构建精灵的动画效果今天打算以此为引子创建一个在移动时同时指挥角色到我手指触摸的移动地点那么就开始吧。
开始
本篇要点
角色缓存
角色缓存使用CCSpriteFrameCache 配合CCSpriteBatchNode将图片*.plist和*.png 加载进内存方便以后调用。
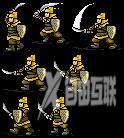
以上为动作序列图图片名称为sg.png.图片来源于博客园:nowpaper.
角色缓存代码如下
 CCSpriteFrameCache* cacheCCSpriteFrameCache::sharedSpriteFrameCache(); cache->addSpriteFramesWithFile("sg.plist"); spriteCCSprite::createWithSpriteFrameName("A1_6.png"); sprite->setPosition(ccp(size.width-sprite->getContentSize().width,size.height/2)); spriteBatchNodeCCSpriteBatchNode::create("sg.png"); spriteBatchNode->addChild(sprite); addChild(spriteBatchNode);
以上代码CCSpriteFrameCache负责加载sg.plistCCSpriteBatchNode负责加载sg.png然后创建一个精灵指定初始化位置和精灵纹理并添加进CCSpriteBatchNode。通过上面的代码即可以将一个plist序列图加载进缓存了你要做的就是将这些缓存的数据拿出来操作它。
动画缓存
上面己经将数据加载进缓存了可以使用其中的那些节点来制作动画缓存了。
缓存动画使用 CCAnimationCache该动画同样需要使用到plist文件代码如下
 CCAnimationCache *animCache CCAnimationCache::sharedAnimationCache(); animCache->addAnimationsWithFile("sg.plist");
在将plist文件添加完后即可以通过动画Animation将每一个动画的Animation添加进CCAnimationCache了这里我写了一个函数代码见下方
 CCAction* HelloWorld::createAction(int begin,int end,char* cacheActionName,CCPoint point){ CCAnimationCache *animCache CCAnimationCache::sharedAnimationCache();//得到一个缓存对象 CCArray *array CCArray::createWithCapacity(end-begin); char name[20]; for(int i begin ;i
触摸精灵到我指定的移动地点
设定好让程序允许Touch之后在回调函数ccTouchesEnded 里面通过捕获触摸位置指定精灵移动代码见下方
 CCTouch* touch(CCTouch*)(touches->anyObject()); CCPoint location touch ->getLocation(); float offXlocation.x-sprite->getPosition().x; float offYlocation.y-sprite->getPosition().y; walkActioncreateAction(4,6,"move",ccp(offX,offY)); sprite->setFlipX(offX>0?true:false); float realXoffY/offX; CCPoint realDeast ccp(location.x,location.y); CCActionInterval *actionToCCMoveTo::create(2.2f,realDeast); CCAction *moveToActionCCSequence::create( actionTo, CCCallFunc::create(this,callfunc_selector(HelloWorld::moveDone)), NULL ); sprite->runAction(moveToAction);
ok了精灵移动了但你会发现你想让精灵移动的时候不是一整张图片移动而是边移动边两只脚在走路的移动就像是我们人类一样是走着过去的而不是幽灵飘过去的那么我们要做些什么呢
动作移动
其实很简单 只要记住要精灵移动的时候即MoveTo时同时再让精灵执行一个动作即walk的动作代码如下
 sprite->stopAllActions(); //因为Touch是无时无刻的所以每当touch一次即停止当前的action walkActioncreateAction(4,6,"move",ccp(offX,offY));//构建一个walk的action sprite->runAction(walkAction);//播放走的action sprite->runAction(moveToAction);//播放moveTo的action
当到达指定地点时希望让角色以站立的姿势站在屏幕上这时我们需要在moveTo的callback函数里面调用让其停止当前action并重新执行站立的action,代码如下
 void HelloWorld::moveDone(){ sprite->stopAllActions(); CCAnimationCache *animCache CCAnimationCache::sharedAnimationCache(); CCAnimation *standAnimation animCache->animationByName("stand"); standAnimation->setRestoreOriginalFrame(true); CCAnimate *standAniCCAnimate::create(standAnimation); CCActionInterval* s(CCActionInterval*)(CCSequence::create(standAni, standAni->copy()->autorelease(), NULL )); CCAction *frameActionCCRepeatForever::create(s); sprite->runAction(frameAction); }
全部代码如下
using namespace cocos2d;using namespace CocosDenshion;#define LOG_TAG "main" ||- function#define LOGD(...) __android_log_print(ANDROID_LOG_DEBUG,LOG_TAG,__VA_ARGS__) CCScene* HelloWorld::scene(){// scene is an autorelease objectCCScene *scene CCScene::create();// layer is an autorelease objectHelloWorld *layer HelloWorld::create();// add layer as a child to scenescene->addChild(layer);// return the scenereturn scene;}// on "init" you need to initialize your instancebool HelloWorld::init(){//// 1. super init firstif ( !CCLayer::init() ){return false;}this->setTouchEnabled(true);CCSize size CCDirector::sharedDirector()->getWinSize();CCAnimationCache::purgeSharedAnimationCache();CCAnimationCache *animCache CCAnimationCache::sharedAnimationCache();animCache->addAnimationsWithFile("sg.plist");cacheCCSpriteFrameCache::sharedSpriteFrameCache();cache->addSpriteFramesWithFile("sg.plist");spriteCCSprite::createWithSpriteFrameName("A1_6.png");sprite->setPosition(ccp(size.width-sprite->getContentSize().width,size.height/2));spriteBatchNodeCCSpriteBatchNode::create("sg.png");spriteBatchNode->addChild(sprite);addChild(spriteBatchNode);cache->addSpriteFramesWithFile("hero.plist");heroCCSprite::createWithSpriteFrameName("Hero02_0.png");hero->setPosition(ccp(hero->getContentSize().width,size.height/2));heroBatchNodeCCSpriteBatchNode::create("hero.png");heroBatchNode ->addChild(hero);hero->setFlipX(true);addChild(heroBatchNode);attackArray CCArray::createWithCapacity(4);char attackName[20];for(int i0;i<4;i){sprintf(attackName,"A1_%d.png",i);CCSpriteFrame* frame cache->spriteFrameByName(attackName);attackArray->addObject(frame);}CCAnimation *attackAnimation CCAnimation::createWithSpriteFrames(attackArray,0.2f);CCAnimationCache::sharedAnimationCache()->addAnimation(attackAnimation, "attack");attackArray->removeAllObjects();standArray CCArray::createWithCapacity(1);char standName[20];for(int i6;i<7;i){sprintf(standName,"A1_%d.png",i);CCSpriteFrame* frame cache->spriteFrameByName(standName);standArray->addObject(frame);}CCAnimation *standAnimation CCAnimation::createWithSpriteFrames(standArray,0.2f);CCAnimationCache::sharedAnimationCache()->addAnimation(standAnimation, "stand");standArray->removeAllObjects();return true;}void HelloWorld::moveDone(){//sprite->stopAllActions();CCAnimationCache *animCache CCAnimationCache::sharedAnimationCache();CCAnimation *standAnimation animCache->animationByName("stand");standAnimation->setRestoreOriginalFrame(true);CCAnimate *standAniCCAnimate::create(standAnimation);CCActionInterval* s(CCActionInterval*)(CCSequence::create(standAni,standAni->copy()->autorelease(),NULL));CCAction *frameActionCCRepeatForever::create(s);sprite->runAction(frameAction);}CCAction* HelloWorld::createAction(int begin,int end,char* cacheActionName,CCPoint point){CCAnimationCache *animCache CCAnimationCache::sharedAnimationCache();CCArray *array CCArray::createWithCapacity(end-begin);char name[20];for(int i begin ;i CCAnimation *attackAnimation CCAnimation::createWithSpriteFrames(attackArray,0.2f); 与 最后实现的效果如下 由于是在ubuntu下开发好像没有什么抓取屏幕gif 图片的软件可用简单截一屏 代码没有做任何的处理很多多余的代码做个DEMO可以看看就行 代码下载https://github.com/terryyhl/SpriteAnimation.git 来自 博客园 居家懒人 原文http://www.cnblogs.com/JD85/archive/2013/01/02/2842271.html 粗略写了个Player类用来测试人物的待机动作和奔跑动作的播放以及两种动作的切换播放。 1这里要用到plist文件对于plist,我目前的理解就是plist和xml很像可以说就是xml, 不过在mac下面就成了plist美术资源如果是一张有9个帧动作的图片那么plist文件里就应该有9个dict节点来分别对应这9个动作每个节点里的属性包括精灵大小、需要渲染的纹理矩形的左上角和右下角这两个点的坐标、坐标偏移值、精灵单张原始图片的大小... 最开始时是想通过setPostition和 setAnothorPoint来解决人物的原点位置设置但发现可以直接在plist里设置offset偏移量来决定原点位置。 plist文件里的spriteOffset属性正好可以用来设置原点的位置。 这里给出我自己算出的spriteOffset坐标公式 CCSpriteBatchNode, CCSpriteFrameCache, CCSpriteFrame, CCAnimation 3, 代码中包括触屏之后除了人物的动作切换还有位移、水平转向的处理,代码借鉴了官方test里的例子贴心的2dx团队呀有么有!!! 4,新手要注意draw方法不是主动去调用的这里是重写了父类的draw方法在这里绘制了一下人物的脚下画了个十字以以表示原点位置方便测试 ccDrawLine()方法就是直接调用openGL ES的接口在屏幕上绘制一条线。那么draw方法是被谁调用的呢是cocos2d-x的UI主线程。 //// Player.h// PlayerActionTest//// Created by 嘉定 on 12-12-25.////#ifndef __PlayerActionTest__Player__#define __PlayerActionTest__Player__#include "cocos2d.h"USING_NS_CC;class Player : public CCSprite{public:Player();virtual ~Player();virtual bool init();virtual void draw();typedef enum{state_idle 1,state_run 2,state_sit 3,state_UnKnown 4} ActionState;typedef enum{headward_left 1,headward_right 2,headward_Unknow 3}HeadwardType;//跑向一个点,达到目标后是否回调void runTo(CCPoint targetPos,bool callback);//播放某个动作动画void playAction(ActionState state);//当前动作状态ActionState currentActionState;//当前朝向HeadwardType currentHeadward;CREATE_FUNC(Player);private://动画批处理节点CCSpriteBatchNode *idleSpriteBatch;CCSpriteBatchNode *runSpriteBatch;//侦动画缓存CCSpriteFrameCache *idleFrameCache;CCSpriteFrameCache *runFrameCache;CCSprite *idleSprite;CCSprite *runSprite;void stopCurrentAction();//播放待机动画void idle();//播放奔跑动画void run();//跑到目标点之后回调//handlervoid runToCallBack();};#endif /* defined(__PlayerActionTest__Player__) */ //// Player.cpp// PlayerActionTest//// Created by 嘉定 on 12-12-25.////#include "Player.h"Player::Player():idleFrameCache(NULL),runFrameCache(NULL),idleSpriteBatch(NULL),runSpriteBatch(NULL),idleSprite(NULL),runSprite(NULL),currentActionState(Player::state_UnKnown),currentHeadward(Player::headward_Unknow){}Player::~Player(){}bool Player::init(){if(!CCSprite::init()){return false;}//默认朝向右边currentHeadward headward_right;//init total action FrameCacheidleFrameCache CCSpriteFrameCache::sharedSpriteFrameCache();idleFrameCache->addSpriteFramesWithFile("player/heping.plist","player/heping.png");runFrameCache CCSpriteFrameCache::sharedSpriteFrameCache();runFrameCache->addSpriteFramesWithFile("player/pao.plist", "player/pao.png");return true;}void Player::runTo(CCPoint targetPos,bool callback){this->stopAllActions();//目前用CCMoveTO,需要设定一个从当前位置到目标位置的移动时间,那么应提前算出移动所需的时间const float SPEED 12;float playerX this->getPosition().x;float playerY this->getPosition().y;if(targetPos.x > playerX){this->currentHeadward headward_right;}else{this->currentHeadward headward_left;}this->playAction(state_run);float disX playerX - targetPos.x;float disY playerY - targetPos.y;const float DIS sqrtf(disX * disX disY * disY);float moveTime (DIS / SPEED) / 60;//但是人物的移动时间要按照从当前点到touch点的真实距离来计算时间CCAction *action NULL;if(callback){action CCSequence::create(CCMoveTo::create(moveTime, targetPos),CCCallFunc::create(this, callfunc_selector(Player::runToCallBack)),NULL);}else{action CCSequence::create(CCMoveTo::create(moveTime, targetPos),NULL);}this->runAction(action);//角度转向//// float at (float) CC_RADIANS_TO_DEGREES(atanf(disX/disY));// // if(disX <0)// {// if(disY <0)// at 180 fabs(at);// else// at 180 - fabs(at);// }// this->runAction(CCRotateTo::create(1, at));}void Player::playAction(ActionState state){if(currentActionState state){//这里逻辑有点细微当正在向左跑时如果点击了人物右边屏幕那么不回重新创建一次奔跑的动画变量但是人物时需要反转的//idle状态不需要考虑这一点跑到了就会idle,这时会自动根据之前奔跑的朝向来设定。if(currentActionState state_run){if(runSprite->isFlipX() headward_right){runSprite->setFlipX(false);}else if(!runSprite->isFlipX() headward_left){runSprite->setFlipX(true);}}return;}if(state state_idle){idle();}else if(state state_run){run();}else{ }}void Player::draw(){ccDrawColor4B(255, 0, 0, 255);glLineWidth(6.0f);ccDrawLine(ccp(-20,0),ccp(20,0));ccDrawLine(ccp(0,15),ccp(0,-15));}void Player::idle(){stopCurrentAction();idleSprite CCSprite::createWithSpriteFrameName("heping_01");if(this->currentHeadward headward_left){idleSprite->setFlipX(true);}else if(this->currentHeadward headward_right){idleSprite->setFlipX(false);}CCSize idleSize idleSprite->getContentSize();idleSpriteBatch CCSpriteBatchNode::create("player/heping.png");idleSpriteBatch->addChild(idleSprite);addChild(idleSpriteBatch);//动画帧数组CCArray *animatFrames CCArray::createWithCapacity(8);char str[100] {0};for(int i 1;i <8;i){sprintf(str, "heping_%02d",i);CCSpriteFrame *frame idleFrameCache->spriteFrameByName(str);animatFrames->addObject(frame);}CCAnimation *animation CCAnimation::createWithSpriteFrames(animatFrames,0.2f);idleSprite->runAction(CCRepeatForever::create(CCAnimate::create(animation)));currentActionState state_idle;}void Player::run(){stopCurrentAction();runSprite CCSprite::createWithSpriteFrameName("run_01");if(this->currentHeadward headward_left){runSprite->setFlipX(true);}else if(this->currentHeadward headward_right){runSprite->setFlipX(false);}CCSize runSize runSprite->getContentSize();runSpriteBatch CCSpriteBatchNode::create("player/pao.png");runSpriteBatch->addChild(runSprite);addChild(runSpriteBatch);CCArray *animatFrames CCArray::createWithCapacity(7);char str[100] {0};for(int i 1;i <7;i){sprintf(str, "run_%02d",i);CCSpriteFrame *frame runFrameCache->spriteFrameByName(str);animatFrames->addObject(frame);}CCAnimation *animation CCAnimation::createWithSpriteFrames(animatFrames,0.08f);runSprite->runAction(CCRepeatForever::create(CCAnimate::create(animation)));currentActionState state_run;}void Player::stopCurrentAction(){if(currentActionState state_idle){idleSprite->stopAllActions();idleSpriteBatch->removeChild(idleSprite,true);removeChild(idleSpriteBatch,true);}else if(currentActionState state_run){runSprite->stopAllActions();runSpriteBatch->removeChild(runSprite, true);removeChild(runSprite,true);}else{}}void Player::runToCallBack(){this->playAction(state_idle);} framesrun_01spriteSize{151, 127}textureRect{{0, 0}, {151,127}}spriteOffset{-13, 42}textureRotatedspriteSourceSize{151,127}aliasesrun_01run_02spriteSize{151,127}textureRect{{151, 0}, {302,127}}spriteOffset{-13, 42}textureRotatedspriteSourceSize{151,127}aliasesrun_02run_03spriteSize{151,127}textureRect{{302, 0}, {453,127}}spriteOffset{-13, 42}textureRotatedspriteSourceSize{151,127}aliasesrun_03run_04spriteSize{151,127}textureRect{{453, 0}, {604,127}}spriteOffset{-13, 42}textureRotatedspriteSourceSize{151,127}aliasesrun_04run_05spriteSize{151,127}textureRect{{604, 0}, {755,127}}spriteOffset{-13, 42}textureRotatedspriteSourceSize{151,127}aliasesrun_05run_06spriteSize{151,127}textureRect{{755, 0}, {906,127}}spriteOffset{-13, 42}textureRotatedspriteSourceSize{151,127}aliasesrun_06run_07spriteSize{151,127}textureRect{{906, 0}, {1057,127}}spriteOffset{-13, 42}textureRotatedspriteSourceSize{151,127}aliasesrun_07metadataformat3size{1057, 127} 注意点


