在使用yum时遇到这个错误
Another app is currently holding the yum lock; waiting for it to exit…
运行命令
rm -f /var/run/yum.pid // 强制关掉yum进程
因为centOS默认自带4点几版本的gcc 、g++编译器,是比较老的版本的,所以先把老版本卸载掉。
1、 先获取root权限 2、 查看当前的安装版本号
rpm -q gcc
3、卸载掉旧版本
rpm -e [第二步查到的版本号]
4、第三步可能会遇到如下错误,卸载失败
error: Failed dependencies:
    gcc = 4.4.7-23.el6 is needed by (installed) gcc-c++-4.4.7-23.el6.x86_64
    gcc = 4.4.4 is needed by (installed) libtool-2.2.6-15.5.el6.x86_64
提示要卸载的版本有两个依赖,要先卸载掉这两个依赖(注意:下面要卸载的版本号要和上面提示的两个依赖的版本号一致)
自由互联热门推荐:PDF电子发票识别软件,一键识别电子发票并导入到Excel中!10大顶级数据挖掘软件!人工智能的十大作用!rpm -e gcc-c++-4.4.7-23.el6.x86_64
rpm -e libtool-2.2.6-15.5.el6.x86_64
将这两个依赖卸载完成之后再次执行第3步就可卸载成功
5、验证卸载
[root@123 /]# gcc -v
-bash: /usr/bin/gcc: No such file or directory
[root@123 /]# g++ -v
-bash: /usr/bin/g++: No such file or directory
这样即为卸载成功
2、安装最新版本的gcc 、g++在安装之前,可以先去查询一下目前gcc 、g++的版本以及区别,本文用了第11版
1、在系统中安装存储库
yum install centos-release-scl
2、安装gcc和g++包(注意版本号:11版)
yum install -y devtoolset-11-gcc devtoolset-11-gcc-c++
3、配置安装好的包(注意版本号:11版)
scl enable devtoolset-11 bash
4、验证安装
[root@123 /]# gcc -v
Using built-in specs.
COLLECT_GCC=gcc
COLLECT_LTO_WRAPPER=/opt/rh/devtoolset-11/root/usr/libexec/gcc/x86_64-redhat-linux/11/lto-wrapper
Target: x86_64-redhat-linux
Configured with: ../configure --enable-bootstrap --enable-languages=c,c++,fortran,lto --prefix=/opt/rh/devtoolset-11/root/usr --mandir=/opt/rh/devtoolset-11/root/usr/share/man --infodir=/opt/rh/devtoolset-11/root/usr/share/info --with-bugurl=http://bugzilla.redhat.com/bugzilla --enable-shared --enable-threads=posix --enable-checking=release --enable-multilib --with-system-zlib --enable-__cxa_atexit --disable-libunwind-exceptions --enable-gnu-unique-object --enable-linker-build-id --with-gcc-major-version-only --with-linker-hash-style=gnu --with-default-libstdcxx-abi=gcc4-compatible --enable-plugin --enable-initfini-array --with-isl=/builddir/build/BUILD/gcc-11.2.1-20210728/obj-x86_64-redhat-linux/isl-install --enable-gnu-indirect-function --with-tune=generic --with-arch_32=x86-64 --build=x86_64-redhat-linux
Thread model: posix
Supported LTO compression algorithms: zlib
gcc version 11.2.1 20210728 (Red Hat 11.2.1-1) (GCC)
[root@123 /]# g++ -v
Using built-in specs.
COLLECT_GCC=g++
COLLECT_LTO_WRAPPER=/opt/rh/devtoolset-11/root/usr/libexec/gcc/x86_64-redhat-linux/11/lto-wrapper
Target: x86_64-redhat-linux
Configured with: ../configure --enable-bootstrap --enable-languages=c,c++,fortran,lto --prefix=/opt/rh/devtoolset-11/root/usr --mandir=/opt/rh/devtoolset-11/root/usr/share/man --infodir=/opt/rh/devtoolset-11/root/usr/share/info --with-bugurl=http://bugzilla.redhat.com/bugzilla --enable-shared --enable-threads=posix --enable-checking=release --enable-multilib --with-system-zlib --enable-__cxa_atexit --disable-libunwind-exceptions --enable-gnu-unique-object --enable-linker-build-id --with-gcc-major-version-only --with-linker-hash-style=gnu --with-default-libstdcxx-abi=gcc4-compatible --enable-plugin --enable-initfini-array --with-isl=/builddir/build/BUILD/gcc-11.2.1-20210728/obj-x86_64-redhat-linux/isl-install --enable-gnu-indirect-function --with-tune=generic --with-arch_32=x86-64 --build=x86_64-redhat-linux
Thread model: posix
Supported LTO compression algorithms: zlib
gcc version 11.2.1 20210728 (Red Hat 11.2.1-1) (GCC)
5、配置环境变量因为不配置环境变量的话,每打开一个客户端,就需要执行一次上面的第三步配置安装包
//先查看gcc和g++安装位置
[root@123 /]# which gcc
/opt/rh/devtoolset-11/root/usr/bin/gcc
[root@123 /]# which g++
/opt/rh/devtoolset-11/root/usr/bin/g++
编辑文件
vim /etc/profile
在文件后面添加下面两行内容:
PATH=$PATH::/opt/rh/devtoolset-11/root/usr/bin
export PATH
重新加载文件
source /etc/profile
2、先用yum安装老版本gcc、g++centOS自带的是4点几的版本 : gcc -v 、g++ -v 两个命令查看,我的是4.8.5版本,如果有,跳到3、官网下载想要安装的gcc版本
sudo yum install -y gcc				//安装gcc
sudo yum install -y gcc-c++			//安装g++
4、安装gcc需要的其他库http://ftp.tsukuba.wide.ad.jp/software/gcc/releases/
mpfr、mpc、gmp三个库 编译之前还需准备以下:
1、安装m4库
sudo yum install -y m4 //首先安装m4,否则configure gmp库时会报错**
2、安装以下三个库
**一定要按照这三个顺序安装**
1、gmp库
下载地址:https://gmplib.org/download/gmp/gmp-6.2.1.tar.xz
	tar -Jxvf gmp-6.2.1.tar.xz	//解压
	cd gmp-6.2.1				//进入
	./configure --prefix=/usr  	//指定编译完后要安装的路径,可以自定,示例用/usr
	make -j4					//编译
	sudo make install			//安装

2、mpfr库
下载地址:https://www.mpfr.org/mpfr-current/mpfr-4.2.0.tar.gz
	tar -zxvf mpfr-4.2.0.tar.gz	//解压
	cd mpfr-4.2.0				//进入
	./configure --prefix=/usr  	//指定编译完后要安装的路径,可以自定,示例用/usr
	make -j4					//编译
	sudo make install			//安装

3、mpc库
下载地址:https://mirrors.aliyun.com/gnu/mpc/mpc-1.3.1.tar.gz?spm=a2c6h.25603864.0.0.60dd1a8cVMdT9B
	tar -zxvf mpc-1.3.1.tar.gz	//解压
	cd 	mpc-1.3.1				//进入
	./configure --prefix=/usr  	//指定编译完后要安装的路径,可以自定,示例用/usr
	make -j4					//编译
	sudo make install			//安装
编译gcc时需要cc1,系统中会有,但是编译时会报错找不到
先到根目录下找:
cd /
sudo find -name cc1
我的cc1在 /usr/libexec/gcc/x86_64-redhat-linux/4.8.2/cc1
创建软连接到/usr/bin目录下
sudo ln -s /usr/libexec/gcc/x86_64-redhat-linux/4.8.2/cc1 /usr/bin/cc1
编译过程中可能会遇到这个错误,找不到libmpfr.so.6 这个库,但是系统中会有,所以要先创建一个软连接
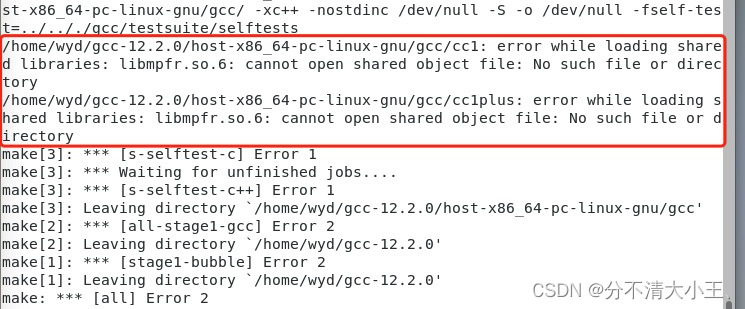

去根目录查找
cd /
sudo find -name libmpfr.so.6
我的这个文件在/usr/lib目录下
在编译前先创建一个软连接到/usr/lib64目录下
sudo ln -s /usr/lib/libmpfr.so.6 /usr/lib64/libmpfr.so.6 //这个软连接一定要创建在/usr/lib64目录下
编译安装gcc、g++
tar -zxvf gcc-12.2.0.tar.gz 	//解压
cd gcc-12.2.0/					//进入
sudo ./configure --disable-multilib --prefix=/usr
								//生成makefile,--prefix指定编译完之后的安装路径
								// /usr表示安装之后的gcc、g++在/usr/bin里面
								//如果路径中有CMakeLists.txt,则也可以使用cmake生成makefile
								//cmake . -G "Unix Makefiles" -DCMAKE_INSTALL_PREFIX=/usr
								//--enable-multilib 允许32位编译,如果系统中有32位的环境,一般不需要
								//--disable-multilib 只使用64位编译
sudo make -j4					//编译
在执行sudo make -j4时,我这里出现了一个报错

这是由于在编译时内存不足造成的,
1、如果是虚拟机,可以扩大虚拟机的内存
2、创建swap分区(推荐)
建议看这篇文章https://blog.csdn.net/weixin_44796670/article/details/121234446
之后再执行sudo make -j4
编译安装完之后根据链接文章删除swap分区即可3、或者将sudo make -j4改为sudo make,减少同时进行的任务数量,但是编译时间会更长
等待编译完成,时间比较长!!!
6、删除创建的软连接,卸载yum安装的gcc、g++//删除创建的软连接
sudo rm -rf /usr/bin/cc1
sudo rm -rf /usr/lib64/libmpfr.so.6
//卸载yum安装的gcc、g++
sudo yum remove gcc gcc-c++
sudo make install //gcc和g++安装到/usr/bin目录中了
原文链接:https://www.cnblogs.com/cppbugboy/p/17338383.html