本篇文章带大家了解一下瀑布流布局,介绍一下三种靠谱JS方案,以及N种不靠谱CSS方案。有一定的参考价值,有需要的朋友可以参考一下,希望对大家有所帮助。

本着实用精神,我们今天来分享一下瀑布流布局(昨天有个小兄弟问我怎么做,我找了半天没找到,啊原来写在内网了)。
瀑布流布局是什么?演示地址: http://www.lilnong.top/static/html/waterfall.html
比如说 花瓣网、蘑菇街 (我下面贴图了), 这些网站在显示内容的时候就使用了瀑布流布局。
我们也想做一个展示我们设计稿(定宽,不定高)的页面,瀑布流是很棒的一种方案。
瀑布流布局其核心是基于一个网格的布局,而且每行包含的项目列表高度是随机的(随着自己内容动态变化高度),同时每个项目列表呈堆栈形式排列,最为关键的是,堆栈之间彼此之间没有多余的间距差存大。还是上图来看看我们说的瀑布流布局是什么样子。



 方案分通道absolute
grid、inline、float 魔性方案
也算是纯 CSS 方案吧,本质上来讲是依赖文档流,从左到右,从上到下。



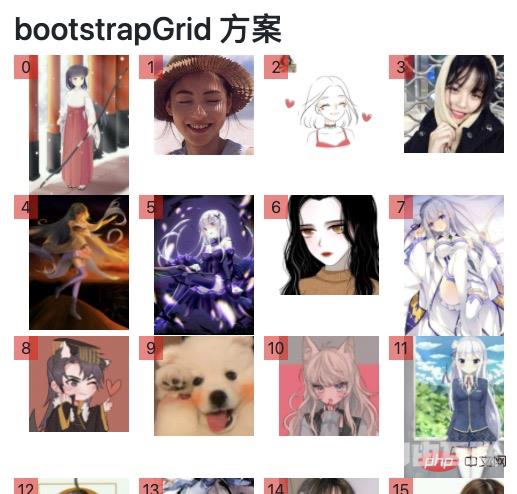
可以看到在文档流布局中有非常明显的行的概念,当一个行被撑开就会留下空白,行与行不会重叠。这里最魔性的就是 float 布局了。
DOM 结构div.list // 设置 gird 或者 block,注意清除浮动
div.item // 设置为 inline 或者 float,使其能流动
img // 设置定宽,高度自适应,间距等。grid 方案说明.wrap-waterfall--grid img{vertical-align: top;width: 100px}
.wrap-waterfall--grid .list{
display: grid;
grid-gap: 10px;
/* 可以看到,网格大小,占据位置是需要提前设定的 */
grid-template-columns: repeat(4, 1fr);
grid-auto-rows: minmax(50px, auto);
}grid 在某些情况下会比 flex 好用。比如说需要突破行的限制,但是只适用于固定布局,如下图的布局,如果不使用grid你会如何实现呢?
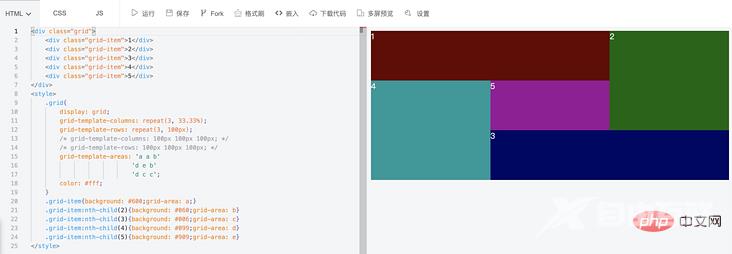
网传有 gird 实现瀑布流布局的方案,但是我看了几个他们不是色块,就是图片变形、裁剪,方案是用 nth-child 定高,太恐怖了吧。
columns、flex CSS实现 不靠谱方案也是纯 CSS 方案,相比较上面的方案而言,方案已经可以接受,只是还有部分问题。
- 顺序是先垂直,后水平
- (columns)兼容性问题
- (flex)需要给一个固定高度,会出现超出设定列,以及无法充满设定列。

 columns 方案
天生支持,只需要给父级设置即可 columns: 4; column-gap: 6px; 。
flex-flow: column wrap;height: 2300px; 默认情况下是水平排列,通过修改为垂直排列并且允许换行,之后把通过固定高度使内容换行。



这里的方案就靠谱起来了,可以满足我们使用要求。
我们来回忆一下我们的需求:展示一些内容,内容有特性定宽,不定高。不定高一般是因为内容长度或者高度不一致导致的,常见内容又分为两种文字和图片。
文字的话,在没有异步字体的情况下,可以理解为同步就可以获取到盒子高度。
图片的话,因为加载是异步的,所以获取盒子的真实高度也是异步的。但是这里一般分为两种情况
无高度,那么可以通过onload来监听图片加载完成。等图片加载完成再去获取高度。
- 有高度,这种方案一般用在封面图、或者文章中,在上传图片的时候会保存原图尺寸,这个时候我们就可以直接使用已有数据。
// 用于获取图片的真实高度
naturalHeight: 1180
// 用于获取图片的真实宽度
naturalWidth: 1200

//用户获取图片当前的渲染高度(会受 css 影响)
height: 98
//用户获取图片当前的渲染宽度(会受 css 影响)
width: 100

// 可返回浏览器是否已完成对图像的加载。如果加载完成,则返回 true,否则返回 fasle。
complete 属性
// 可以监听到图片加载完成的动作
onload
基于上面的内容,那我们可以先判断 complete 属性,
function getImageSize(img){
    if(img.complete){
        return Promise.resolve({
            naturalHeight: img.naturalHeight,
            naturalWidth: img.naturalWidth,
            height: img.height,
            width: img.width,
        })
    }else{
        return new Promise((resolve, reject)=>{
            img.addEventListener('load', ()=>{
                resolve({
                    naturalHeight: img.naturalHeight,
                    naturalWidth: img.naturalWidth,
                    height: img.height,
                    width: img.width,
                })
            })
        })
    }
}
/*
// 测试用例
el = document.createElement('img');
el.src = 'http://cors-www.lilnong.top/favicon.ico?'+Math.random()

getImageSize(el).then(console.log).catch(console.error)
setTimeout(()=>getImageSize(el).then(console.log).catch(console.error), 1000)
*/
absolute 计算高度方案因为普通的布局已经无法满足我们的需求,所以我们可以考虑通过 position: absolute 来使内容通过绝对定位来显示。
核心操作就是维护每个元素的 left、top,然后使用 left 和 top 去渲染到正确位置。
getListPosition(){
    // 视口宽度 / 每列宽度 得出划分为几列
    let col = this.screenWidth / this.itemWidth >> 0;
    var arr = [];
    for(var i = 0; i < col; i++) arr.push({
        list: [],
        height: 0,
    })
    // 遍历所有元素
    this.listInfo.forEach((item,idx)=>{
        // 找到最低的一列
        var colIndex = 0;
        for(var i = 1; i < col; i++){
            if(arr[colIndex].height > arr[i].height){
                // colItem = arr[i]
                colIndex = i
            }
        }
        // 修改元素的信息
        // 所属列
        item.line = colIndex;
        // 计算之后的 top 距离
        item.top = arr[colIndex].height+ 'px';
        // 计算之后的 left 距离
        item.left = colIndex * (this.itemWidth + 10) + 'px'

        // 累加操作
        arr[colIndex].list.push(item);
        arr[colIndex].height += item.height + 10;
    })
    return arr
},
通过计算,我们可以到,瀑布流布局下每个元素的位置,通过绝对定位就可以实现。
根据下标,来渲染到不同的通道 idx % 4因为上个方案用到了绝对定位,那么有没有不用绝对定位的方案呢?回到我们的问题点上 定宽,不定高,那我们完全可以通过分开渲染放弃 absolute 来实现。
jsGroupList(){
    return this.list.reduce((s,n,idx)=>{
        // 根据下标,直接分配所属列
        s[idx % 4].push({idx: idx, item: n})
        return s
    }, [[],[],[],[],])
},看开头是实现类似的功能的,但是有一个弊端(快来评论区回复呀)。
通过高度计算,然后分通道,避免 absolute因为上一个方案是按下标分类的,其实瀑布流是按高度分类的,所以我们分类条件换成最低的列。
jsGroupHeightList(){
    var list = [
        {height: 0, list: []},{height: 0, list: []},
        {height: 0, list: []},{height: 0, list: []},
    ]
    // 遍历每个元素
    for(var i = 0; i < this.list.length; i++){
        // 当元素有大小的时候在进行操作。
        if(!this.listInfo[i].height) return list;
        // 默认第一个通道是最小高度列
        var minHeightItem = list[0];
        // 计算最小高度列
        list.forEach(v=>{
            if(v.height < minHeightItem.height) minHeightItem = v
        })
        // 把新的元素高度累加到列中。
        minHeightItem.height += this.listInfo[i].height
        // 把新的元素push到列中
        minHeightItem.list.push({idx: i, item: this.list[i]})
    }
    return list;
},总结好了,到这里我能想到的方案就都介绍了。你还有什么方案吗?咱们可以在评论区讨论一下可行性。接下来就是我们的方案总结了。
更多编程相关知识,请访问:编程入门!!
