今天我们来来讲解如何在Spring boot的项目中操作Elasticsearch,本章采用的API是官方的Java High Level REST Client v7.9.1。在学习本章以前,你最好已经掌握基本的Java后端开发知识并会使用Spring boot开发框架。由于篇幅的限制,本章只讲解比较常用的代码实现,很多代码可以复用,大家可以在实际项目中举一反三。
去码云上下载本章的源代码,地址为https://gitee.com/shenzhanwang/Spring-elastic_search,然后将它导入IDE,它是一个标准的Spring boot工程,该工程的各个package说明如下:
(1)boot.spring.config:包含全局的配置类,例如允许接口跨域的配置。
(2)boot.spring.controller:包含各种后台接口的控制器。
(3)boot.spring,elastic.client:包含连接Elasticsearch的客户端配置类。
(4)boot.spring.elastic.service:包含读写Elasticsearch的通用方法服务,包含建索引、搜索和统计分析的三个服务类。
(5)boot.spring.pagemodel:包含主要用于下发到前端的对象类。
(6)boot.spring.po:包含索引字段结构的对象。
(7)boot.spring.util:包含常用的工具类。
在pom.xml中,需要引入相关的依赖:
<dependency>
  <groupId>org.elasticsearch.client</groupId>
  <artifactId>elasticsearch-rest-high-level-client</artifactId>
  <version>7.9.1</version>
</dependency>

<dependency>
  <groupId>org.elasticsearch</groupId>
  <artifactId>elasticsearch</artifactId>
  <version>7.9.1</version>
</dependency>
在包boot.spring.elastic.client中,有一个RestHighLevelClient的客户端,它会读取application.yml中的es.url,向配置的Elasticsearch地址发送请求。使用时,请把es.url的配置改为实际的地址,多个节点之间用逗号隔开。客户端配置类的代码如下:
@Configuration
public class Client {
  @Value("${es.url}")
  private String esUrl;

  @Bean
  RestHighLevelClient configRestHighLevelClient() throws Exception {
    String[] esUrlArr = esUrl.split(",");
    List<HttpHost> httpHosts = new ArrayList<>();
    for(String es : esUrlArr){
      String[] esUrlPort = es.split(":");
      httpHosts.add(new HttpHost(esUrlPort[0], Integer.parseInt(esUrlPort[1]), "http"));
    }
    return new RestHighLevelClient(RestClient.builder(httpHosts.toArray(new HttpHost[0])));
  }
}
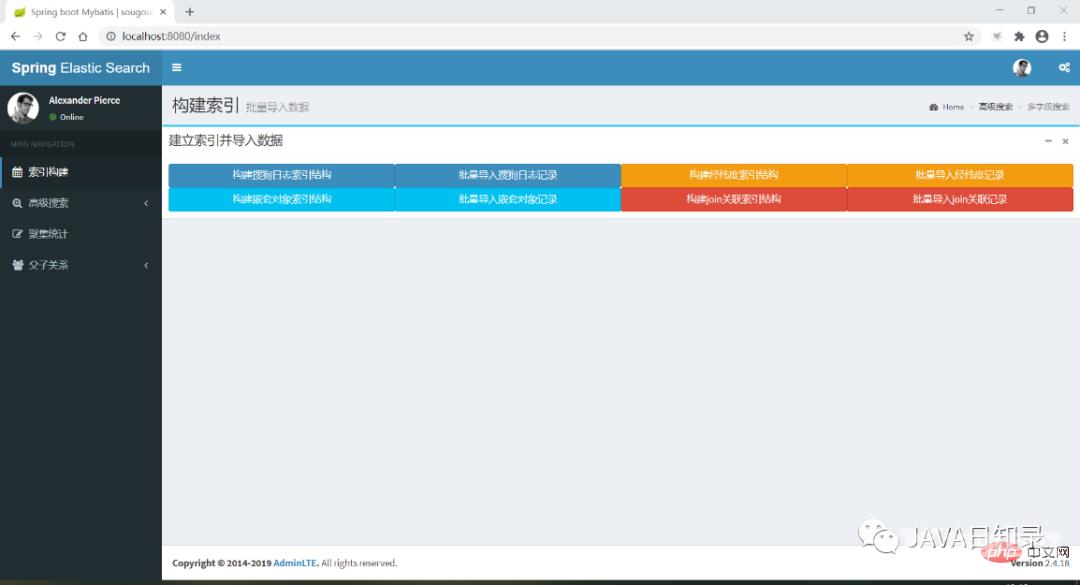
现在运行该Spring boot项目,访问http://localhost:8080/index就能进入工程的首页,界面如图8.1所示。在后面的章节中,将会陆续介绍导航菜单中的各个功能,完成索引的建立、搜索和统计分析。

本节探讨如何使用Java代码创建索引的映射并写入数据到索引,演示的实例包括四个索引:使用最细粒度分析器进行分词的索引sougoulog、包含经纬度坐标点的索引shop、包含嵌套对象的索引city、包含Join字段的索引cityjoincountry。
8.2.1 创建映射1.自定义分析器的映射sougoulog
创建sougoulog索引的映射接口在类IndexController中,你可以使用XContentBuilder对象非常优雅地创建json格式的映射,其中关键的代码如下:
@ApiOperation("创建索引sougoulog")
@RequestMapping(value="/createIndexMapping",method = RequestMethod.GET)
@ResponseBody
MSG createMapping() throws Exception{
    // 创建sougoulog索引映射
    boolean exsit = indexService.existIndex("sougoulog");
    if ( exsit == false ) {
        XContentBuilder builder = XContentFactory.jsonBuilder();
        builder.startObject();
        {
            …...
            builder.startObject("analyzer");
            {
                builder.startObject("my_analyzer");
                {
                    builder.field("filter", "my_filter");
                    builder.field("char_filter", "");
                    builder.field("type", "custom");
                    builder.field("tokenizer", "my_tokenizer");
                }
                builder.endObject();
            }
            builder.endObject();
            …...
            builder.startObject("keywords");
            {
                builder.field("type", "text");
                builder.field("analyzer", "my_analyzer");
                builder.startObject("fields");
                {
                    builder.startObject("keyword");
                    {
                        builder.field("type", "keyword");
                        builder.field("ignore_above", "256");
                    }
                    builder.endObject();
                }
                builder.endObject();
            }
            builder.endObject();
            ......
        }
        builder.endObject();
        System.out.println(builder.prettyPrint());
        indexService.createMapping("sougoulog", builder);
    }
    return new MSG("index success");
}
在这个接口中,创建的映射sougoulog包含一个名为my_tokenizer的分析器,并且将这个分析器应用到了keywords、url、userid这三个字段中,它会把这三个字段的文本切割到最细粒度,用于多文本字段搜索的功能。在接口的末尾createMapping方法会根据写好的json结构创建名为sougoulog的映射。indexService的方法createMapping的内容如下:
@Override
public void createMapping(String indexname, XContentBuilder mapping) {
  try {
    CreateIndexRequest index = new CreateIndexRequest(indexname);
    index.source(mapping);
    client.indices().create(index, RequestOptions.DEFAULT);
  } catch (IOException e) {
    // TODO Auto-generated catch block
    e.printStackTrace();
  }
}
创建映射时,需要新建一个CreateIndexRequest对象,为该对象设置XContentBuilder载入映射的具体字段信息,最后使用RestHighLevelClient对象发起构建映射的请求。
2.包含经纬度坐标的映射
下面的接口createShopMapping创建了一个名为shop的索引,里面包含一个经纬度坐标字段,其部分代码如下:
@ApiOperation("创建shop索引")
@RequestMapping(value="/createShopMapping",method = RequestMethod.GET)
@ResponseBody
MSG createShopMapping() throws Exception{
  // 创建shop索引映射
  boolean exsit = indexService.existIndex("shop");
  if ( exsit == false ) {
    XContentBuilder builder = XContentFactory.jsonBuilder();
    builder.startObject();
    {
      ……
      builder.startObject("location");
      {
       builder.field("type", "geo_point");
      }
      builder.endObject();
      ……
    }
    builder.endObject();
    System.out.println(builder.prettyPrint());
    indexService.createMapping("shop",builder);
  }
  return new MSG("index success");
}
它的实现过程跟sougoulog索引是一样的,都是先用XContentBuilder构建映射内容,然后由客户端发起CreateIndexRequest请求把索引创建出来。
3.包含嵌套对象的映射
下面的接口createCityMapping创建了一个名为city的索引,它包含一个嵌套对象,用于存放城市所属的国家数据,部分代码如下:
@ApiOperation("创建城市索引")
@RequestMapping(value="/createCityMapping",method = RequestMethod.GET)
@ResponseBody
MSG createCityMapping() throws Exception{
// 创建shop索引映射
    boolean exsit=indexService.existIndex("city");
    if(exsit==false){
        XContentBuilder builder=XContentFactory.jsonBuilder();
        builder.startObject();
        {
            ……
            builder.startObject("country");
            {
                builder.field("type","nested");
                builder.startObject("properties");
                {
                    ……
                }
                ……
                indexService.createMapping("city",builder);
            }
            return new MSG("index success");
        }
    }
}
4.包含join类型的映射
接口createJoinMapping创建一个带有join字段的索引cityjoincountry,该索引包含父关系country、子关系city,其创建方法也是类似的:
@ApiOperation("创建一对多关联索引")
@RequestMapping(value="/createJoinMapping",method = RequestMethod.GET)
@ResponseBody
MSG createJoinMapping() throws Exception {
    // 创建shop索引映射
    boolean exsit = indexService.existIndex("cityjoincountry");
    if ( exsit == false ) {
        XContentBuilder builder = XContentFactory.jsonBuilder();
        builder.startObject();
        {
            ……
            builder.startObject("joinkey");
            {
                builder.field("type", "join");
                builder.startObject("relations");
                {
                    builder.field("country", "city");
                }
                builder.endObject();
            }
            builder.endObject();
            ……
        }
        builder.endObject();
        indexService.createMapping("cityjoincountry",builder);
    }
    return new MSG("index success");
}
8.2.2 写入数据向索引写入数据的格式通常有两种,一种是使用json字符串格式,另一种是使用Hashmap对象写入各个字段。
1.使用json字符串写入一条数据
向索引写入数据的请求需要使用IndexRequest对象,它可以接收一个索引名称作为参数,通过方法id为索引指定主键,你还需要使用source方法指定传入的数据格式和数据本身的json字符串:
@ApiOperation("索引一个日志文档")
@RequestMapping(value="/indexSougoulog", method = RequestMethod.POST)
@ResponseBody
MSG indexDoc(@RequestBody Sougoulog log){
    IndexRequest indexRequest = new IndexRequest("sougoulog").id(String.valueOf(log.getId()));
    indexRequest.source(JSON.toJSONString(log), XContentType.JSON);
    try {
        client.index(indexRequest, RequestOptions.DEFAULT);
    } catch(ElasticsearchException e ) {
        if (e.status() == RestStatus.CONFLICT) {
            System.out.println("写入索引产生冲突"+e.getDetailedMessage());
        }
    } catch(IOException e) {
        e.printStackTrace();
    }
    return new MSG("index success");
}
2.使用Hashmap格式写入数据
使用Hashmap写入数据时,最大的区别是在使用source方法时,要传入Hashmap对象,在IndexServiceImpl中包含了这一方法:
@Override
public void indexDoc(String indexName, String id, Map<String, Object> doc) {
    IndexRequest indexRequest = new IndexRequest(indexName).id(id).source(doc);
    try {
        IndexResponse response = client.index(indexRequest, RequestOptions.DEFAULT);
        System.out.println("新增成功" + response.toString());
    } catch(ElasticsearchException e ) {
        if (e.status() == RestStatus.CONFLICT) {
            System.out.println("写入索引产生冲突"+e.getDetailedMessage());
        }
    } catch(IOException e) {
        e.printStackTrace();
    }
}
3.批量写入数据
批量写入数据在实际应用中更为常见,也支持json格式或Hashmap格式,需要用到批量请求对象BulkRequest。这里列出使用Hashmap批量写入数据的关键代码:
@Override
public void indexDocs(String indexName, List<Map<String, Object>> docs) {
    try {
        if (null == docs || docs.size() <= 0) {
            return;
        }
        BulkRequest request = new BulkRequest();
        for (Map<String, Object> doc : docs) {
            request.add(new IndexRequest(indexName).id((String)doc.get("key")).source(doc));
        }
        BulkResponse bulkResponse = client.bulk(request, RequestOptions.DEFAULT);
        ……
    } catch (IOException e) {
        e.printStackTrace();
    }
}
在这个方法中,传入的参数是包含多个Hashmap的列表,BulkRequest需要循环将每个Hashmap数据载入进来,最后通过客户端的bulk方法一次性提交写入所有的数据。
实际上,四个索引的数据导入都是采用Hashmap格式进行批量导入,数据源在resources文件夹下,有四个txt文件,有四个接口会分别读取这四个文本文件导入到对应的索引中。当你在写入嵌套对象的字段时,你需要将嵌入的文本作为一个单独的Hashmap来写入。
4.写入带有路由的数据
当你想为join字段写入数据时,需要先写入父文档,再写入子文档,并且写入子文档时会带有路由参数,写入数据时,需要给indexRequest对象设置routing参数来指定路由,关键的代码如下:
@Override
public void indexDocWithRouting(String indexName, String route, Map<String, Object> doc) {
    IndexRequest indexRequest = new IndexRequest(indexName).id((String)doc
    .get("key")).source(doc);
    indexRequest.routing(route);
    try {
        IndexResponse response = client.index(indexRequest, RequestOptions.DEFAULT);
        System.out.println("新增成功" + response.toString());
    } catch(ElasticsearchException e ) {
        if (e.status() == RestStatus.CONFLICT) {
            System.out.println("写入索引产生冲突"+e.getDetailedMessage());
        }
    } catch(IOException e) {
        e.printStackTrace();
    }
}
5.修改数据
修改数据的请求需要使用UpdateRequest对象来实现,该对象需要指定修改数据的主键,如果主键不存在则会报错。为了达到upsert的效果,也就是主键不存在时执行添加操作,需要设置docAsUpsert参数为true。最后调用客户端的update方法即可更新成功:
@Override
public void updateDoc(String indexName, String id, Map<String, Object> doc) {
    UpdateRequest request = new UpdateRequest(indexName, id).doc(doc);
    request.docAsUpsert(true);
    try {
        UpdateResponse updateResponse = client.update(request, RequestOptions.DEFAULT);
        long version = updateResponse.getVersion();
        if (updateResponse.getResult() == DocWriteResponse.Result.CREATED) {
            System.out.println("insert success, version is " + version);
        } else if (updateResponse.getResult() == DocWriteResponse.Result.UPDATED) {
            System.out.println("update success, version is " + version);
        }
    } catch (IOException e) {
        // TODO Auto-generated catch block
        e.printStackTrace();
    }
}
6.删除数据
要删除数据,需要使用DeleteRequest对象,传入索引的名称和主键,调用客户端的删除方法即可,代码如下:
@Override
public int deleteDoc(String indexName, String id) {
    DeleteResponse deleteResponse = null;
    DeleteRequest request = new DeleteRequest(indexName, id);
    try {
        deleteResponse = client.delete(request, RequestOptions.DEFAULT);
        System.out.println("删除成功" + deleteResponse.toString());
        if (deleteResponse.getResult() == DocWriteResponse.Result.NOT_FOUND) {
            System.out.println("删除失败,文档不存在" + deleteResponse.toString());
            return -1;
        }
    } catch (ElasticsearchException e) {
        if (e.status() == RestStatus.CONFLICT) {
            System.out.println("删除失败,版本号冲突" + deleteResponse.toString());
            return -2;
        }
    } catch (IOException e) {
        e.printStackTrace();
        return -3;
    }
    return 1;
}
