Python 学习手册
【学习线路】
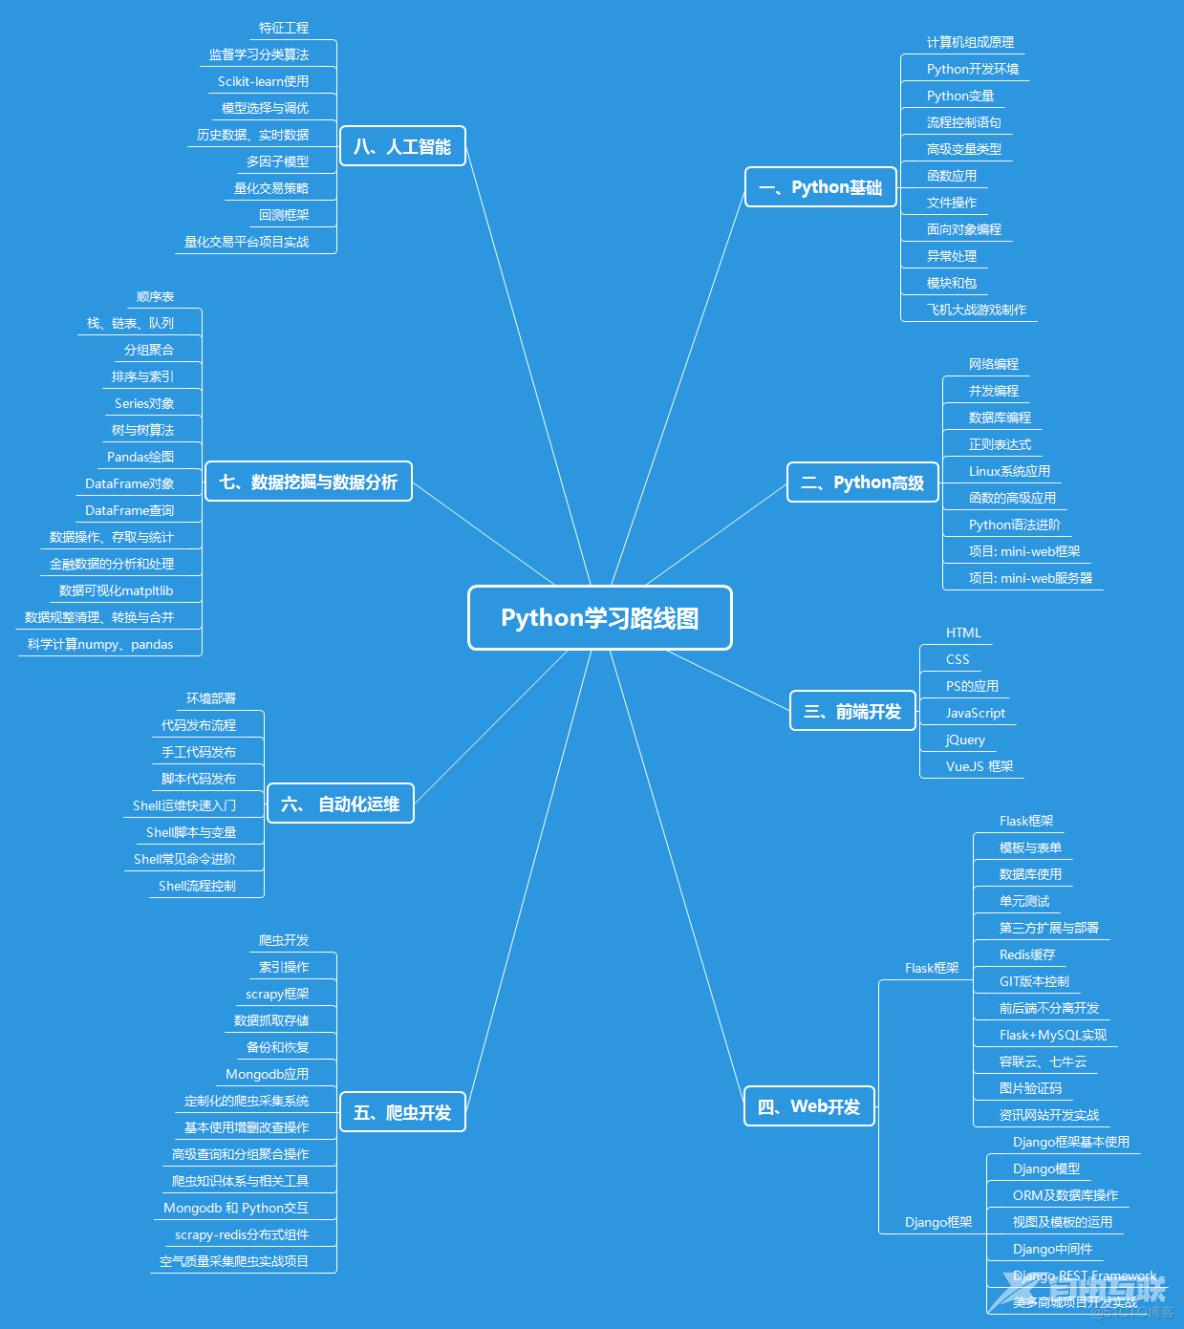
【学习线路图】
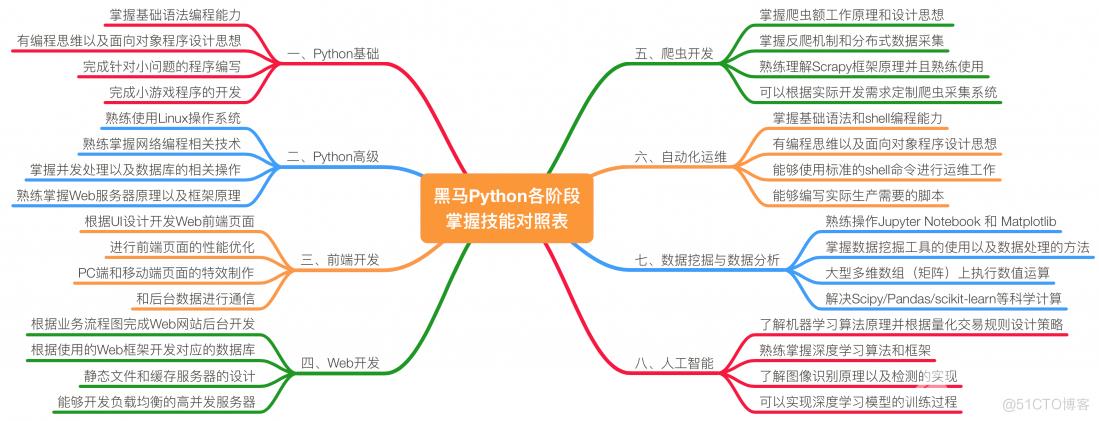
【技能对照表】
一、容器
- 列表(list)
- 元组(tuple)
- 集合(set)
- 字典(dict)
1、列表
线性表:
- 数组:连续内存的实现
- 栈:先进后出,后进先出
- 队列:先进先出,后进后出
- 链表:
- 单向链表:尾指针指向首地址
- 双向链表:收尾指向
- [ ] Python 没有数组,数组查询速度快,增删改查效率慢
- [ ] Python 的列表是基于双向链表实现,列表查询速度慢,增删改查速度快。
- [ ] 列表底层是基于双向链表实现的,里面的元素的有序的、可以重复的。
(1)列表的定义
# 若数据类型语言
>>> ls = [1, 2, 'zhangwanqiang', 'man']
>>> type(ls)
<class 'list'>
>>> ls
[1, 2, 'zhangwanqiang', 'man']

# 全局函数
>>> ls1 = list(['zhangwanqiag', 18, 'man'])
>>> type(ls1)
<class 'list'>
>>> ls1
['zhangwanqiag', 18, 'man']
(2)元素的访问
>>> ls1
['zhangwanqiag', 18, 'man']
>>> ls[1]
2
>>> ls1[2]
'man'
全局函数:
>>> ls1[2]
'man'
>>> len(ls)
4
>>> len(ls1)
3
(3)遍历列表
>>> for i in ls:
...     print(i)
...
1
2
zhangwanqiang
man
>>>
>>>
>>> index = 0
>>> while index < len(ls):
...     print(ls[index])
...     index += 1
...
1
2
zhangwanqiang
man
(4)列表的常见方法
--- append # 列表尾部插入元素
>>> ls
[1, 2, 'zhangwanqiang', 1]
>>> ls.append('man')
>>> ls
[1, 2, 'zhangwanqiang', 1, 'man']

--- insert # 指定位置插入元素
>>> ls
[1, 2, 'zhangwanqiang', 1, 'man']
>>> ls.insert(2, 'good')
>>> ls
[1, 2, 'good', 'zhangwanqiang', 1, 'man']

--- sort # 对列表元素进行排序
>>> ls2 = [21, 45, 32, 100]
>>> ls3 = ['s', 'k', 'r', 's', 'a', 'g']
>>> ls2.sort()
>>> ls3.sort()
>>> ls2
[21, 32, 45, 100]
>>> ls3
['a', 'g', 'k', 'r', 's', 's']

--- index # 查看指定元素索引位置
>>> ls
[1, 2, 'good', 'zhangwanqiang', 1, 'man']
>>> ls.index(1)
0

--- reverse # 反转列表元素
>>> ls
[1, 2, 'good', 'zhangwanqiang', 1, 'man']
>>> ls.reverse()
>>> ls
['man', 1, 'zhangwanqiang', 'good', 2, 1]

--- remove # 移除指定元素
>>> ls
['man', 1, 'zhangwanqiang', 'good', 2, 1]
>>> ls.remove('good')
>>> ls
['man', 1, 'zhangwanqiang', 2, 1]

--- count # 统计列表元素个数
>>> ls
['man', 1, 'zhangwanqiang', 2, 1]
>>> ls.count(1)
2

--- clear # 清除列表
>>> ls1
['zhangwanqiag', 18, 'man']
>>> ls1.clear()
>>> ls1
[]

--- copy  # 浅拷贝
>>> ls
['man', 1, 'zhangwanqiang', 2, 1]
>>> ls10 = ls.copy()
>>> ls10
['man', 1, 'zhangwanqiang', 2, 1]
>>> ls.append(123456)
>>> ls
['man', 1, 'zhangwanqiang', 2, 1, 123456]
>>> ls10
['man', 1, 'zhangwanqiang', 2, 1]

--- extend # 合并列表
>>> ls2
[21, 32, 45, 100]
>>> ls3
['a', 'g', 'k', 'r', 's', 's']
>>> ls2.extend(ls3)
>>> ls2
[21, 32, 45, 100, 'a', 'g', 'k', 'r', 's', 's']
>>> ls3
['a', 'g', 'k', 'r', 's', 's']

--- 删除最后一个元素
>>>
>>> ls3
['a', 'g', 'k', 'r', 's', 's']
>>> ls3.pop()
's'
>>> ls
['man', 1, 'zhangwanqiang', 2, 1, 123456]
2、元组
元组的特点:
- 有序的、可重复的。
- 固定的,一旦定义了元素不可改变。
(1)元组的创建
--- 若数据类型语言
>>> t = (1, 2, 3, 'zhang')
>>> type(t)
<class 'tuple'>

--- 全局函数
>>> tt = tuple((1,45,76, 'wan', 'qiang'))
>>> type(tt)
<class 'tuple'>
(2)常见方法
>>> t
(1, 2, 3, 'zhang')
--- index # 查看元素的索引位置
>>> t.index(3)
2
---- count # 查看元素的个数
>>> t.count(1)
1
3、集合
- [ ] 集合底层是基于hash表实现的,里面的元素是唯一的、无序的。
(1)集合的创建
--- 若数据类型
 s = set({1, 3, 'zhang', 34})
>>> type(s)
<class 'set'>

--- 全局函数
>>> ss = {22, 'wan'}
>>> type(ss)
<class 'set'>
(2)集合的常见方法
--- clear # 清除集合中的元素
--- remove # 移除集合中指定的元素
--- copy # 浅拷贝

--- add # 集合中插入元素
>>> s
{1, 34, 3, 'zhang'}
>>> s.add(10101)
>>> s
{1, 34, 3, 'zhang', 10101}

--- difference # 差集
>>> s
{1, 34, 3, 2, 'zhang', 10101}
>>> ss
{1, 2, 3, 22, 'wan'}
>>> ss.difference(s)
{'wan', 22}

--- intersection # 交集
>>> s
{1, 34, 3, 2, 'zhang', 10101}
>>> ss
{1, 2, 3, 22, 'wan'}
>>> ss.intersection(s)
{1, 2, 3}

--- union # 并集
>>> s
{1, 34, 3, 2, 'zhang', 10101}
>>> ss
{1, 2, 3, 22, 'wan'}
>>> ss.union(s)
{1, 2, 3, 34, 'zhang', 10101, 22, 'wan'}

--- 合并元素
>>> s
{1, 34, 3, 2, 'zhang', 10101}
>>> ss
{1, 2, 3, 22, 'wan'}
>>> s.update(ss)
>>> s
{1, 34, 3, 2, 'zhang', 10101, 22, 'wan'}
>>> ss
{1, 2, 3, 22, 'wan'}

--- 移除元素
>>> s
{1, 34, 3, 2, 'zhang', 10101, 22, 'wan'}
>>> s.discard('wan')
>>> s
{1, 34, 3, 2, 'zhang', 10101, 22}
>>> s.discard('wan')
>>> s
{1, 34, 3, 2, 'zhang', 10101, 22}
4、字典
特点:
- 键值对的方式存储
(1)字典的创建
--- 若数据类型
>>> d = {'name':'z3', 'age':'17', 'gender':'man'}
>>> type(d)
<class 'dict'>

--- 全局函数
>>> dd = dict({'name':'lisi', 'age':'16', 'gender':'g'})
>>> type(dd)
<class 'dict'>
(2)元素的访问
>>> d['name']
'z3'
(3)常见方法
--- clean # 清除元素
--- copy # 浅拷贝
--- get # 返回key对应的值
>>> d
{'name': '456', 'age': '17', 'gender': 'man', 'niu': '666'}
>>> d.get('name')
'456'

--- keys # 返回所有的键
>>> d
{'name': '456', 'age': '17', 'gender': 'man', 'niu': '666'}
>>> d.keys()
dict_keys(['name', 'age', 'gender', 'niu'])

--- values # 返回所有的值
>>> d
{'name': '456', 'age': '17', 'gender': 'man', 'niu': '666'}
>>> d.values()
dict_values(['456', '17', 'man', '666'])

--- items # 返回一个键值对
>>> d
{'name': '456', 'age': '17', 'gender': 'man', 'niu': '666'}
>>> d.items()
dict_items([('name', '456'), ('age', '17'), ('gender', 'man'), ('niu', '666')])

--- pop # 删除key对应的键值对
>>> d
{'name': '456', 'age': '17', 'gender': 'man', 'niu': '666'}
>>> d.pop('gender')
'man'
>>> d
{'name': '456', 'age': '17', 'niu': '666'}

--- popitem # 移除一个键值对,移除规则是(LIFO)
{'name': '456', 'age': '17', 'niu': '666'}
>>> d.popitem()
('niu', '666')
>>> d
{'name': '456', 'age': '17'}
(4)遍历元素
--- 方法一
>>> d
{'name': '456', 'age': '17'}
{'name': '456', 'age': '17'}
>>> for key in d:
...     print(key, d.get(key))
...
name 456
age 17

--- 方法二
>>> d
{'name': '456', 'age': '17'}
>>> for key in d.keys():
...     print(key, d.get(key))
...
name 456
age 17

--- 方法三
>>> d
{'name': '456', 'age': '17'}
>>> for k, v in d.items():
...     print(k, v)
...
name 456
age 17
二、字符串
1、字符串的创建
--- 弱数据类型
>>> s = 'hello python'
>>> type(s)
<class 'str'>

>>> ss = "i am zhangwanqiang"
>>> type(ss)
<class 'str'>

>>> sss = """i am a boy"""
>>> type(sss)
<class 'str'>

--- 全局函数
>>> ssss = str("this is a string")
>>> type(ssss)
<class 'str'>
2、字符串的常见方法
>>> ss
'i am zhangwanqiang'
>>> dir(ss)
['capitalize', 'casefold', 'center', 'count', 'encode', 'endswith', 'expandtabs', 'find', 'format', 'format_map', 'index', 'isalnum', 'isalpha', 'isascii', 'isdecimal', 'isdigit', 'isidentifier', 'islower', 'isnumeric', 'isprintable', 'isspace', 'istitle', 'isupper', 'join', 'ljust', 'lower', 'lstrip', 'maketrans', 'partition', 'replace', 'rfind', 'rindex', 'rjust', 'rpartition', 'rsplit', 'rstrip', 'split', 'splitlines', 'startswith', 'strip', 'swapcase', 'title', 'translate', 'upper', 'zfill']

--- capitalize # 首字母大写
>>> ss
'i am zhangwanqiang'
>>> ss.capitalize()
'I am zhangwanqiang'

--- center #字符串居中
>>> ss
'i am zhangwanqiang'
>>> ss.center(100, "8")
'88888888888888888888888888888888888888888i am zhangwanqiang88888888888888888888888888888888888888888'

--- strip # 取出字符串两侧的空格
>>> ss
'        hello python             '
>>> ss.strip()
'hello python'

--- lstrip # 字符串左对齐
>>> ss
'        hello python             '
>>> ss.lstrip()
'hello python             '

--- rstrip # 字符串右对齐
>>> ss
'        hello python             '
>>> ss.rstrip()
'        hello python'

--- count # 统计字符或者字符串出现的个数
>>> ss
'i am zhangwanqiang'
>>> ss.count("a")
4

--- endswith # 判断字符或者字符串是否在字符串尾部
>>> ss
'i am zhangwanqiang'
>>> ss.endswith("ang")
True
>>> ss.endswith("wan")
False

--- startswith 判断字符或者字符串是否在字符串首部
>>> ss
'i am zhangwanqiang'
>>> ss.startswith("i")
True
>>> ss.startswith("an")
False
>>> ss.startswith("am")
False

--- index、rindex # 返回字符或者字符串的索引位置(不存在抛出异常)
>>> ss
'i am zhangwanqiang'
>>> ss.index("a")
2
>>> ss.rindex("a")
15

--- find、rfind # 返回字符或者字符串的索引位置(不存在返回-1)
>>> ss
'i am zhangwanqiang'
>>> ss.find("a")
2
>>> ss.rfind("a")
15

--- encode # 将字符串转换为字节
>>> ss
'i am zhangwanqiang'
>>> tt = ss.encode("utf-8")
>>> tt
b'i am zhangwanqiang'
>>> type(tt)
<class 'bytes'>

# 字节转换为字符串
>>> tt
b'i am zhangwanqiang'
>>> type(tt)
<class 'bytes'>
>>> dd = tt.decode("utf-8")
>>> dd
'i am zhangwanqiang'
>>> type(dd)
<class 'str'>

--- format # 格式化字符串
>>> num1 = 123
>>> num2 = 321
>>> print("num = {}, num = {}".format(num1, num2))
num = 123, num = 321

--- islower # 判断字符串是否为小写字母
>>> s
'abcde'
>>> ss
'ABCDE'
>>> s.islower()
True
>>> ss.islower()
False

--- isupper # 判断字符串是否为大写字母
>>> s
'abcde'
>>> ss
'ABCDE'
>>> s.isupper()
False
>>> ss.isupper()
True

--- istitle # 判断字符串是否为标题
>>> aa
'This Is A Boy'
>>> aa.istitle()
True

--- isdigit # 判断字符串是否为数字
>>> bb = '123456'
>>> bb.isdigit()
True

--- isalpha # 判断字符串是否为字母
>>> s
'abcde'
>>> s.isalpha()
True

--- isalnum # 判断字符串是否为有效符号
>>> s
'abcde'
>>> ss
'xs23ecc3*^%'
>>> s.isalnum()
True
>>> ss.isalnum()
False

--- isspace # 判断字符串是否为空格
>>> aa
'This Is A Boy'
>>> bb
'        '
>>> aa.isspace()
False
>>> bb.isspace()
True

--- title # 将字符串转换为标题
>>> aa
'i am a boy'
>>> aa.title()
'I Am A Boy'

--- 将字符串转换为大写
>>> aa
'i am a boy'
>>> aa.upper()
'I AM A BOY'

--- 将字符串转换为小写
>>> bb
'THIA IA A NUM'
>>> bb.lower()
'thia ia a num'


--- split # 将字符串切成列表
'i am a good boy'
>>> aa.split(' ')
['i', 'am', 'a', 'good', 'boy']

--- join # 将可迭代对象拼接成字符串
>>> bb
['i', 'am', 'a', 'good', 'boy']
>>> ' '.join(bb)
'i am a good boy'

--- 替换字符串中的字符串
>>> aa
'i am a good boy'
>>> aa.replace('boy', 'girl')
'i am a good girl'
3、字符串的切片
>>> ls
[112, 3, 'good', 'yesr', 242, True]
>>> ls[3:]
['yesr', 242, True]

>>> ls
[112, 3, 'good', 'yesr', 242, True]
>>> ls[1:4]
[3, 'good', 'yesr']

>>> ls
[112, 3, 'good', 'yesr', 242, True]
>>> ls[1:5:2]
[3, 'yesr']

>>> ls
[112, 3, 'good', 'yesr', 242, True]
>>> ls[::-1]
[True, 242, 'yesr', 'good', 3, 112]

>>> ls
[112, 3, 'good', 'yesr', 242, True]
>>> ls[-1:-5:-1]
[True, 242, 'yesr', 'good']
使用切片去切割数据,如果超越了下标不会报错,会返回一个空列表[]
练习:
已知一个字符串路径,如:D:\\上课.视频\\python\\Python.脱产班\\01.Python的环境安装.mp4请使用字符串和切片技术奖该路径的文件后缀名取出来。
--- 方法一
>>> ll
'D:\\上课.视频\\python\\Python.脱产班\\01.Python的环境安装.mp4'
>>> tt = ll.split()
>>> tt
['D:\\上课', '视频\\python\\Python', '脱产班\\01', 'Python的环境安装', 'mp4']
>>> tt[len(tt) -1]
'mp4'

--- 方法二
>>> ll
'D:\\上课.视频\\python\\Python.脱产班\\01.Python的环境安装.mp4'
>>> ll[ll.rfind(".") +1:]
'mp4'
三、全局函数
>>> import builtins
>>> dir(builtins)
['abs', 'all', 'any', 'ascii', 'bin', 'bool', 'breakpoint', 'bytearray', 'bytes', 'callable', 'chr', 'classmethod', 'compile', 'complex', 'copyright', 'credits', 'delattr', 'dict', 'dir', 'divmod', 'enumerate', 'eval', 'exec', 'exit', 'filter', 'float', 'format', 'frozenset', 'getattr', 'globals', 'hasattr', 'hash', 'help', 'hex', 'id', 'input', 'int', 'isinstance', 'issubclass', 'iter', 'len', 'license', 'list', 'locals', 'map', 'max', 'memoryview', 'min', 'next', 'object', 'oct', 'open', 'ord', 'pow', 'print', 'property', 'quit', 'range', 'repr', 'reversed', 'round', 'set', 'setattr', 'slice', 'sorted', 'staticmethod', 'str', 'sum', 'super', 'tuple', 'type', 'vars', 'zip']
四、系统内置模块
常见的模块
- random
- math
- datetime
- time
- os
- os.path
- sys
- hashlib
- hmac ... ...
模块的导入
>>> import os
>>> import hashlib [as hash]
>>> import http.server [as ser]
>>> from http import client [as cli]
1、random
作用:产生随机数
>>> import random
>>> dir(random)
['betavariate', 'choice', 'choices', 'expovariate', 'gammavariate', 'gauss', 'getrandbits', 'getstate', 'lognormvariate', 'normalvariate', 'paretovariate', 'randint', 'random', 'randrange', 'sample', 'seed', 'setstate', 'shuffle', 'triangular', 'uniform', 'vonmisesvariate', 'weibullvariate']
>>> random.randint(5, 10)      # 产生5--10之间的整数
8
>>> random.random()            # 产生0--1之间的整数
0.2718111326910797
>>> random.uniform(5, 10)      # 产生一个范围的正态分布的数
7.911538309334022
>>> ls = ['hello', 123, True, 4533]
>>> random.choice(ls)          # 在序列(seq)中随机筛选一个元素
'hello'
2、math
作用:用于数学计算
>>> import math
>>> dir(math)
['acos', 'acosh', 'asin', 'asinh', 'atan', 'atan2', 'atanh', 'ceil', 'comb', 'copysign', 'cos', 'cosh', 'degrees', 'dist', 'e', 'erf', 'erfc', 'exp', 'expm1', 'fabs', 'factorial', 'floor', 'fmod', 'frexp', 'fsum', 'gamma', 'gcd', 'hypot', 'inf', 'isclose', 'isfinite', 'isinf', 'isnan', 'isqrt', 'ldexp', 'lgamma', 'log', 'log10', 'log1p', 'log2', 'modf', 'nan', 'perm', 'pi', 'pow', 'prod', 'radians', 'remainder', 'sin', 'sinh', 'sqrt', 'tan', 'tanh', 'tau', 'trunc']
>>> math.ceil(3.0000000001)   # 向上取整
4
>>> math.floor(3.0000000001)  # 向下取整
3
>>> math.fabs(-7)             # 求绝对值
7.0
>>> math.fmod(10, 3)          # 求模
1.0
>>> math.isnan(1)             # 判断一个数不是数字
False
>>> math.isfinite(5)          # 判断是否为数字(整数/浮点数,有限,无限或NaN),则返回True既不是无穷大也不是NaN(不是数字),否则返回False
True
>>> math.isfinite(math.e)
True
>>> math.pi                   # 取圆周率
3.141592653589793
>>> math.e                    # 自然常数
2.718281828459045
>>> math.pow(2, 3)            # 幂次方运算
8.0
>>> math.sqrt(7)              # 开平方根
2.6457513110645907
3、os
作业:操作系统文件系统
>>> dir(os)
['abc', 'abort', 'access', 'add_dll_directory', 'altsep', 'chdir', 'chmod', 'close', 'closerange', 'cpu_count', 'curdir', 'defpath', 'device_encoding', 'devnull', 'dup', 'dup2', 'environ', 'error', 'execl', 'execle', 'execlp', 'execlpe', 'execv', 'execve', 'execvp', 'execvpe', 'extsep', 'fdopen', 'fsdecode', 'fsencode', 'fspath', 'fstat', 'fsync', 'ftruncate', 'get_exec_path', 'get_handle_inheritable', 'get_inheritable', 'get_terminal_size', 'getcwd', 'getcwdb', 'getenv', 'getlogin', 'getpid', 'getppid', 'isatty', 'kill', 'linesep', 'link', 'listdir', 'lseek', 'lstat', 'makedirs', 'mkdir', 'name', 'open', 'pardir', 'path', 'pathsep', 'pipe', 'popen', 'putenv', 'read', 'readlink', 'remove', 'removedirs', 'rename', 'renames', 'replace', 'rmdir', 'scandir', 'sep', 'set_handle_inheritable', 'set_inheritable', 'spawnl', 'spawnle', 'spawnv', 'spawnve', 'st', 'startfile', 'stat', 'stat_result', 'statvfs_result', 'strerror', 'supports_bytes_environ', 'supports_dir_fd', 'supports_effective_ids', 'supports_fd', 'supports_follow_symlinks', 'symlink', 'sys', 'system', 'terminal_size', 'times', 'times_result', 'truncate', 'umask', 'uname_result', 'unlink', 'urandom', 'utime', 'waitpid', 'walk', 'write']
>>> os.system('cls')                       # 执行操作系统命令
0
>>> os.curdir                              # 返回当前目录(相对)
'.'
>>> os.path.abspath(os.curdir)             # 返回当前目录(绝对)
'C:\\Windows\\system32'
>>> os.chdir("C:\\ProgramData\\NVIDIA")    # 切换工作目录
>>> os.path.abspath(os.curdir)
'C:\\ProgramData\\NVIDIA'
>>> os.cpu_count()                         # 统计计算机cpu线程数
8
>>> os.getcwd()                            # 返回当前绝对路径
'C:\\ProgramData\\NVIDIA'
getpid()                             # 获取当前进程的进程编号
getppid()                              # 获取当前进程的父进程的编程
kill()                                 # 通过进程编号杀死进程
>>> os.linesep                             # 查看操作系统换行符
'\r\n'
>>> os.listdir()                           # 查看当前目录下文件夹以及文件
['.jetbrains', 'AccountPictures', 'Desktop', 'desktop.ini', 'Documents', 'Downloads', 'Foxit Software', 'Libraries', 'Music', 'Nwt', 'Pictures', 'SogouInput', 'Thunder Network', 'Videos']
>>> os.mkdir("C:\\Users\\Public\\wan")     # 创建目录,仅支持创建一层目录
>>> os.makedirs("C:\\Users\\Public\\wan\\a\\b\\c\\d")      # 创建目录,仅支持递归创建
open()                     # 打开文件
>>> os.pathsep                            # 查看系统环境变量分隔符
';'
>>> os.sep                                # 查看系统路径的分隔符
'\\'
>>> os.remove("wan.txt")                  # 删除指定文件
>>> os.removedirs('wan')               # 删除指定目录(支持多级删除)
4、os.path
作用:用于获取文件的属性
>>> import os.path as p
>>> dir(p)
['abspath', 'altsep', 'basename', 'commonpath', 'commonprefix', 'curdir', 'defpath', 'devnull', 'dirname', 'exists', 'expanduser', 'expandvars', 'extsep', 'genericpath', 'getatime', 'getctime', 'getmtime', 'getsize', 'isabs', 'isdir', 'isfile', 'islink', 'ismount', 'join', 'lexists', 'normcase', 'normpath', 'os', 'pardir', 'pathsep', 'realpath', 'relpath', 'samefile', 'sameopenfile', 'samestat', 'sep', 'split', 'splitdrive', 'splitext', 'stat', 'supports_unicode_filenames', 'sys']
>>> p.abspath('.')               # 返回路径的绝对路径
'C:\\Users\\DELL'
>>> p.realpath('.')              # 返回路径的绝对路径
'C:\\Windows\\System32'
>>> help(p.altsep)               # 用来查看python中各种符号
Operator precedence
*******************

The following table summarizes the operator precedence in Python, from
lowest precedence (least binding) to highest precedence (most
binding).  Operators in the same box have the same precedence.  Unless
the syntax is explicitly given, operators are binary.  Operators in
the same box group left to right (except for exponentiation, which
groups from right to left).

Note that comparisons, membership tests, and identity tests, all have
the same precedence and have a left-to-right chaining feature as
described in the Comparisons section.

+-------------------------------------------------+---------------------------------------+
| Operator                                        | Description                           |
|=================================================|=======================================|
| ":="                                            | Assignment expression                 |
+-------------------------------------------------+---------------------------------------+
| "lambda"                                        | Lambda expression                     |
+-------------------------------------------------+---------------------------------------+
| "if" – "else"                                   | Conditional expression                |
+-------------------------------------------------+---------------------------------------+
| "or"                                            | Boolean OR                            |
+-------------------------------------------------+---------------------------------------+
| "and"                                           | Boolean AND                           |
+-------------------------------------------------+---------------------------------------+
| "not" "x"                                       | Boolean NOT                           |
+-------------------------------------------------+---------------------------------------+
| "in", "not in", "is", "is not", "<", "<=", ">", | Comparisons, including membership     |
| ">=", "!=", "=="                                | tests and identity tests              |
+-------------------------------------------------+---------------------------------------+
| "|"                                             | Bitwise OR                            |
+-------------------------------------------------+---------------------------------------+
| "^"                                             | Bitwise XOR                           |
+-------------------------------------------------+---------------------------------------+
| "&"                                             | Bitwise AND                           |
+-------------------------------------------------+---------------------------------------+
| "<<", ">>"                                      | Shifts                                |
+-------------------------------------------------+---------------------------------------+
| "+", "-"                                        | Addition and subtraction              |
+-------------------------------------------------+---------------------------------------+
| "*", "@", "/", "//", "%"                        | Multiplication, matrix                |
|                                                 | multiplication, division, floor       |
|                                                 | division, remainder [5]               |
+-------------------------------------------------+---------------------------------------+
| "+x", "-x", "~x"                                | Positive, negative, bitwise NOT       |
+-------------------------------------------------+---------------------------------------+
| "**"                                            | Exponentiation [6]                    |
+-------------------------------------------------+---------------------------------------+
| "await" "x"                                     | Await expression                      |
+-------------------------------------------------+---------------------------------------+
| "x[index]", "x[index:index]",                   | Subscription, slicing, call,          |
| "x(arguments...)", "x.attribute"                | attribute reference                   |
+-------------------------------------------------+---------------------------------------+
| "(expressions...)",  "[expressions...]", "{key: | Binding or parenthesized expression,  |
| value...}", "{expressions...}"                  | list display, dictionary display, set |
|                                                 | display                               |
+-------------------------------------------------+---------------------------------------+
... ...

>>> p.basename('E:\\openlab--Training\\Python--刘建宏\\3.26\\遍历磁盘.py')     # 获取文件名
'遍历磁盘.py'
>>> p.dirname('E:\\openlab--Training\\Python--刘建宏\\3.26\\遍历磁盘.py')      # 获取路径
'E:\\openlab--Training\\Python--刘建宏\\3.26'
>>> p.curdir                                # 返回相对路径
'.'
>>> p.exists('E:\\openlab--Training\\Python--刘建宏\\3.26\\遍历磁盘.py')       # 判断目录或者文件是否存在
True
>>> p.getctime('E:\\openlab--Training\\Python--刘建宏\\3.26\\遍历磁盘.py')     # 获取文件的创建时间
1585210654.3121617
>>> p.getmtime('E:\\openlab--Training\\Python--刘建宏\\3.26\\遍历磁盘.py')    # 获取文件内容修改时间
1585210653.45535
>>> p.getatime('E:\\openlab--Training\\Python--刘建宏\\3.26\\遍历磁盘.py')     # 获取文件的元数据修改时间
1627211302.8820622
>>> p.getsize('E:\\openlab--Training\\Python--刘建宏\\3.26\\遍历磁盘.py')      # 获取文件或者文件夹字节大小
684
>>> p.isdir('E:\\openlab--Training\\Python--刘建宏\\3.26\\')                  # 判断是否为目录
True
>>> p.isfile('E:\\openlab--Training\\Python--刘建宏\\3.26\\遍历磁盘.py')       # 判断是否为文件
True
>>> p.isabs('E:\\openlab--Training\\Python--刘建宏\\3.26\\')                  # 判断是否为绝对路径
True
islink                                     # 判断是否为链接文件
ismount                                    # 判断是否为挂载文件
>>> file_name = 'wan.txt'                               # 拼接文件路径和文件名
>>> url = 'c:/user/system/info/'
>>> p.join(url, file_name)
'c:/user/system/info/wan.txt'
>>> p.sep                                   # 查看路径分隔符
'\\'
>>> p.split('E:\\openlab--Training\\Python--刘建宏\\3.26\\遍历磁盘.py')        # 返回文件的路径和文件名(元组)
('E:\\openlab--Training\\Python--刘建宏\\3.26', '遍历磁盘.py')
练习
import os
from os import path


def scanner_file(url):
    files = os.listdir(url)
    for f in files:
        # real_path = url + "\\" + f
        # real_path = path.join(url, f)
        real_path = path.join(url, f)
        if path.isfile(real_path):
            print(path.abspath(real_path))
        elif path.isdir(real_path):
            scanner_file(real_path)
        else:
            print("其他情况")


scanner_file("D:\\软件安装包")
5、sys
作用:提供了许多函数和变量来处理 Python 运行时环境的不同部分
>>> import sys
>>> dir(sys)
['addaudithook', 'api_version', 'argv', 'audit', 'base_exec_prefix', 'base_prefix', 'breakpointhook', 'builtin_module_names', 'byteorder', 'call_tracing', 'callstats', 'copyright', 'displayhook', 'dllhandle', 'dont_write_bytecode', 'exc_info', 'excepthook', 'exec_prefix', 'executable', 'exit', 'flags', 'float_info', 'float_repr_style', 'get_asyncgen_hooks', 'get_coroutine_origin_tracking_depth', 'getallocatedblocks', 'getcheckinterval', 'getdefaultencoding', 'getfilesystemencodeerrors', 'getfilesystemencoding', 'getprofile', 'getrecursionlimit', 'getrefcount', 'getsizeof', 'getswitchinterval', 'gettrace', 'getwindowsversion', 'hash_info', 'hexversion', 'implementation', 'int_info', 'intern', 'is_finalizing', 'maxsize', 'maxunicode', 'meta_path', 'modules', 'path', 'path_hooks', 'path_importer_cache', 'platform', 'prefix', 'ps1', 'ps2', 'pycache_prefix', 'set_asyncgen_hooks', 'set_coroutine_origin_tracking_depth', 'setcheckinterval', 'setprofile', 'setrecursionlimit', 'setswitchinterval', 'settrace', 'stderr', 'stdin', 'stdout', 'thread_info', 'unraisablehook', 'version', 'version_info', 'warnoptions', 'winver']
>>> sys.api_version          # 查看Python内部版本号
1013
>>> sys.argv                        # 接受脚本参数,第一个参数是脚本名(类似于shell位置变量)
['']
>>> sys.copyright          # 查看Python版权信息
'Copyright (c) 2001-2020 Python Software Foundation.\nAll Rights Reserved.\n\nCopyright (c) 2000 BeOpen.com.\nAll Rights Reserved.\n\nCopyright (c) 1995-2001 Corporation for National Research Initiatives.\nAll Rights Reserved.\n\nCopyright (c) 1991-1995 Stichting Mathematisch Centrum, Amsterdam.\nAll Rights Reserved.'
>>> sys.exit()           # 退出系统

C:\Windows\system32>
>>> sys.getdefaultencoding()   # 获取解释器编码
'utf-8'
>>> sys.getfilesystemencoding()    # 获取文件系统编码
'utf-8'
>>> sys.getrecursionlimit()      # 获取Python递归限制层数(默认1000层)
1000
>>> sys.setrecursionlimit(8000)    # 设置Python递归限制层数
>>> sys.getrecursionlimit()
8000
>>> s = [1, 2, 3, 4]       # 获取Python对象的引用计数
>>> sys.getrefcount(s)
2
>>> ss = s
>>> sys.getrefcount(s)
3
>>> sys.getwindowsversion()      # 获取窗口大小
sys.getwindowsversion(major=10, minor=0, build=18363, platform=2, service_pack='')
>>> sys.version            # 获取Python版本信息
'3.8.2 (tags/v3.8.2:7b3ab59, Feb 25 2020, 23:03:10) [MSC v.1916 64 bit (AMD64)]'
>>> sys.version_info       # 获取Python版本信息
sys.version_info(major=3, minor=8, micro=2, releaselevel='final', serial=0)
Python的垃圾回收原理:引用计数为主,以标记清除和分带收集为辅
6、hashlib
作用:hash加密
算法分类:
按照算法是否可逆分类
- 可逆算法
- 对称加密算法
加密与解密使用同一把秘钥
DES
SEDS
AES
IDEA - 非对称加密算法
加密与解密使用不同的秘钥(公钥/私钥)
RSA
DH
DSA
EC
- 非可逆算法
特地:不可逆行、唯一性、雪崩效应
- hash
MD5
SHA
HMAC
>>> import hashlib
>>> dir(hashlib)
['__all__', '__block_openssl_constructor', '__builtin_constructor_cache', '__builtins__', '__cached__', '__doc__', '__file__', '__get_builtin_constructor', '__loader__', '__name__', '__package__', '__spec__', '_hashlib', 'algorithms_available', 'algorithms_guaranteed', 'blake2b', 'blake2s', 'md5', 'new', 'pbkdf2_hmac', 'scrypt', 'sha1', 'sha224', 'sha256', 'sha384', 'sha3_224', 'sha3_256', 'sha3_384', 'sha3_512', 'sha512', 'shake_128', 'shake_256']
# hash 加密使用方法:
>>> md5 = hashlib.md5("hello python".encode("utf-8"))
>>> md5
<md5 HASH object @ 0x00000154A70C7C10>
>>> md5.hexdigest()
'e53024684c9be1dd3f6114ecc8bbdddc'
# 使用update颜值混淆加密
>>> md5 = hashlib.md5("hello python".encode("utf-8"))
>>> md5.hexdigest()
'e53024684c9be1dd3f6114ecc8bbdddc'
>>> md5.update("xnudsy832d0ws2h*&^$%$%VY&".encode("utf-8"))
>>> md5.hexdigest()
'f2da0a61a7e483d9b1df742958eb0244'
应用:
- 数据校验,安全检查 ---- 不需要做盐值混淆
- 数据库传输 ---- 需要做盐值混淆
注意:hashlib中所有hash算法操作方法雷同
用途:数字摘要,密码信息加密
7、hmac
作用:对称加密 + hash加密
>>> import hmac
>>> dir(hmac)
['HMAC', '__builtins__', '__cached__', '__doc__', '__file__', '__loader__', '__name__', '__package__', '__spec__', '_hashlib', '_hashopenssl', '_openssl_md_meths', '_warnings', 'compare_digest', 'digest', 'digest_size', 'new', 'trans_36', 'trans_5C']
# 先进行对称加密,在进行MD5加密
>>> hmac = hmac.new("123456".encode("utf-8"), "zhangwanqiang".encode("utf-8"), "MD5")
>>> hmac.hexdigest()
'eb4ee22adc6a3f77696703f21d65ac07'
用途:密码信息加密(安全性较高)
8、time
作用:时间相关
>>> import time
>>> dir(time)
['_STRUCT_TM_ITEMS', '__doc__', '__loader__', '__name__', '__package__', '__spec__', 'altzone', 'asctime', 'ctime', 'daylight', 'get_clock_info', 'gmtime', 'localtime', 'mktime', 'monotonic', 'monotonic_ns', 'perf_counter', 'perf_counter_ns', 'process_time', 'process_time_ns', 'sleep', 'strftime', 'strptime', 'struct_time', 'thread_time', 'thread_time_ns', 'time', 'time_ns', 'timezone', 'tzname']
>>> time.asctime()              # 获取当前时间
'Tue Jul 27 16:54:56 2021'
>>> time.ctime()              # 获取当前时间
'Tue Jul 27 17:16:23 2021'
>>> time.localtime()            # 获取本地时间
time.struct_time(tm_year=2021, tm_mon=7, tm_mday=27, tm_hour=16, tm_min=55, tm_sec=18, tm_wday=1, tm_yday=208, tm_isdst=0)
>>> ltime = time.localtime()
>>> ltime.tm_year
2021
>>> ltime.tm_mon
7
>>> ltime.tm_mday
27
>>> print("%s-%s-%s %s:%s:%s" %(ltime.tm_year, ltime.tm_mon, ltime.tm_mday, ltime.tm_hour, ltime.tm_min, ltime.tm_sec))                  # 获取本地时间(方便格式化时间显示)
2021-7-27 16:58:17
>>> time.sleep(10)              # 程序休眠10s
>>> time.time()                 # 获取时间戳(1970-7-1 0:0:0 到当前时间的秒数)
1627377088.9805143
>>> time.strftime("%Y-%m-%d %H:%M:%S")    # 时间对象格式化显示,转换成字符串
'2021-07-27 17:19:30'
>>> ss = "2008-08-08 08:08:08"        # 将字符串转换为时间对象
>>> time.strptime(ss, "%Y-%m-%d %H:%M:%S")
time.struct_time(tm_year=2008, tm_mon=8, tm_mday=8, tm_hour=8, tm_min=8, tm_sec=8, tm_wday=4, tm_yday=221, tm_isdst=-1)
9、datetime
作用:时间相关(是对time模块的补充)
>>> import datetime
>>> dir(datetime)
['MAXYEAR', 'MINYEAR', '__builtins__', '__cached__', '__doc__', '__file__', '__loader__', '__name__', '__package__', '__spec__', 'date', 'datetime', 'datetime_CAPI', 'sys', 'time', 'timedelta', 'timezone', 'tzinfo']
>>> from datetime import datetime
>>> dir(datetime)
['__add__', '__class__', '__delattr__', '__dir__', '__doc__', '__eq__', '__format__', '__ge__', '__getattribute__', '__gt__', '__hash__', '__init__', '__init_subclass__', '__le__', '__lt__', '__ne__', '__new__', '__radd__', '__reduce__', '__reduce_ex__', '__repr__', '__rsub__', '__setattr__', '__sizeof__', '__str__', '__sub__', '__subclasshook__', 'astimezone', 'combine', 'ctime', 'date', 'day', 'dst', 'fold', 'fromisocalendar', 'fromisoformat', 'fromordinal', 'fromtimestamp', 'hour', 'isocalendar', 'isoformat', 'isoweekday', 'max', 'microsecond', 'min', 'minute', 'month', 'now', 'replace', 'resolution', 'second', 'strftime', 'strptime', 'time', 'timestamp', 'timetuple', 'timetz', 'today', 'toordinal', 'tzinfo', 'tzname', 'utcfromtimestamp', 'utcnow', 'utcoffset', 'utctimetuple', 'weekday', 'year']
>>> datetime.now()              # 获取当前时间
datetime.datetime(2021, 7, 27, 17, 32, 28, 13861)
10、calendar
作用:日历相关模块
>>> import calendar
>>> dir(calendar)
['Calendar', 'EPOCH', 'FRIDAY', 'February', 'HTMLCalendar', 'IllegalMonthError', 'IllegalWeekdayError', 'January', 'LocaleHTMLCalendar', 'LocaleTextCalendar', 'MONDAY', 'SATURDAY', 'SUNDAY', 'THURSDAY', 'TUESDAY', 'TextCalendar', 'WEDNESDAY', '_EPOCH_ORD', '__all__', '__builtins__', '__cached__', '__doc__', '__file__', '__loader__', '__name__', '__package__', '__spec__', '_colwidth', '_locale', '_localized_day', '_localized_month', '_monthlen', '_nextmonth', '_prevmonth', '_spacing', 'c', 'calendar', 'datetime', 'day_abbr', 'day_name', 'different_locale', 'error', 'firstweekday', 'format', 'formatstring', 'isleap', 'leapdays', 'main', 'mdays', 'month', 'month_abbr', 'month_name', 'monthcalendar', 'monthrange', 'prcal', 'prmonth', 'prweek', 'repeat', 'setfirstweekday', 'sys', 'timegm', 'week', 'weekday', 'weekheader']
11、UUID
作用:获取用不重复的字符串
>>> import uuid
>>> dir(uuid)
['Enum', 'NAMESPACE_DNS', 'NAMESPACE_OID', 'NAMESPACE_URL', 'NAMESPACE_X500', 'RESERVED_FUTURE', 'RESERVED_MICROSOFT', 'RESERVED_NCS', 'RFC_4122', 'SafeUUID', 'UUID', '_AIX', '_DARWIN', '_GETTERS', '_LINUX', '_OS_GETTERS', '_UuidCreate', '_WINDOWS', '__author__', '__builtins__', '__cached__', '__doc__', '__file__', '__loader__', '__name__', '__package__', '__spec__', '_arp_getnode', '_find_mac', '_generate_time_safe', '_has_uuid_generate_time_safe', '_ifconfig_getnode', '_ip_getnode', '_ipconfig_getnode', '_is_universal', '_lanscan_getnode', '_last_timestamp', '_load_system_functions', '_netbios_getnode', '_netstat_getnode', '_node', '_popen', '_random_getnode', '_unix_getnode', '_uuid', '_windll_getnode', 'bytes_', 'getnode', 'int_', 'os', 'platform', 'sys', 'uuid1', 'uuid3', 'uuid4', 'uuid5']
>>> uuid.uuid4()             # 获取用不重复的字符串,每次获取都不相同
UUID('c6e232f2-f55c-4918-b0ac-397cd5f5d518')
>>> uuid.uuid4().hex
'abe6f101edc448c4b9de6828e709c8e2'
>>> uuid.uuid4().hex
'e41a9b3e006c45ee9c5c43f3e1e64ba8'
>>> uuid.uuid4().hex
'4a22a06747a042c6ac536500e907c9a4'
>>> uuid.uuid4().hex
'7300954d813b40dcace0606d02c531b9
五、IO 流操作
常见的持久化技术:
- 内存 ----> 磁盘
- 数据库
什么是IO流:
IO流指的就是计算机的输入输出操作,常见IO操作,一般说的是内存与磁盘之间的输入输出,IO流操作是一种常见的持久化技术。
1、open 全局函数
open函数的帮助手册
>>> help(open)
Help on built-in function open in module io:

open(file, mode='r', buffering=-1, encoding=None, errors=None, newline=None, closefd=True, opener=None)
    Open file and return a stream.  Raise OSError upon failure.

    file is either a text or byte string giving the name (and the path
    if the file isn't in the current working directory) of the file to
    be opened or an integer file descriptor of the file to be
    wrapped. (If a file descriptor is given, it is closed when the
    returned I/O object is closed, unless closefd is set to False.)

    mode is an optional string that specifies the mode in which the file
    is opened. It defaults to 'r' which means open for reading in text
    mode.  Other common values are 'w' for writing (truncating the file if
    it already exists), 'x' for creating and writing to a new file, and
    'a' for appending (which on some Unix systems, means that all writes
    append to the end of the file regardless of the current seek position).
    In text mode, if encoding is not specified the encoding used is platform
    dependent: locale.getpreferredencoding(False) is called to get the
    current locale encoding. (For reading and writing raw bytes use binary
    mode and leave encoding unspecified.) The available modes are:

    ========= ===============================================================
    Character Meaning
    --------- ---------------------------------------------------------------
    'r'       open for reading (default)
    'w'       open for writing, truncating the file first
    'x'       create a new file and open it for writing
    'a'       open for writing, appending to the end of the file if it exists
    'b'       binary mode
    't'       text mode (default)
    '+'       open a disk file for updating (reading and writing)
    'U'       universal newline mode (deprecated)
    ========= ===============================================================

    The default mode is 'rt' (open for reading text). For binary random
    access, the mode 'w+b' opens and truncates the file to 0 bytes, while
    'r+b' opens the file without truncation. The 'x' mode implies 'w' and
    raises an `FileExistsError` if the file already exists.

    Python distinguishes between files opened in binary and text modes,
    even when the underlying operating system doesn't. Files opened in
    binary mode (appending 'b' to the mode argument) return contents as
    bytes objects without any decoding. In text mode (the default, or when
    't' is appended to the mode argument), the contents of the file are
    returned as strings, the bytes having been first decoded using a
    platform-dependent encoding or using the specified encoding if given.

    'U' mode is deprecated and will raise an exception in future versions
    of Python.  It has no effect in Python 3.  Use newline to control
    universal newlines mode.

    buffering is an optional integer used to set the buffering policy.
    Pass 0 to switch buffering off (only allowed in binary mode), 1 to select
    line buffering (only usable in text mode), and an integer > 1 to indicate
    the size of a fixed-size chunk buffer.  When no buffering argument is
    given, the default buffering policy works as follows:

    * Binary files are buffered in fixed-size chunks; the size of the buffer
      is chosen using a heuristic trying to determine the underlying device's
      "block size" and falling back on `io.DEFAULT_BUFFER_SIZE`.
      On many systems, the buffer will typically be 4096 or 8192 bytes long.

    * "Interactive" text files (files for which isatty() returns True)
      use line buffering.  Other text files use the policy described above
      for binary files.

    encoding is the name of the encoding used to decode or encode the
    file. This should only be used in text mode. The default encoding is
    platform dependent, but any encoding supported by Python can be
    passed.  See the codecs module for the list of supported encodings.

    errors is an optional string that specifies how encoding errors are to
    be handled---this argument should not be used in binary mode. Pass
    'strict' to raise a ValueError exception if there is an encoding error
    (the default of None has the same effect), or pass 'ignore' to ignore
    errors. (Note that ignoring encoding errors can lead to data loss.)
    See the documentation for codecs.register or run 'help(codecs.Codec)'
    for a list of the permitted encoding error strings.

    newline controls how universal newlines works (it only applies to text
    mode). It can be None, '', '\n', '\r', and '\r\n'.  It works as
    follows:

    * On input, if newline is None, universal newlines mode is
      enabled. Lines in the input can end in '\n', '\r', or '\r\n', and
      these are translated into '\n' before being returned to the
      caller. If it is '', universal newline mode is enabled, but line
      endings are returned to the caller untranslated. If it has any of
      the other legal values, input lines are only terminated by the given
      string, and the line ending is returned to the caller untranslated.

    * On output, if newline is None, any '\n' characters written are
      translated to the system default line separator, os.linesep. If
      newline is '' or '\n', no translation takes place. If newline is any
      of the other legal values, any '\n' characters written are translated
      to the given string.

    If closefd is False, the underlying file descriptor will be kept open
    when the file is closed. This does not work when a file name is given
    and must be True in that case.

    A custom opener can be used by passing a callable as *opener*. The
    underlying file descriptor for the file object is then obtained by
    calling *opener* with (*file*, *flags*). *opener* must return an open
    file descriptor (passing os.open as *opener* results in functionality
    similar to passing None).

    open() returns a file object whose type depends on the mode, and
    through which the standard file operations such as reading and writing
    are performed. When open() is used to open a file in a text mode ('w',
    'r', 'wt', 'rt', etc.), it returns a TextIOWrapper. When used to open
    a file in a binary mode, the returned class varies: in read binary
    mode, it returns a BufferedReader; in write binary and append binary
    modes, it returns a BufferedWriter, and in read/write mode, it returns
    a BufferedRandom.

    It is also possible to use a string or bytearray as a file for both
    reading and writing. For strings StringIO can be used like a file
    opened in a text mode, and for bytes a BytesIO can be used like a file
    opened in a binary mode.
open 函数的用法
IO操作  open
  f = open(file, "r") # f对象就是python IO对象
    # read(size=-1)   # 读取
    # write(data)   # 写入到文件
    # writelines()    # 将多个数据写入
    # flush()     # 刷新缓存区
    # close()     # 关闭File对象,注意close自动的调用flush进行最后的文件刷新
2、IO 字符流操作
>>> import os
>>> from os import path
>>> path.abspath(".")
'C:\\Users\\DELL'

>>> f = open('wan.txt')
>>> f
<_io.TextIOWrapper name='wan.txt' mode='r' encoding='cp936'>
>>> type(open("wan.txt"))
<class '_io.TextIOWrapper'>
>>> dir(f)
['_CHUNK_SIZE', '__class__', '__del__', '__delattr__', '__dict__', '__dir__', '__doc__', '__enter__', '__eq__', '__exit__', '__format__', '__ge__', '__getattribute__', '__gt__', '__hash__', '__init__', '__init_subclass__', '__iter__', '__le__', '__lt__', '__ne__', '__new__', '__next__', '__reduce__', '__reduce_ex__', '__repr__', '__setattr__', '__sizeof__', '__str__', '__subclasshook__', '_checkClosed', '_checkReadable', '_checkSeekable', '_checkWritable', '_finalizing', 'buffer', 'close', 'closed', 'detach', 'encoding', 'errors', 'fileno', 'flush', 'isatty', 'line_buffering', 'mode', 'name', 'newlines', 'read', 'readable', 'readline', 'readlines', 'reconfigure', 'seek', 'seekable', 'tell', 'truncate', 'writable', 'write', 'write_through', 'writelines']

>>> f.read()
'hello python'
>>> f.read()
''
>>> f.close()
注意:IO流非常宝贵资源,操作完之后需要关闭IO流。
IO流的使用
>>> f = open("wan.txt")        # 读入流
>>> f
<_io.TextIOWrapper name='wan.txt' mode='r' encoding='cp936'>
>>> file = f.read()
>>> file
'hello python'
>>> f.close()


>>> f = open("wan.txt", mode='w')    # 写入流
>>> f
<_io.TextIOWrapper name='wan.txt' mode='w' encoding='cp936'>
>>> f.write("hello world")
11
>>> f.close()
# 查看结果
hello world


>>> f = open("wan.txt", mode='w')    # 追加流
>>> f
<_io.TextIOWrapper name='wan.txt' mode='w' encoding='cp936'>
>>> f.write("hello world")
11
>>> f.close()
>>> f = open("wan.txt", mode="a")
>>> f
<_io.TextIOWrapper name='wan.txt' mode='a' encoding='cp936'>
>>> f.write("hello python")
12
>>> f.close()
>>> f = open("wan.txt", mode="a")
>>> f.write("hello c")
7
>>> f.close()
>>> f = open("wan.txt", mode="a")
>>> f.write("hello java")
10
>>> f.close()
# 查看结果
hello worldhello pythonhello chello java
换行操作
>>> f = open("wan.txt", mode="a")
>>> f.write("hello c++")
9
>>> f.close()
>>> f = open("wan.txt", mode="a")
>>> f.write("hello php\n")
10
>>> f.close()
>>> f = open("wan.txt", mode="a")
>>> f.write("hello go\n")
9
>>> f.close()
>>> f = open("wan.txt", mode="a")
>>> f.write("hello c#\n")
9
>>> f.close()
# 查看结果
hello worldhello pythonhello chello java c++ php
go
c#
IO流的分类:
- 按照数据流动(内存而言)
- 输入流
- 输出流
- 按照数据的类型
- 字节流
- 字符流
字符流复制文件
def io_operater(url1, url2):
    f1 = open(url1, mode="r")
    f2 = open(url2, mode="w")


    msg = f1.read()
    f2.write(msg)

    f1.close()
    f2.close()


io_operater("E:\\Users\\DELL\\Desktop\\Python Study\\a.txt", \
            "E:\\Users\\DELL\\Desktop\\Python Study\\b.txt")
3、IO 字节流操作
字节流复制文件
f1 = open("a.jfif", mode="rb")
f2 = open("b.jfif", mode="wb")

f2.write(f1.read())

f1.close()
f2.close()
字节流复制文件(限制每次服务数据量)
def copy_file(src, dest):
    f1 = open(src, mode="rb")
    f2 = open(dest, mode="wb")

    # f2.write(f1.read())

    # 由于字符流数据流过大,基于性能考虑,我们1M读取一次
    while True:
        data_volume = f1.read(1024 * 1024)
        if data_volume == b"":
            print("数据已经读取完成")
            break
        else:
            f2.write(data_volume)

    f1.close()
    f2.close()


if __name__ == '__main__':
    copy_file("E:\\openlab--Training\HCIP\\2.3\\第一天(下午).mp4", \
              ".\\a.mp4")
字节流复制文件(优化)
import uuid
import time
from os import path


def copy_file():
    src = input("请输入您要备份的数据:")
    dest = input("请输入您要保存的路径:")

    f1 = open(src, mode="rb")
    file_name = src[src.rfind("\\")+1:]
    # 方式多个相同文件名备份到同一个目录下,产生文件覆盖的问题,我们在备份文件前面拼接该文件的UUID号和时间戳
    file_uuid = uuid.uuid4().hex
    file_name = file_uuid + str(time.time()) + file_name
    print(file_name)

    f2 = open(path.join(dest, file_name), mode="wb")

    # f2.write(f1.read())

    # 由于字符流数据流过大,基于性能考虑,我们1M读取一次
    while True:
        data_volume = f1.read(1024 * 1024)
        if data_volume == b"":
            print("数据已经读取完成")
            break
        else:
            f2.write(data_volume)

    f1.close()
    f2.close()


if __name__ == '__main__':
    copy_file()
注:为了防止备份文件同一个目录下重名,我们在备份时可以给文件拼接该文件的UUID、时间戳、主机IP地址、随机值等等
六、对象序列化
1、什么是对象序列化
将内存中的一个对象(逻辑概念、抽象概念)转换成字节或者字符数据的过程,最终存储下来(持久化)
2、Python 中的对象序列化
2.1 pickle
作用:可以将对象转换为字节数据
|-- dump # 将对象序列化成为字节数据,并且保存到file中 |-- dumps # 将对象序列化成为字节数据 |-- load # 将一个open() 打开的file对象反序列化为对象 |-- loads # 将一个字节数据反序列化为对象
>>> import pickle
>>>
>>> dir(pickle)
['ADDITEMS', 'APPEND', 'APPENDS', 'BINBYTES', 'BINBYTES8', 'BINFLOAT', 'BINGET', 'BININT', 'BININT1', 'BININT2', 'BINPERSID', 'BINPUT', 'BINSTRING', 'BINUNICODE', 'BINUNICODE8', 'BUILD', 'BYTEARRAY8', 'DEFAULT_PROTOCOL', 'DICT', 'DUP', 'EMPTY_DICT', 'EMPTY_LIST', 'EMPTY_SET', 'EMPTY_TUPLE', 'EXT1', 'EXT2', 'EXT4', 'FALSE', 'FLOAT', 'FRAME', 'FROZENSET', 'FunctionType', 'GET', 'GLOBAL', 'HIGHEST_PROTOCOL', 'INST', 'INT', 'LIST', 'LONG', 'LONG1', 'LONG4', 'LONG_BINGET', 'LONG_BINPUT', 'MARK', 'MEMOIZE', 'NEWFALSE', 'NEWOBJ', 'NEWOBJ_EX', 'NEWTRUE', 'NEXT_BUFFER', 'NONE', 'OBJ', 'PERSID', 'POP', 'POP_MARK', 'PROTO', 'PUT', 'PickleBuffer', 'PickleError', 'Pickler', 'PicklingError', 'PyStringMap', 'READONLY_BUFFER', 'REDUCE', 'SETITEM', 'SETITEMS', 'SHORT_BINBYTES', 'SHORT_BINSTRING', 'SHORT_BINUNICODE', 'STACK_GLOBAL', 'STOP', 'STRING', 'TRUE', 'TUPLE', 'TUPLE1', 'TUPLE2', 'TUPLE3', 'UNICODE', 'Unpickler', 'UnpicklingError', '_Framer', '_HAVE_PICKLE_BUFFER', '_Pickler', '_Stop', '_Unframer', '_Unpickler', '__all__', '__builtins__', '__cached__', '__doc__', '__file__', '__loader__', '__name__', '__package__', '__spec__', '_compat_pickle', '_dump', '_dumps', '_extension_cache', '_extension_registry', '_getattribute', '_inverted_registry', '_load', '_loads', '_test', '_tuplesize2code', 'bytes_types', 'codecs', 'compatible_formats', 'decode_long', 'dispatch_table', 'dump', 'dumps', 'encode_long', 'format_version', 'io', 'islice', 'load', 'loads', 'maxsize', 'pack', 'partial', 're', 'sys', 'unpack', 'whichmodule']
>>> import pickle
>>>
>>>
>>> ls = [21, 'hello python', True, False]
>>> ls
[21, 'hello python', True, False]
>>> pickle.dumps(ls)
b'\x80\x04\x95\x18\x00\x00\x00\x00\x00\x00\x00]\x94(K\x15\x8c\x0chello python\x94\x88\x89e.'
>>> data = pickle.dumps(ls)
>>>
>>> f = open("c:\\ls_data", "wb")
>>> f.write(data)
35
>>> f.close()
>>> f = open("c:\\ls_data", "rb")
>>> f.read()
b'\x80\x04\x95\x18\x00\x00\x00\x00\x00\x00\x00]\x94(K\x15\x8c\x0chello python\x94\x88\x89e.'
>>> f.close()
>>> f = open("c:\\ls_data", "rb")
>>> show_data = f.read()
>>> pickle.loads(show_data)
[21, 'hello python', True, False]
>>> ls
[21, 'hello python', True, False]
>>> pickle.dump(ls, open("c:\\a.data", "bw"))
>>> pickle.load(open("c:\\a.data", "rb"))
[21, 'hello python', True, False]
2.2 json
作用:可以将对象转换为字符数据
|-- dump # 将对象序列化成为字符数据,并且保存到file中 |-- dumps # 将对象序列化成为字符数据 |-- load # 将一个open() 打开的file对象反序列化为对象 |-- loads # 将一个字符数据反序列化为对象
>>> import json
>>> dir(jsoin)
>>>
>>> dir(json)
['JSONDecodeError', 'JSONDecoder', 'JSONEncoder', '__all__', '__author__', '__builtins__', '__cached__', '__doc__', '__file__', '__loader__', '__name__', '__package__', '__path__', '__spec__', '__version__', '_default_decoder', '_default_encoder', 'codecs', 'decoder', 'detect_encoding', 'dump', 'dumps', 'encoder', 'load', 'loads', 'scanner']
>>> my_info = {"name":"zhangwanqiang", "age":"16", "gender":"boy"}
>>> my_info
{'name': 'zhangwanqiang', 'age': '16', 'gender': 'boy'}
>>> import json
>>> json.dumps(my_info)
'{"name": "zhangwanqiang", "age": "16", "gender": "boy"}'
>>> my_info_data = json.dumps(my_info)
>>> f = open("c:\\b.data", "w")
>>> f.write(my_info_data)
55
>>> f.close()
>>> f = open("c:\\b.data", "r")
>>> data = f.read()
>>> data
'{"name": "zhangwanqiang", "age": "16", "gender": "boy"}'
>>> type(data)
<class 'str'>
>>> json.loads(data)
{'name': 'zhangwanqiang', 'age': '16', 'gender': 'boy'}
>>> my_info_data = json.loads(data)
>>> my_info_data
{'name': 'zhangwanqiang', 'age': '16', 'gender': 'boy'}
>>> type(my_info_data)
<class 'dict'>
>>> dd = {'name': 'zhangwanqiang', 'age': '16', 'gender': 'boy'}
>>> dd
{'name': 'zhangwanqiang', 'age': '16', 'gender': 'boy'}
>>> json.dump(dd, open("c:\\d.data", "w"))
>>> json.load(open("c:\\d.data", "r"))
{'name': 'zhangwanqiang', 'age': '16', 'gender': 'boy'}
>>> data = json.load(open("c:\\d.data", "r"))
>>> type(data)
<class 'dict'>注意:json这个模块一般用来序列化字典对象,或者转换json数据,但是其他对象也是可以的。
七、面向对象
面向对象三大特征:
- 封装
- 继承
- 多态
1、封装
将属性和方法 封装到一个类或者多个类,需要使用的时候,通过对象调用对应的属性或者方法
将类的属性封装(隐藏)起来,提供公开的方法(getter和setter)来访问的行为!!(封装)
将属性私有化(只有类内部能访问,外界无法访问),提供公开的方法(getter和setter)来访问的行为
定义类
class MyInfo(object):

    def __init__(self, name, age, gender):
        self.name = name
        self.age = age
        self.gender = gender


if __name__ == '__main__':
    show_my_info = MyInfo("zhangwanqiang", 18, "男")
    print(show_my_info.name)
    print(show_my_info.age)
    print(show_my_info.gender)


运行结果:
zhangwanqiang
18
男
封装属性
1.1 属性的封装 一
class MyInfo(object):

    def __init__(self, name, age, gender):
        self.__name = name
        self.__age = age
        self.__gender = gender

    # 为封装的属性,使用getter提供公开的方法
    def get_name(self):
        return self.__name

    def get_age(self):
        return self.__age

    def get_gender(self):
        return self.__gender

    # 为封装的属性,使用setter修改属性的值
    def set_name(self, name):
        self.__name = name

    def set_age(self, age):
        self.__age = age

    def set_gender(self, gender):
        self.__gender = gender

    def __str__(self):
        return "【 name = " + self.__name + ", age = " + str(self.__age) + ", gender = " + self.__gender + "】"


if __name__ == '__main__':
    show_my_info = MyInfo("zhangwanqiang", 18, "男")

    # 调用私有化属性的get方法来访问属性
    print(show_my_info.get_name())
    print(show_my_info.get_age())
    print(show_my_info.get_gender())

    # 调用私有化属性的set方法来访问属性
    show_my_info.set_name("shuaigezhang")
    show_my_info.set_age(19)
    show_my_info.set_gender("男")

    print(show_my_info)


运行结果:
zhangwanqiang
18
男
【 name = shuaigezhang, age = 19, gender = 男】
1.2 属性的封装 二
property
class MyInfo(object):

    def __init__(self, name, age, gender):
        self.__name = name
        self.__age = age
        self.__gender = gender

    def get_name(self):
        return self.__name

    def set_name(self, name):
        self.__name = name

    def get_age(self):
        return self.__age

    def set_age(self, age):
        self.__age = age

    def get_gender(self):
        return self.__gender

    def set_gender(self, gender):
        self.__gender = gender

    # 第二种写法(进一步的伪装封装代码)
    name = property(get_name, set_name)
    age = property(get_age, set_age)
    gender = property(get_gender, set_gender)


if __name__ == '__main__':
    show_my_info = MyInfo("zhangwanqiang", 18, "男")
    # print(show_my_info.get_name())
    # show_my_info.set_name("zhangmazi")
    # print(show_my_info.get_name())

    print(show_my_info.name)
    show_my_info.name = "z3"
    print(show_my_info.name)

    print(show_my_info.age)
    show_my_info.age = 20
    print(show_my_info.age)

    print(show_my_info.gender)
    show_my_info.gender = "boy"
    print(show_my_info.gender)


运行结果:
zhangwanqiang
z3
18
20
男
boy
注意:这种方法对属性进行封装,可以混淆用户(感觉没有封装),但是属性确实被封装起来了。
1.3 属性的封装 三
装饰器
class MyInfo(object):

    def __init__(self, name, age, gender):
        self.__name = name
        self.__age = age
        self.__gender = gender

    @property
    def name(self):
        return self.__name

    @name.setter
    def name(self, name):
        self.__name = name

    @property
    def age(self):
        return self.__age

    @age.setter
    def age(self, age):
        self.__age = age

    @property
    def gender(self):
        return self.__gender

    @gender.setter
    def gender(self, gender):
        self.__gender = gender


if __name__ == '__main__':
    show_my_info = MyInfo("zhangwanqiang", 18, "男")
    # print(show_my_info.get_name())
    # show_my_info.set_name("zhangmazi")
    # print(show_my_info.get_name())

    print(show_my_info.name)
    show_my_info.name = "z3"
    print(show_my_info.name)

    print(show_my_info.age)
    show_my_info.age = 20
    print(show_my_info.age)

    print(show_my_info.gender)
    show_my_info.gender = "boy"
    print(show_my_info.gender)


运行结果:
zhangwanqiang
z3
18
20
男
boy
总结:在定义类的时候,一定要封装类,也就是一定要私有化属性,提供公开的set\get方法去访问。
2、继承
继承本质就是为实现代码的复用!
属性和方法的继承
class RichMan(object):
    def __init__(self):
        self.money = 100000000000000000000000000000000000000
        self.company = "alibaba"

    def worlds(self):
        print("我不喜欢钱,我对钱不感兴趣")
        print("我好久没有见到钱了")

class Son(RichMan):
    def my_worlds(self):
        print("哈哈,从此以后,我就可以不用努力啦!!!")


if __name__ == '__main__':
    show_me = Son()
    print(show_me.money)
    print(show_me.company)
    show_me.worlds()
    show_me.my_worlds()


运行结果:
100000000000000000000000000000000000000
alibaba
我不喜欢钱,我对钱不感兴趣
我好久没有见到钱了
哈哈,从此以后,我就可以不用努力啦!!!
私有属性和方法的继承
class RichMan(object):
    def __init__(self):
        self.money = 100000000000000000000000000000000000000
        self.company = "alibaba"
        # 私有属性
        self.__secretary = "小雅"

    def worlds(self):
        print("我不喜欢钱,我对钱不感兴趣")
        print("我好久没有见到钱了")

    # 私有方法
    def __tell_worlds(self):
        print("大家好,我真的对钱一点兴趣都没有!")

class Son(RichMan):
    def my_worlds(self):
        print("哈哈,从此以后,我就可以不用努力啦!!!")


if __name__ == '__main__':
    show_me = Son()
    print(show_me.money)
    print(show_me.company)
    show_me.worlds()
    show_me.my_worlds()

    # 查看私有属性的继承
    print(show_me.__secretary)
    # 查看私有方法的继承
    show_me.__tell_worlds()


运行结果:
Traceback (most recent call last):
  File "E:/Users/DELL/Desktop/Python Study/object_oriented/面向对象--继承1.py", line 28, in <module>
    print(show_me.__secretary)
AttributeError: 'Son' object has no attribute '__secretary'
100000000000000000000000000000000000000
alibaba
我不喜欢钱,我对钱不感兴趣
我好久没有见到钱了
哈哈,从此以后,我就可以不用努力啦!!!
注:有上面案例可以得出结论,输了 私有属性 和 私有方法 ,都可以继承。
方法重写:
在继承基础上,如果子类方法父类的方法不能满足自己使用的时候,那么就重写这个方法注意:覆盖时:方法名称和参数必须一模一样
# 方法重写前
class RichMan(object):
    def __init__(self):
        self.money = 100000000000000000000000000000000000000
        self.company = "alibaba"
        # 私有属性
        # self.__secretary = "小雅"

    def worlds(self):
        print("我不喜欢钱,我对钱不感兴趣")
        print("我好久没有见到钱了")

    # 私有方法
    # def __tell_worlds(self):
    #     print("大家好,我真的对钱一点兴趣都没有!")


    def working(self):
        print("我是大boss")
        print("整个公司我最伟大")

class Son(RichMan):
    def my_worlds(self):
        print("哈哈,从此以后,我就可以不用努力啦!!!")


if __name__ == '__main__':
    show_me = Son()
    print(show_me.money)
    print(show_me.company)
    show_me.worlds()
    show_me.my_worlds()

    # # 查看私有属性的继承
    # print(show_me.__secretary)
    # # 查看私有方法的继承
    # show_me.__tell_worlds()

    show_me.working()


运行结果:
100000000000000000000000000000000000000
alibaba
我不喜欢钱,我对钱不感兴趣
我好久没有见到钱了
哈哈,从此以后,我就可以不用努力啦!!!
我是大boss
整个公司我最伟大


# 方法重写后
class RichMan(object):
    def __init__(self):
        self.money = 100000000000000000000000000000000000000
        self.company = "alibaba"
        # 私有属性
        # self.__secretary = "小雅"

    def worlds(self):
        print("我不喜欢钱,我对钱不感兴趣")
        print("我好久没有见到钱了")

    # 私有方法
    # def __tell_worlds(self):
    #     print("大家好,我真的对钱一点兴趣都没有!")


    def working(self):
        print("我是大boss")
        print("整个公司我最伟大")

class Son(RichMan):
    def my_worlds(self):
        print("哈哈,从此以后,我就可以不用努力啦!!!")

    # 方法重写
    def working(self):
        print("我才是王者,谁敢不服我")
        print("你不服我,你试试!")


if __name__ == '__main__':
    show_me = Son()
    print(show_me.money)
    print(show_me.company)
    show_me.worlds()
    show_me.my_worlds()

    # # 查看私有属性的继承
    # print(show_me.__secretary)
    # # 查看私有方法的继承
    # show_me.__tell_worlds()

    show_me.working()


运行结果:
100000000000000000000000000000000000000
alibaba
我不喜欢钱,我对钱不感兴趣
我好久没有见到钱了
哈哈,从此以后,我就可以不用努力啦!!!
我才是王者,谁敢不服我
你不服我,你试试!
supper:
super关键字
  super 是一个指针,默认指向父类

  在子类中调用父类的方法或者属性
class RichMan(object):
    def __init__(self):
        self.money = 100000000000000000000000000000000000000
        self.company = "alibaba"
        # 私有属性
        # self.__secretary = "小雅"

    def worlds(self):
        print("我不喜欢钱,我对钱不感兴趣")
        print("我好久没有见到钱了")

    # 私有方法
    # def __tell_worlds(self):
    #     print("大家好,我真的对钱一点兴趣都没有!")


    def working(self):
        print("我是大boss")
        print("整个公司我最伟大")

class Son(RichMan):
    def my_worlds(self):
        print("哈哈,从此以后,我就可以不用努力啦!!!")

    # 方法重写
    def working(self):
        print("我才是王者,谁敢不服我")
        print("你不服我,你试试!")

    def my_supper(self):
        self.working()


if __name__ == '__main__':
    show_me = Son()
    # print(show_me.money)
    # print(show_me.company)
    # show_me.worlds()
    # show_me.my_worlds()

    # # 查看私有属性的继承
    # print(show_me.__secretary)
    # # 查看私有方法的继承
    # show_me.__tell_worlds()

    show_me.my_supper()


运行结果:
我才是王者,谁敢不服我
你不服我,你试试!


添加super
class RichMan(object):
    def __init__(self):
        self.money = 100000000000000000000000000000000000000
        self.company = "alibaba"
        # 私有属性
        # self.__secretary = "小雅"

    def worlds(self):
        print("我不喜欢钱,我对钱不感兴趣")
        print("我好久没有见到钱了")

    # 私有方法
    # def __tell_worlds(self):
    #     print("大家好,我真的对钱一点兴趣都没有!")


    def working(self):
        print("我是大boss")
        print("整个公司我最伟大")

class Son(RichMan):
    def my_worlds(self):
        print("哈哈,从此以后,我就可以不用努力啦!!!")

    # 方法重写
    def working(self):
        print("我才是王者,谁敢不服我")
        print("你不服我,你试试!")

    def my_supper(self):
        # self.working()
        super().working()


if __name__ == '__main__':
    show_me = Son()
    # print(show_me.money)
    # print(show_me.company)
    # show_me.worlds()
    # show_me.my_worlds()

    # # 查看私有属性的继承
    # print(show_me.__secretary)
    # # 查看私有方法的继承
    # show_me.__tell_worlds()

    show_me.my_supper()


运行结果:
我是大boss
整个公司我最伟大
class User(object):
    def __init__(self):
        print("我是父类")

class Admin(User):
    def __init__(self):
        print("我是子类")

show_info = Admin()


运行结果:
我是子类


class User(object):
    def __init__(self):
        print("我是父类")

class Admin(User):
    def __init__(self):
        super().__init__()
        print("我是子类")

show_info = Admin()


运行结果:
我是父类
我是子类


class User(object):
    def __init__(self):
        print("我是父类")

class Admin(User):
    def __init__(self):
        print("我是子类")
        super().__init__()

show_info = Admin()


运行结果:
我是子类
我是父类
结论:子类初始化函数的调用,并不会触发父类初始化函数的调用,若要调用父类,需要使用supper关键字调用。(这也是Python与其他面向对象语言的区别)
3、多态
八、异常处理
1、什么是异常
异常指的是软件在运行的过程中,因为一些原因(如:使用者操作不当等),引起程序错误,导致软件奔溃的这种现象,就叫做异常。
2、异常处理的目的
提高软件容错性。代码就能够继续向后执行,而不会奔溃。
3、Python 中的异常处理
Python 中的异常
>>> import builtins
>>> dir(builtins)
['ArithmeticError', 'AssertionError', 'AttributeError', 'BaseException', 'BlockingIOError', 'BrokenPipeError', 'BufferError', 'BytesWarning', 'ChildProcessError', 'ConnectionAbortedError', 'ConnectionError', 'ConnectionRefusedError', 'ConnectionResetError', 'DeprecationWarning', 'EOFError', 'Ellipsis', 'EnvironmentError', 'Exception', 'False', 'FileExistsError', 'FileNotFoundError', 'FloatingPointError', 'FutureWarning', 'GeneratorExit', 'IOError', 'ImportError', 'ImportWarning', 'IndentationError', 'IndexError', 'InterruptedError', 'IsADirectoryError', 'KeyError', 'KeyboardInterrupt', 'LookupError', 'MemoryError', 'ModuleNotFoundError', 'NameError', 'None', 'NotADirectoryError', 'NotImplemented', 'NotImplementedError', 'OSError', 'OverflowError', 'PendingDeprecationWarning', 'PermissionError', 'ProcessLookupError', 'RecursionError', 'ReferenceError', 'ResourceWarning', 'RuntimeError', 'RuntimeWarning', 'StopAsyncIteration', 'StopIteration', 'SyntaxError', 'SyntaxWarning', 'SystemError', 'SystemExit', 'TabError', 'TimeoutError', 'True', 'TypeError', 'UnboundLocalError', 'UnicodeDecodeError', 'UnicodeEncodeError', 'UnicodeError', 'UnicodeTranslateError', 'UnicodeWarning', 'UserWarning', 'ValueError', 'Warning', 'WindowsError', 'ZeroDivisionError']
Python 的异常处理
# 正常代码举例
age = int(input("请输入您的年龄:"))
next_age = age + 1
print("年龄为{}的人,明年的年龄为:{}".format(age ,next_age))

运行结果:
请输入您的年龄:20
年龄为20的人,明年的年龄为:21


# 代码异常
age = int(input("请输入您的年龄:"))
next_age = age + 1
print("年龄为{}的人,明年的年龄为:{}".format(age ,next_age))

运行结果:
请输入您的年龄:张帅哥
Traceback (most recent call last):
  File "E:/Users/DELL/Desktop/Python Study/异常处理/异常处理.py", line 1, in <module>
    age = int(input("请输入您的年龄:"))
ValueError: invalid literal for int() with base 10: '张帅哥'


# 处理异常
try:
    age = int(input("请输入您的年龄:"))
    next_age = age + 1
    print("年龄为{}的人,明年的年龄为:{}".format(age ,next_age))

except:
    print("对不起,您的输入有误,请重新出入!")
    age = int(input("请输入您的年龄:"))
    next_age = age + 1

print("年龄为{}的人,明年的年龄为:{}".format(age, next_age))

运行结果:
请输入您的年龄:帅哥张
对不起,您的输入有误,请重新出入!
请输入您的年龄:17
年龄为17的人,明年的年龄为:18


# 捕获异常
try:
    age = int(input("请输入您的年龄:"))
    next_age = age + 1
    print("年龄为{}的人,明年的年龄为:{}".format(age, next_age))

except Exception as ex:
    print("出现了异常,异常是:", ex)
    print("对不起,您的输入有误,请重新出入!")
    age = int(input("请输入您的年龄:"))
    next_age = age + 1

print("年龄为{}的人,明年的年龄为:{}".format(age, next_age))

运行结果:
请输入您的年龄:张大帅
出现了异常,异常是: invalid literal for int() with base 10: '张大帅'
对不起,您的输入有误,请重新出入!
请输入您的年龄:17
年龄为17的人,明年的年龄为:18


try:
    age = int(input("请输入您的年龄:"))
    next_age = age + 1
    print("年龄为{}的人,明年的年龄为:{}".format(age, next_age))

except ValueError as ex:
    print("出现了异常,异常是:", ex)
    print("对不起,您的输入有误,请重新出入!")
    age = int(input("请输入您的年龄:"))
    next_age = age + 1

print("年龄为{}的人,明年的年龄为:{}".format(age, next_age))
运行结果:
请输入您的年龄:帅帅张
出现了异常,异常是: invalid literal for int() with base 10: '帅帅张'
对不起,您的输入有误,请重新出入!
请输入您的年龄:18
年龄为18的人,明年的年龄为:19
异常的继承关系
BaseException
  |
    Exception
     |
       常见异常(ValueError、KeyError、KeyboardInterrupt、ArithmeticError)
异常的处理流程
try:
    # 将有可能触发异常的代码

except Xxx as e:
    print("处理Xxx异常")
except Xxxx as e:
    print("处理Xxxx异常")

except Exception as e:
    print("使用多态将其他异常一网打尽")

# 在python中,很多块级作用域,都有这个else
else:
    print("没有出现异常时执行的代码")


try:
    pass

except KeyboardInterrupt:
    pass
except BlockingIOError:
    pass
except EOFError:
    pass
except Exception:


try:
    pass
except (KeyboardInterrupt, KeyError, ValueError, EnvironmentError) as e:
    print("出现了异常")
finally 关键字
- 表示最后要执行的代码
- 必须要执行的代码
- 不管有没有异常出现,必须要执行的
- 一般会将必须要执行的代码,如资源的释放,链接的是关闭等等
try:
    int(input("请输入一个数:"))

except Exception as e:
    print("出现了异常")
else:
    print("没有出现异常")
finally:
    print("不管出不出现异常,我都要执行")
    # 一般会将必须要执行的代码,如资源的释放,链接的是关闭等等


print("剩余的代码")

运行结果:
请输入一个数:123456
没有出现异常
不管出不出现异常,我都要执行
剩余的代码

再次运行:
请输入一个数:帅哥张
出现了异常
不管出不出现异常,我都要执行
剩余的代码
如果在return后面存在finally,那么代码并不会直接返回,而是需要先执行finally代码,之后才会返回。
def demo(msg):
    try:
        int(msg)
        return "a"
    except Exception as e:
        print("处理异常")
        return "b"
    finally:
        print("释放资源")
        # return "C"

    return "D"


res = demo(input(">>>:"))
print(res)


运行结果:
>>>:123456
释放资源
a

再次运行:
>>>:张帅哥
处理异常
释放资源
b
4、自定义异常
class MyException(Exception):

    def __init__(self, msg):
        Exception.__init__(self, msg)


def login(username, password):

    if username is None or username.strip() == "":
        # 抛出异常,使用raise关键字抛出异常
        # 认为的抛出异常,1、这儿出了错, 2、向调用者传递信息
        raise MyException("对不起,用户名称不能为空")

    if password is None or password.strip() == "":
        raise Exception("对不起,用户密码不能为空")

    print("登录成功")


if __name__ == '__main__':
    try:
        login(input(">>"), input(">>"))
    except Exception as e:
        print("抓捕到异常,信息是--->", e)


运行结果:
>>z3
>>123
登录成功


class MyException(Exception):

    def __init__(self, msg):
        Exception.__init__(self, msg)


def login(username, password):

    if username is None or username.strip() == "":
        # 抛出异常,使用raise关键字抛出异常
        # 认为的抛出异常,1、这儿出了错, 2、向调用者传递信息
        raise MyException("对不起,用户名称不能为空")

    if password is None or password.strip() == "":
        raise Exception("对不起,用户密码不能为空")

    print("登录成功")


if __name__ == '__main__':
    try:
        login(None, None)
    except Exception as e:
        print("抓捕到异常,信息是--->", e)

运行结果:
抓捕到异常,信息是---> 对不起,用户名称不能为空


class MyException(Exception):

    def __init__(self, msg):
        Exception.__init__(self, msg)


def login(username, password):

    if username is None or username.strip() == "":
        # 抛出异常,使用raise关键字抛出异常
        # 认为的抛出异常,1、这儿出了错, 2、向调用者传递信息
        raise MyException("对不起,用户名称不能为空")

    if password is None or password.strip() == "":
        raise Exception("对不起,用户密码不能为空")

    print("登录成功")


if __name__ == '__main__':
    try:
        login("z3", None)
    except Exception as e:
        print("抓捕到异常,信息是--->", e)


运行结果:
抓捕到异常,信息是---> 对不起,用户密码不能为
九、深浅拷贝
1、赋值
1.1 基本数据类型
主要的操作,栈内存的复制
>>> num1 = 20
>>> num2 = num1
>>> num1 == num2
True
>>> num1 is num2
True
1.2 对象
主要操作,保存的是同一个堆内存地址,指向同一块堆内存
>>> ls = [23, 'zhang', 'shaanxi', True]
>>> ls1 = ls
>>> ls == ls1
True
>>> ls is ls1
True
2、浅拷贝
copy 模块
>>> import copy
>>> dir(copy)
['Error', '__all__', '__builtins__', '__cached__', '__doc__', '__file__', '__loader__', '__name__', '__package__', '__spec__', '_copy_dispatch', '_copy_immutable', '_deepcopy_atomic', '_deepcopy_dict', '_deepcopy_dispatch', '_deepcopy_list', '_deepcopy_method', '_deepcopy_tuple', '_keep_alive', '_reconstruct', 'copy', 'deepcopy', 'dispatch_table', 'error']
如果是一个列表:ls2 = ls.copy() 浅拷贝对象,并不是把对象完整的拷贝,而是仅仅拷贝了第一层对象, 如果对象中存储子对象,那么子对象还是藕断丝连
>>> ls = [21, 'zhang', [11, 22, 33], True]
>>> ls1 = copy.copy(ls)
>>> ls
[21, 'zhang', [11, 22, 33], True]
>>> ls1
[21, 'zhang', [11, 22, 33], True]
>>> ls is ls1
False
>>> ls.append(123)
>>> ls
[21, 'zhang', [11, 22, 33], True, 123]
>>> ls1
[21, 'zhang', [11, 22, 33], True]
>>> ls[2].append(44)
>>> ls
[21, 'zhang', [11, 22, 33, 44], True, 123]
>>> ls1
[21, 'zhang', [11, 22, 33, 44], True]
3、深拷贝
深拷贝使用的递归的方式完成的拷贝,这样的,两个对象之间将没有任何关系
>>> ls = [21, 'zhang', [11, 22, 33], True]
>>> ls1 = copy.deepcopy(ls)
>>> ls
[21, 'zhang', [11, 22, 33], True]
>>> ls1
[21, 'zhang', [11, 22, 33], True]
>>> ls is ls1
False
>>> ls.append(123)
>>> ls
[21, 'zhang', [11, 22, 33], True, 123]
>>> ls1
[21, 'zhang', [11, 22, 33], True]
>>> ls[2].insert(1,1111)
>>> ls
[21, 'zhang', [11, 1111, 22, 33], True, 123]
>>> ls1
[21, 'zhang', [11, 22, 33], True]
实践总结:
1、需要将当前对象拷贝的时候,一般建议拷贝为浅拷贝,(效率高,内存占有少)2、如果说,就是需要完全分离,请使用深拷贝
>>> t = (12, 23, 34, 45)
>>> tt = copy.copy(t)
>>> ttt = copy.deepcopy(t)
>>> t is tt
True
>>> t is ttt
True
>>>
>>>
>>> t = 'hello world'
>>> s = 'hello world'
>>> ss = copy.copy(s)
>>> sss = copy.deepcopy(s)
>>> s is ss
True
>>> s is sss
True
>>>
>>>
>>> num = 123
>>> num1 = copy.copy(num)
>>> num2 = copy.deepcopy(num)
>>> num is num1
True
>>> num is num2
True
>>>
>>>
>>> num = 2.21
>>> num1 = copy.copy(num)
>>> num2 = copy.deepcopy(num)
>>> num is num1
True
>>> num is num2
True
结论:元组、字符串、数值这些不可变类型,所有深浅拷贝后,永远只有一份内存(赋值)注意特殊情况,如元组中的存在可变类型的元素
>>> t = (12, 23, 345, [21, 32, 43, 45], 67)
>>>
>>> tt = copy.copy(t)
>>> ttt = copy.deepcopy(t)
>>>
>>> t[3].append(123454321)
>>> tt
(12, 23, 345, [21, 32, 43, 45, 123454321], 67)
>>> ttt
(12, 23, 345, [21, 32, 43, 45], 67)
注意:虽然tuple类型不可变,但是其元素列表为可变类型,则支持深浅拷贝
十、生成器
1、列表推导式
这个功能非常的强大,可以快速得到需要的列表
>>> ls = [ x for x in range(101)]
>>> ls
[0, 1, 2, 3, 4, 5, 6, 7, 8, 9, 10, 11, 12, 13, 14, 15, 16, 17, 18, 19, 20, 21, 22, 23, 24, 25, 26, 27, 28, 29, 30, 31, 32, 33, 34, 35, 36, 37, 38, 39, 40, 41, 42, 43, 44, 45, 46, 47, 48, 49, 50, 51, 52, 53, 54, 55, 56, 57, 58, 59, 60, 61, 62, 63, 64, 65, 66, 67, 68, 69, 70, 71, 72, 73, 74, 75, 76, 77, 78, 79, 80, 81, 82, 83, 84, 85, 86, 87, 88, 89, 90, 91, 92, 93, 94, 95, 96, 97, 98, 99, 100]

>>> ls1 = [ x for x in range(101) if x % 2 ==0]
>>> ls2 = [ x for x in range(101) if x % 2 !=0]
>>> ls1
[0, 2, 4, 6, 8, 10, 12, 14, 16, 18, 20, 22, 24, 26, 28, 30, 32, 34, 36, 38, 40, 42, 44, 46, 48, 50, 52, 54, 56, 58, 60, 62, 64, 66, 68, 70, 72, 74, 76, 78, 80, 82, 84, 86, 88, 90, 92, 94, 96, 98, 100]
>>> ls2
[1, 3, 5, 7, 9, 11, 13, 15, 17, 19, 21, 23, 25, 27, 29, 31, 33, 35, 37, 39, 41, 43, 45, 47, 49, 51, 53, 55, 57, 59, 61, 63, 65, 67, 69, 71, 73, 75, 77, 79, 81, 83, 85, 87, 89, 91, 93, 95, 97, 99]

>>> ls3 = [i * j for i in range(10) for j in range(10)]
>>> ls3
[0, 0, 0, 0, 0, 0, 0, 0, 0, 0, 0, 1, 2, 3, 4, 5, 6, 7, 8, 9, 0, 2, 4, 6, 8, 10, 12, 14, 16, 18, 0, 3, 6, 9, 12, 15, 18, 21, 24, 27, 0, 4, 8, 12, 16, 20, 24, 28, 32, 36, 0, 5, 10, 15, 20, 25, 30, 35, 40, 45, 0, 6, 12, 18, 24, 30, 36, 42, 48, 54, 0, 7, 14, 21, 28, 35, 42, 49, 56, 63, 0, 8, 16, 24, 32, 40, 48, 56, 64, 72, 0, 9, 18, 27, 36, 45, 54, 63, 72, 81]
缺点:如果一个列表特别的庞大,这样所有的元素直接初始化到内存中,引起大量无用元素占有内存问题
2、列表生成器
>>> res = ( x for x in range(10))
>>> res
<generator object <genexpr> at 0x000001F7D461C4A0>
>>> for i in res:
...     print(i)
...
0
1
2
3
4
5
6
7
8
9
使用全局函数next,每调用一次next,返回下一个值,直到最后抛出异常也可以使用循环迭代generator
>>> res = ( x for x in range(10))
>>> next(res)
0
>>> next(res)
1
>>> next(res)
2
>>> next(res)
3
>>> next(res)
4
>>> next(res)
5
>>> next(res)
6
>>> next(res)
7
>>> next(res)
8
>>> next(res)
9
generator的魔法属性
>>> res = ( x for x in range(10))
>>> dir(res)
['__class__', '__del__', '__delattr__', '__dir__', '__doc__', '__eq__', '__format__', '__ge__', '__getattribute__', '__gt__', '__hash__', '__init__', '__init_subclass__', '__iter__', '__le__', '__lt__', '__name__', '__ne__', '__new__', '__next__', '__qualname__', '__reduce__', '__reduce_ex__', '__repr__', '__setattr__', '__sizeof__', '__str__', '__subclasshook__', 'close', 'gi_code', 'gi_frame', 'gi_running', 'gi_yieldfrom', 'send', 'throw']
>>> res.__next__()
0
>>> res.__next__()
1
>>> res.__next__()
2
>>> res.__next__()
3
>>> res.__next__()
4
>>> res.__next__()
5
>>> res.__next__()
6
>>> res.__next__()
7
>>> res.__next__()
8
>>> res.__next__()
9
>>> res.__next__()
generator 好处:节约内存
3、将函数转换为生成器
ls = []

# 使用函数求斐波那锲数列,但是这样也存在内存被大量浪费的情况
def fibonacci(num):
    first, second = 1, 2
    index = 0
    while index < num:
        ls.append(first)
        first, second = second, first + second
        index += 1


if __name__ == '__main__':
    fibonacci(10)
    print(ls)


# 运行结果
[1, 2, 3, 5, 8, 13, 21, 34, 55, 89]
函数转换为生成器
# 使用函数求斐波那锲数列,但是这样也存在内存被大量浪费的情况
def fibonacci(num):
    first, second = 1, 2
    index = 0
    while index < num:
        first, second = second, first + second
        # 通过yield关键字,让函数被调用后返回一个生成器对象
        yield first
        index += 1


if __name__ == '__main__':
    res = fibonacci(5)
    print(res)
    for i in res:
        print(i)


# 运行结果
<generator object fibonacci at 0x000001ECED7BCC10>
2
3
5
8
13
十一、迭代器
1、判断可迭代对象
迭代对象:可以被迭代的对象。
>>> from collections.abc import Iterable
>>> dir(Iterable)
['__abstractmethods__', '__class__', '__delattr__', '__dir__', '__doc__', '__eq__', '__format__', '__ge__', '__getattribute__', '__gt__', '__hash__', '__init__', '__init_subclass__', '__iter__', '__le__', '__lt__', '__module__', '__ne__', '__new__', '__reduce__', '__reduce_ex__', '__repr__', '__setattr__', '__sizeof__', '__slots__', '__str__', '__subclasshook__', '_abc_impl']
>>>
>>> ls = [1, 2, 3]
>>> str = 'hello python'
>>> a = 10.55
>>> isinstance(ls, Iterable)
True
>>> isinstance(str, Iterable)
True
>>> isinstance(a, Iterable)
False
举例
from collections.abc import Iterable


# 使用函数求斐波那锲数列,但是这样也存在内存被大量浪费的情况
def fibonacci(num):
    first, second = 1, 2
    index = 0
    while index < num:
        first, second = second, first + second
        # 通过yield关键字,让函数被调用后返回一个生成器对象
        yield first
        index += 1


if __name__ == '__main__':
    res = fibonacci(5)
    print(res)
    # for i in res:
    #     print(i)
    if isinstance(res, Iterable):
        for i in res:
            print(i)
    else:
        print("该对象是不可迭代对象")
2、判断可迭代器
迭代器:在python,能够被全局函数next调用,并且返回下一个值的对象,就是迭代器。
>>> from collections.abc import Iterator
>>>
>>>
>>> dir(Iterator)
['__abstractmethods__', '__class__', '__delattr__', '__dir__', '__doc__', '__eq__', '__format__', '__ge__', '__getattribute__', '__gt__', '__hash__', '__init__', '__init_subclass__', '__iter__', '__le__', '__lt__', '__module__', '__ne__', '__new__', '__next__', '__reduce__', '__reduce_ex__', '__repr__', '__setattr__', '__sizeof__', '__slots__', '__str__', '__subclasshook__', '_abc_impl']
>>>
>>>
>>> ls = [21, 23, 44]
>>> res = ( x for x in range(10))
>>> isinstance(ls, Iterator)
False
>>> isinstance(res, Iterator)
True
3、可迭代对象,转换为迭代器
>>> isinstance(ls, Iterator)
False
>>> ls_s = iter(ls)
>>> next(ls_s)
21
>>> next(ls_s)
23
>>> next(ls_s)
44
可迭代对象不一定是迭代器,迭代器都是可迭代对象
结论:
- 凡是可作用于 for 循环的对象都是 Iterable 类型;
- 凡是可作用于 next() 函数的对象都是 Iterator 类型
- 可迭代对象不一定是迭代器,迭代器都是可迭代对象
- 集合数据类型如 list 、 dict 、 str 等是 Iterable 但不是 Iterator ,不过可以通过iter() 函数获得一个 Iterator 对象。
- 目的是在使用迭代器的时候,减少内存的占用。
生成器是一种特殊的迭代器
十二、闭包
闭包是一种现象,是若数据类型编程语言所特有的现象。
JavaScript(js)时时刻刻在使用闭包
概念: 能够在函数内部调用其他函数变量的现象就闭包函数包裹函数的现象,就叫做闭包
作用:让外层函数常驻内存,有可能垃圾无法回收(缺点)让局部变量全局化(优点)
def outer():
    '''
        这是一个闭包
    '''
    print("这个是一个闭包")
    a = 10
    def inner():
        print("这个是函数里面的代码")
        b = 20
        print(a + b)
    return inner


res = outer()
print(res)
res()


运行结果:
这个是一个闭包
<function outer.<locals>.inner at 0x00000155F62793A0>
这个是函数里面的代码
30
十三、装饰器
1、什么是装饰器
装饰器就是一个闭包函数,它能够@闭包名称装饰一个原有的函数,是的原有函数的功能更加的强大
2、如何定义装饰器
- 定义一个闭包,闭包有一个默认的参数,是一个引用,该引用就是需要装饰的函数
- 一个需要在里面函数里面调用引用(函数),在调用之前写的代码就会被装饰在原函数之前调用之后的代码,会被装饰在原函数之后。
def record(fn):
    print("装饰器开始工作了")
    # 如果装饰的函数存在了参数,请在闭包里面的函数中传递
    def inner(name, password):
        print("开始记录日志")
        fn(name, password)
        print("日志记录结束")
    print("装饰器返回了")
    return inner


@record
def login(name, password):
    print("{} --{} 用户要开始登录了".format(name, password))
    print("登录成功率")


login("刘建宏", "123456")


运行结果:
装饰器开始工作了
装饰器返回了
开始记录日志
刘建宏 --123456 用户要开始登录了
登录成功率
日志记录结束
十四、正则表达式
正则匹配
正则表达式是一门独立的技术,被很多编程语言实现了
>>> import re
>>> dir(re)
['A', 'ASCII', 'DEBUG', 'DOTALL', 'I', 'IGNORECASE', 'L', 'LOCALE', 'M', 'MULTILINE', 'Match', 'Pattern', 'RegexFlag', 'S', 'Scanner', 'T', 'TEMPLATE', 'U', 'UNICODE', 'VERBOSE', 'X', '_MAXCACHE', '__all__', '__builtins__', '__cached__', '__doc__', '__file__', '__loader__', '__name__', '__package__', '__spec__', '__version__', '_cache', '_compile', '_compile_repl', '_expand', '_locale', '_pickle', '_special_chars_map', '_subx', 'compile', 'copyreg', 'enum', 'error', 'escape', 'findall', 'finditer', 'fullmatch', 'functools', 'match', 'purge', 'search', 'split', 'sre_compile', 'sre_parse', 'sub', 'subn', 'template']
特殊说明
compile       编译--改变正则表达式的规则
findall       查找所有--返回列表
finditer      查找所有--返回一个迭代器
match         从头匹配
search        查找--匹配一次就返回结果
split         分割
sub           替换(和字符换方法中的replace功能一致)
案例
>>> s = 'i am a goog boy'
>>> re.match('i', s)
<re.Match object; span=(0, 1), match='i'>
>>> res = re.match('i', s)
>>> res.group()
'i'
1、元字符
# /d      匹配数字
>>> re.match("\d", "3")
<re.Match object; span=(0, 1), match='3'>
>>> re.match("\d", "a")
>>> re.match("\d", "A")

# .       匹配任意符号(/n除外)
<re.Match object; span=(0, 1), match='a'>
>>> re.match(".", 'b')
<re.Match object; span=(0, 1), match='b'>
>>> re.match(".", '12')
<re.Match object; span=(0, 1), match='1'>
>>> re.match(".", "\r")
<re.Match object; span=(0, 1), match='\r'>
>>> re.match(".", "\t")
<re.Match object; span=(0, 1), match='\t'>
>>> re.match(".", "\n")
>>> re.match("...", 'a&3')
<re.Match object; span=(0, 3), match='a&3'>

# \w       匹配有效符号(大小写字母、数字、下划线、各国文字)
>>> re.match("\w", "12aB_")
<re.Match object; span=(0, 1), match='1'>
>>> re.match("\w", "男孩 is man")
<re.Match object; span=(0, 1), match='男'>
>>> re.match("\w", "$2aB_")
>>> re.match("\w", "%2aB_")
>>> re.match("\w", "&2aB_")

# \s       匹配空白位
>>> re.match("\s", " oooadsds")
<re.Match object; span=(0, 1), match=' '>
>>> re.match("\s", "\taoooadsds")
<re.Match object; span=(0, 1), match='\t'>
>>> re.match("\s", "aoooadsds")

# ^       以...开头
>>> re.findall("^1.*", "1sxcd2dwer34")
['1sxcd2dwer34']
>>> re.findall("^1.*", "sxcd2dwer34")
[]

# $       以...结尾
>>> re.match("1\d*8$", "18")
<re.Match object; span=(0, 2), match='18'>
>>> re.match("1\d*8$", "1768")
<re.Match object; span=(0, 4), match='1768'>

# []      列举([0123456789]和\d功能相同)
>>> re.match("[0123456789]", "3")
<re.Match object; span=(0, 1), match='3'>
>>> re.match("[0123456789]", "63")
<re.Match object; span=(0, 1), match='6'>
>>> re.match("[0-9]", "63")
<re.Match object; span=(0, 1), match='6'>
>>> re.match("[a-zA-Z]", "A")
<re.Match object; span=(0, 1), match='A'>
>>> re.match("[a-zA-Z]", "a")
<re.Match object; span=(0, 1), match='a'>
>>> re.match("[a-zA-Z]", "-")
>>> re.match("[a-zA-Z0-9_]", "i")
<re.Match object; span=(0, 1), match='i'>
课堂练习
>>> re.match(".", "A")
<re.Match object; span=(0, 1), match='A'>
>>>
>>> re.match(".", "8")
<re.Match object; span=(0, 1), match='8'>
>>>
>>> re.match(".", "_")
<re.Match object; span=(0, 1), match='_'>
>>>
>>> re.match(".", "zhangshuaige")
<re.Match object; span=(0, 1), match='z'>
>>>
>>> re.match(".", "10000")
<re.Match object; span=(0, 1), match='1'>
>>>
>>>
>>> re.match(".", "\n10000")
>>> re.match(".", "\t10000")
<re.Match object; span=(0, 1), match='\t'>
>>> re.match("...", "10000")
<re.Match object; span=(0, 3), match='100'>

>>> re.match("[123456789]", "6六六六")
<re.Match object; span=(0, 1), match='6'>
>>>
>>> re.match("[0-9]", "6六六六")
<re.Match object; span=(0, 1), match='6'>
>>>
>>> re.match("[a-z]", "this is good day")
<re.Match object; span=(0, 1), match='t'>
>>>
>>> re.match("[a-z0-9A-Z]", "this is good day")
<re.Match object; span=(0, 1), match='t'>
>>>
>>>
>>> re.match("[a-z0-9A-Z张万强]", "万this is good day")
<re.Match object; span=(0, 1), match='万'>

>>> re.match("[\u4e00-\u9fa5]", "算法与数据结构")
<re.Match object; span=(0, 1), match='算'>
>>>
>>> re.match("我今年成年了", "我今年成年了")
<re.Match object; span=(0, 6), match='我今年成年了'>
>>>
>>> re.match("我今年\d岁", "我今年16岁")
>>> re.match("我今年\d岁", "我今年1岁")
<re.Match object; span=(0, 5), match='我今年1岁'>
>>> re.match("我今年\d\d岁", "我今年16岁")
<re.Match object; span=(0, 6), match='我今年16岁'>

>>> re.match("\D", "我今年20岁")
<re.Match object; span=(0, 1), match='我'>
>>>
>>> re.match("\s", "我今年20岁")
>>>
>>> re.match("\s", "\t我今年20岁")
<re.Match object; span=(0, 1), match='\t'>
>>>
>>> re.match("\s", "\n我今年20岁")
<re.Match object; span=(0, 1), match='\n'>
2、反义符
# \D          不是数字
>>> re.match("\D", "3")
>>> re.match("\D", "c")
<re.Match object; span=(0, 1), match='c'>

# \W          不是有效符号
>>> re.match("\W", "3")
>>> re.match("\W", "c")
>>> re.match("\W", "-")
<re.Match object; span=(0, 1), match='-'>
>>> re.match("\W", "_")
>>> re.match("\W", "%")
<re.Match object; span=(0, 1), match='%'>

# \S          非空白位(空白位也属于符号,在acsiic中占有字节)
>>> re.match("\S", " kxaasichisdc")
>>> re.match("\S", "kxaasichisdc")
<re.Match object; span=(0, 1), match='k'>

# ^           列举相反
>>> re.findall("1[^356789]\d{9}", "13423456733")
[]
>>> re.findall("1[^356789]\d{9}", "14423456733")
['14423456733']
>>> re.findall("1[^356789]\d{9}", "12423456733")
['12423456733']
3、转移符号
在python的字符串中\是具有特殊含义的,要正常表示一个\,需要两个\\来表示 在正则中,\是具有特殊含义的,要正常表示一个\,需要两个\\来表示
建议大家以后在写正则的时候,一定要在正则表达式前面加上r
>>> path = "c:\\a\\b\\c"
>>> re.match("c:\\\\a\\\\b\\\\c", path)
>>> re.match(r"c:\\a\\b\\c", path)
<re.Match object; span=(0, 8), match='c:\\a\\b\\c'>
>>> re.findall(r"\d", ss)
['1', '7', '1', '8']
4、位数
# *         表示匹配任意位(可以是0位、可以是1位、可以有n位)
>>> re.findall(r".*", ss)
['我是我帅哥,我今年17岁,不对是18岁...', '']

# +     至少一位(至少是1位、可以有n位)
>>> re.findall(r"\d+", ss)
['17', '18']

# ?         0位或者1位
>>> re.findall("1[356789]\d{?}", "13423456733")
[]

# {n}   有n位
>>> re.findall("1[356789]\d{9}", "13423456733")
['13423456733']

# {n,}    至少n
>>> re.findall("1[356789]\d{3,}", "13423456733")
['13423456733']

# {n, m}  表示n~m这个区间范围
>>> re.findall("1[356789]\d{3,5}", "13423456733")
['1342345']
5、分组
在正则表达式中,使用圆括号()将正则中包裹起来,会形成正则匹配后的二次筛选 分组最大的好处就是能够形成第二次筛选
r"</?.*?>" # 匹配HTML标签
6、贪婪模式和非贪婪(懒惰)模式
Python,默认都是使用贪婪模式将贪婪转换为非贪婪模式使用?
十五、Python高级
- 系统编程
- 多任务
- 多进程(居多)
- 多线程
- 协程
- 网络编程(套接字编程 socket)
- TCP
- UDP
- 并发编程
- 数据库编程