第2章 课程管理
1. 新增课程
1.1 前端页面实现
用户管理页面对应的是/course/index.html页面,根据产品设计的原型已经完成了页面基本结构的编写,现在需要完善页面动态效果。
1.1.1 弹出新增窗口
页面中已经提供了新增页面,当用户在/course/index.html中点击新增用户按钮会打开新增页面。新增页面中的表单在div中由inputVisible属性控制为true显示状态。当点击el-tag标签页关闭的时候设置inputVisible为false会隐藏表单返回到/course/index.html
data: {
    /*校验的字段*/
    ruleForm: {
        courseName: '',
        descs: '',
        courseType: '',
        coursePrice: '',
    },
    /*规则*/
    rules: {
        courseName: [{
            required: true,
            message: '请输入课程名称',
            trigger: 'blur'
        }, ],
        descs: [{
            required: true,
            message: '请选择课程简介',
            trigger: 'blur'
        }],
        courseType: [{
            required: true,
            message: '请选择课程类型',
            trigger: 'change'
        }],
        coursePrice: [{
            required: true,
            message: '请输入课程价格',
            trigger: 'blur'
        }],
        status: [{
            required: true,
            message: '请至少选择一个状态',
            trigger: 'change'

        }]
    },
    /*文件上传*/
    dialogImageUrl: '',
    dialogVedioUrl: '',
    /*选项卡*/
    inputVisible: true,
    disable: false,
},
methods: {
    /*选项卡关闭 、表单取消*/
    handleClose() {
        this.disable = true
        this.inputVisible = false
        history.go(-1);
    }
1.1.2 文件上传
页面中使用了2个elementUI中的上传组件 分别用于上传图片和上传视频 组件上有一个函数分别
handleExceed:/超出提示/
handleRemove:/移除文件/
submitUpload:/提交文件到服务器/
http-request:覆盖上传的行为

/*文件上传*/
dialogImageUrl: '', //回显图片
dialogVedioUrl: '', //回显视频


/*
    执行上传图片和上传视频都会执行的函数
     content:上传的upload组件
        action:从组件中获取上传提交
        file:获取你上传的文件资源
*/
myUpload(content) {

    console.log(content)
    //用于文件上传的请求体、它会将表单编码方式multipart/form-data
    var  params= new FormData();
    params.append("fileName",content.file)
    /* 发送ajax请求 */
    axios({
        url:content.action,
        data:params,
        method:"post"
    }).then(resp=>{

        if(resp.data.code==401){
            this.$message.warning(resp.data.message)
            setTimeout("location.href='http://127.0.0.1:5500/edu/html/login.html'",1000)
            return
        }
        this.$message.success(resp.data.message)
        if(resp.data.message=="图片上传成功"){
            //给图片赋值
            this.dialogImageUrl="http://localhost/img/"+resp.data.obj
        }else{
            //给视频赋值
            this.dialogVedioUrl="http://localhost/img/"+resp.data.obj
        }

    })

}
1.1.3 上传文件后端业务实现
创建课程管理模块实体类
package com.ujiuye.entity;
/**
 * 课程表实体类
 */
public class Course {
    private int cid;
    private String courseName;
    private String descs;
    private int courseType;
    private String courseImage;
    private String courseVideo;
    private String coursePrice;
    private int status; // 课程状态 0:未上架  1:上架 2:下架
    private String createTime;

    public int getCid() {
        return cid;
    }

    public void setCid(int cid) {
        this.cid = cid;
    }

    public String getCourseName() {
        return courseName;
    }

    public void setCourseName(String courseName) {
        this.courseName = courseName;
    }

    public String getDescs() {
        return descs;
    }

    public void setDescs(String descs) {
        this.descs = descs;
    }

    public int getCourseType() {
        return courseType;
    }

    public void setCourseType(int courseType) {
        this.courseType = courseType;
    }

    public String getCourseImage() {
        return courseImage;
    }

    public void setCourseImage(String courseImage) {
        this.courseImage = courseImage;
    }

    public String getCourseVideo() {
        return courseVideo;
    }

    public void setCourseVideo(String courseVideo) {
        this.courseVideo = courseVideo;
    }

    public String getCoursePrice() {
        return coursePrice;
    }

    public void setCoursePrice(String coursePrice) {
        this.coursePrice = coursePrice;
    }

    public int getStatus() {
        return status;
    }

    public void setStatus(int status) {
        this.status = status;
    }

    public String getCreateTime() {
        return createTime;
    }

    public void setCreateTime(String createTime) {
        this.createTime = createTime;
    }

    @Override
    public String toString() {
        return "Course{" +
                "cid=" + cid +
                ", courseName='" + courseName + '\'' +
                ", descs='" + descs + '\'' +
                ", courseType=" + courseType +
                ", courseImage='" + courseImage + '\'' +
                ", courseVideo='" + courseVideo + '\'' +
                ", coursePrice='" + coursePrice + '\'' +
                ", status=" + status +
                ", createTime='" + createTime + '\'' +
                '}';
    }
}
1.上传文件采用的表单编码方式为multipart/form-data、请求方式为post、CourseServlet上必须添加注解@MutipartConfig

2.在com.ujiuye.utils中创建上传工具类FileUploadUtils 用于上传图片和视频 返回值是上传成功后重命名后的文件名
package com.ujiuye.utils;

public class FileNameUtils {

    public static String substringFileNme(String fileName) {
        //http://localhost/img/38ad0fb0-907a-46e8-8357-129ca9d45973javaWeb.jpg
        //substring从指定索引位置开始一直截取最后
        //lastIndexOf:获取指定字符串在该字符串最后一次出现的索引位置 返回值是个索引
        return  fileName.substring(fileName.lastIndexOf("/")+1);
    }

    public static void main(String[] args) {

        String s = substringFileNme("http://localhost/img/f910efed-02b3-46d2-b79a-1d2566c97fa5001.mp4");

        System.out.println(s);
    }
}
3.在CourseServlet中创建uploadFile方法用于文件上传
    public void insertCourse(HttpServletRequest request, HttpServletResponse response) throws InvocationTargetException, IllegalAccessException {
        //接受数据到map中
        Map<String, String[]> map = request.getParameterMap();
        //创建课程对象
        Course course = new Course();
        //将Map中的数据封装到课程对象中
        BeanUtils.populate(course,map);
        //接受图片名称
        course.setCourseImage(FileNameUtils.substringFileNme(request.getParameter("dialogImageUrl")));
        //接受视频名称
        course.setCourseVideo(FileNameUtils.substringFileNme(request.getParameter("dialogVedioUrl")));
        //调用业务保持数据
        int row =service.insertCourse(course);
        if (row>0) {
            vo = new ResultVo(200, "新增课程成功", null);
        }else{
            vo = new ResultVo(500, "新增课程失败", null);

        }
        JsonUtils.objToJson(vo,response);
    }
4.配置D:/xm_upload文件存放目录到服务器中

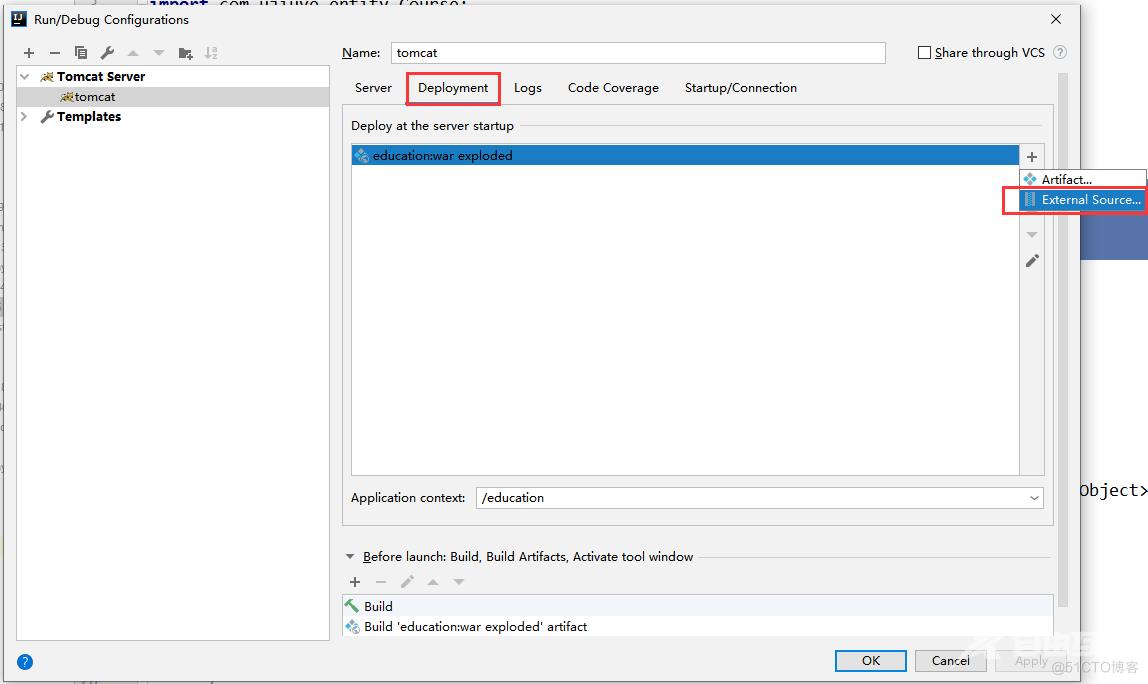
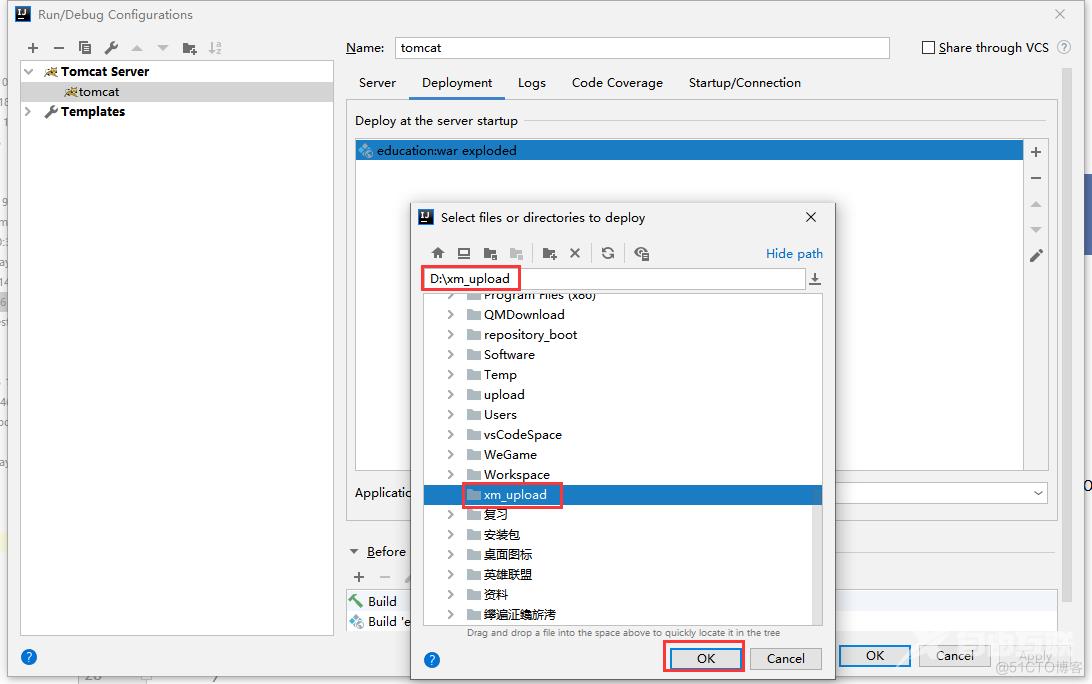
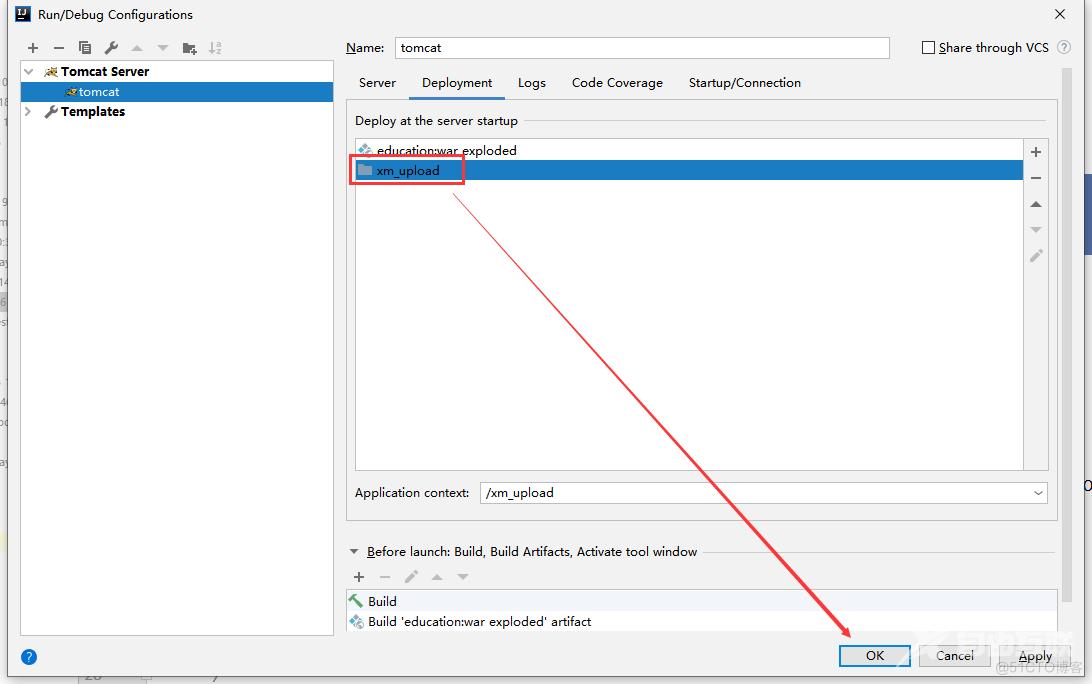
1.1.4 权限过滤
思考一个问题当我们没有登录,用户直接通过addCourse.html做上传课程操作或者做系统内其他检索操作这种情况下我们能让客户随便操作吗?答案是当然不可以!那么我们可以这样做
在com.ujiuye.utils下创建过滤器loginFiter2
(强调一下、一定要注意写到这我们已经用了2个过滤器、而且这2个过滤器都会拦截所有的请求称为过滤器链、这块我们用的是注解方式,注解用于区分哪个过滤器先执行主要是按照过滤器后面的阿拉伯数字排序 因此我们要知道 CorsFilter1先执行 loginFiter2后执行)
package com.ujiuye.utils;

import com.ujiuye.entity.User;

import javax.servlet.*;
import javax.servlet.annotation.WebFilter;
import javax.servlet.http.HttpServletRequest;
import javax.servlet.http.HttpServletResponse;
import javax.servlet.http.HttpSession;
import java.io.IOException;

@WebFilter("/*")
public class LoginFilter2 implements Filter {
    @Override
    public void init(FilterConfig filterConfig) throws ServletException {

    }

    @Override
    public void doFilter(ServletRequest servletRequest, ServletResponse servletResponse, FilterChain filterChain) throws IOException, ServletException {
        HttpServletResponse response = (HttpServletResponse) servletResponse;
        HttpServletRequest request = (HttpServletRequest) servletRequest;

        //从session中获取用户对象
        HttpSession session = request.getSession();
        User user = (User) session.getAttribute("user");

        if (user!=null) {
            //登录了
            filterChain.doFilter(request,response);//放行
        }else{
            //没有登录  http://localhost/education/user?method=login
            // http://localhost/education/user?method=loginOut
            // http://localhost/education/user?method=findUser
            //获取请求路径
            String uri = request.getRequestURI();// education/code
            String method = request.getParameter("method");
            if (uri.contains("code") || "login".equals(method) || "loginOut".equals(method) || "findUser".equals(method)) {
                //不需要拦截
                filterChain.doFilter(request,response);//放行
            }else{
                    ResultVo vo = new ResultVo(401, "请登录后再操作", null);
                    JsonUtils.objToJson(vo,response);
                /* 错误颜色
                  response.sendRedirect("http://127.0.0.1:5500/edu/html/login.html");*/
            }

        }

    }

    @Override
    public void destroy() {

    }
}
在没有登录的情况下再次直接通过addCorse.html上传资源试试看
1.1.5 移除文件
当用户将添加在上传组件中的文件移除后就会触发handleRemove函数 移除本地磁盘中已上传的文件
/* 移除文件 */
handleRemove(file, fileList) {
    var fileName
    if(this.dialogImageUrl.indexOf(file.name)!=-1){
        //删除是图片
        fileName=this.dialogImageUrl
        this.dialogImageUrl=""
    }else{
        //删除是视频
        fileName=this.dialogVedioUrl
        this.dialogVedioUrl=""
    }

    axios({
        url:"http://localhost/education/courses?method=removeFile&fileName="+fileName,
        method:"get"
    }).then(resp=>{
        //给出提示
        this.$message.success(resp.data.message)
    })

}
1.1.6 移除文件后端业务实现
1.在com.ujiuye.utils中添加工具类SubStringFileName 用于截取 要删除资源中的文件名
public class SubStringFileName {

    public static String subFileName(String fileName){
        fileName=fileName.substring(fileName.lastIndexOf("/")+1);
        return fileName;
    }
}
2.在CourseServlet中添加RemoveFile方法根据用户传入的要移除文件的名称去本地磁盘中删除该文件
 public void removeFile(HttpServletRequest request, HttpServletResponse response) {
        //获取文件名
        String fileName = request.getParameter("fileName");
        //截取文件名
        fileName= FileNameUtils.substringFileNme(fileName);
        //创建文件对象
        File file = new File("D:/xm_upload/"+fileName);
        //删除文件
        file.delete();
        //判断上次是图片还是视频
        if (fileName.endsWith(".jpg") || fileName.endsWith(".jpeg") || fileName.endsWith(".png") || fileName.endsWith(".gif")) {
            //是图片
            vo = new ResultVo(200, "图片移除成功", fileName);
        } else {
            vo = new ResultVo(200, "视频移除成功", fileName);
        }
        JsonUtils.objToJson(vo,response);

    }
1.1.7 提交表单数据
点击新增窗口中的确定按钮时,触发submitForm方法,所以需要在submitForm方法中进行完善。
实现步骤:
步骤:
-
校验表单输入项是否合法
-
表单数据校验通过,发送ajax请求将表单数据提交到后台
1.判断后台返回的code值, 200表示添加操作成功, 500为添加操作失败
2.保存成功, 弹出成功提示, 显示服务返回的消息
3.保存失败, 弹出错误提示, 显示服务返回的消息
4.无论什么情况,都重新请求当前分页, 跳转到展示课程页面
-
表单验证失败,弹出验证失败提示
/* 数据提交 */
submitForm(formName) {
    this.$refs[formName].validate((valid)=>{
        if(valid){
            //组装请求参数
            var params=	new URLSearchParams();
            params.append("courseName",this.ruleForm.courseName)
            params.append("descs",this.ruleForm.descs)
            params.append("courseType",this.ruleForm.courseType)
            params.append("coursePrice",this.ruleForm.coursePrice)
            params.append("status",this.ruleForm.status)
            params.append("dialogImageUrl",this.dialogImageUrl)
            params.append("dialogVedioUrl",this.dialogVedioUrl)

            axios({
                url:"http://localhost/education/courses?method=insertCourse",
                data:params,
                method:"post"
            }).then(resp=>{
                if(resp.data.code==200){
                    this.$message.success(resp.data.message)
                }
                //跳转到/course/index.html
                setTimeout("location.href='http://127.0.0.1:5500/edu/html/course/index.html'",1000)
            })


        }else{

            this.$message.warning(`表单校验失败`)

        }


    })
}
2.2 后端业务实现
-
实现步骤:
1.实现后端业务控制器
在CourseServlet控制器,提供新增用户的方法,让其调用服务完成新增业务;
2.完善业务实现与业务实现
- 在CourseService接口提供业务方法
- 在CourseServiceImpl实现类中实现业务方法
- 在CourseDao接口中提供操作数据库方法
- 在CourseDaoImpl实现类中提供方法实现
最终验证测试,是否插入数据成功
2.2.1 servlet
修改education工程,在CourseServlet中增加新增用户方法
  public void insertCourse(HttpServletRequest request, HttpServletResponse response) throws InvocationTargetException, IllegalAccessException {
        //接受数据到map中
        Map<String, String[]> map = request.getParameterMap();
        //创建课程对象
        Course course = new Course();
        //将Map中的数据封装到课程对象中
        BeanUtils.populate(course,map);
        //接受图片名称
        course.setCourseImage(FileNameUtils.substringFileNme(request.getParameter("dialogImageUrl")));
        //接受视频名称
        course.setCourseVideo(FileNameUtils.substringFileNme(request.getParameter("dialogVedioUrl")));
        //调用业务保持数据
        int row =service.insertCourse(course);
        if (row>0) {
            vo = new ResultVo(200, "新增课程成功", null);
        }else{
            vo = new ResultVo(500, "新增课程失败", null);

        }
        JsonUtils.objToJson(vo,response);
    }
2.2.2 service类
修改com.ujiuye.service在CourseService实现类中扩展方法实现
public class CourseService {
    CourseDao dao= new CourseDao();
    public int insertCourse(Course c) {
        String sql = "insert into course values(null,?,?,?,?,?,?,?,?)";
        return dao.update(sql, c.getCourseName(), c.getDescs(), c.getCourseType(), c.getCourseImage(), c.getCourseVideo(), c.getCoursePrice(), c.getStatus(), new Date());
    }
}
2.2.3 dao接口
修改com.ujiuye.dao,在CourseDao接口中扩展操作数据库方法
package com.ujiuye.dao;

import com.ujiuye.entity.Course;

public class CourseDao extends BaseDao<Course> {
}
2、课程分页
2.1 分页分析
本项目所有分页功能都是基于ajax的异步请求来完成的,请求参数是键值对形式 后台响应数据格式使用json数据格式。
请求参数包括页码、每页显示记录数、查询条件。
请求参数的键值对格式为:currentPage:1,pageSize:10,Coursename:''adm''
后台响应数据包括总记录数、当前页、每页显示条数、需要展示的数据集合。
响应数据的json格式为:
{ "currentPage":1, "pageSize":3, "totalCount":8, "totalPage":3, "list":[{课程1},{课程2}..]
}
如下图:
前端页面:

2.2 完善页面
2.2.1 定义分页相关模型数据
tableData: [],//当前页要展示的分页列表数据
search: '',//查询条件
pageSize: 3,//每页显示的记录数
currentPage: 1,//当前页码
totalCount: '',//总记录数
2.2.2 定义分页方法
在页面中提供了findAll方法用于分页查询,为了能够在/course/index.html页面加载后直接可以展示分页数据,可以在VUE提供的钩子函数created中调用findAll方法
实现步骤:
-
初始化请求参数
如果有查询条件,就携带查询条件查询符合条件的当前页数据
-
封装请求参数
当前页、默认每页记录数、查询条件
-
发送axios请求,处理回调
把数据集和总记录数等数据重新赋值给模型
/*加载数据*/
created: function () {
    this.findAll(this.currentPage);
}
//分页查询
    /* 分页+组合条件方法 */
    findAll() {
        //组装参数
        var params=	new URLSearchParams()
        params.append("currentPage",this.currentPage)
        params.append("pageSize",this.pageSize)
        params.append("search",this.search)
        //发送请求
        axios({
            url:"http://localhost/education/courses?method=findPages",
            data:params,
            method:"post"
        }).then(resp=>{
            this.tableData=	resp.data.list
            this.pageSize=resp.data.pageSize
            this.currentPage=resp.data.currentPage
            this.totalCount=resp.data.totalCount
            this.totalPage=resp.data.totalPage
        })

    }
2.2.3 完善分页方法执行时机
除了在created钩子函数中调用findAll方法查询分页数据之外,当用户输入完查询条件后分也需要调用findAll方法重新发起查询请求。
为查询按钮绑定离开焦点事件,调用findAll方法
<el-table-column align="left" width="200px">
 <template slot="header" slot-scope="scope">
  <el-input v-model="search" @blur="findAll()" size="mini" placeholder="输入课程名称搜索" />
  </template>
</el-table-column>
为分页条组件绑定current-change事件,此事件是分页条组件自己定义的事件,当页码改变时触发,对应的处理函数为handleCurrentChange
<el-pagination @size-change="handleSizeChange" @current-change="handleCurrentChange"
    :current-page="currentPage" :page-sizes="[3, 4, 5, 6]" :page-size="pageSize"
    layout="total, sizes, prev, pager, next, jumper" :total="totalCount">
</el-pagination>
定义handleCurrentChange方法
/* 切换页码 */
handleCurrentChange: function (currentPage) {
    this.currentPage=currentPage
    this.findAll()
},
定义handleSizeChange方法
/* 切换每页显示条数 */
handleSizeChange: function (size) {
    this.pageSize=size
    this.findAll()
},
2.3 后台代码
2.3.1 在com.ujiuye.utils下创建分页所需工具类
package com.ujiuye.utils;
import java.util.List;
public class PageBean<T> {

	private int currentPage;//当前页
	private int pageSize;//每页显示条数
	private int totalCount;//总条数
	private int totalPage;//总页数
	private List<T>list;// 用户想看的数据
	public int getCurrentPage() {
		return currentPage;
	}
	public void setCurrentPage(int currentPage) {
		this.currentPage = currentPage;
	}

	public int getPageSize() {
		return pageSize;
	}

	public void setPageSize(int pageSize) {
		this.pageSize = pageSize;
	}

	public int getTotalCount() {
		return totalCount;
	}

	public void setTotalCount(int totalCount) {
		this.totalCount = totalCount;
	}

	public int getTotalPage() {
		return totalPage;
	}

	public void setTotalPage(int totalPage) {
		this.totalPage = totalPage;
	}

	public List<T> getList() {
		return list;
	}

	public void setList(List<T> list) {
		this.list = list;
	}

	public PageBean(int currentPage, int pageSize, int totalCount, int totalPage, List<T> list) {
		super();
		this.currentPage = currentPage;
		this.pageSize = pageSize;
		this.totalCount = totalCount;
		this.totalPage = totalPage;
		this.list = list;
	}

	public PageBean() {
		super();
		// TODO Auto-generated constructor stub
	}


}
2.3.2 servlet
修改education工程,在CourseServlet中增加分页查询方法
 public void findPages(HttpServletRequest request, HttpServletResponse response) {
        //接受请求
        String currentPage = request.getParameter("currentPage");
        String pageSize = request.getParameter("pageSize");
        String search = request.getParameter("search");
        //调用业务
        PageBean<Course> pb= service.findPages(currentPage,pageSize,search);
        //响应处理结果
        JsonUtils.objToJson(pb,response);

    }
2.3.3 service类
修改com.ujiuye.service,在CourseService实现类中扩展分页查询方法
  public PageBean<Course> findPages(String currentPage, String pageSize, String search) {
        int cpage = Integer.parseInt(currentPage);
        int size = Integer.parseInt(pageSize);
        PageBean<Course> pb = new PageBean<>();
        pb.setCurrentPage(cpage);
        pb.setPageSize(size);
        //定义初始化的sql
        StringBuilder sb = new StringBuilder("select * from course where 1=1  ");

        //创建集合存储?占位符参数
        ArrayList<Object> list = new ArrayList<>();

        if (search!=null && !search.trim().equals("")) {
            //输出了查询关键字
            sb.append(" and courseName like ?  ");
            list.add("%" + search + "%");
        }
        //查询符合条件的一共有多少记录
        int totalCount = dao.getListEntity(sb.toString(), Course.class, list.toArray()).size();
        pb.setTotalCount(totalCount);
        //计算总页数
        int totalPage= totalCount%size==0?totalCount/size:totalCount/size+1;
        pb.setTotalPage(totalPage);
        //以分页查询符合条件的数据
        sb.append(" limit ?,? ");
        //计算起始页
        int start = (cpage - 1) * size;
        list.add(start);
        list.add(size);
        //以分页查询符合条件的数据
        List<Course> courseList = dao.getListEntity(sb.toString(), Course.class, list.toArray());
        pb.setList(courseList);
        return pb;
    }
2.3.4 dao类
修改com.ujiuye.dao,在CourseDao实现类中扩展实现方法
package com.ujiuye.dao;

import com.ujiuye.entity.Course;

public class CourseDao extends BaseDao<Course> {
}
3. 批量删除课程
3.1 完善页面
为了防止用户误操作,点击删除按钮时需要弹出确认删除的提示,用户点击取消则不做任何操作,用户点击确定按钮再提交删除请求。
3.1.1 全选全不选功能实现
当点击页面中表头上的复选框后、当前页面中所有的复选框将会选中并收集选中行的课程cid放入数组中、反之则不选中
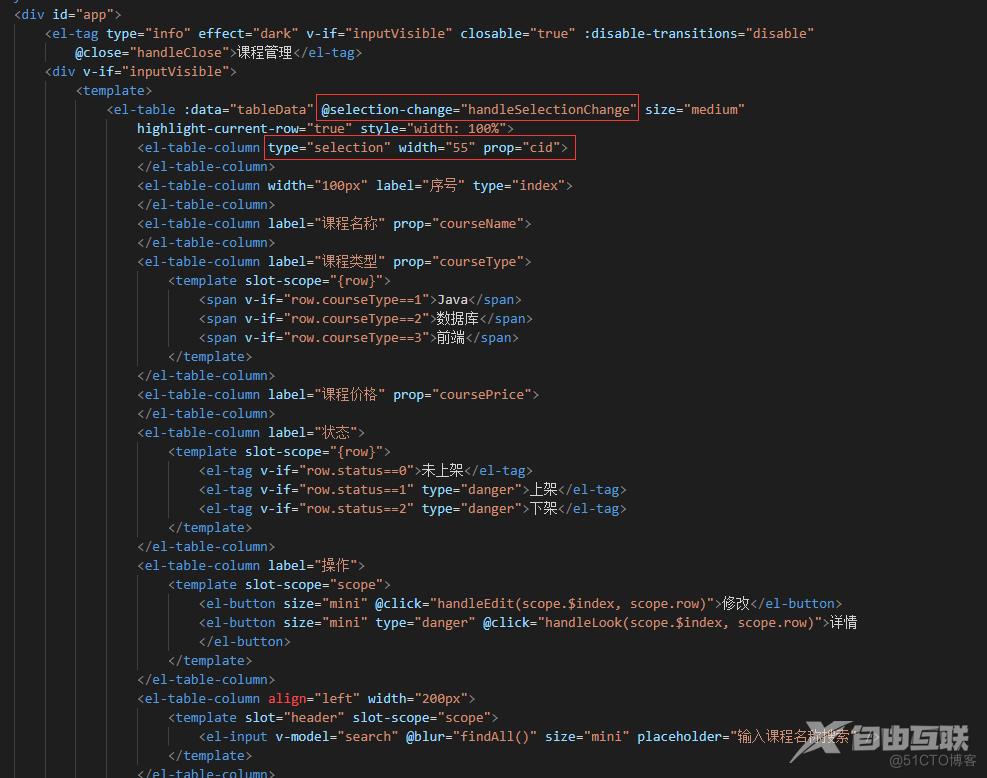
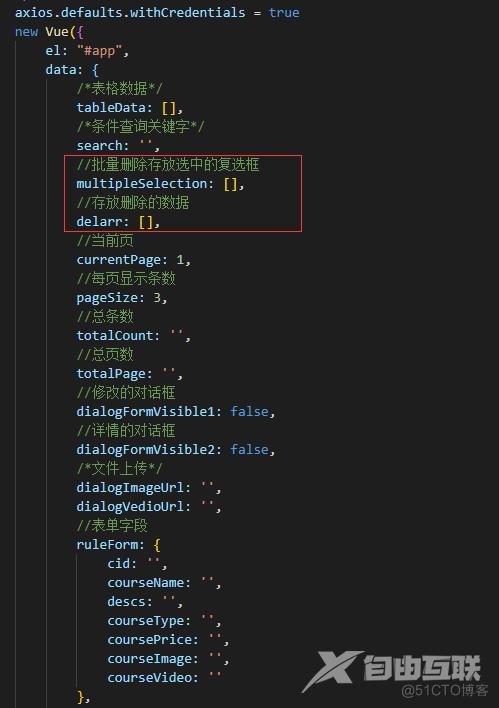
//批量删除被选中的复选框
handleSelectionChange(val) {
    this.multipleSelection = val;
},
3.1.2 绑定单击事件
需要为删除选中按钮绑定单击事件,并且所选行数据作为参数传递给处理函数
<el-button type="warning" @click="delAll()">删除选中</el-button>
用户点击删除按钮会执行delAll方法,此处需要完善delAll方法,弹出确认提示信息。ElementUI提供了$confirm方法来实现确认提示信息弹框效果
3.1.3 发送请求
如果用户点击确定按钮就需要发送ajax请求,并且将当前检查项的id作为参数提交到后台进行删除操作
实现步骤:
- 提示是否删除
- 确认删除,发送axios请求,进行回调处理
- 删除成功,弹出消息, 提示服务器返回的正常消息,刷新当前页面
- 删除失败,弹出消息, 提示服务器返回的错误消息
delAll() {
    	this.$confirm("确认删除当前选中的记录吗?", "提示", { type: 'warning' }).then(() => {
        const length = this.multipleSelection.length;
        for (let i = 0; i < length; i++) {
            this.delarr.push(this.multipleSelection[i].cid);
        }
        //发送axios请求
        let url = "http://localhost/education/courses?method=delAll&cids=" + this.delarr
        axios.get(url).then(resp => {
            if (resp.data.code == 200) {
                this.$message({
                    showClose: true,
                    message: resp.data.message,
                    type: 'success'
                });
            }else{
                this.$message({
                    message: resp.data.message,
                    type: 'warning'
                });
            }
             //1秒后跳转到课程管理的index
            window.setTimeout("window.location='index.html'",1000);
        })
    }).catch(() => {
        alert('点击了取消按钮');
    })
}
3.2 后台代码
3.2.1 servlet
修改education工程,在CourseServlet中增加批量删除课程方法
public void delAll(HttpServletRequest request, HttpServletResponse response) throws IOException {
    String cids = request.getParameter("cids");
    int row = service.delAll(cids);
    if (row > 0) {
        vo = new ResultVO(200, "批量删除成功", null);
    } else {
        vo = new ResultVO(500, "批量删除成功", null);
    }
	JsonUtils.objToJson(vo,response);
}
3.2.2 service类
修改com.ujiuye.service,在CourseService类中扩展方法实现
public int delAll(String cids) {
    String[] ids = cids.split(",");
    int index =0;
    for (String cid : ids) {
       int row = dao.update(cid);
       if(row>0){
           index++;
       }
    }
    return index;
}
3.2.3 dao类
修改com.ujiuye.dao,在CourseDao实现类中扩展实现方法
package com.ujiuye.dao;

import com.ujiuye.entity.Course;

public class CourseDao extends BaseDao<Course> {
}
4. 编辑课程
4.1 完善页面
用户点击编辑按钮时,需要弹出编辑窗口并且将当前记录的数据进行回显,用户修改完成后点击确定按钮将修改后的数据提交到后台进行数据库操作。
4.1.1 绑定单击编辑按钮事件编写vue数据回显
需要为编辑按钮绑定单击事件,并且将当前行数据作为参数传递给处理函数
<el-button size="mini" @click="handleEdit(scope.$index, scope.row)">修改</el-button>
    /* 修改回显 */
    handleEdit(index, row) {
        this.dialogImageUrl="http://localhost/img/"+row.courseImage
        this.dialogVedioUrl="http://localhost/img/"+row.courseVideo
        //将当前行内容赋值给修改表单
        this.ruleForm=row
        //将修改对话框显示出来
        this.dialogFormVisible1=true

    }
4.1.2 发送请求
在编辑窗口中修改完成后,点击确定按钮提交请求,所以需要为确定按钮绑定事件并提供处理函数submitForm
实现步骤:
-
进行表单验证
-
表单验证成功,发送axios请求,进行回调处理
2.编辑成功,弹出成功提示,显示服务返回的消息
3.编辑失败,弹出错误提示,显示服务返回的消息
4.无论执行结果如何,隐藏编辑窗口, 重新发送请求查询分页数据
-
表单验证失败, 弹出验证失败提示
<el-button type="primary" @click="submitForm('ruleForm')">确 定</el-button>
/* 修改数据提交 */
submitForm(formName) {
    this.$refs[formName].validate((valid)=>{
        if(valid){
            //组装数据
            var params=	new URLSearchParams()
            params.append("cid",this.ruleForm.cid)
            params.append("courseName",this.ruleForm.courseName)
            params.append("descs",this.ruleForm.descs)
            params.append("courseType",this.ruleForm.courseType)
            params.append("coursePrice",this.ruleForm.coursePrice)
            params.append("status",this.ruleForm.status)
            params.append("dialogImageUrl",this.dialogImageUrl)
            params.append("dialogVedioUrl",this.dialogVedioUrl)

            //发送ajax
            axios({
                url:"http://localhost/education/courses?method=updateCourse",
                data:params,
                method:"post"
            }).then(resp=>{
                if(resp.data.code==200){
                    this.$message.success(resp.data.message)
                    //隐藏对话框
                    this.dialogFormVisible1=false
                    //查询最新数据
                    this.findAll()
                }else{
                    this.$message.warning(resp.data.message)
                }
            })


        }else{
            this.$message.warning(`表单校验失败`)
        }

    })
},
4.2 后台代码
4.2.1 servlet
修改education工程,在CourseServlet中增加更新课程方法
    public void updateCourse(HttpServletRequest request, HttpServletResponse response) throws InvocationTargetException, IllegalAccessException {
        //接受数据到map中
        Map<String, String[]> map = request.getParameterMap();
        //创建课程对象
        Course course = new Course();
        //将Map中的数据封装到课程对象中
        BeanUtils.populate(course,map);
        //接受图片名称
        course.setCourseImage(FileNameUtils.substringFileNme(request.getParameter("dialogImageUrl")));
        //接受视频名称
        course.setCourseVideo(FileNameUtils.substringFileNme(request.getParameter("dialogVedioUrl")));
        //调用业务进行更新
        int row =service.updateCourse(course);

        //响应数据
        if (row > 0) {
            vo = new ResultVo(200, "修改课程成功", null);
        } else {
            vo = new ResultVo(500, "修改课程失败", null);
        }
        JsonUtils.objToJson(vo,response);
    }
4.2.3 service类
修改com.ujiuye.service,在CourseService类中扩展方法实现
 public int updateCourse(Course c) {
        String sql = "update course set courseName=?,descs=?,courseType=?,courseImage=?,courseVideo=?,coursePrice=?,status=?,createTime=? where cid =?";
        return dao.update(sql, c.getCourseName(), c.getDescs(), c.getCourseType(), c.getCourseImage(), c.getCourseVideo(), c.getCoursePrice(), c.getStatus(), new Date(), c.getCid());
    }
4.2.4 dao类
修改com.ujiuye.dao,在CourseDao类中扩展操作数据库方法
package com.ujiuye.dao;

import com.ujiuye.entity.User;

public class UserDao extends BaseDao<User> {


}
5.课程明显
5.1 完善页面
用户点击详情按钮时,需要弹出详情窗口并且将当前记录的数据赋值给ruleForm数组进行回显
5.1.1 绑定单击详情按钮事件
需要为编辑按钮绑定单击事件,并且将当前行数据作为参数传递给处理函数
<el-button size="mini" type="danger" @click="handleLook(scope.$index, scope.row)">明细</el-button>

<!--课程明细对话框-->
<el-dialog title="课程明细" :visible.sync="dialogFormVisible2">
    <el-form ref="ruleForm" :model="ruleForm" label-width="80px">
        <el-form-item label="课程名称">
            <el-input v-model="ruleForm.name" style="width: 210px;"></el-input>
        </el-form-item>
        <el-form-item label="所属课程">
            <el-input v-model="ruleForm.courseName" style="width: 210px;"></el-input>
        </el-form-item>
        <el-form-item label=所属章节>
            <el-select v-model="ruleForm.type" placeholder="请选择所属章节">
                <el-option label="章节一" :value="1"></el-option>
                <el-option label="章节二" :value="2"></el-option>
                <el-option label="章节三" :value="3"></el-option>
            </el-select>
        </el-form-item>

        <el-form-item label="开课时间">
            <el-col :span="7">
              <el-date-picker type="date"  value-format="yyyy-MM-dd"   placeholder="开课日期" v-model="ruleForm.start_data" style="width: 100%;"></el-date-picker>
            </el-col>
        </el-form-item>

        <el-upload style="margin-left: 25px;" :on-remove="handleRemove" :on-exceed="handleExceed"
            :http-request="myUpload" class="upload-demo" ref="upload3"
            action="http://localhost/edu/courses?method=uploadFile" :limit="1" :auto-upload="false">
            <el-button slot="trigger" size="small" type="primary">选取视频</el-button>
            <el-button style="margin-left: 10px;" size="small" type="success" @click="submitUpload(3)">上传到服务器
            </el-button>
        </el-upload>

        <video controls autoplay muted="muted"
            style="width: 100px;height: 100px;margin-left: 25px;margin-top: 5px;" :src="ruleForm.url"></video>
    </el-form>
    <div slot="footer" class="dialog-footer">
        <el-button @click="dialogFormVisible2 = false">取 消</el-button>
        <el-button type="primary" @click="detailForm('ruleForm')">确 定</el-button>
    </div>
</el-dialog>
//表单字段
ruleForm: {
    cid: '',
    courseName: '',
    descs: '',
    courseType: '',
    coursePrice: '',
    courseImage: '',
    courseVideo: '',
    status:'',
    name:'',
    type:'',
    url:'',
    start_data:''
},

	/* 明细 */
    handleLook(index, row) {
        //row就表示当前行数据
        this.ruleForm.courseName =row.courseName
        this.ruleForm.cid =row.cid
        //显示明细对话框
        this.dialogFormVisible2=true

    },

    /* 新增明细 */
    detailForm(){
        //组装参数
      var params=new URLSearchParams()
      params.append("name",this.ruleForm.name)
      params.append("type",this.ruleForm.type)
      params.append("url",this.ruleForm.url)
      params.append("start_data",this.ruleForm.start_data)
      params.append("cid",this.ruleForm.cid)
      /* 发送ajax */
      axios({
          url:"http://localhost/education/coursedetail?method=insertCoursedetail",
          data:params,
          method:"post"
      }).then(resp=>{
          if(resp.data.code==200){
              this.$message.success(resp.data.message)
              //关闭明细对话框
              this.dialogFormVisible2=false
          }
      })
    }
5.2 后台代码
添加实体Coursedetail
package com.ujiuye.entity;

public class Coursedetail {
     private int  id;
     private String  name;
     private String  type;
     private String  url;
     private int  cid;
     private String start_data;

    public String getStart_data() {
        return start_data;
    }

    public void setStart_data(String start_data) {
        this.start_data = start_data;
    }

    public Coursedetail() {
    }

    public int getCid() {
        return cid;
    }

    public void setCid(int cid) {
        this.cid = cid;
    }

    public Coursedetail(int id, String name, String type, String url, int cid, String start_data) {
        this.id = id;
        this.name = name;
        this.type = type;
        this.url = url;
        this.cid = cid;
        this.start_data = start_data;
    }

    public int getId() {
        return id;
    }

    public void setId(int id) {
        this.id = id;
    }

    public String getName() {
        return name;
    }

    public void setName(String name) {
        this.name = name;
    }

    public String getType() {
        return type;
    }

    public void setType(String type) {
        this.type = type;
    }

    public String getUrl() {
        return url;
    }

    public void setUrl(String url) {
        this.url = url;
    }
}
5.2.1 servlet
修改education工程,创建CoursedetailServlet并新增addCourseDetail明细方法
package com.ujiuye.web.back;

import com.ujiuye.entity.Coursedetail;
import com.ujiuye.service.CoursedetailService;
import com.ujiuye.utils.FileNameUtils;
import com.ujiuye.utils.JsonUtils;
import com.ujiuye.utils.ResultVo;
import com.ujiuye.web.BaseServlet;
import org.apache.commons.beanutils.BeanUtils;

import javax.servlet.annotation.WebServlet;
import javax.servlet.http.HttpServletRequest;
import javax.servlet.http.HttpServletResponse;
import java.lang.reflect.InvocationTargetException;
import java.util.Map;

@WebServlet("/coursedetail")
public class CoursedetailServlet extends BaseServlet {
    ResultVo vo;
    CoursedetailService service =new CoursedetailService();
    public void insertCoursedetail(HttpServletRequest request, HttpServletResponse response) throws InvocationTargetException, IllegalAccessException {
        //将明细数据接收到map中
        Map<String, String[]> map = request.getParameterMap();
        Coursedetail coursedetail = new Coursedetail();
        BeanUtils.populate(coursedetail,map);
        //调用业务
        int row =service.insertCoursedetail(coursedetail);
        coursedetail.setUrl(FileNameUtils.substringFileNme(request.getParameter("url")));

        //响应数据
        if (row > 0) {
            vo = new ResultVo(200, "新增明细成功", null);
        } else {
            vo = new ResultVo(500, "新增明细失败", null);
        }
        JsonUtils.objToJson(vo,response);
    }
}
5.2.2 service类
修改com.ujiuye.service,在CourseService类中扩展方法实现
package com.ujiuye.service;

import com.ujiuye.dao.CoursedetailDao;
import com.ujiuye.entity.Coursedetail;

public class CoursedetailService {
    CoursedetailDao dao= new CoursedetailDao();
    public int insertCoursedetail(Coursedetail c) {

        if(c.getType().equals("1")){
            c.setType("章节一");
        }else if(c.getType().equals("2")){
            c.setType("章节二");
        }else if(c.getType().equals("3")){
            c.setType("章节三");
        }

        String sql = "insert into coursedetail values(null,?,?,?,?)";
        return dao.update(sql, c.getName(), c.getType(), c.getUrl(), c.getStart_data(), c.getCid());
    }
}
5.2.3 dao类
package com.ujiuye.dao;

import com.ujiuye.entity.Coursedetail;

public class CoursedetailDao extends BaseDao<Coursedetail>{
}
