最近产品那边说APP上要加个车牌识别的功能,用户不用手动输入,我说没问题啊加就加呗。脑子中第一反应就是第三方SDK,最终用了百度车牌识别SDK,完成了需求,集成方法详见“百度SDK文档”,好了文章到这里在可以结束了。 文章要是真结束了,提刀的兄弟估计又要砍我了,标题党一个,老是做这些***子放屁的事情,哈哈~~~。皮一下很开心。
问题
一开始我们确实用的百度车牌识别,但是识别率不是太高,而且车牌图片要上传到百度那边去,也会受网速影响,最重要的是,百度每天只能调用200次,多于200次要掏钱的,产品那边就说,能不能做成本地识别, 能啊,肯定可以啊,但是我还是个算法小白,怎么搞这个识别算法嘛,最后找了几个识别平台,某泊车平台,开口就要了八万,他们说还有另一种授权方式接入,一台机器400块,20台起售。虽说贵了点,但是识别率确实可以,我倒是想直接接过来,多省事了,但是公司肯定不想掏这个钱的啊,最后还是让开发想办法 。最苦逼的还是开发~~~~。
找方法
在百度上找了一大圈,大多数都是识别平台的广吿,也有几个说到了识别,但是说的比较模糊,还不提供源码,有的只是打着识别名号赚积分,所以我写文章的时候,只会写一些很实用的,真正能帮到大家的东西,废话不多说了,直奔主题,最后找到了两个识别的库:
一,EasyPR EasyPR github上 star 有五千多个了,但是由于长期没有更新了,新能源车牌,也不支持,所以没有使用这个库。
二, HyperLPR
HyperLPR 作者现在还在维护着,不止Android还支持其他平台的识别,最终选择了这个 ,但是作者关于Android方面的文档写的不是太多,以致于在集成过程中会遇到很多问题。下面我们一步一步来做。
实现
一,下载OpenCV : OpenCV官网:opencv.org/ OpenCV Android 3.4.6 版本 下载地址:nchc.dl.sourceforge.net/project/ope… 用3.4.6版本的,直接打开链接可下载,下载过程有点慢,没办法,多等会吧,我也是下了好长时间的。下载完解压。
二,新建项目,依赖OpenCV 在AS新建一个新项目名字随便取啦,然后在 APP 上右键 New-----> Module 在弹窗里选择 Import Eclipse ADT Project 点Next 。 选择你刚才解压的OpenCV目录下的 sdk/java 目录 点击 OK ,然后填下 Module Name ,我填的 "openCV" 然后 点Next -----> Finish。
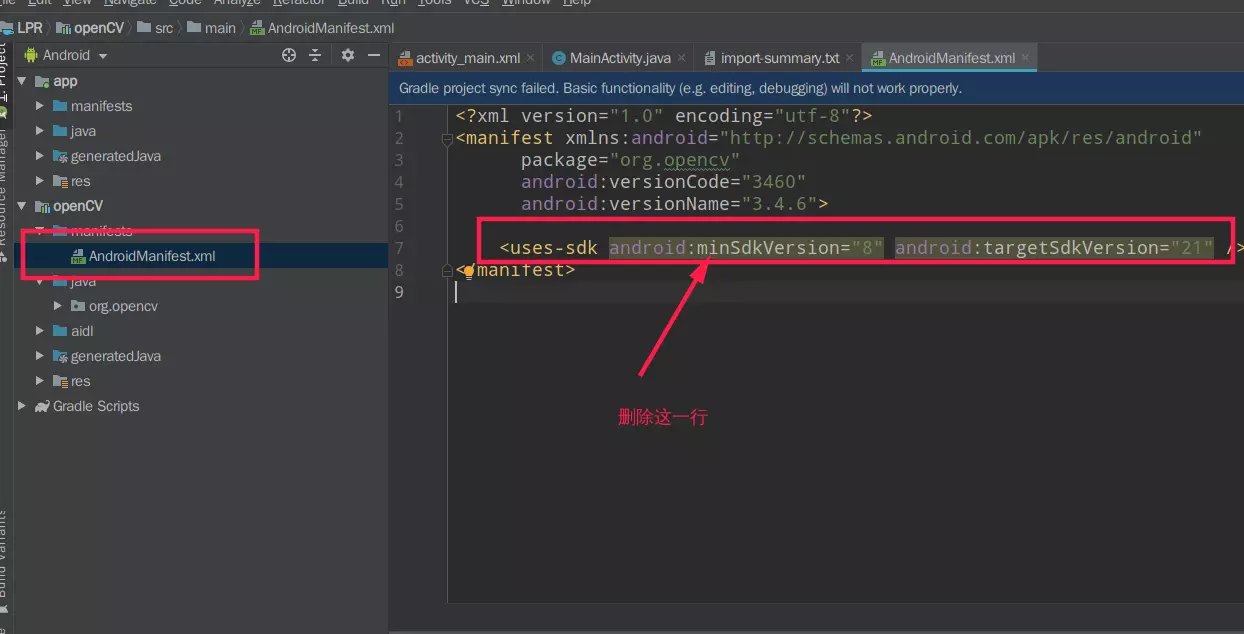
接下来项目会报错的,打开 刚导入 的OpenCV 的 AndroidManifest.xml 删除 <uses-sdk android:minSdkVersion="8" android:targetSdkVersion="21" /> 这行代码。
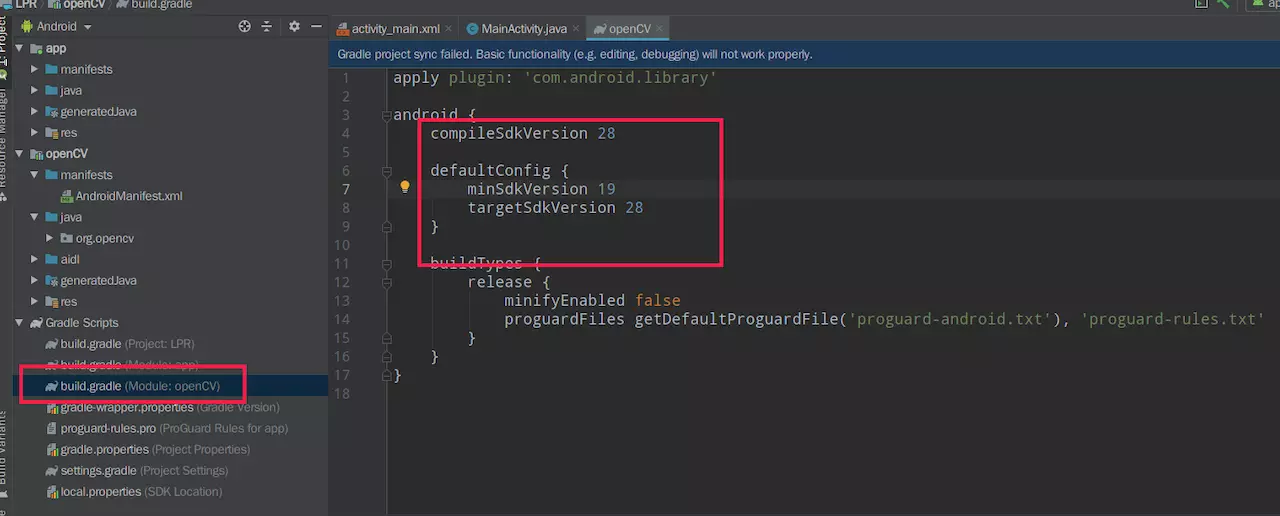
再打开 OpenCV 的 build.gradle 文件,把版本改成和APP 的build.gradle 文件想同的版本,如下:
在APP 的 build.gradle 加入 implementation project(path: ‘:openCV‘) 这行代码 OK,现在同步下项目。 还要添加 SO 文件, 在App 的 buidl.gradle 中 defaultConfig 下加入
ndk   {
            //选择要添加的对应 cpu 类型的 .so 库。
            abiFilters ‘armeabi-v7a‘
            // 还可以添加 ‘x86‘, ‘x86_64‘, ‘mips‘, ‘mips64‘
        }
在main下新建jinLibs 目录 ,把OpenCV SDK 的解压目录下 sdk/native/libs/armeabi-v7a 目录拷到 jniLibs 下 好了OpenCV 现在完成了,检验下是否可用。
在MainActivity中的代码:
public class MainActivity extends AppCompatActivity {

    private final String TAG = getClass().getSimpleName();

    private BaseLoaderCallback mLoaderCallback = new BaseLoaderCallback(this) {
        @SuppressLint("StaticFieldLeak")
        @Override
        public void onManagerConnected(int status) {
            super.onManagerConnected(status);
            if (status == LoaderCallbackInterface.SUCCESS) {
                Log.d(TAG, "OpenCV 加载成功");
            } else {
                Log.d(TAG, "OpenCV 加载失败");
            }
        }
    };

    @Override
    protected void onCreate(Bundle savedInstanceState) {
        super.onCreate(savedInstanceState);
        setContentView(R.layout.activity_main);
    }

    @Override
    protected void onResume() {
        super.onResume();
        if (!OpenCVLoader.initDebug()) {
            Log.d(TAG, "Internal OpenCV library not found. Using OpenCV Manager for initialization");
            OpenCVLoader.initAsync(OpenCVLoader.OPENCV_VERSION_3_4_0, getApplicationContext(), mLoaderCallback);
        } else {
            Log.d(TAG, "OpenCV library found inside package. Using it!");
            mLoaderCallback.onManagerConnected(LoaderCallbackInterface.SUCCESS);
        }
    }
}
运行下项目,能看到日志加载成功就没问题,其实OpenCV没加载成功的话,会有个对话框提示的。
配置NDK,编译库文件
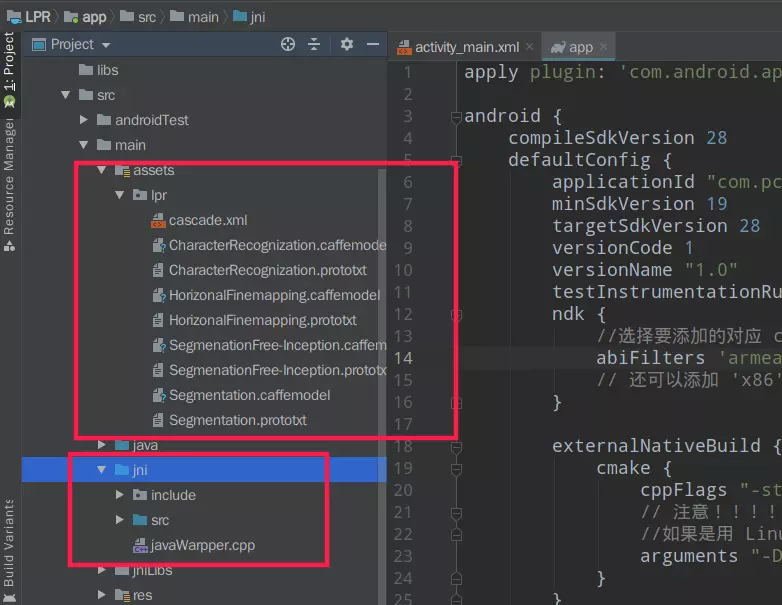
现在NDK最新版本应该是 r20 吧,不能用最新的NDK,不然会出现编译过不去的问题,我们去官网下载 NDK-r14b 的版本,作者应该是在这个版本上开发的,附上下载 地址 : NDK 下载地址 下载对应平台的NDK,一定要下载 NDK-r14b版本。 配置好NDK,我们在main目录下面新建 jin 目录 ,然后把DemoLPR 库下载下来,把里面的 app/src/main/jni 目录下的 include 、src、还有javaWarpper.cpp 文件复制到 jni 目录下,把 assets/lpr/ 目录下的文件全部复制到我们项目的 assets目录下的lpr文件夹。 如下图:
我们在 项目 app文件下新建 CMakeLists.txt 文件,内容如下:
# Sets the minimum version of CMake required to build the native
# library. You should either keep the default value or only pass a
# value of 3.4.0 or lower.

cmake_minimum_required(VERSION 3.4.1)

# Creates and names a library, sets it as either STATIC
# or SHARED, and provides the relative paths to its source code.
# You can define multiple libraries, and CMake builds it for you.
# Gradle automatically packages shared libraries with your APK.
include_directories(src/main/jni/include)

include_directories(src/main/jni)
aux_source_directory(src/main/jni SOURCE_FILES)
aux_source_directory(src/main/jni/src SOURCE_FILES_CORE)
list(APPEND SOURCE_FILES ${SOURCE_FILES_CORE})

#修改修改为自己的opencv-android-sdk 的JNI路径
set(OpenCV_DIR /home/aleyn/Android/TestProject/OpenCV-android-sdk/sdk/native/jni)
find_package(OpenCV REQUIRED)

add_library( # Sets the name of the library.
        lpr
        # Sets the library as a shared library.
        SHARED
        # Provides a relative path to your source file(s).
        # Associated headers in the same location as their source
        # file are automatically included.
        ${SOURCE_FILES})

# Searches for a specified prebuilt library and stores the path as a
# variable. Because system libraries are included in the search path by
# default, you only need to specify the name of the public NDK library
# you want to add. CMake verifies that the library exists before
# completing its build.

find_library( # Sets the name of the path variable.
        log-lib

        # Specifies the name of the NDK library that
        # you want CMake to locate.
        log)

# Specifies libraries CMake should link to your target library. You
# can link multiple libraries, such as libraries you define in the
# build script, prebuilt third-party libraries, or system libraries.

target_link_libraries( # Specifies the target library.
        lpr
        ${OpenCV_LIBS}
        # Links the target library to the log library
        # included in the NDK.
        ${log-lib})
我是用Linux环境开发的,上面的路径是Linux目录的路径,一定要替换成你解压过的OpenCV SDK的 jni 对应本地目录
下面我们修改 app的build.gradle 文件,最终配置如下:
apply plugin: ‘com.android.application‘

android {
    compileSdkVersion 28
    defaultConfig {
        applicationId "com.pcl.lpr"
        minSdkVersion 19
        targetSdkVersion 28
        versionCode 1
        versionName "1.0"
        testInstrumentationRunner "android.support.test.runner.AndroidJUnitRunner"
        ndk {
            //选择要添加的对应 cpu 类型的 .so 库。
            abiFilters ‘armeabi-v7a‘
            // 还可以添加 ‘x86‘, ‘x86_64‘, ‘mips‘, ‘mips64‘
        }

        externalNativeBuild {
            cmake {
                cppFlags "-std=gnu++11"
                // 注意!!!!       注意!!!!!!
                //如果是用 Linux 开发的的用户下面这行代码不用动,如果是 Win 用户请把 下面这行代码注释了
                arguments "-DANDROID_TOOLCHAIN=gcc", "-DANDROID_ARM_NEON=TRUE", "-DANDROID_STL_FORCE_FEATURES=OFF"
            }
        }
    }

    externalNativeBuild {
        cmake {
            path "CMakeLists.txt"
        }
    }

    buildTypes {
        release {
            minifyEnabled false
            proguardFiles getDefaultProguardFile(‘proguard-android-optimize.txt‘), ‘proguard-rules.pro‘
        }
    }
}

dependencies {
    implementation fileTree(dir: ‘libs‘, include: [‘*.jar‘])
    implementation ‘com.android.support:appcompat-v7:28.0.0‘
    implementation ‘com.android.support.constraint:constraint-layout:1.1.3‘
    testImplementation ‘junit:junit:4.12‘
    androidTestImplementation ‘com.android.support.test:runner:1.0.2‘
    androidTestImplementation ‘com.android.support.test.espresso:espresso-core:3.0.2‘
    implementation project(path: ‘:openCV‘)
}
OK,我们在项目下新建 PlateRecognition 类和 DeepAssetUtil: PlateRecognition:
package com.pcl.lpr.utils;

/**
 * @auther : Aleyn
 * time   : 2019/04/24
 */
public class PlateRecognition {

    static {
        System.loadLibrary("lpr");
    }

    static native long InitPlateRecognizer(String casacde_detection,
                                           String finemapping_prototxt, String finemapping_caffemodel,
                                           String segmentation_prototxt, String segmentation_caffemodel,
                                           String charRecognization_proto, String charRecognization_caffemodel,
                                           String segmentation_free_prototxt, String segmentation_free_caffemodel);

    static native void ReleasePlateRecognizer(long object);

    public static native String SimpleRecognization(long inputMat, long object);

}
如果你的包名和我的不一样,一定要到javaWartpper.cpp 文件修改成 和你对应的。
DeepAssetUtil:
package com.pcl.lpr.utils;

import android.content.Context;
import android.os.Environment;

import java.io.File;
import java.io.FileOutputStream;
import java.io.IOException;
import java.io.InputStream;
import java.io.OutputStream;

public class DeepAssetUtil {

    public static final String ApplicationDir = "lpr";
    public static final String CASCADE_FILENAME = "cascade.xml";
    public static final String FINEMAPPING_PROTOTXT = "HorizonalFinemapping.prototxt";
    public static final String FINEMAPPING_CAFFEMODEL = "HorizonalFinemapping.caffemodel";
    public static final String SEGMENTATION_PROTOTXT = "Segmentation.prototxt";
    public static final String SEGMENTATION_CAFFEMODEL = "Segmentation.caffemodel";
    public static final String RECOGNIZATION_PROTOTXT = "CharacterRecognization.prototxt";
    public static final String RECOGNIZATION_CAFFEMODEL = "CharacterRecognization.caffemodel";
    public static final String FREE_INCEPTION_PROTOTXT = "SegmenationFree-Inception.prototxt";
    public static final String FREE_INCEPTION_CAFFEMODEL = "SegmenationFree-Inception.caffemodel";

    public static final String SDCARD_DIR = Environment.getExternalStorageDirectory().getAbsolutePath() + File.separator + ApplicationDir; //解压文件存放位置

    private static void CopyAssets(Context context, String assetDir, String dir) {
        String[] files;
        try {
            // 获得Assets一共有几多文件
            files = context.getAssets().list(assetDir);
        } catch (IOException e1) {
            return;
        }
        File mWorkingPath = new File(dir);
        // 如果文件路径不存在
        if (!mWorkingPath.exists()) {
            // 创建文件夹
            if (!mWorkingPath.mkdirs()) {
                // 文件夹创建不成功时调用
            }
        }

        for (String file : files) {
            try {
                // 根据路径判断是文件夹还是文件
                if (!file.contains(".")) {
                    if (0 == assetDir.length()) {
                        CopyAssets(context, file, dir + file + "/");
                    } else {
                        CopyAssets(context, assetDir + "/" + file, dir + "/" + file + "/");
                    }
                    continue;
                }
                File outFile = new File(mWorkingPath, file);
                if (outFile.exists())
                    continue;
                InputStream in;
                if (0 != assetDir.length()) {
                    in = context.getAssets().open(assetDir + "/" + file);
                } else {
                    in = context.getAssets().open(file);
                }

                OutputStream out = new FileOutputStream(outFile);
                // Transfer bytes from in to out
                byte[] buf = new byte[1024];
                int len;
                while ((len = in.read(buf)) > 0) {
                    out.write(buf, 0, len);
                }

                in.close();
                out.close();
            } catch (IOException e) {
                e.printStackTrace();
            }
        }
    }

    private static void copyFilesFromAssets(Context context) {
        DeepAssetUtil.CopyAssets(context, ApplicationDir, SDCARD_DIR);
    }

    //初始化识别资源
    public static long initRecognizer(Context context) {
        String cascade_filename = SDCARD_DIR + File.separator + CASCADE_FILENAME;
        String finemapping_prototxt = SDCARD_DIR + File.separator + FINEMAPPING_PROTOTXT;
        String finemapping_caffemodel = SDCARD_DIR + File.separator + FINEMAPPING_CAFFEMODEL;
        String segmentation_prototxt = SDCARD_DIR + File.separator + SEGMENTATION_PROTOTXT;
        String segmentation_caffemodel = SDCARD_DIR + File.separator + SEGMENTATION_CAFFEMODEL;
        String character_prototxt = SDCARD_DIR + File.separator + RECOGNIZATION_PROTOTXT;
        String character_caffemodel = SDCARD_DIR + File.separator + RECOGNIZATION_CAFFEMODEL;
        String segmentation_free_prototxt = SDCARD_DIR + File.separator + FREE_INCEPTION_PROTOTXT;
        String segmentation_free_caffemodel = SDCARD_DIR + File.separator + FREE_INCEPTION_CAFFEMODEL;
        copyFilesFromAssets(context);
        //调用JNI 加载资源函数
        return PlateRecognition.InitPlateRecognizer(
                cascade_filename,
                finemapping_prototxt, finemapping_caffemodel,
                segmentation_prototxt, segmentation_caffemodel,
                character_prototxt, character_caffemodel,
                segmentation_free_prototxt, segmentation_free_caffemodel);
    }
}
好了现在识别功能可以用了,差个识别界面
识别界面:
识别界面其实就是一个相机界面,我随便写了一个,还做了个识别框不过没有做屏幕适配,本来想把代码都贴到文章里的,但是稍微有一点多,大家还是看下Demo里边吧。结合Demo把识别功能,移植到你们的项目中。
Demo运行说明
Demo地址: LPR 打开项目肯定会报错,做以下修改
- 用AS打开项目
- 设置项目NDK为 NDK-r14b
- 先修改 CMakeLists.txt 文件, 把第19行修改成你本地的 OpenCV SDK 的对应路径。
- 跟据自己的开发平台,设置app下的build.gradle 第 23 行代码 是否要注释。 完成以上步骤后再运行项目,就没有问题了。
推荐:Android学习PDF+架构视频+面试文档+源码笔记
就这样,有问题请留言,更多文章,敬请期待。
此外,我还有一份自己收录、整理和分类的资料分享,Android学习PDF+架构视频+面试文档+源码笔记,高级架构技术进阶脑图、Android开发面试专题资料,还有高级进阶架构资料分享,希望能帮助大家学习提升进阶,也节省大家在网上搜索资料的时间来学习,也是可以分享给身边好友一起学习的!
可以扫微信二维码加我免费领取