ribbon简介
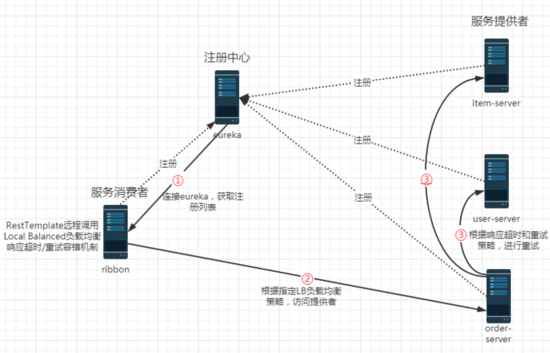
Ribbon 是 Netflix 发布的开源项目,主要功能是提供客户端的 软件负载均衡算法 ,将 Netflix 的中间层服务连接在一起。Ribbon 客户端组件提供一系列完善的配置项如连接超时,重试等。简单的说,就是在配置文件中列出Load Balancer(简称LB)后面所有的机器,Ribbon 会自动的帮助你基于某种规则(如简单轮询,随机连接等)去连接这些机器。我们也很容易使用 Ribbon 实现自定义的负载均衡算法。
ribion=负载均衡+重试
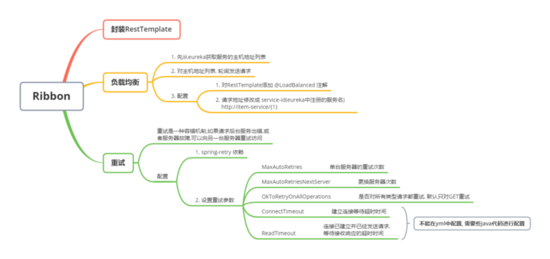
ribbon的工作步骤:
第一步先选择 EurekaServer ,它优先选择在同一个区域内负载较少的server。 第二步再根据用户指定的策略,在从server取到的服务注册列表中选择一个地址。 其中Ribbon提供了多种策略:比如轮询、随机和根据响应时间加权。
创建spring ribbon项目
第一步:新建spring项目

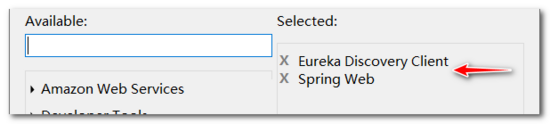
第二步:添加Eureka Discovery Client,Spring Web依赖
第三步:添加sp01-commons工具API依赖;eureka-client 中已经包含 ribbon 依赖
<?xml version="1.0" encoding="UTF-8"?>
<project xmlns="http://maven.apache.org/POM/4.0.0" xmlns:xsi="http://www.w3.org/2001/XMLSchema-instance"
  xsi:schemaLocation="http://maven.apache.org/POM/4.0.0 https://maven.apache.org/xsd/maven-4.0.0.xsd">
  <modelVersion>4.0.0</modelVersion>
  <parent>
    <groupId>org.springframework.boot</groupId>
    <artifactId>spring-boot-starter-parent</artifactId>
    <version>2.2.1.RELEASE</version>
    <relativePath/> <!-- lookup parent from repository -->
  </parent>
  <groupId>cn.tedu</groupId>
  <artifactId>sp06-ribbon</artifactId>
  <version>0.0.1-SNAPSHOT</version>
  <name>sp06-ribbon</name>
  <description>Demo project for Spring Boot</description>

  <properties>
    <java.version>1.8</java.version>
    <spring-cloud.version>Hoxton.RELEASE</spring-cloud.version>
  </properties>

  <dependencies>
    <dependency>
      <groupId>org.springframework.boot</groupId>
      <artifactId>spring-boot-starter-web</artifactId>
    </dependency>
    <dependency>
      <groupId>org.springframework.cloud</groupId>
      <artifactId>spring-cloud-starter-netflix-eureka-client</artifactId>
    </dependency>

    <dependency>
      <groupId>org.springframework.boot</groupId>
      <artifactId>spring-boot-starter-test</artifactId>
      <scope>test</scope>
      <exclusions>
        <exclusion>
          <groupId>org.junit.vintage</groupId>
          <artifactId>junit-vintage-engine</artifactId>
        </exclusion>
      </exclusions>
    </dependency>
    <dependency>
      <groupId>cn.tedu</groupId>
      <artifactId>sp01-commons</artifactId>
      <version>0.0.1-SNAPSHOT</version>
    </dependency>
  </dependencies>

  <dependencyManagement>
    <dependencies>
      <dependency>
        <groupId>org.springframework.cloud</groupId>
        <artifactId>spring-cloud-dependencies</artifactId>
        <version>${spring-cloud.version}</version>
        <type>pom</type>
        <scope>import</scope>
      </dependency>
    </dependencies>
  </dependencyManagement>

  <build>
    <plugins>
      <plugin>
        <groupId>org.springframework.boot</groupId>
        <artifactId>spring-boot-maven-plugin</artifactId>
      </plugin>
    </plugins>
  </build>

</project>
第四步:添加yml配置
spring:
 application:
  name: ribbon #服务器命名

server:
 port: 3001 # 设置服务器端口号

# 配置添加注册中心集群
eureka:
 client:
  service-url:
   defaultZone: http://eureka1:2001/eureka, http://eureka2:2002/eureka
远程调用RestTemplate
RestTemplate 是SpringBoot提供的一个Rest远程调用工具。
类似于 HttpClient,可以发送 http 请求,并处理响应。RestTemplate简化了Rest API调用,只需要使用它的一个方法,就可以完成请求、响应、Json转换
方法:
- getForObject(url, 转换的类型.class, 提交的参数)
- postForObject(url, 协议体数据, 转换的类型.class)
RestTemplate 和 Dubbo 远程调用的区别:
RestTemplate:
http调用
效率低
Dubbo:
RPC调用,Java的序列化
效率高
第一步:创建RestTemplate实例
RestTemplate 是用来调用其他微服务的工具类,封装了远程调用代码,提供了一组用于远程调用的模板方法,例如: getForObject() 、 postForObject() 等
package cn.tedu.sp06;

import org.springframework.boot.SpringApplication;
import org.springframework.boot.autoconfigure.SpringBootApplication;
import org.springframework.cloud.client.discovery.EnableDiscoveryClient;
import org.springframework.context.annotation.Bean;
import org.springframework.web.client.RestTemplate;

@EnableDiscoveryClient
@SpringBootApplication
public class Sp06RibbonApplication {

  //创建 RestTemplate 实例,并存入 spring 容器
  @Bean
  public RestTemplate getRestTemplate() {
    return new RestTemplate();
  }

  public static void main(String[] args) {
    SpringApplication.run(Sp06RibbonApplication.class, args);
  }

}
第二步:创建RibbonController
package cn.tedu.sp06.controller;

import java.util.List;

import org.springframework.beans.factory.annotation.Autowired;
import org.springframework.web.bind.annotation.GetMapping;
import org.springframework.web.bind.annotation.PathVariable;
import org.springframework.web.bind.annotation.PostMapping;
import org.springframework.web.bind.annotation.RequestBody;
import org.springframework.web.bind.annotation.RestController;
import org.springframework.web.client.RestTemplate;

import cn.tedu.sp01.pojo.Item;
import cn.tedu.sp01.pojo.Order;
import cn.tedu.sp01.pojo.User;
import cn.tedu.web.util.JsonResult;

@RestController
public class RibbonController {
  @Autowired
  private RestTemplate rt;

  @GetMapping("/item-service/{orderId}")
  public JsonResult<List<Item>> getItems(@PathVariable String orderId) {
    //向指定微服务地址发送 get 请求,并获得该服务的返回结果
    //{1} 占位符,用 orderId 填充
    return rt.getForObject("http://localhost:8001/{1}", JsonResult.class, orderId);
  }

  @PostMapping("/item-service/decreaseNumber")
  public JsonResult decreaseNumber(@RequestBody List<Item> items) {
    //发送 post 请求
    return rt.postForObject("http://localhost:8001/decreaseNumber", items, JsonResult.class);
  }

  /

  @GetMapping("/user-service/{userId}")
  public JsonResult<User> getUser(@PathVariable Integer userId) {
    return rt.getForObject("http://localhost:8101/{1}", JsonResult.class, userId);
  }

  @GetMapping("/user-service/{userId}/score")
  public JsonResult addScore(
      @PathVariable Integer userId, Integer score) {
    return rt.getForObject("http://localhost:8101/{1}/score?score={2}", JsonResult.class, userId, score);
  }

  /

  @GetMapping("/order-service/{orderId}")
  public JsonResult<Order> getOrder(@PathVariable String orderId) {
    return rt.getForObject("http://localhost:8201/{1}", JsonResult.class, orderId);
  }

  @GetMapping("/order-service")
  public JsonResult addOrder() {
    return rt.getForObject("http://localhost:8201/", JsonResult.class);
  }
}
第三步:启动服务,进行测试
http://localhost:3001/item-service/35
等。。
ribbon负载均衡
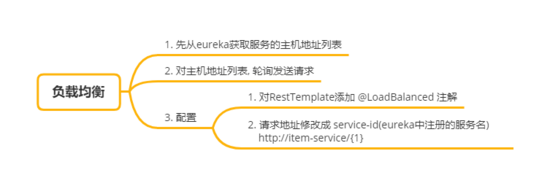
第一步:RestTemplate设置@LoadBalanced
@LoadBalanced 负载均衡注解,会对 RestTemplate 实例进行封装,创建动态代理对象,并切入(AOP)负载均衡代码,把请求分发到集群中的服务器
package cn.tedu.sp06;

import org.springframework.boot.SpringApplication;
import org.springframework.boot.autoconfigure.SpringBootApplication;
import org.springframework.cloud.client.discovery.EnableDiscoveryClient;
import org.springframework.cloud.client.loadbalancer.LoadBalanced;
import org.springframework.context.annotation.Bean;
import org.springframework.web.client.RestTemplate;

@EnableDiscoveryClient
@SpringBootApplication
public class Sp06RibbonApplication {

  @LoadBalanced //负载均衡注解
  @Bean
  public RestTemplate getRestTemplate() {
    return new RestTemplate();
  }

  public static void main(String[] args) {
    SpringApplication.run(Sp06RibbonApplication.class, args);
  }
}
第二步:访问路径设置为id
package cn.tedu.sp06.controller;

import java.util.List;

import org.springframework.beans.factory.annotation.Autowired;
import org.springframework.web.bind.annotation.GetMapping;
import org.springframework.web.bind.annotation.PathVariable;
import org.springframework.web.bind.annotation.PostMapping;
import org.springframework.web.bind.annotation.RequestBody;
import org.springframework.web.bind.annotation.RestController;
import org.springframework.web.client.RestTemplate;

import cn.tedu.sp01.pojo.Item;
import cn.tedu.sp01.pojo.Order;
import cn.tedu.sp01.pojo.User;
import cn.tedu.web.util.JsonResult;

@RestController
public class RibbonController {
  @Autowired
  private RestTemplate rt;

  @GetMapping("/item-service/{orderId}")
  public JsonResult<List<Item>> getItems(@PathVariable String orderId) {
    //这里服务器路径用 service-id 代替,ribbon 会向服务的多台集群服务器分发请求
    return rt.getForObject("http://item-service/{1}", JsonResult.class, orderId);
  }

  @PostMapping("/item-service/decreaseNumber")
  public JsonResult decreaseNumber(@RequestBody List<Item> items) {
    return rt.postForObject("http://item-service/decreaseNumber", items, JsonResult.class);
  }

  /

  @GetMapping("/user-service/{userId}")
  public JsonResult<User> getUser(@PathVariable Integer userId) {
    return rt.getForObject("http://user-service/{1}", JsonResult.class, userId);
  }

  @GetMapping("/user-service/{userId}/score")
  public JsonResult addScore(
      @PathVariable Integer userId, Integer score) {
    return rt.getForObject("http://user-service/{1}/score?score={2}", JsonResult.class, userId, score);
  }

  /

  @GetMapping("/order-service/{orderId}")
  public JsonResult<Order> getOrder(@PathVariable String orderId) {
    return rt.getForObject("http://order-service/{1}", JsonResult.class, orderId);
  }

  @GetMapping("/order-service")
  public JsonResult addOrder() {
    return rt.getForObject("http://order-service/", JsonResult.class);
  }
}
第三步:访问测试,ribbon 会把请求分发到 8001 和 8002 两个服务端口上
http://localhost:3001/item-service/34 ribbon重试
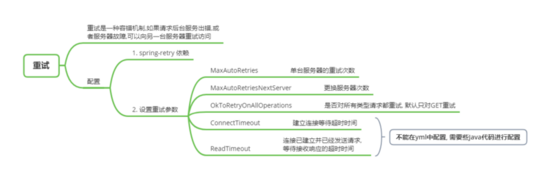
第一步:添加spring-retry依赖
<dependency>
  <groupId>org.springframework.retry</groupId>
  <artifactId>spring-retry</artifactId>
</dependency>
第二步:application.yml 配置 ribbon 重试
# 06项目用来测试远程调用和ribbon工具
# 等功能测试完成后,直接删除
spring:
 application:
  name: ribbon
server:
 port: 3001
# 连接eureka,从eureka发现其他服务的地址
eureka:
 client:
  service-url:
   defaultZone: http://eureka1:2001/eureka,http://eureka2:2002/eureka
#配置ribbon 重试次数
ribbon:
 # 次数参数没有提示,并且会有黄色警告
 # 重试次数越少越好,一般建议用0,1
 MaxAutoRetries: 1
 MaxAutoRetriesNextServer: 2
第三步:设置 RestTemplate 的请求工厂的超时属性
package cn.tedu.sp06;
import org.springframework.boot.SpringApplication;
import org.springframework.boot.autoconfigure.SpringBootApplication;
import org.springframework.cloud.client.loadbalancer.LoadBalanced;
import org.springframework.context.annotation.Bean;
import org.springframework.http.client.SimpleClientHttpRequestFactory;
import org.springframework.web.client.RestTemplate;
@SpringBootApplication
public class Sp06RibbonApplication {
  public static void main(String[] args) {
   SpringApplication.run(Sp06RibbonApplication.class, args);
  }
  /**
 * 创建RestTemplate实例
 * 放入spring容器
 * @LoadBalanced-对RestTemplate进行增强,封装RestTemplate,添加负载均衡功能
 */
 @LoadBalanced
 @Bean public RestTemplate restTemplate(){
   //设置调用超时时间,超时后认为调用失败
 SimpleClientHttpRequestFactory f =
      new SimpleClientHttpRequestFactory();
   f.setConnectTimeout(1000);//建立连接等待时间
   f.setReadTimeout(1000);//连接建立后,发送请求后,等待接收响应的时间
 return new RestTemplate(f);
  }
}
第四步:ItemController 添加延迟代码
package cn.tedu.sp02.item.controller;
import java.util.List;
import java.util.Random;
import org.springframework.beans.factory.annotation.Autowired;
import org.springframework.beans.factory.annotation.Value;
import org.springframework.web.bind.annotation.GetMapping;
import org.springframework.web.bind.annotation.PathVariable;
import org.springframework.web.bind.annotation.PostMapping;
import org.springframework.web.bind.annotation.RequestBody;
import org.springframework.web.bind.annotation.RestController;
import cn.tedu.sp01.pojo.Item;
import cn.tedu.sp01.service.ItemService;
import cn.tedu.web.util.JsonResult;
import lombok.extern.slf4j.Slf4j;
@Slf4j
@RestController
public class ItemController {
  @Autowired
 private ItemService itemService;
  //配置文件 application.yml中的server.port=8001注入到这个变量
 //是为了后面做负载均衡测试,可以直接看到调用的是那个服务器
 @Value("${server.port}")
  private int port;

  //获取订单的商品列表
 @GetMapping("/{orderId}")
  public JsonResult<List<Item>> getItems(@PathVariable String orderId) throws InterruptedException {
    log.info("server.port="+port+", orderId="+orderId);
    //模拟延迟代码
 if (Math.random()<0.9){
      long t = new Random().nextInt(5000);
      log.info("延迟:"+t);
      Thread.sleep(t);
    }
   List<Item> items = itemService.getItems(orderId);//根据订单id获取商品列表
 return JsonResult.ok(items).msg("port="+port);
  }

  //减少商品库存
 /**
 * @RequestBody 完整接收请求协议体中的数据
 * @param items
 * @return
 */ @PostMapping("/decreaseNumber")
  public JsonResult decreaseNumber(@RequestBody List<Item> items) {
    for (Item item : items){
      log.info("减少商品库存:"+item );
    }
    itemService.decreaseNumbers(items);
    return JsonResult.ok();
  }
}
第五步:测试 ribbon 重试机制
通过 ribbon 访问 item-service,当超时,ribbon 会重试请求集群中其他服务器
http://localhost:3001/item-service/35
到此这篇关于深入学习Spring Cloud-Ribbon的文章就介绍到这了,更多相关Spring Cloud-Ribbon内容请搜索易盾网络以前的文章或继续浏览下面的相关文章希望大家以后多多支持易盾网络!